Alternative to Hinged Ironman Helmet

indiefilmgeek

Sr Member
I'm working on an Ironman costume for my 5yr old, and since the parts are smaller than standard, I didn't want to mess around with trying to get a faceplate hinge set up; however, he most certainly needs to be able to open the mask on a regular basis (in between houses for trick-or-treating let say).

So as an alternative to a faceplate hinge on his Ironman helmet, I used two sets of rare earth magnets (neodymium). I also took this one step further and split the electrical lines which power the eye lights so the circuit is only competed when the faceplate is in the lowered position.

In the way of a disclaimer, I have to say the helmet is still rough and has a long way to go before it's done, but here's a short Youtube video of the working mechanics.

YouTube - denverobsession's Channel
 
Last edited:
Diagrams and instructions please? :) Love this.

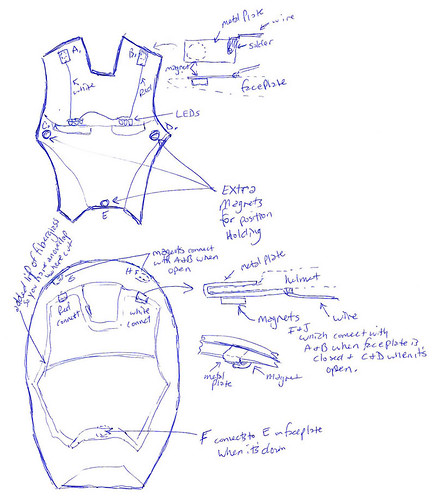
Please excuse the very bad drawing... The top image is supposed to be the inside of the faceplate. The LED's for the eyes have an open circuit ending at two metal plates (with a powerful magnet under each A & B - in a space carved out of the faceplate). These magnets will hold the metal plates to their matching metal plates on the main body of the helmet (bottom image). That will keep the top of the faceplate in the 'closed' position and also keep the electrical connection between the plates stable (I actually added extra I & J magnets on the inside/underside of the helmet side plates just to keep this connection even tighter.
For the bottom of the faceplate in the closed position, I have another set of magnets E & F (one on the lowest edge of the faceplate and a matching one on the 'chin' of the main helmet piece).

When the faceplate is the 'Open' position, the A & B magnets are held on the top of the helmet by magnets INSIDE the top of the main helmet piece (G & H). The two magnets around the eye level of the faceplate C & D then connect with the I & J magnets. These four powerful magnets seem to hold the faceplate very stable in the 'Open' position.


5601087723_d4ec7bee0f.jpg


I'll try to take a couple of 'live' shots tonight of the actual pieces so you can better see where these are.

Thanks,
Jonathan
 
Nice work of the electronics. Magnetic contact points are an excellent way to mechanically light up the faceplate without programed circuit boards.
If you want an actual swinging faceplate check out my thread, Ive got two designs over there that will work perfectly.
 
I also took this one step further and split the electrical lines which power the eye lights so the circuit is only competed when the faceplate is in the lowered position.

this is exactly what i was going to do with mine! glad to see it is more or less easily achievable. very cool!

my plan is to combine magnets and hinges, strong magnets in the chin and weaker magnets in the top of the faceplate. the weaker magnets to help keep it open while moving around and such and then i can just shake my head down and get it to swing closed on the hinges and light up

this has me sooo excited to get to this point on my build, thanks for the inspiration!
 
Last edited:
Ok, I totally forgot to pass long the specs on the magnets I used.... sorry about that.

I have purchased all my neodymium magnets from K&J MAGNETS

D86.jpg
The heaviest magnets I used were the ones on the inside top of the helmet (for use when the faceplate is in the open position). These were 1/2" dia. x 3/8" thick - Grade N42 - Nickel Plated neodymium magnets (~$2 each).

ZD2.jpg
The lightest (thinnest) magnets I used were on the chin of the faceplate. Those were 10mm dia. x 2mm thick - Grade N35 - Nickel Plated neodymium magnets (pack of 25 for ~$5).

Most of the others were in between these sizes/strengths. There's no one-fit, magic size or strength, I think it just takes a few different types that you can test and try in different spaces.

Hope this helps.
 
Argh! Using the magnets for electrical connectors is a brilliant idea.

I've been using snap connectors for too long.

Thank you so much
 
Back
Top