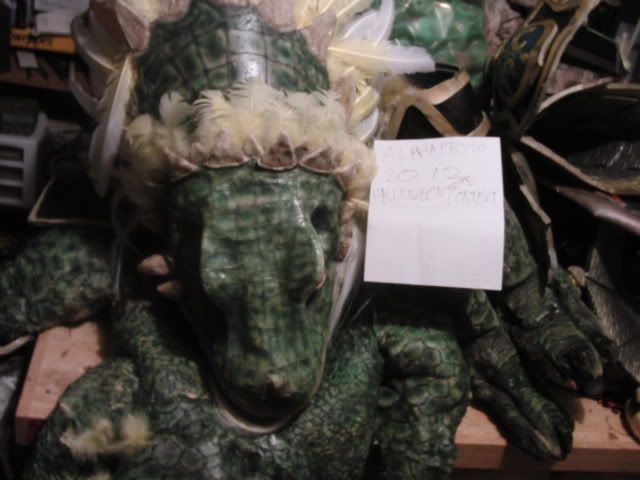
Alpha Proto
Sr Member
It is odd making this post with the finished post being up so long ago, but here is how I made this creature.
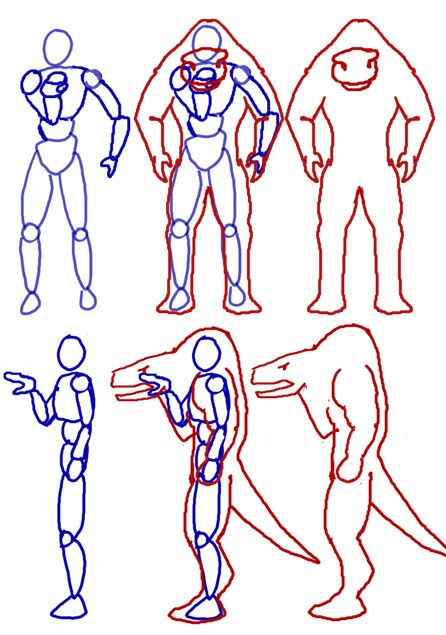
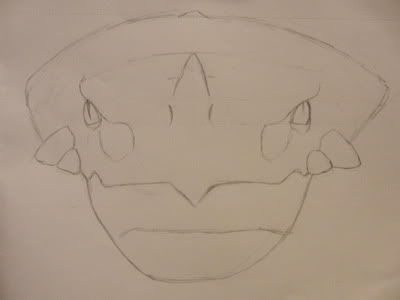
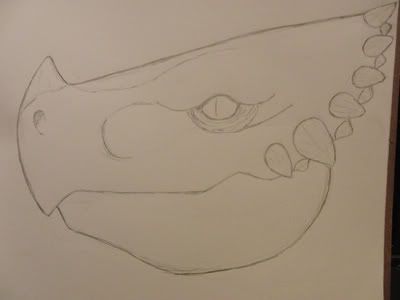
There have been over 5 diffrent concepts of this creature including alternate designs throughout the series.
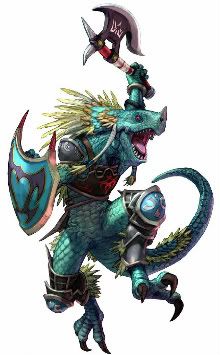
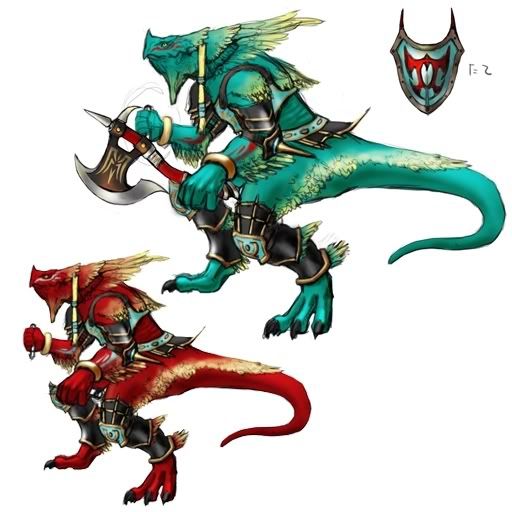
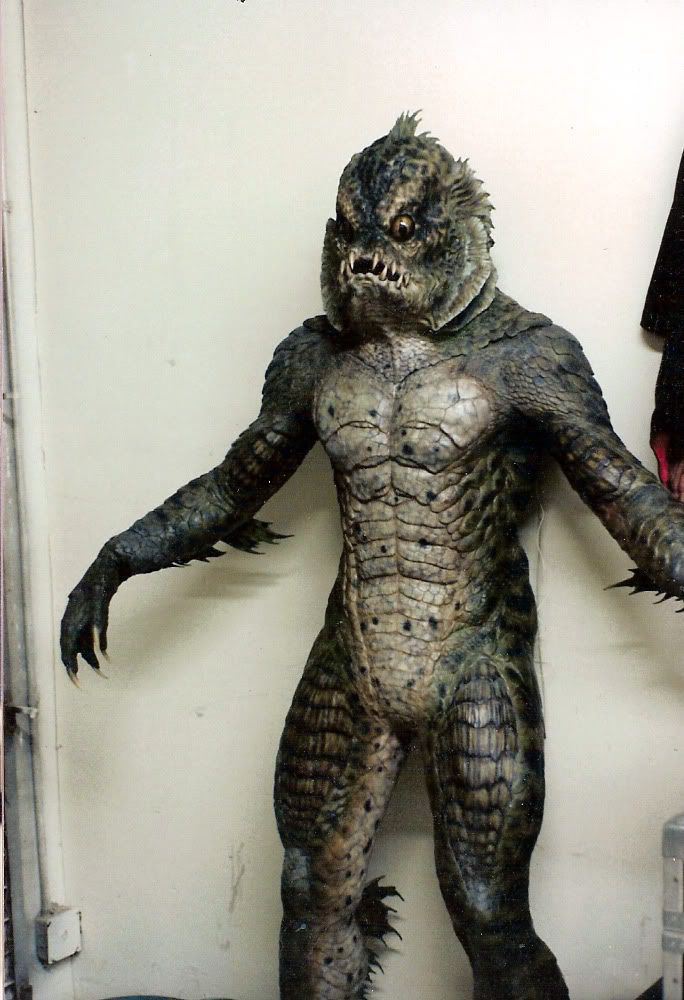
The Lizardman above is the one I am making. This version has feathers that willadd a lot of movement to the character.
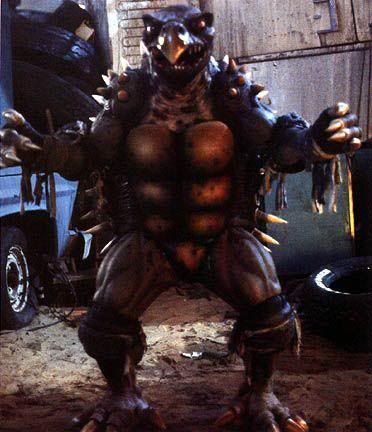
I searched google for other people's Lizardman costumes and was very dissapointed in their results.
I noticed that they all kept human proportions. Then I remebered this guy!
His head was mainly puppeted like Big Birds or the bear in the big blue house costumes. After giving it a few sketches I came up with this concept of how my build would work.
The right arm of the Lizard man will be a fake. The fake arm will be the arm with his sheild. So it will not look too strange being held in that postion for an extended time.
I will puppet the head with my right arm, and carry my axe in my left hand.
I figure if I give the build a neck gobbler it would hide my right elbow. Also if it flapped a bit that will add movement.
To fit my head into the suit I will add a hump to his back.That is where I will see out of. I will also move the shoulders up to the side of my head. This will make the arms look longer, and reduce the size of the hump look. The feathers of his head crest are a good cover for where I would be looking out of.
The armor and weapons I am making out of EVA foam. For the body I will use a method used for making Predator costumes. I will build the body frame out of mesh fencing, foam, and fabric . Then add muscles and texture details with cotton, foam sheet shapes, and liquid latex. To paint the costume I will use mostly acrylic paints and brushes.
I have all of this planned out, but I still have not figuring out a solid way to fit into the costume.
I just need to figure out a way to minimize the time to get it all on, and off. I also need it to be rest room friendly. XD!
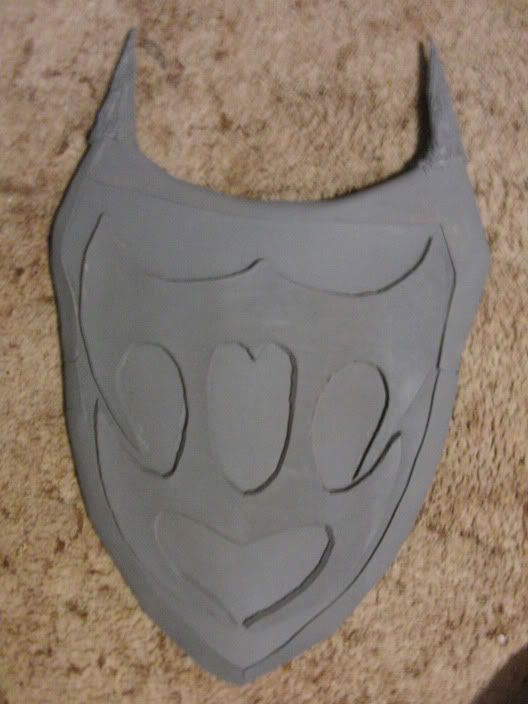
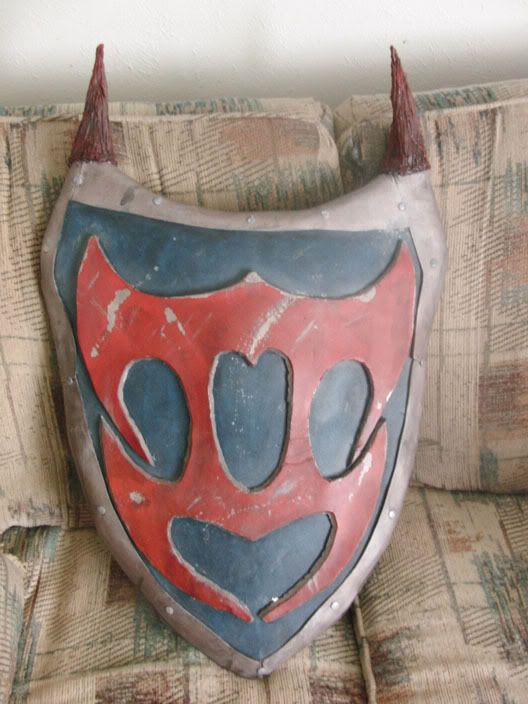
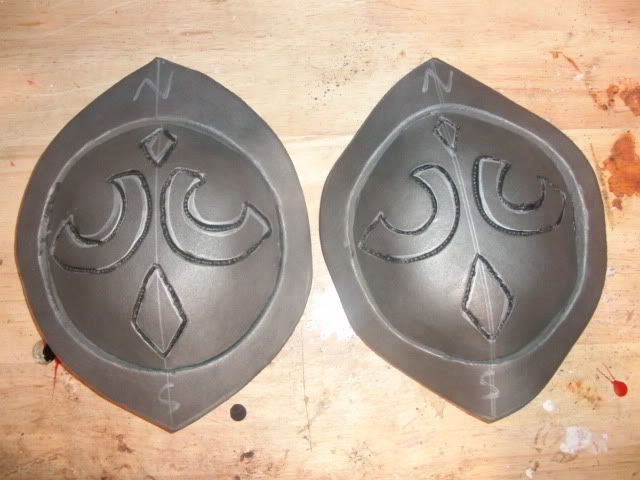
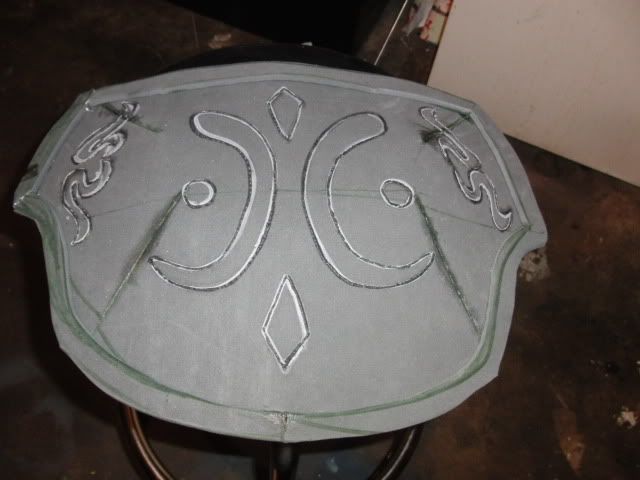
After that I rolled the craft foam into two cone shapes and glued them to the top of the shield. Looking at the art work it looked like the spikes are a horn, claw, or tooth. So I used a hard edge to scrape,and poke the foam.
Next I hot glued on the horns to give them a texture.
Using 1/4 inch EVA I cut out the shield crest and glued it on.
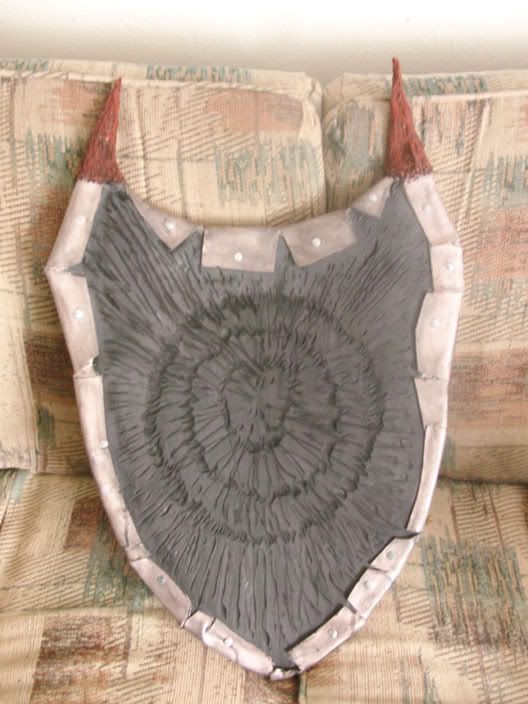
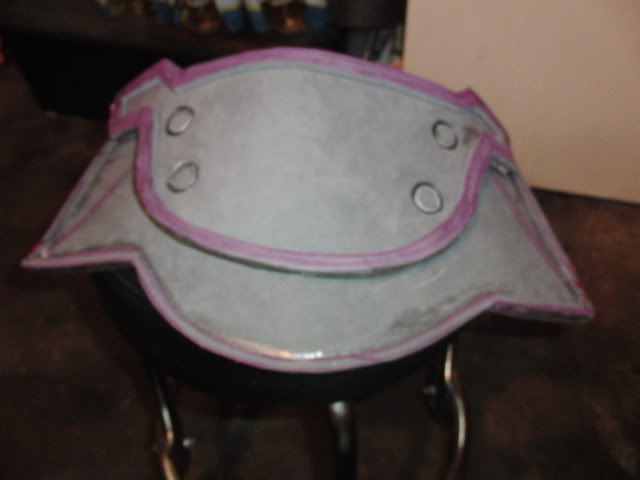
Sheild Back
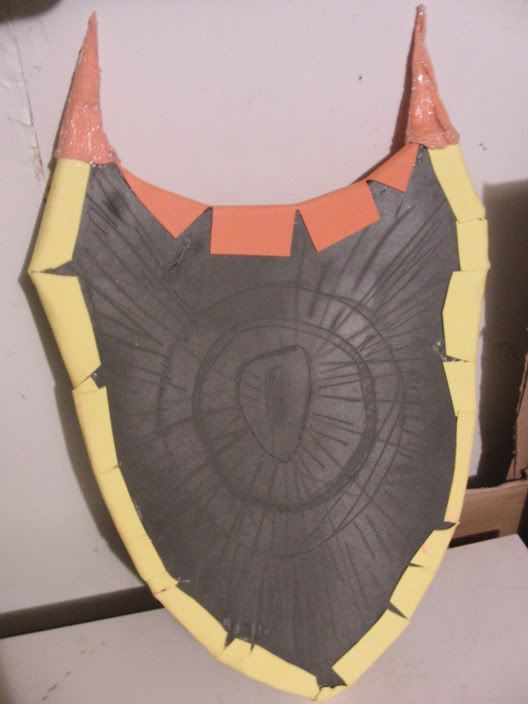
I just used hard edge and drew on it. Since it wont be seen I didn't bother with the details.
Once that was all done I sealed the foam with watered wood glue.
Right now I have it painted a flat coat of grey primer.
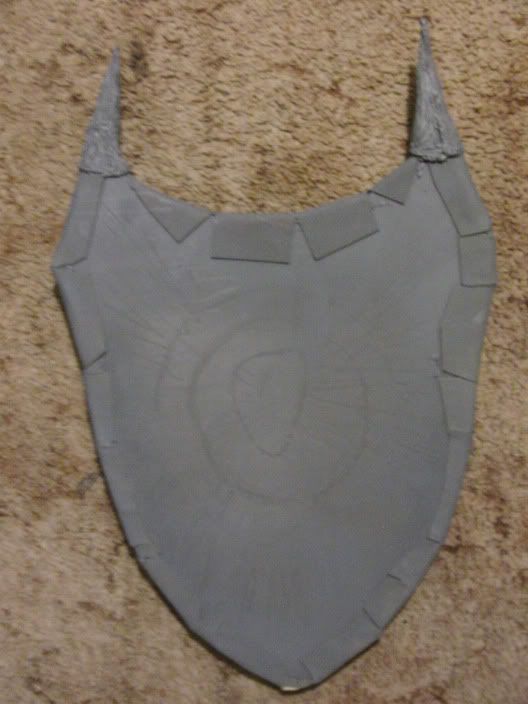
Next I will spray the front a base coat of copper. Then the back will be a satin brown. that I will make look like wood.
I didn't want to try this build unless I could find out a way to get the eyes and mouth to move.
So I looked up a ventriloquist dummy head tutorials. I found this link Ventriloquist Dummies - Ventriloquist Figures , and I just followed the pictures. You have no idea how difficult it is to find that. Took me like 30 mins. ~_~
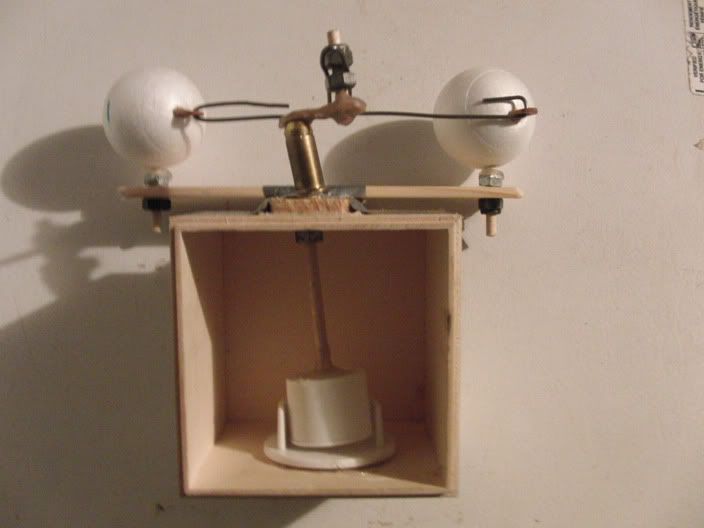
So far the eye movement is down with the move of a finger to the left or right on the nob I made. I am trying to make an easier way for mouth movement to work . My thumb isn't able to do much. I ended up taking the front off of the build so my hand could go all the way through. I am thinking I may have to take the bottom out as well for my thumb can work the mouth better. Then I would have to make a new way to support the build over my hand.
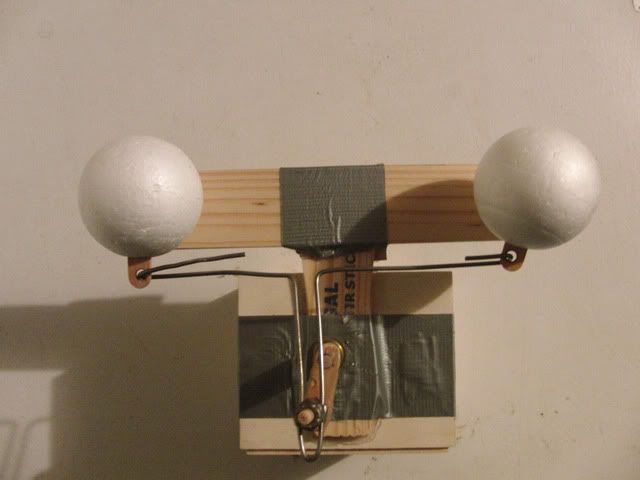
Here are the eye controls I made.
Inside view
front view
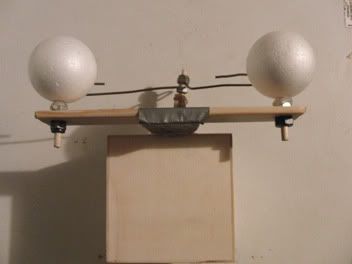
side view
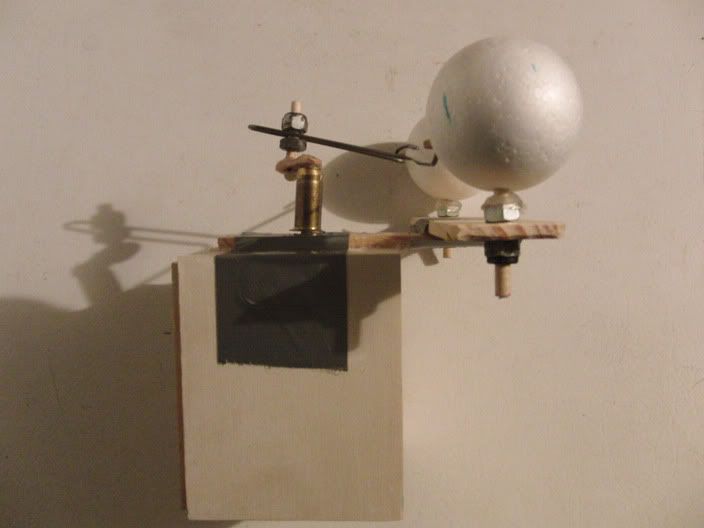
top
I made it with a bunch of stuff I found in the craft part of walmart.
A wooden box, wooden sticks, hot glue, styrofoam craft balls, pumptoothpast cap,some kind of pole hanger, paint mixing stick, metal nuts, duct tape and a metal cloths hanger.
To make sure I get the size correct I made a real size front and side drawing.
I did not add all the detail in the world. I just wanted to get the idea across. I plan on making the extra head crest out of foam so my arm can have extra motion and I wont use too much materials in my molding and casting process.
I got my felxi foam X in the mail yesterday so i will start sculpting soon as I finish this shield. I just need to paint in the wood detail, age, clear coat , and strap that and its done.
Progress...
Here is how my sheild looks after painting,and a few hundred battles.
Here are so progress shots of the head sculpt.
It has gone through a lot of changes. When I first started I built a frame out of mesh and sculpted over it. The frame ended up too big. So I had to dismantle the sculpt ,reshape the frame ,and tried my best get the clay to stick back onto on the armature.
Then I ended up sculpting this. I ran through a lot more clay than I thought I would. This thing feels like it is nearing 20 pounds. So to save clay I decided to just sculpt the top of the head .Then after I have that head cast I can sculpt the jaw using the head clay. Then the head cast will be fitting reference.
Originally I was using balls of clay to replicate the eyes I would put into the head. I watched a video on Stan Winstons school that said use a ball the same size the eye will be to ensure it will fit into the cast. So I got my rig to see where the eyes are going to place. Then I cut out the socket and put in foam spheres like the ones I will be using in the rig.
Here is what I have now.

I decided to sculpt the horn in later. It was giving the sculpt too much of a bird look when I want a dino look.
It is going to be hybrid but I cant lose sight of the lizard. I also added lids to the eyes so the spheres will have a good border to hold them in. I also added nostrils to give it a more finished look.
At the moment it has the smooth appearance of a raptor head.
Symmetry has been a big challenge. I am getting a mirror to sit on the side so I can sculpt booth sides even.
I really don't want to over do the head sculpt. If I do I don't think the body will be able to match the detail of the head . I am hoping that the paint will bring everything together into one cohesive build.
This is what I have for the body so far.
I took a dummy torso and added a mask I have in place of the head.
I took a wet suit and used a rubber based craft glue to glued black mesh to the shoulders.
I plan on building the body musculature with sections of cut foam. Next I will use a strong spray glue to stick the foam on the body.
Then I will use a wood burning tool to put in the scale details. I tried a dremil, but it leaves a rough cut. When it gets around the edges of the foam it catches the head and the foam wraps around the tip. This causes the the foam to spin around the bit.
After all the foam is added for the muscles I will latex the body, and gloss the build with permawet.
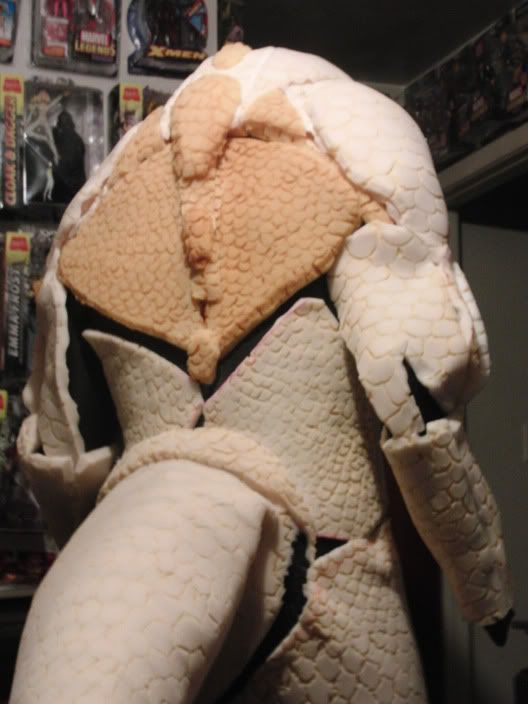
I started building the body out of foam.
I am not sure how I should build the chest. I also have to take the chest armor into consideration. I need my right arm to work the head so I will need space. I don't want to sacrifice visuals for functionality.
I will have to try this on in front of a mirror and mark where everything should go.
I plan on building the muscles in the forearms before I move to the legs.
I am trying to make sure I leave some space for the jointed areas to flex.
Since this is just a torso I will have to find a way to stuff the legs so I can work on them.
This build is so many things, monster suit , with a puppet head, and then I have to put armor over it.
The chest will have to come out a bit. I am making a flap that will form the chest, and cover my arm. Since the zipper will be down for my arm.
I can just put a baby clip pin to where I want the zipper to stop.
I was lucky this body suit zipped up in the front. If it was in the back I would not have a way to puppet the head. If it was in the back I would not be able to put the muscles onto the back.So if anyone is considering doing this, the bodysuit has to zip up front or you will have to do a bit of sewing.
The neck will be a fabric that I can stick my arm out, but I don't know if the black mesh I am using can hold the latex I am going to add.I may have to find a new material.
------------------------------------------------------------------------------------------------------------
Update
------------------------------------------------------------------------------------------------------------
I added a few things. I made a clear resin lense for eyes. I made the mold with mold putty around some of those styrofoam balls. The styrofoam texture came through in the casting , and it looked a bit frosted. So I wet sanded the cast. Then I waxed it and that didnt help do much. Then I decided I would hit it with a few layers of clear gloss coat spray paint and that did wonders.

I added abs, and a chest flap that opens and closes.
I also made and attached a tail. I used a wood burning tool to burn scales into the tale. I dont know if the detail will show up when I add the latex though.
I found a new material for the neck hood. I will attach it soon.
I started using a hot glue gun since I ran out of spray glue. It holds stronger , but takes a few seconds longer to set.
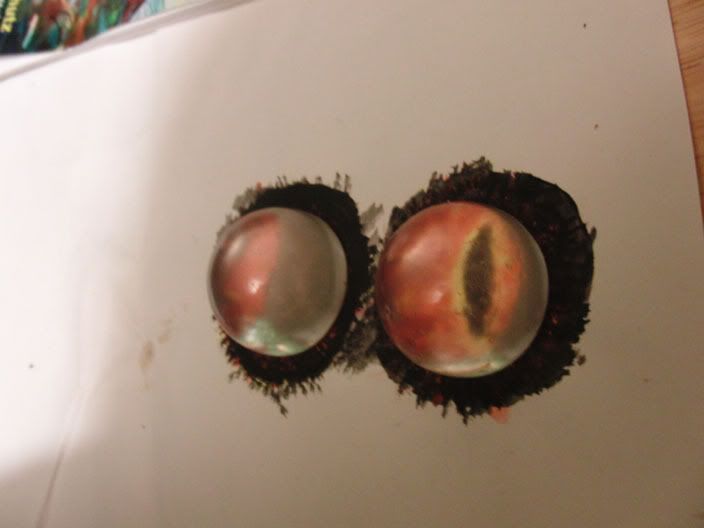
Here I painted some eyes on some paper.
The clear sphere halfs I casted are preeent alohg with half of a styrofoam sphere.
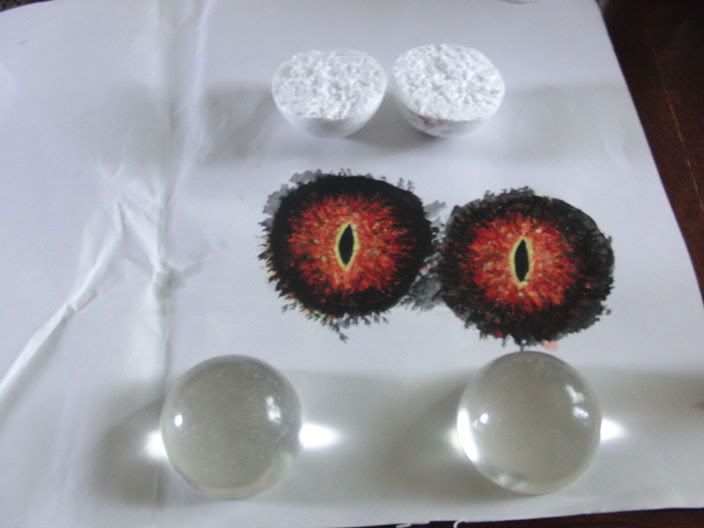
What I have done is glued all of these together to make a whole eyeball.
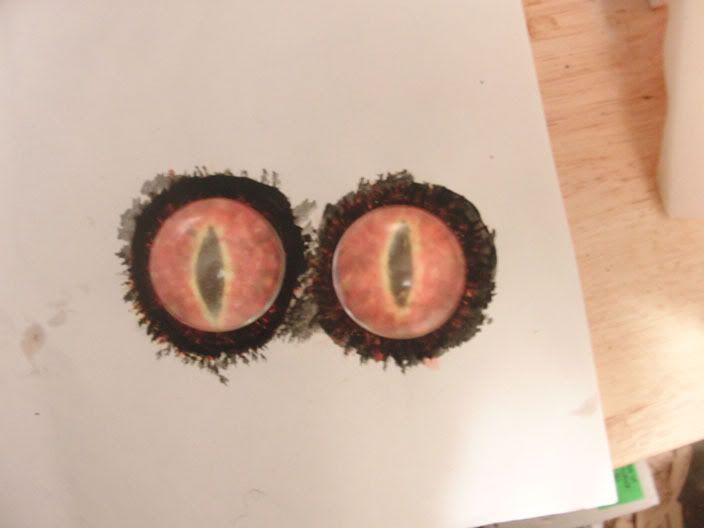
My only concern is if this eye's movment will be noticable.Since from the side the eye is clear.
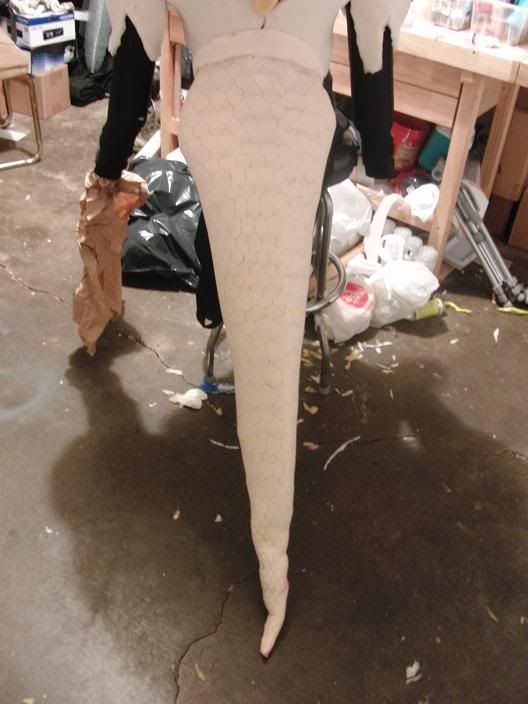
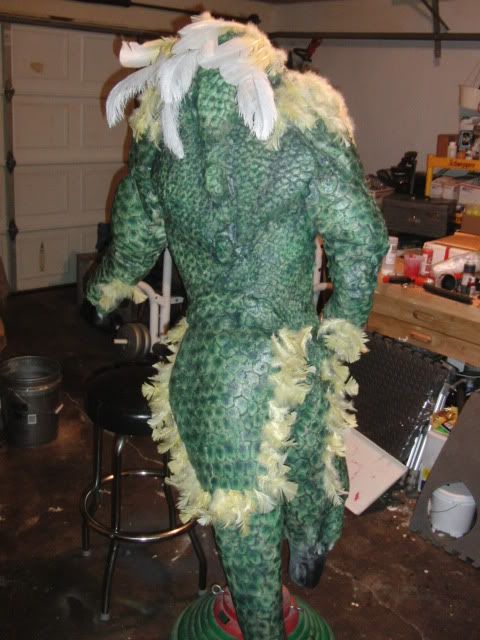
I burned more scales onto the back. I made them smaller than the scales on the tail. I am not sure I should have done that. I also added foam to the forearms. So I will have scales covering the entire upper body, neck excluded.
I got a light fabric with a leathery texture for the neck. I attached it the edges to the outer opening of the shoulders, and under a bit of the left chest flap. So it should tuck into the chest and make a good sleeve for my arm.
Now I have to figure out a way to see out of this thing.
Today I added some foam for the thighs , and finished burning in all of the details. I will not be adding foam for the calves, because I will have armor and fake feet that will cover that area.
After that I put it on for a test run.
The foam around the legs was too long and was not attached very well so I adjusted that after the fitting.
The space between the abs next to the zipper is looking apparent. I can adjust that once I added the liquid latex and some cotton.
From looking at the pictures I decided I want to see from under the head and not over it.
Having the puppeting arm that low does not look good.
So I may not add the goobler under the neck. If I do it will be very narrow.
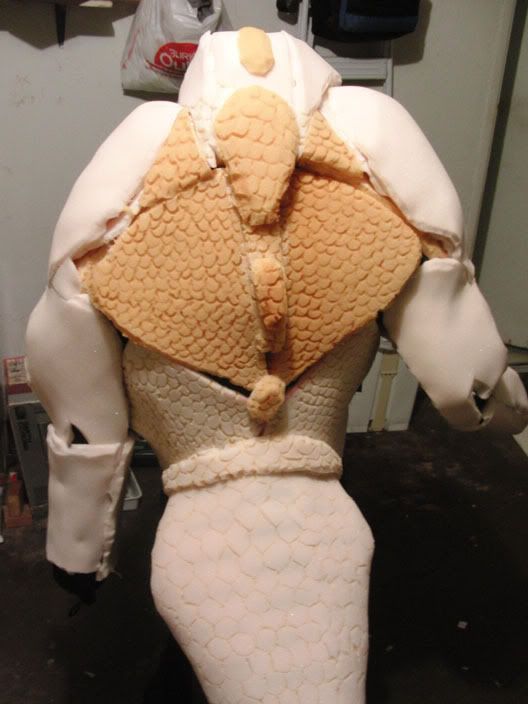
I do like how the back turned out.
After looking at these pictures I stuffed the tricepts to add a bit more bulk. They where looking flat.
The Abs are a bit diffrent than the original art in the game. I looked around the net and decided I wanted to give it abs like this.
I also want to try a color scheme simular to the Gillman. While still trying to maintain that iguana look from the game.
The next stop for the body is covering it in latex. I have never tried this before , but from what I have read in tuts online it will take 5 layers of liquid latex over the suit.
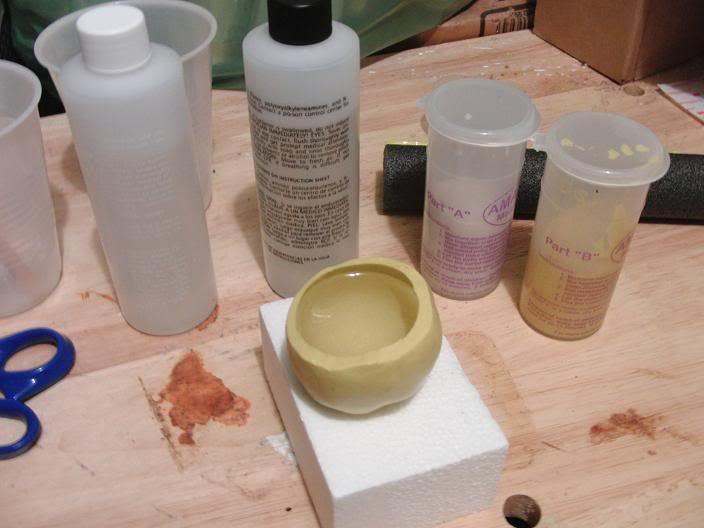
I am also in the process of making the mother mold for the puppet head. I think I will cast a resin master before I try casting in foam. I am also thinking of making the bottom jaw in foam and not sculpting, molding and casting it. Just to save time and maybe save on weight.
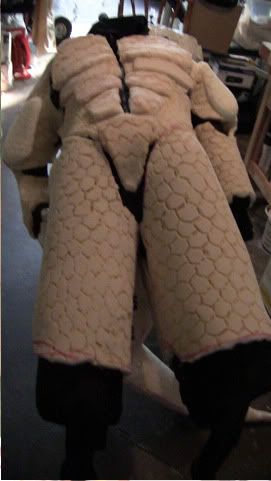
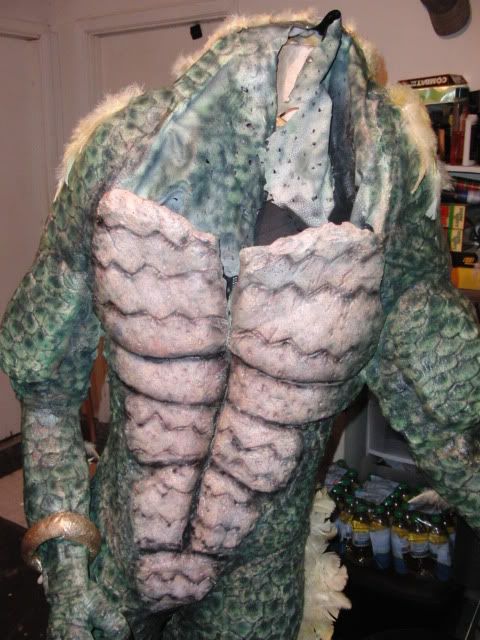
Here is the finished foam build of the body. I took the two parts of that chest flap and split it down the middle. Then I attached them to the chest. The zipper shows now, but the paint job camos it.
Next I started adding the latex and filing the gaps with cotton. A gallon can of mold builder latex, and a gallon of monster maker latex.
After a few days of latexing I tried the build on...
Wow that suit is hot, and heavy! I ordered some cooling vest right after putting that on. I asked my brother how long I had it on before I took it off. He said 5 mins!
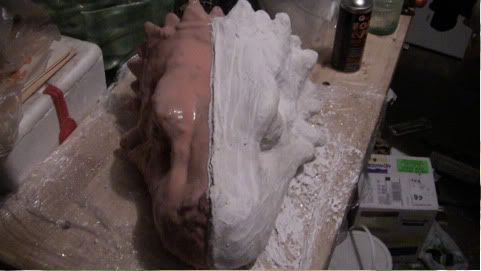
Molds of the sculpt.
Start of mother mold.
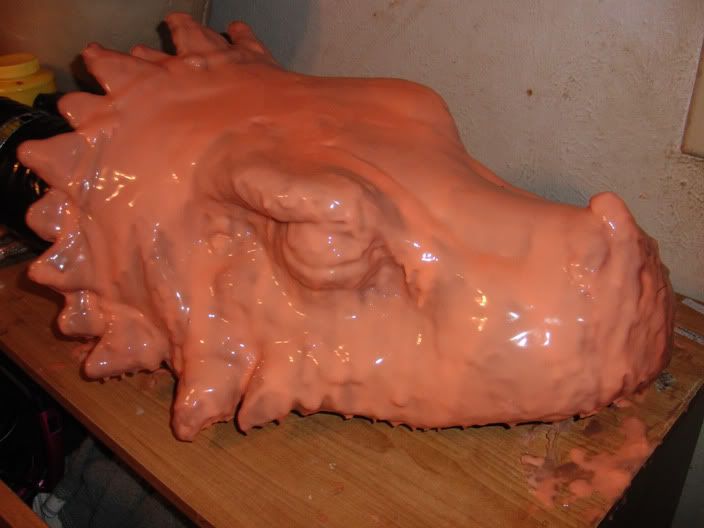
Resin pull.
I made a foam-it X pull, but it is way heavier than I thought it would be. So I am going to keep working with the resin pull. Since I don't want to spend any money on shipping and supplies I made the bottom jaw out of EVA foam.
I sculpted some teeth out of sculpey clay, and a tung from a 2 part rubber mold compound.
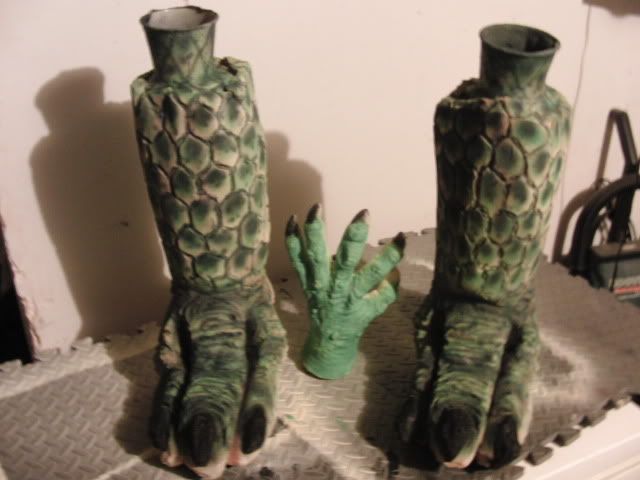
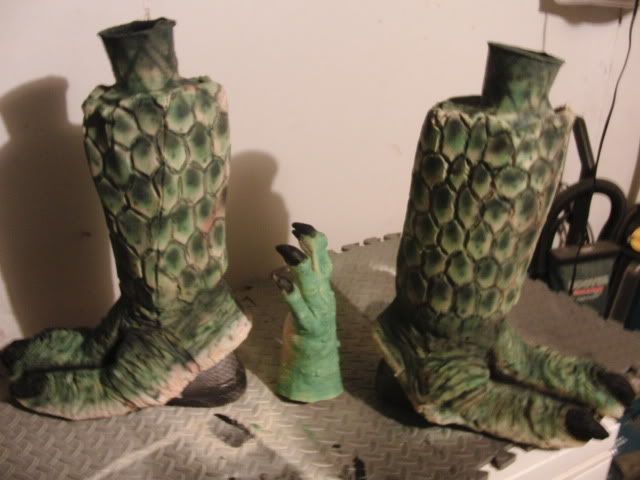
I started making the feet by wraping some boots in cling wrap/ platsic wrap.
Then I pulled stockings over the boots and glued foam to the stocking.
 The I used my burn tool, and scissors to sculpt the foam.
 At this time I have covered the feet in 2 coats of latex. I am hoping that is enough, because I am planing on air brushing them soon.
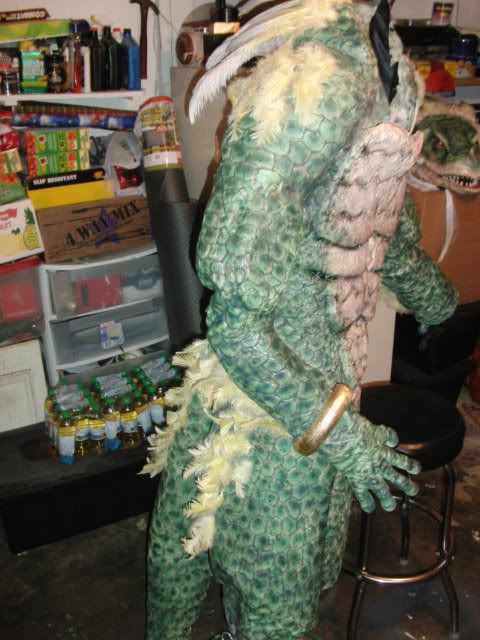
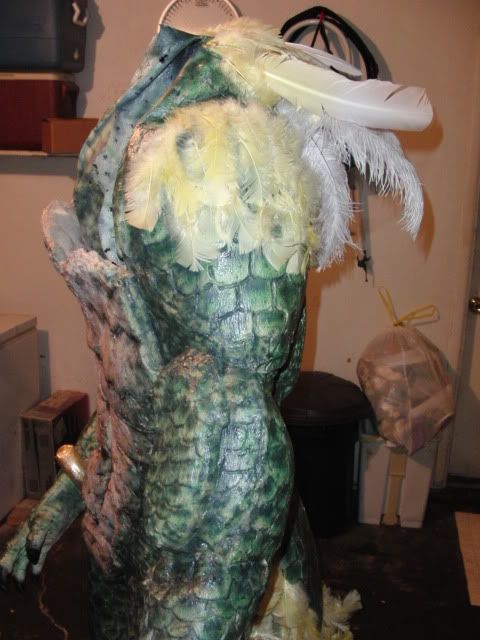
Since I couldn't wait any longer I started the airbrushing of the body! I started with a base coat close to the color of the cured latex body. This was to cover the maker lines from the cutting phase, and establish a fleash tone. Next I used a darker shade of the tan. I went for a bit of mottling, but it didn't really show. Then I added the base green.

I am liking what I have so far, but I plan on adding a lot more colors to this; shades, high lights, ect. In the end, I hope to use this color to bring everything together as a solid build.
I started the ax. I cut a cardboard tube at 2 angles then put another card board inside to bridge the parts. Next I duct taped the card tubes and spraed gap fillerfoam into the tube to make it dense. I plan on wraping a thin foam over the cardboard handle. The blade will be two sheets of EVA foam hot glued together. Next I will sealing the foam, painting the ax, then clear coat the ax.
Here are pictures of the bodies paint job 90% complete.
I realy went for the motling, and veins this time on the lighter parts. I noticed the lighter parts looked too warm. So I whitened it up a bit like a frog. I told myself wouldn't use any black on the body, but I gave in to temptation and used it on the creases in the ab area.
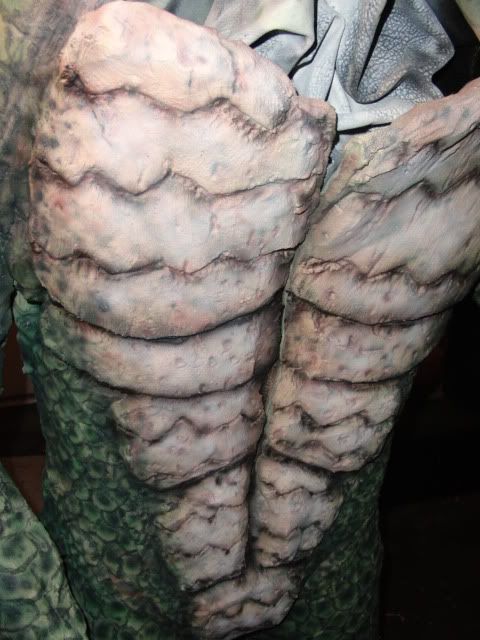
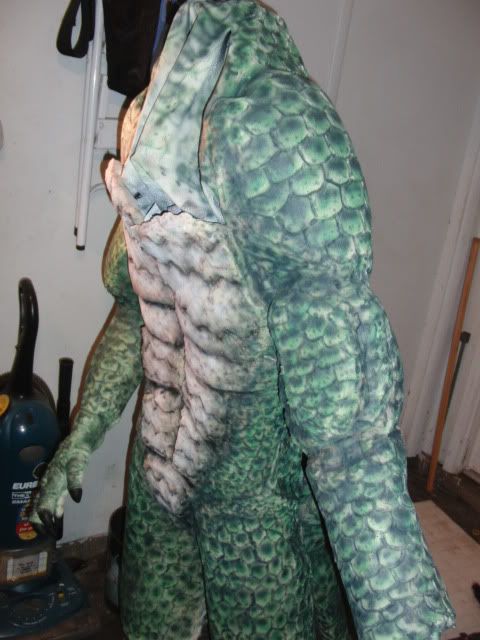
If you look at the source pctures you will notice it gets lghter where the feathers are.
It is almost like a frosted look. I am going to add that next along with some high lights on the nails.
Here are the completed feet, and what I have started on the glove.
Then to finish up the painting I will add the perma-wet! I am really excited to see how it fx the build.
Should not only seal ,but enhance the colors ,and a greasy /flesh look!
I have the body fully painted , and. I just had to splater it all with a burnt umber color, added some veins, and seal it all with perma-wet. The splater of paint from the tooth brush took away the smooth air brush feeling and gave the painting a almost pour like texture. It just brought everything together. I didnt think the bodys finished paint job would really show well .So I just took pictures of the head, and the glove I painted.
I have decided I am just going to look of the mouth so I wont have to hold it up so high, and I can see if the mechs are working.

It is not easy to hold where I can oporate everything. Getting to eyes to move with just my finger took hours to get right. There was just too much friction at the eye and the lid.
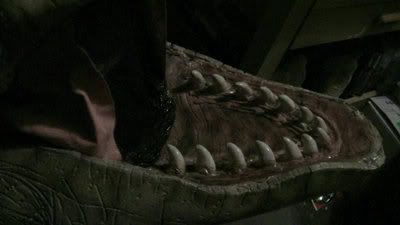
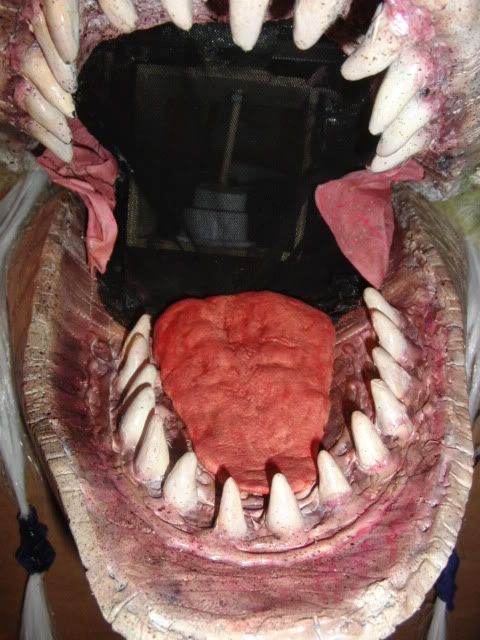
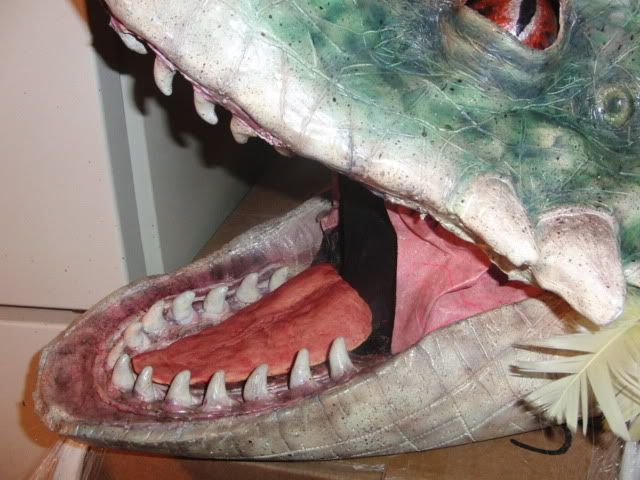
I put a black mesh in the mouth so I can see out and hide the mechs a bit.
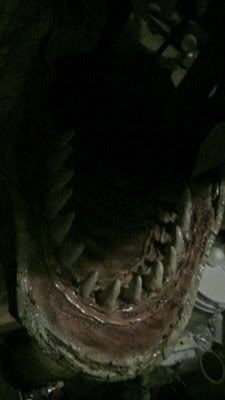
The teeth are made out of super sculpey clay. I burnt them when I backed them. So they are really a dark brown. They took paint well so it was an easy fix.

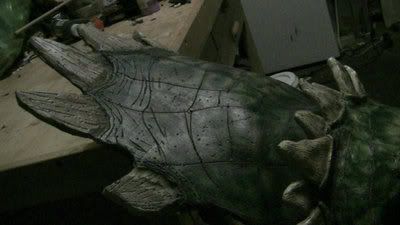
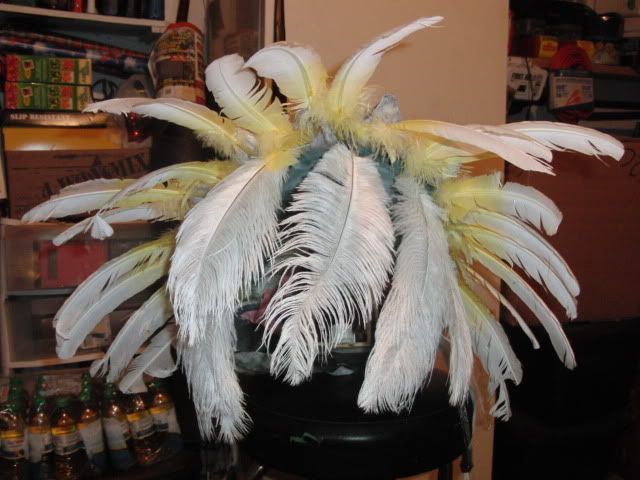
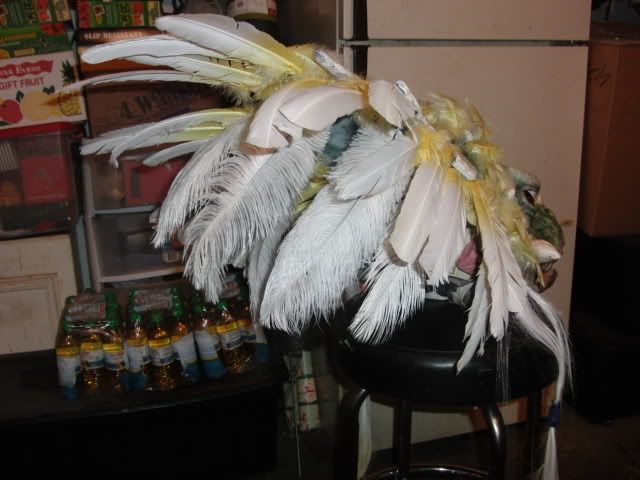
The head creast is EVA foam I sculpted with a dremil, wood burning tool, and scissors.
The cheeks are a thin white fabric I painted with acrylics, and added perma-wet too.
The neck skin is the same textured material I am using for the neck hood. I hot glued it too the EVA foam jaw I made.

After tinkering around with the mechanics I put together head to where the eyes move.
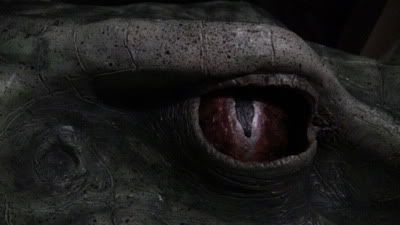
I decided to use foam spheres instead of the resin eyes I made because the resin did not noticibly turn.
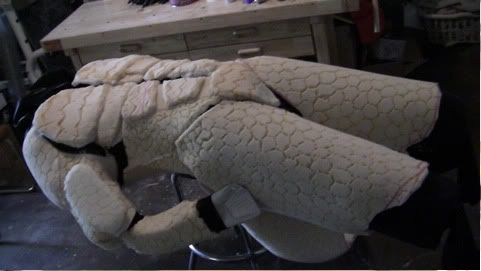
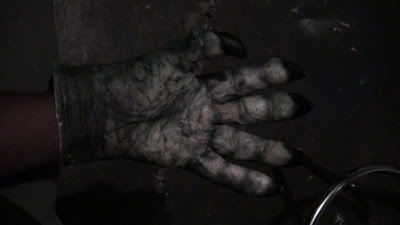
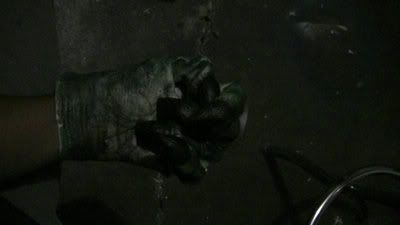
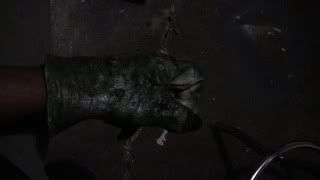
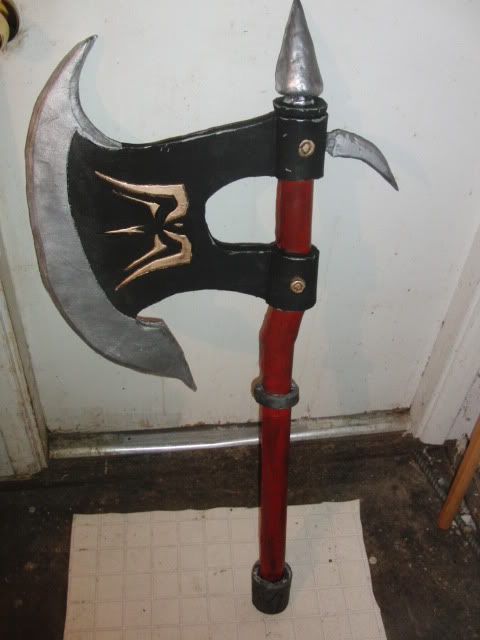
Here is the finished glove

Here is the finished axe. I just need to clear coat it.
Start of the armor.
Part of the knee pads.
Left bicept gaurd.
Right shoulder pad.
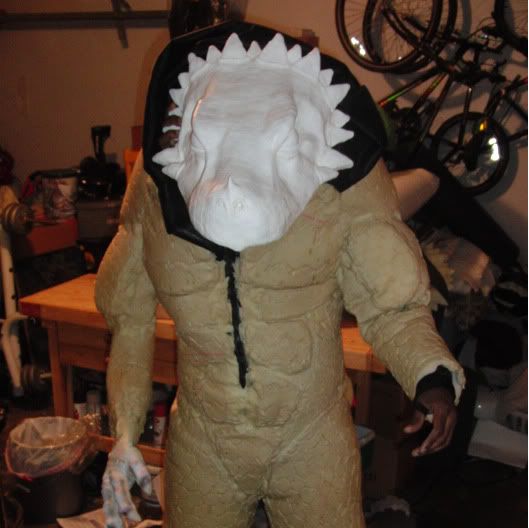
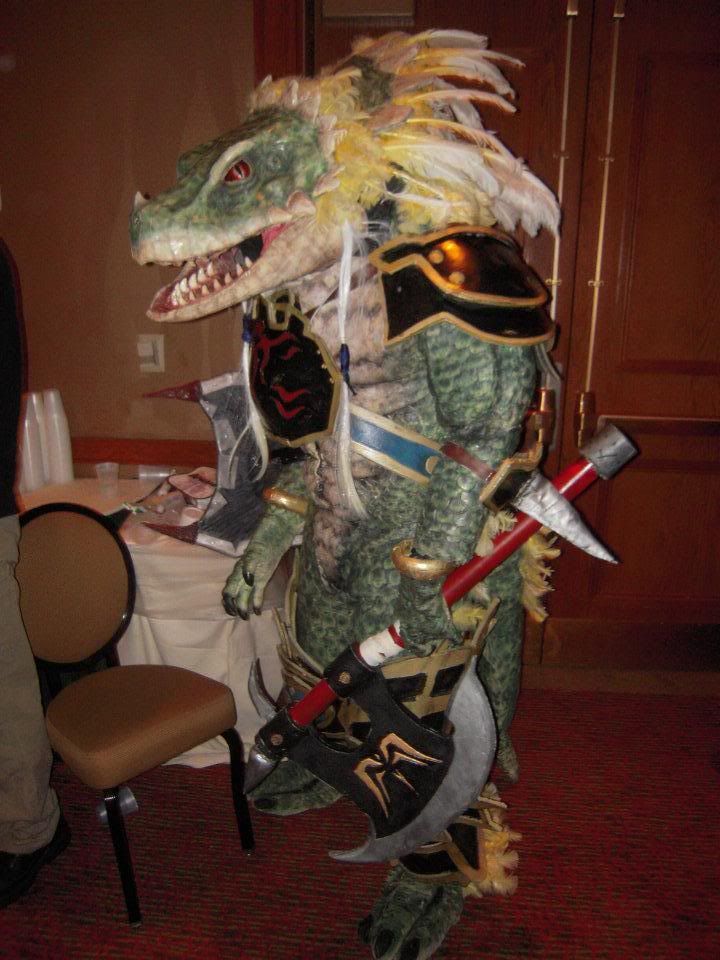
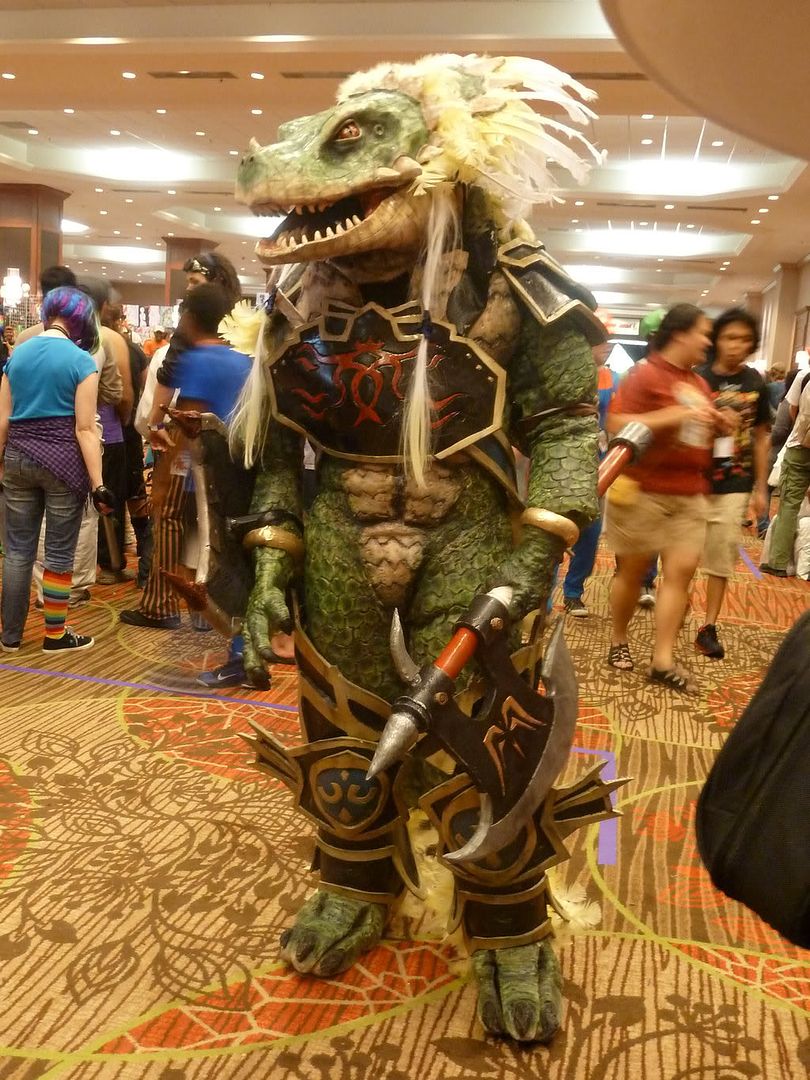
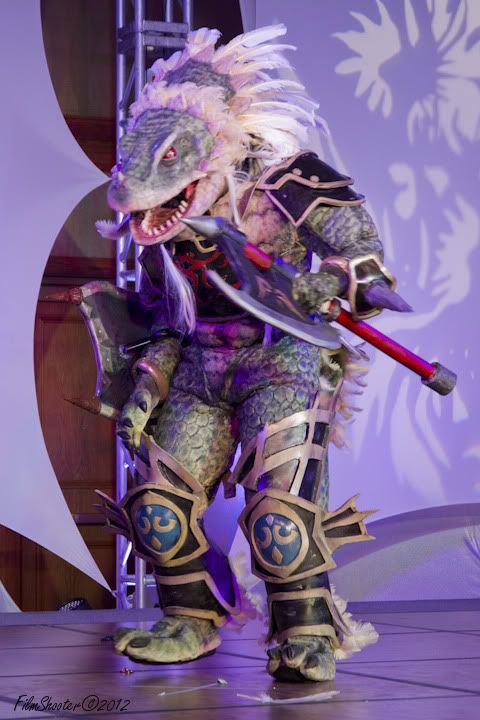
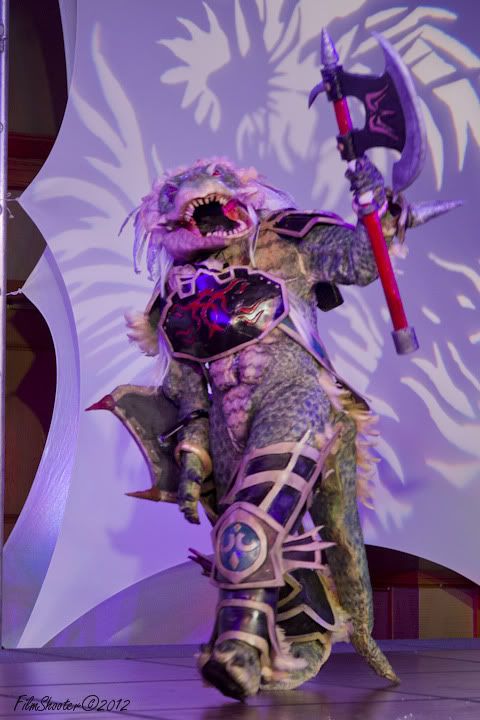
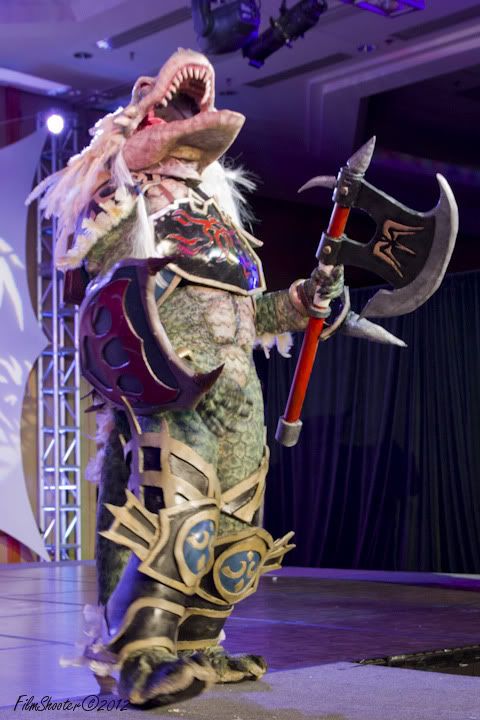
Lizardman finished body.
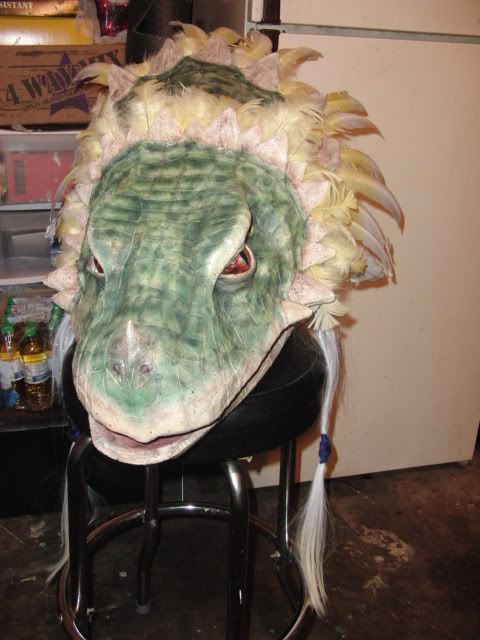
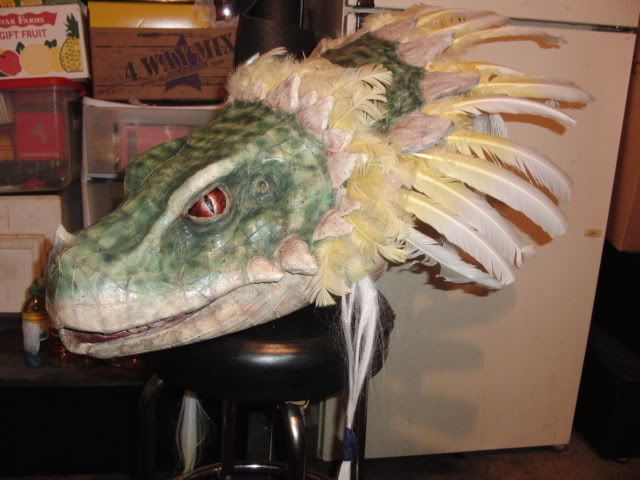
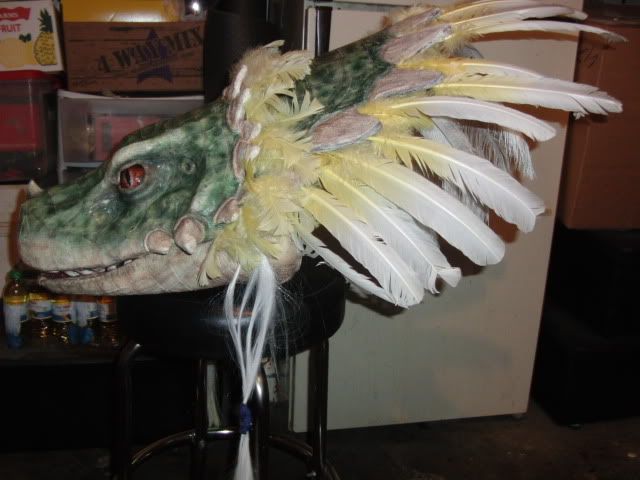
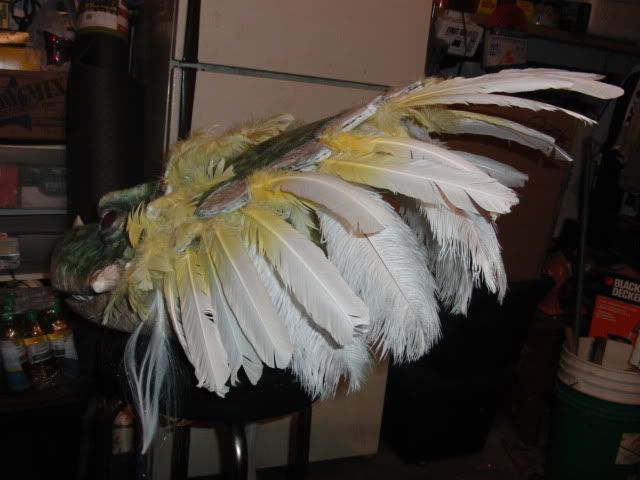
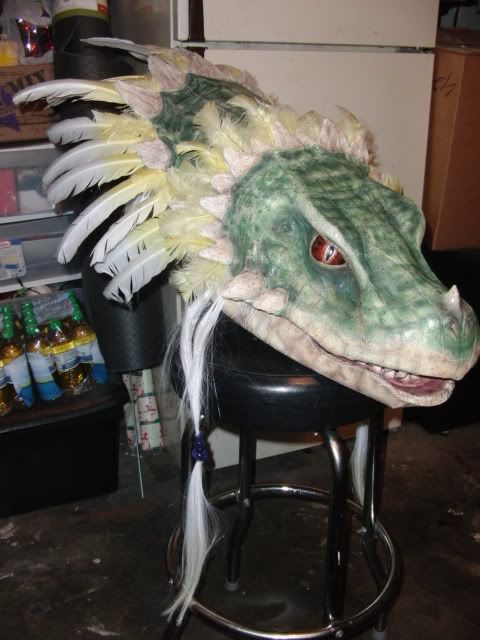
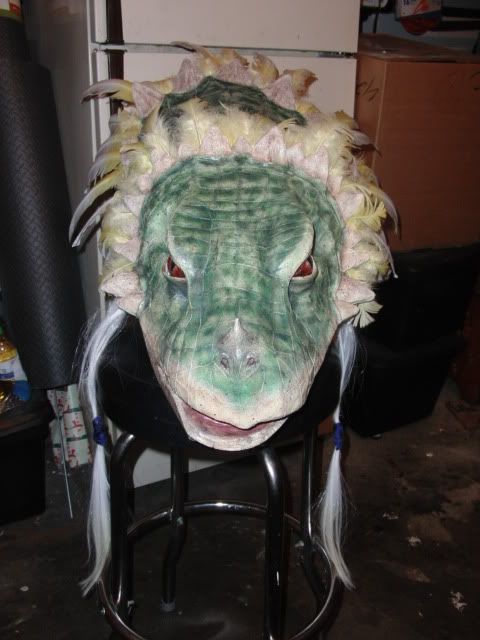
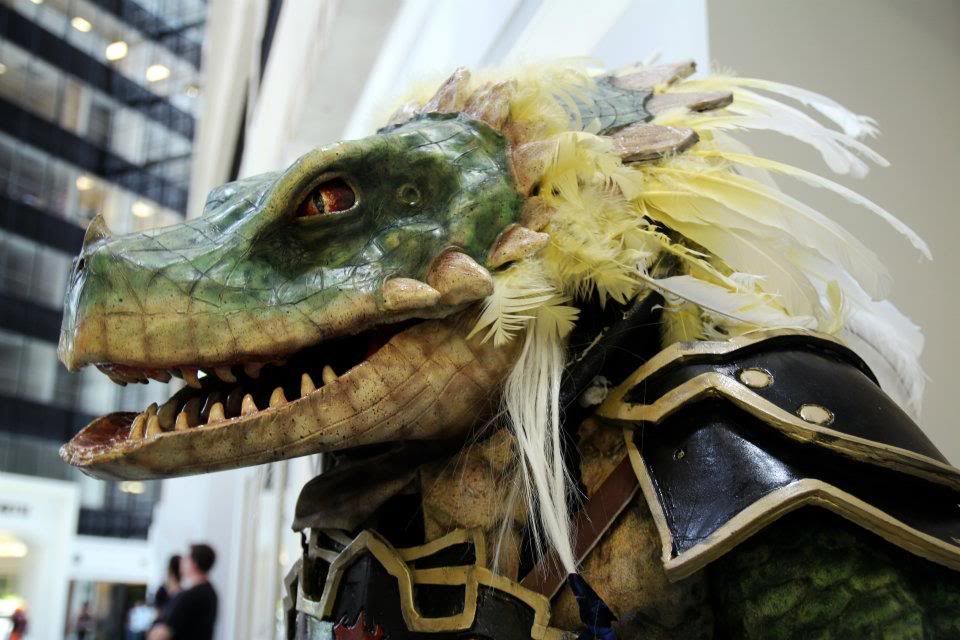
Finished Lizardman head with tounge and feathers.

Finished
video
http://youtu.be/QNtPCRFyDNk?t=7m52s
http://youtu.be/pCcOX9oyLwk?t=4m17s
http://youtu.be/2gGrhklO2zU?t=28m12s
http://youtu.be/lv4SrhrLsDA?t=3m1s
http://youtu.be/ap1rQUSOV_k?t=7m16s
There have been over 5 diffrent concepts of this creature including alternate designs throughout the series.
The Lizardman above is the one I am making. This version has feathers that willadd a lot of movement to the character.
I searched google for other people's Lizardman costumes and was very dissapointed in their results.
I noticed that they all kept human proportions. Then I remebered this guy!
His head was mainly puppeted like Big Birds or the bear in the big blue house costumes. After giving it a few sketches I came up with this concept of how my build would work.
The right arm of the Lizard man will be a fake. The fake arm will be the arm with his sheild. So it will not look too strange being held in that postion for an extended time.
I will puppet the head with my right arm, and carry my axe in my left hand.
I figure if I give the build a neck gobbler it would hide my right elbow. Also if it flapped a bit that will add movement.
To fit my head into the suit I will add a hump to his back.That is where I will see out of. I will also move the shoulders up to the side of my head. This will make the arms look longer, and reduce the size of the hump look. The feathers of his head crest are a good cover for where I would be looking out of.
The armor and weapons I am making out of EVA foam. For the body I will use a method used for making Predator costumes. I will build the body frame out of mesh fencing, foam, and fabric . Then add muscles and texture details with cotton, foam sheet shapes, and liquid latex. To paint the costume I will use mostly acrylic paints and brushes.
I have all of this planned out, but I still have not figuring out a solid way to fit into the costume.
I just need to figure out a way to minimize the time to get it all on, and off. I also need it to be rest room friendly. XD!
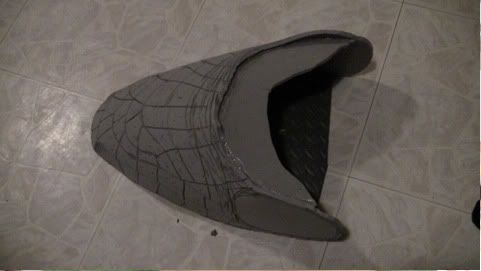
After that I rolled the craft foam into two cone shapes and glued them to the top of the shield. Looking at the art work it looked like the spikes are a horn, claw, or tooth. So I used a hard edge to scrape,and poke the foam.
Next I hot glued on the horns to give them a texture.
Using 1/4 inch EVA I cut out the shield crest and glued it on.
Sheild Back
I just used hard edge and drew on it. Since it wont be seen I didn't bother with the details.
Once that was all done I sealed the foam with watered wood glue.
Right now I have it painted a flat coat of grey primer.
Next I will spray the front a base coat of copper. Then the back will be a satin brown. that I will make look like wood.
I didn't want to try this build unless I could find out a way to get the eyes and mouth to move.
So I looked up a ventriloquist dummy head tutorials. I found this link Ventriloquist Dummies - Ventriloquist Figures , and I just followed the pictures. You have no idea how difficult it is to find that. Took me like 30 mins. ~_~
So far the eye movement is down with the move of a finger to the left or right on the nob I made. I am trying to make an easier way for mouth movement to work . My thumb isn't able to do much. I ended up taking the front off of the build so my hand could go all the way through. I am thinking I may have to take the bottom out as well for my thumb can work the mouth better. Then I would have to make a new way to support the build over my hand.
Here are the eye controls I made.
Inside view
front view
side view
top
I made it with a bunch of stuff I found in the craft part of walmart.
A wooden box, wooden sticks, hot glue, styrofoam craft balls, pumptoothpast cap,some kind of pole hanger, paint mixing stick, metal nuts, duct tape and a metal cloths hanger.
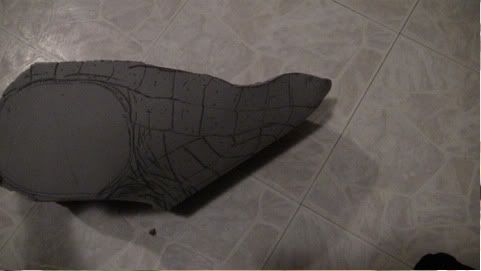
To make sure I get the size correct I made a real size front and side drawing.
I did not add all the detail in the world. I just wanted to get the idea across. I plan on making the extra head crest out of foam so my arm can have extra motion and I wont use too much materials in my molding and casting process.
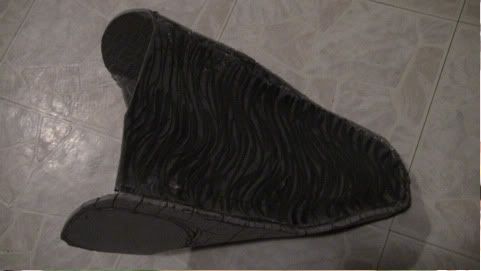
I got my felxi foam X in the mail yesterday so i will start sculpting soon as I finish this shield. I just need to paint in the wood detail, age, clear coat , and strap that and its done.
Progress...
Here is how my sheild looks after painting,and a few hundred battles.
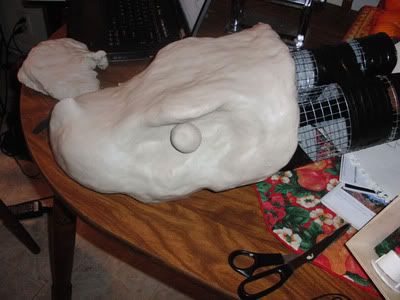
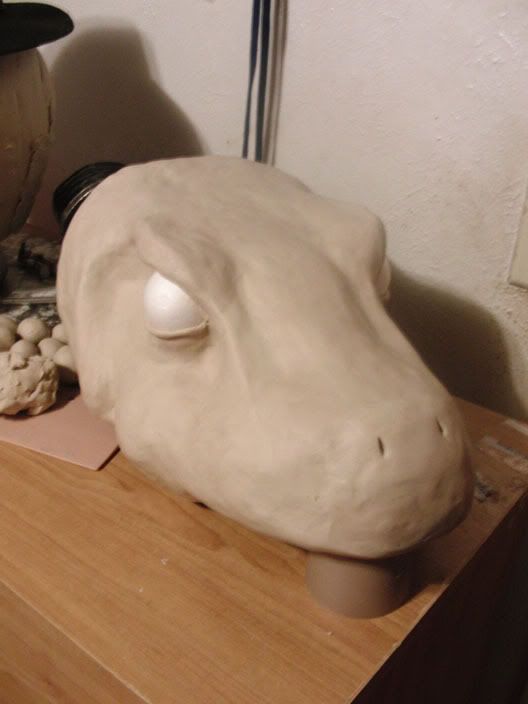
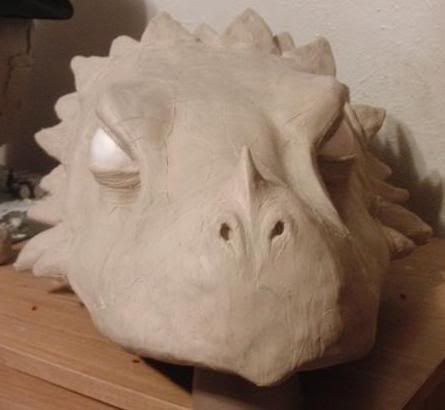
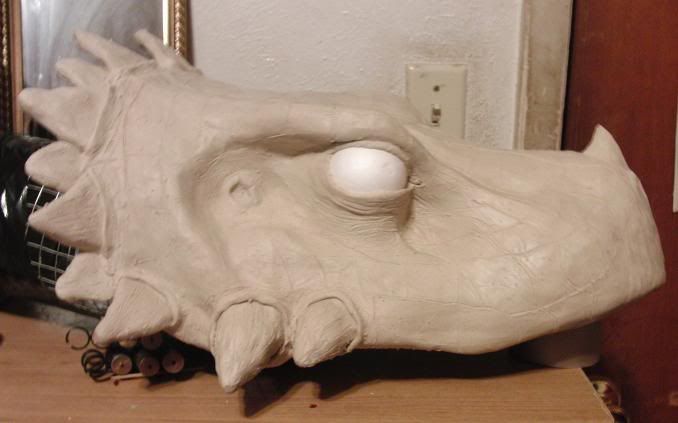
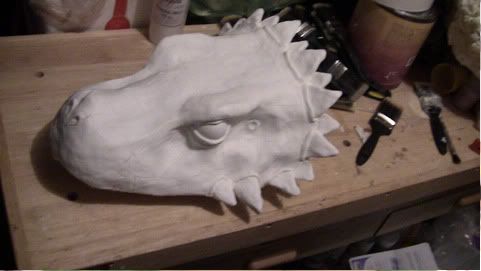
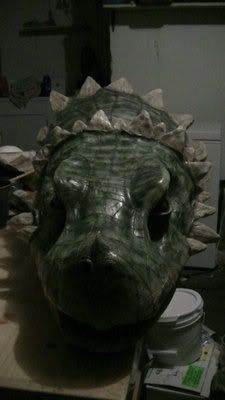
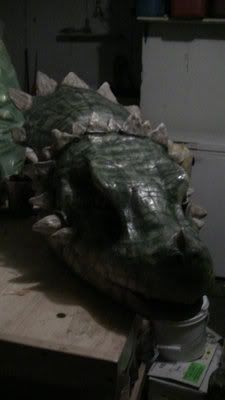
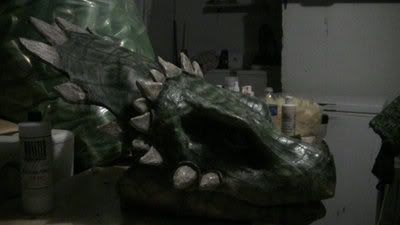
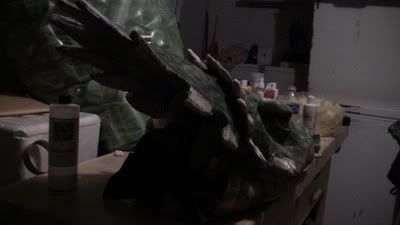
Here are so progress shots of the head sculpt.
It has gone through a lot of changes. When I first started I built a frame out of mesh and sculpted over it. The frame ended up too big. So I had to dismantle the sculpt ,reshape the frame ,and tried my best get the clay to stick back onto on the armature.
Then I ended up sculpting this. I ran through a lot more clay than I thought I would. This thing feels like it is nearing 20 pounds. So to save clay I decided to just sculpt the top of the head .Then after I have that head cast I can sculpt the jaw using the head clay. Then the head cast will be fitting reference.
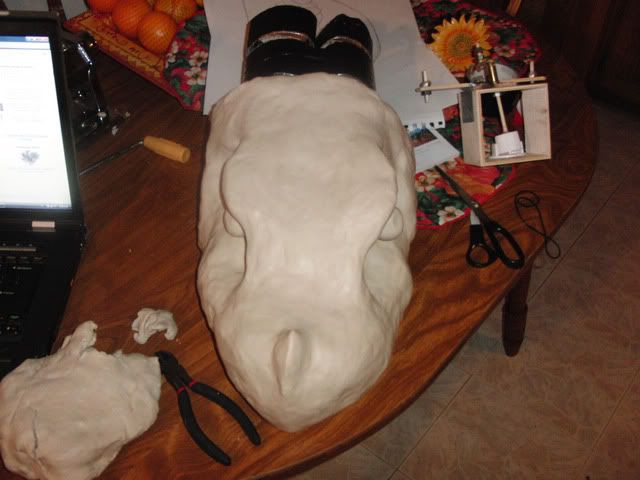
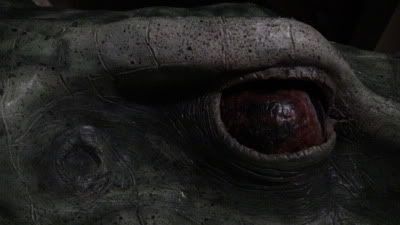
Originally I was using balls of clay to replicate the eyes I would put into the head. I watched a video on Stan Winstons school that said use a ball the same size the eye will be to ensure it will fit into the cast. So I got my rig to see where the eyes are going to place. Then I cut out the socket and put in foam spheres like the ones I will be using in the rig.
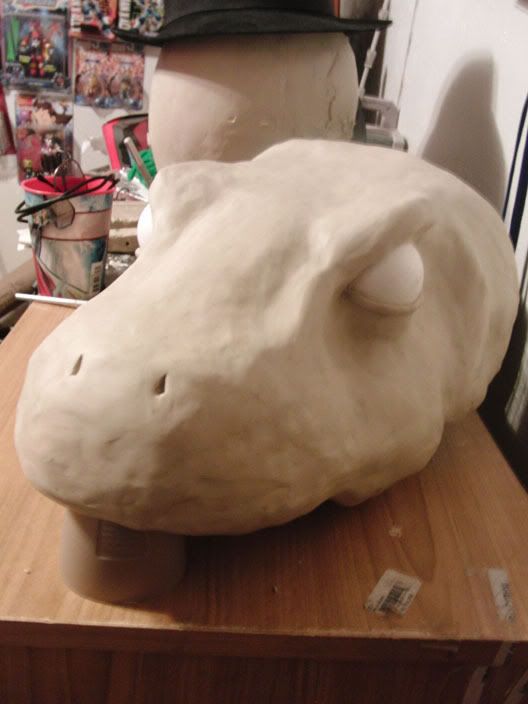
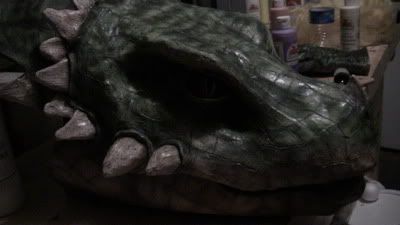
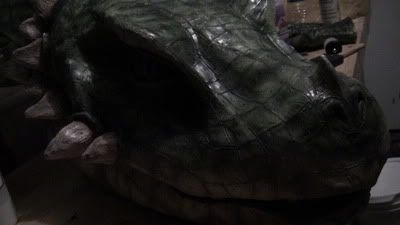
Here is what I have now.
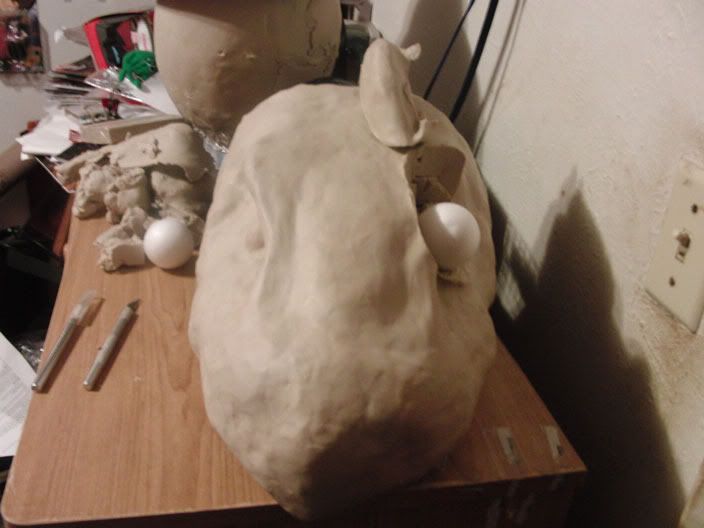
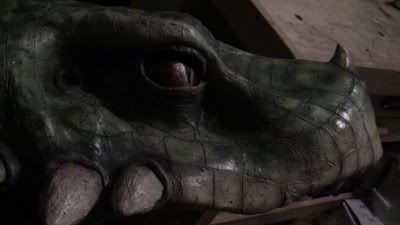
I decided to sculpt the horn in later. It was giving the sculpt too much of a bird look when I want a dino look.
It is going to be hybrid but I cant lose sight of the lizard. I also added lids to the eyes so the spheres will have a good border to hold them in. I also added nostrils to give it a more finished look.
At the moment it has the smooth appearance of a raptor head.
Symmetry has been a big challenge. I am getting a mirror to sit on the side so I can sculpt booth sides even.
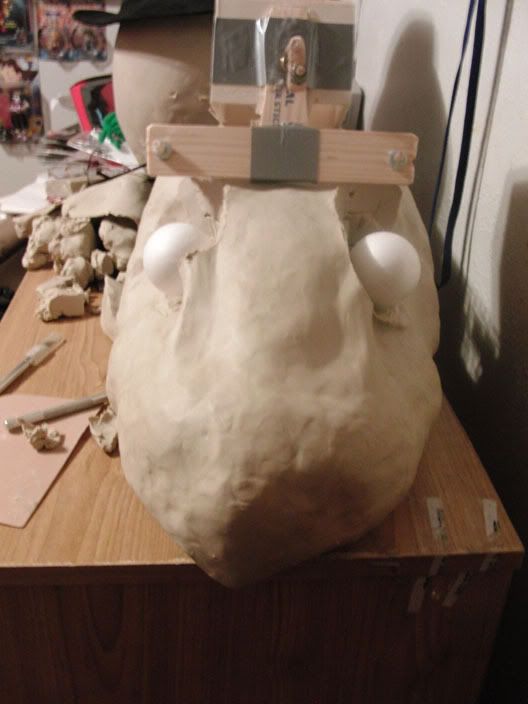
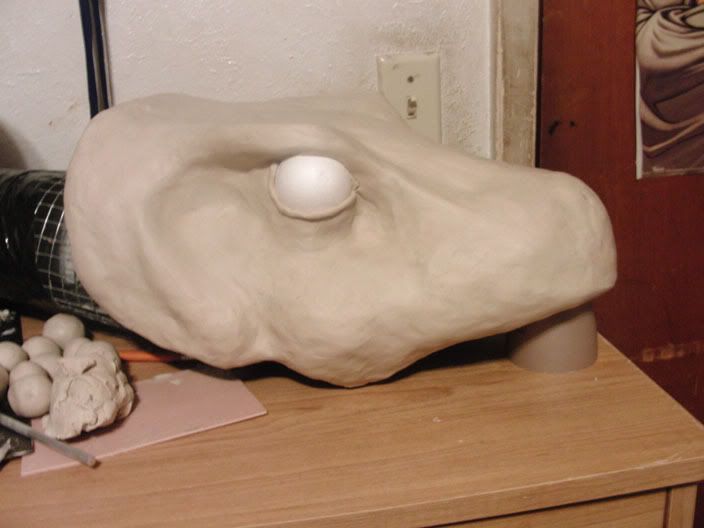
I really don't want to over do the head sculpt. If I do I don't think the body will be able to match the detail of the head . I am hoping that the paint will bring everything together into one cohesive build.
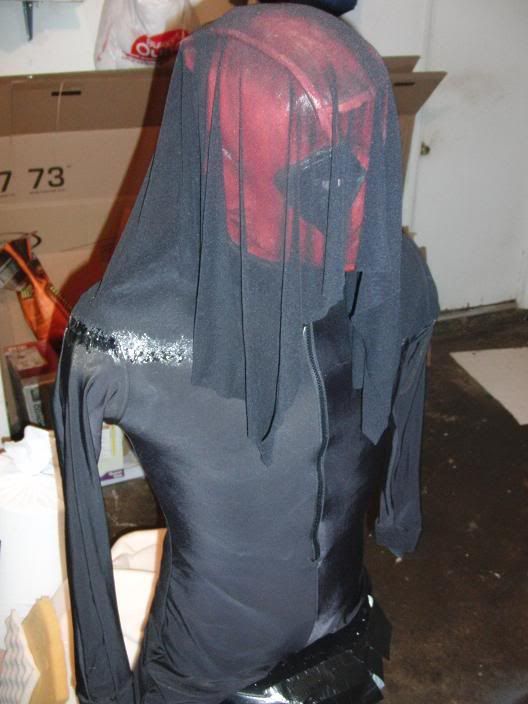
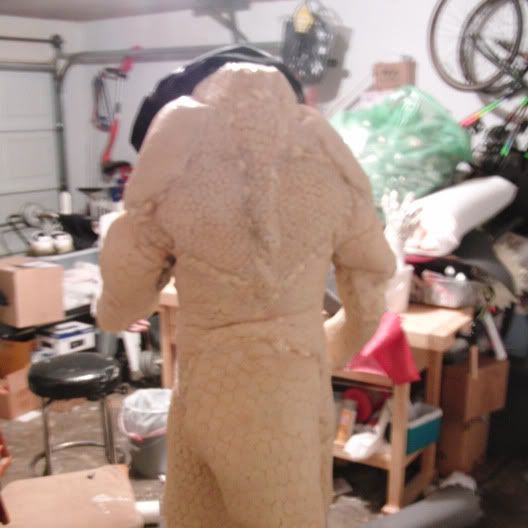
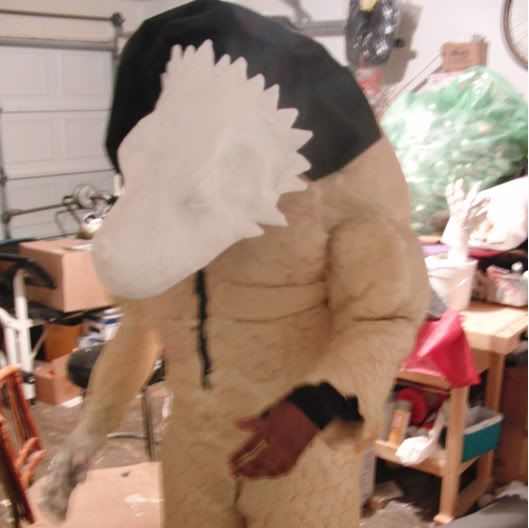
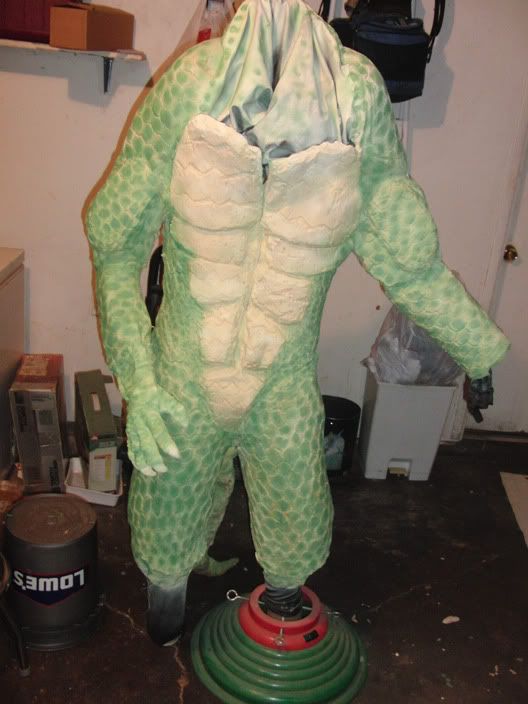
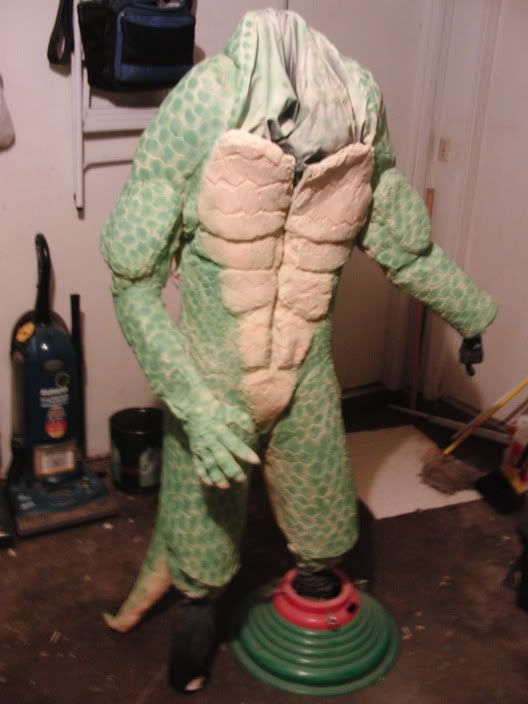
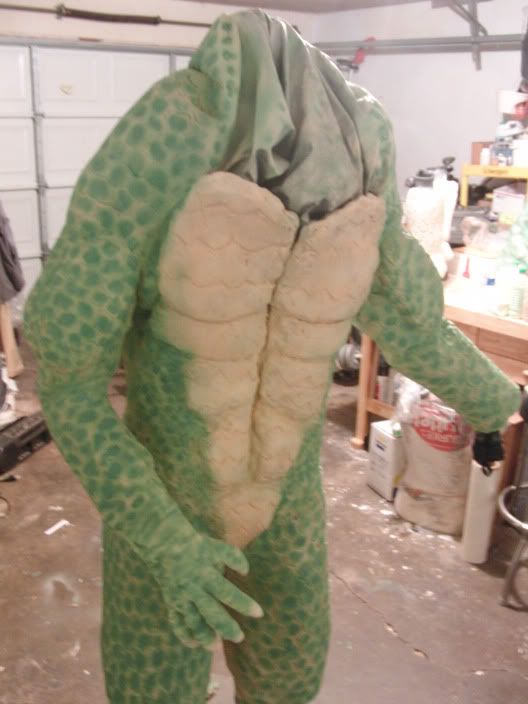
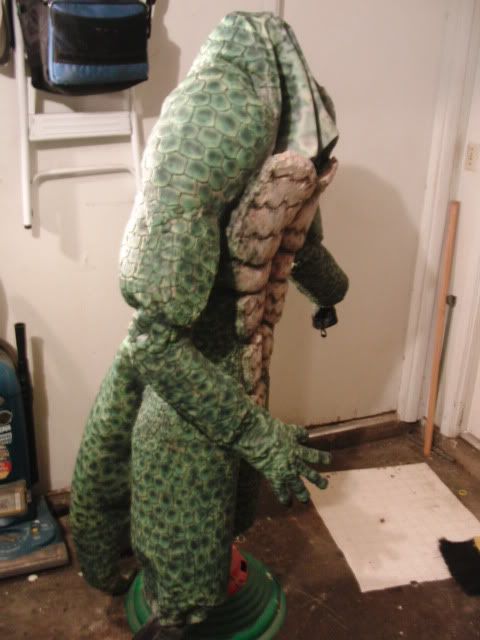
This is what I have for the body so far.
I took a dummy torso and added a mask I have in place of the head.
I took a wet suit and used a rubber based craft glue to glued black mesh to the shoulders.
I plan on building the body musculature with sections of cut foam. Next I will use a strong spray glue to stick the foam on the body.
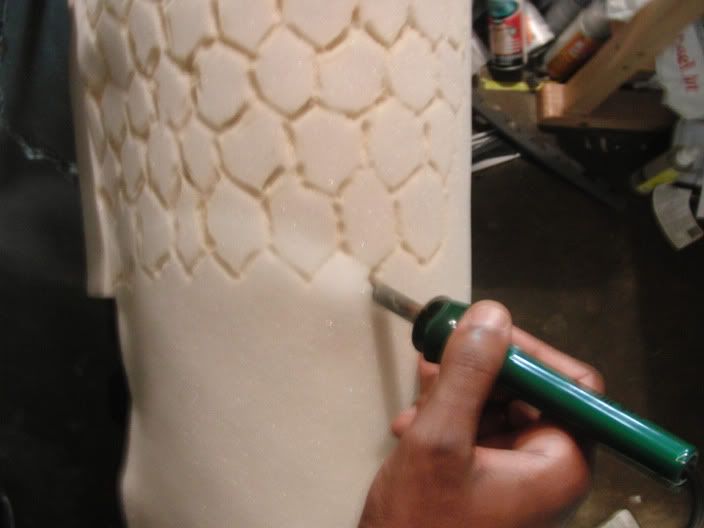
Then I will use a wood burning tool to put in the scale details. I tried a dremil, but it leaves a rough cut. When it gets around the edges of the foam it catches the head and the foam wraps around the tip. This causes the the foam to spin around the bit.
After all the foam is added for the muscles I will latex the body, and gloss the build with permawet.
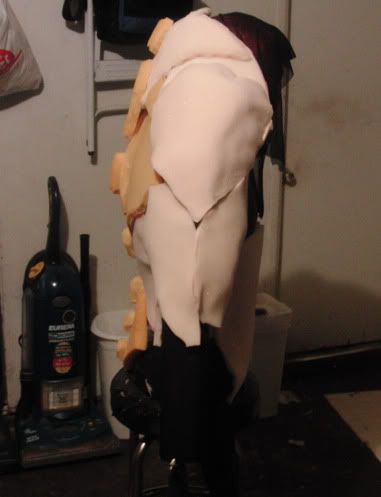
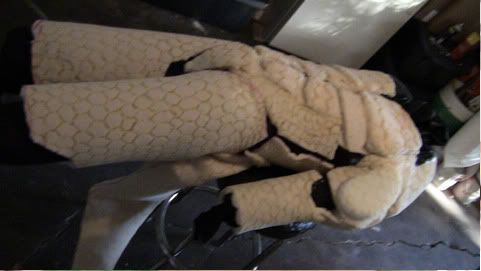
I started building the body out of foam.
I am not sure how I should build the chest. I also have to take the chest armor into consideration. I need my right arm to work the head so I will need space. I don't want to sacrifice visuals for functionality.
I will have to try this on in front of a mirror and mark where everything should go.
I plan on building the muscles in the forearms before I move to the legs.
I am trying to make sure I leave some space for the jointed areas to flex.
Since this is just a torso I will have to find a way to stuff the legs so I can work on them.
This build is so many things, monster suit , with a puppet head, and then I have to put armor over it.
The chest will have to come out a bit. I am making a flap that will form the chest, and cover my arm. Since the zipper will be down for my arm.
I can just put a baby clip pin to where I want the zipper to stop.
I was lucky this body suit zipped up in the front. If it was in the back I would not have a way to puppet the head. If it was in the back I would not be able to put the muscles onto the back.So if anyone is considering doing this, the bodysuit has to zip up front or you will have to do a bit of sewing.
The neck will be a fabric that I can stick my arm out, but I don't know if the black mesh I am using can hold the latex I am going to add.I may have to find a new material.
------------------------------------------------------------------------------------------------------------
Update
------------------------------------------------------------------------------------------------------------
I added a few things. I made a clear resin lense for eyes. I made the mold with mold putty around some of those styrofoam balls. The styrofoam texture came through in the casting , and it looked a bit frosted. So I wet sanded the cast. Then I waxed it and that didnt help do much. Then I decided I would hit it with a few layers of clear gloss coat spray paint and that did wonders.
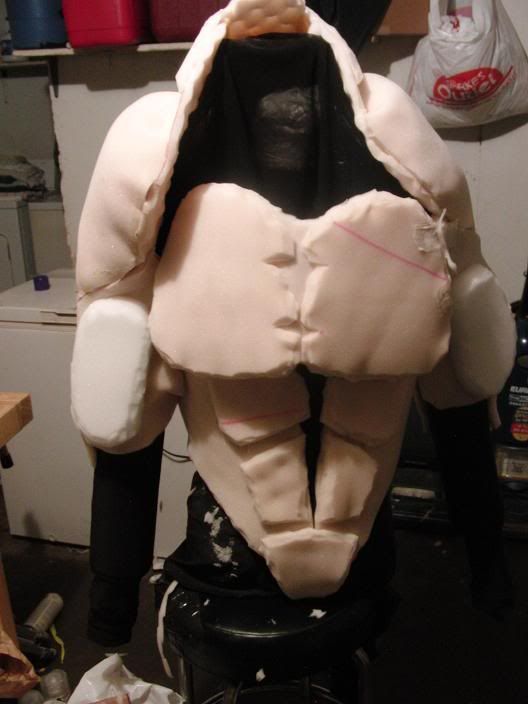
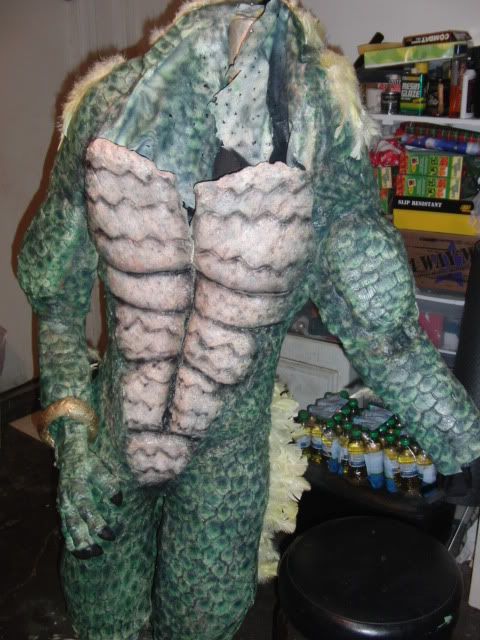
I added abs, and a chest flap that opens and closes.
I also made and attached a tail. I used a wood burning tool to burn scales into the tale. I dont know if the detail will show up when I add the latex though.
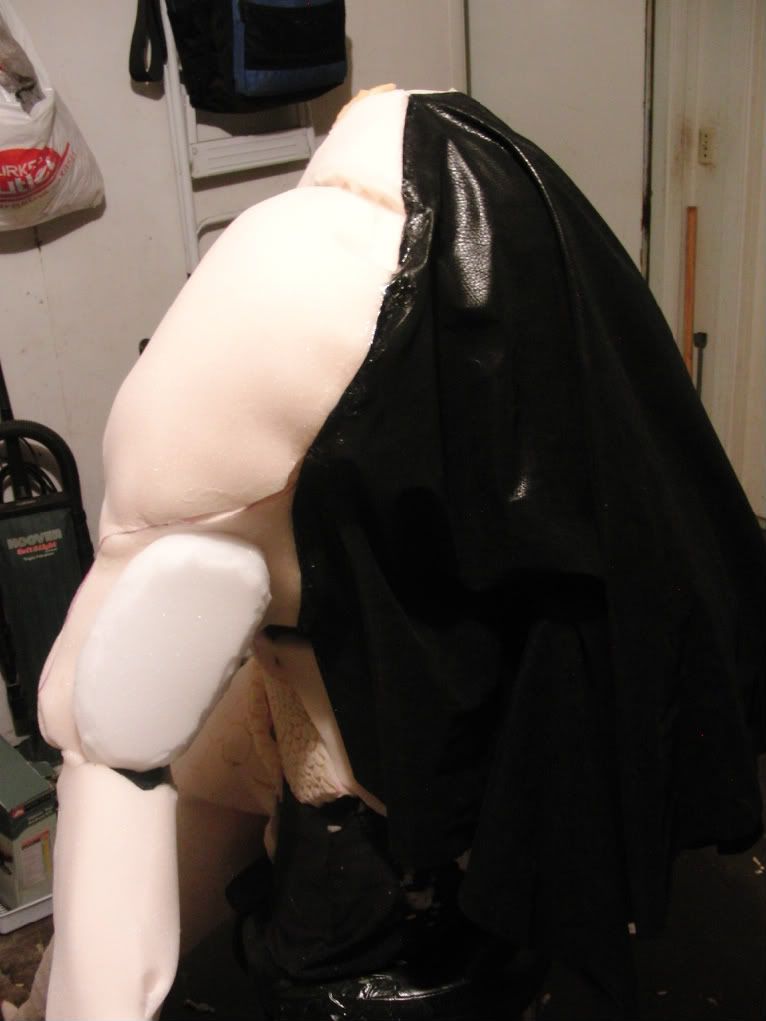
I found a new material for the neck hood. I will attach it soon.
I started using a hot glue gun since I ran out of spray glue. It holds stronger , but takes a few seconds longer to set.
Here I painted some eyes on some paper.
The clear sphere halfs I casted are preeent alohg with half of a styrofoam sphere.
What I have done is glued all of these together to make a whole eyeball.
My only concern is if this eye's movment will be noticable.Since from the side the eye is clear.
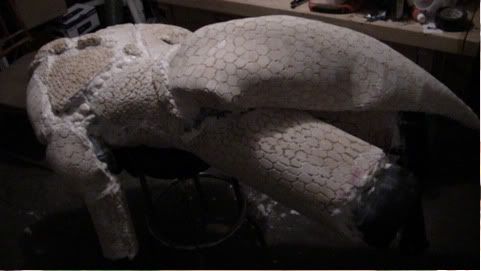
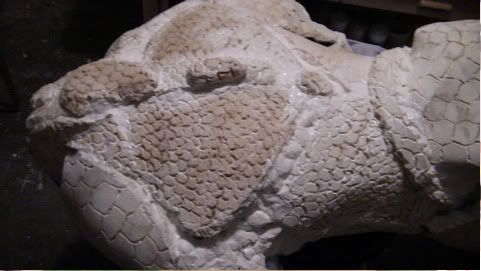
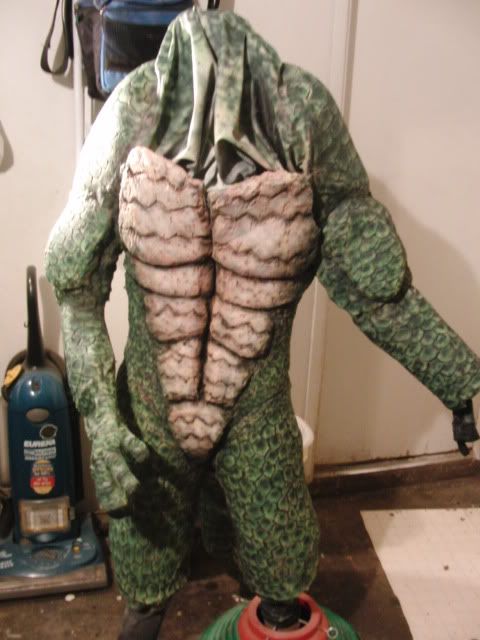
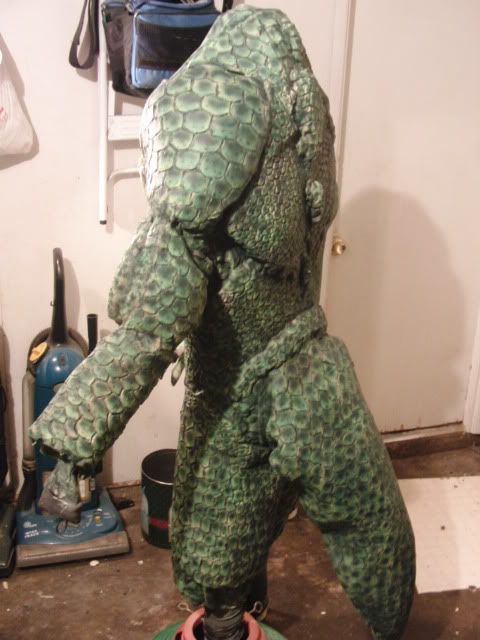
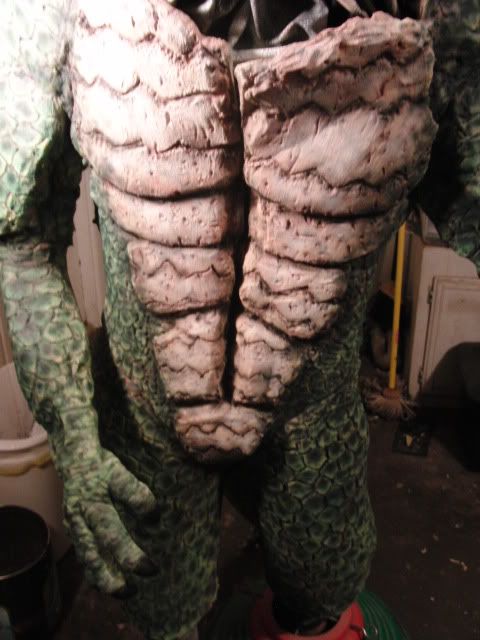
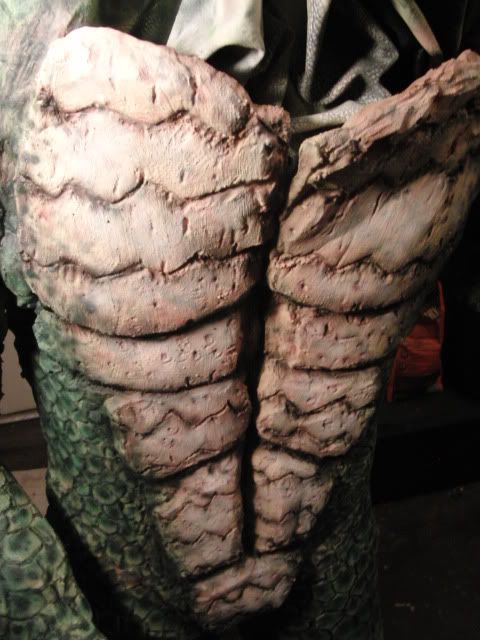
I burned more scales onto the back. I made them smaller than the scales on the tail. I am not sure I should have done that. I also added foam to the forearms. So I will have scales covering the entire upper body, neck excluded.
I got a light fabric with a leathery texture for the neck. I attached it the edges to the outer opening of the shoulders, and under a bit of the left chest flap. So it should tuck into the chest and make a good sleeve for my arm.
Now I have to figure out a way to see out of this thing.
Today I added some foam for the thighs , and finished burning in all of the details. I will not be adding foam for the calves, because I will have armor and fake feet that will cover that area.
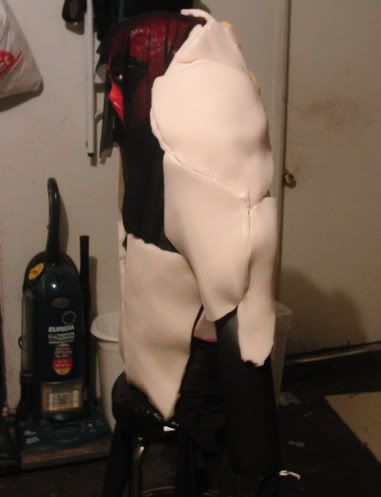
After that I put it on for a test run.
The foam around the legs was too long and was not attached very well so I adjusted that after the fitting.
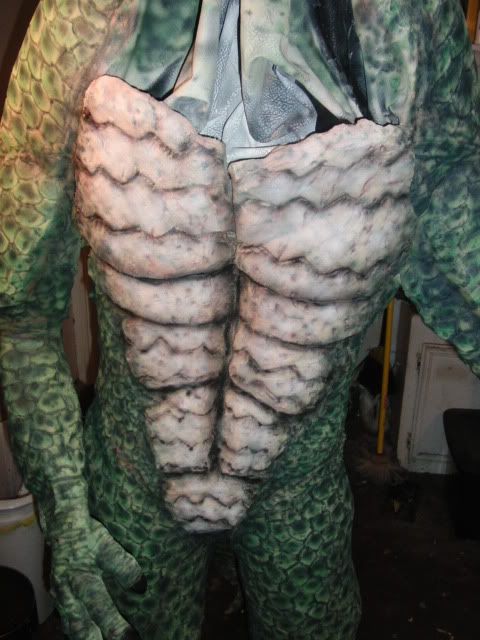
The space between the abs next to the zipper is looking apparent. I can adjust that once I added the liquid latex and some cotton.
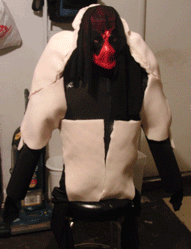
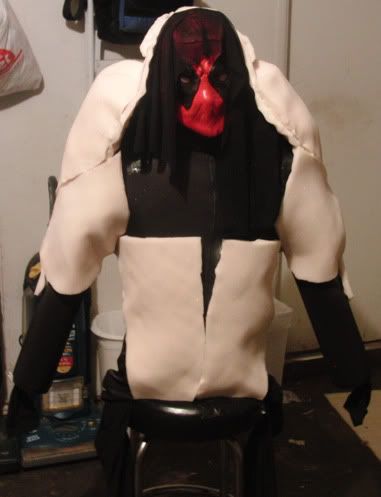
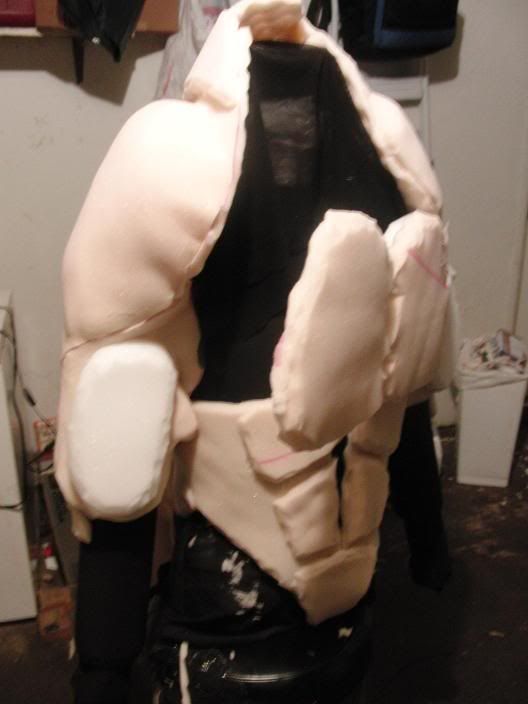
From looking at the pictures I decided I want to see from under the head and not over it.
Having the puppeting arm that low does not look good.
So I may not add the goobler under the neck. If I do it will be very narrow.
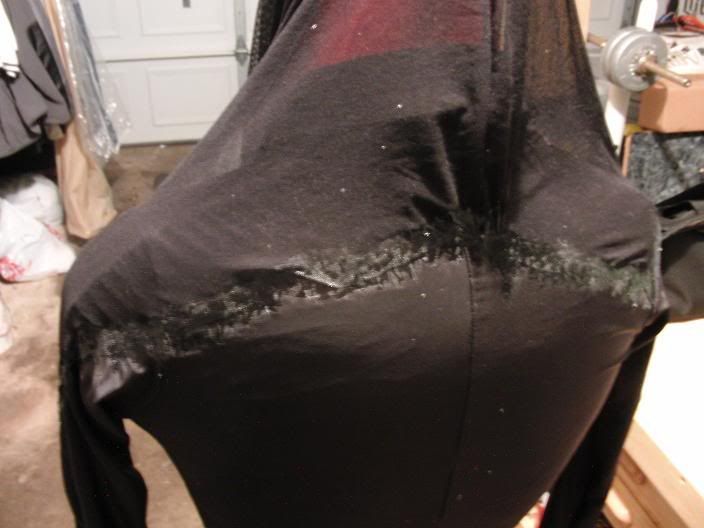
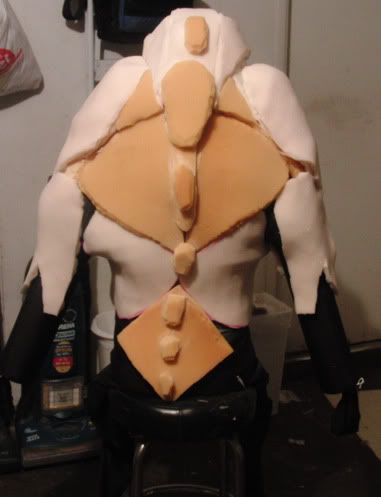
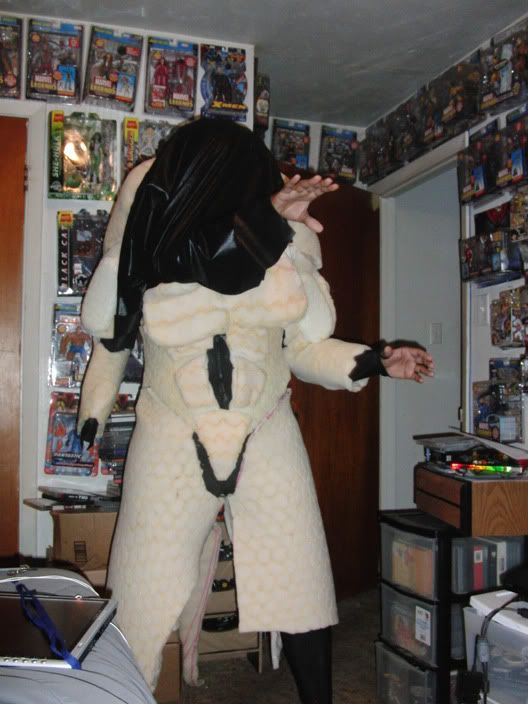
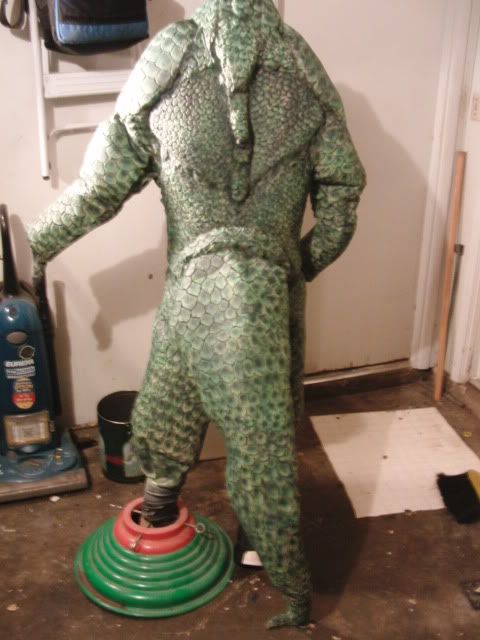
I do like how the back turned out.
After looking at these pictures I stuffed the tricepts to add a bit more bulk. They where looking flat.
The Abs are a bit diffrent than the original art in the game. I looked around the net and decided I wanted to give it abs like this.
I also want to try a color scheme simular to the Gillman. While still trying to maintain that iguana look from the game.
The next stop for the body is covering it in latex. I have never tried this before , but from what I have read in tuts online it will take 5 layers of liquid latex over the suit.
I am also in the process of making the mother mold for the puppet head. I think I will cast a resin master before I try casting in foam. I am also thinking of making the bottom jaw in foam and not sculpting, molding and casting it. Just to save time and maybe save on weight.
Here is the finished foam build of the body. I took the two parts of that chest flap and split it down the middle. Then I attached them to the chest. The zipper shows now, but the paint job camos it.
Next I started adding the latex and filing the gaps with cotton. A gallon can of mold builder latex, and a gallon of monster maker latex.
After a few days of latexing I tried the build on...
Wow that suit is hot, and heavy! I ordered some cooling vest right after putting that on. I asked my brother how long I had it on before I took it off. He said 5 mins!
Molds of the sculpt.
Start of mother mold.
Resin pull.
I made a foam-it X pull, but it is way heavier than I thought it would be. So I am going to keep working with the resin pull. Since I don't want to spend any money on shipping and supplies I made the bottom jaw out of EVA foam.
I sculpted some teeth out of sculpey clay, and a tung from a 2 part rubber mold compound.
I started making the feet by wraping some boots in cling wrap/ platsic wrap.
Then I pulled stockings over the boots and glued foam to the stocking.
Since I couldn't wait any longer I started the airbrushing of the body! I started with a base coat close to the color of the cured latex body. This was to cover the maker lines from the cutting phase, and establish a fleash tone. Next I used a darker shade of the tan. I went for a bit of mottling, but it didn't really show. Then I added the base green.
I am liking what I have so far, but I plan on adding a lot more colors to this; shades, high lights, ect. In the end, I hope to use this color to bring everything together as a solid build.
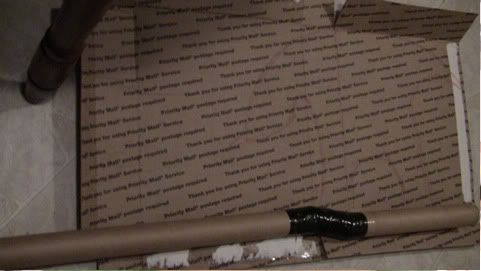
I started the ax. I cut a cardboard tube at 2 angles then put another card board inside to bridge the parts. Next I duct taped the card tubes and spraed gap fillerfoam into the tube to make it dense. I plan on wraping a thin foam over the cardboard handle. The blade will be two sheets of EVA foam hot glued together. Next I will sealing the foam, painting the ax, then clear coat the ax.
Here are pictures of the bodies paint job 90% complete.
I realy went for the motling, and veins this time on the lighter parts. I noticed the lighter parts looked too warm. So I whitened it up a bit like a frog. I told myself wouldn't use any black on the body, but I gave in to temptation and used it on the creases in the ab area.
If you look at the source pctures you will notice it gets lghter where the feathers are.
It is almost like a frosted look. I am going to add that next along with some high lights on the nails.
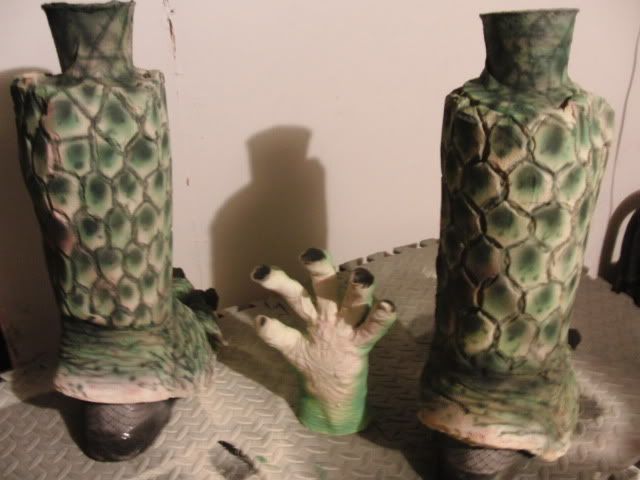
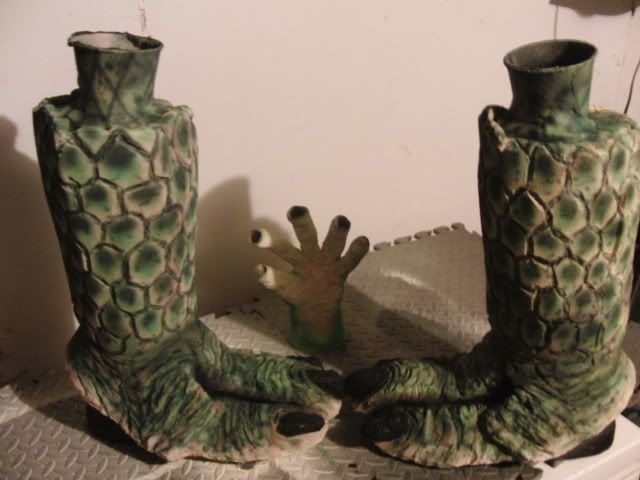
Here are the completed feet, and what I have started on the glove.
Then to finish up the painting I will add the perma-wet! I am really excited to see how it fx the build.
Should not only seal ,but enhance the colors ,and a greasy /flesh look!
I have the body fully painted , and. I just had to splater it all with a burnt umber color, added some veins, and seal it all with perma-wet. The splater of paint from the tooth brush took away the smooth air brush feeling and gave the painting a almost pour like texture. It just brought everything together. I didnt think the bodys finished paint job would really show well .So I just took pictures of the head, and the glove I painted.
I have decided I am just going to look of the mouth so I wont have to hold it up so high, and I can see if the mechs are working.
It is not easy to hold where I can oporate everything. Getting to eyes to move with just my finger took hours to get right. There was just too much friction at the eye and the lid.
I put a black mesh in the mouth so I can see out and hide the mechs a bit.
The teeth are made out of super sculpey clay. I burnt them when I backed them. So they are really a dark brown. They took paint well so it was an easy fix.
The head creast is EVA foam I sculpted with a dremil, wood burning tool, and scissors.
The cheeks are a thin white fabric I painted with acrylics, and added perma-wet too.
The neck skin is the same textured material I am using for the neck hood. I hot glued it too the EVA foam jaw I made.
After tinkering around with the mechanics I put together head to where the eyes move.
I decided to use foam spheres instead of the resin eyes I made because the resin did not noticibly turn.
Here is the finished glove
Here is the finished axe. I just need to clear coat it.
Start of the armor.
Part of the knee pads.
Left bicept gaurd.
Right shoulder pad.
Lizardman finished body.
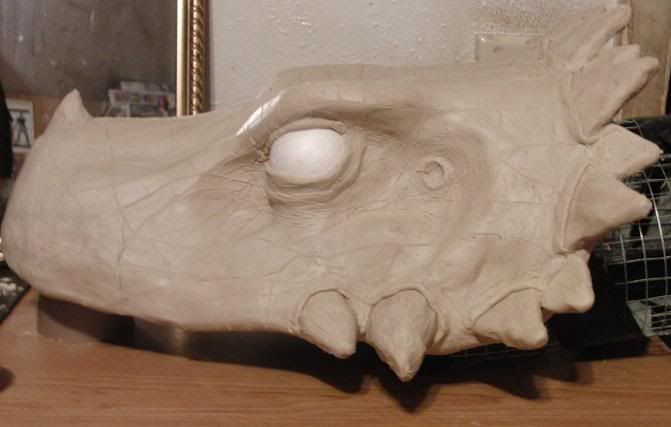
Finished Lizardman head with tounge and feathers.
Finished
video
http://youtu.be/QNtPCRFyDNk?t=7m52s
http://youtu.be/pCcOX9oyLwk?t=4m17s
http://youtu.be/2gGrhklO2zU?t=28m12s
http://youtu.be/lv4SrhrLsDA?t=3m1s
http://youtu.be/ap1rQUSOV_k?t=7m16s
Last edited: