All Aluminum Rocketeer Jetpack build

Really nice work!
I'm curious what fastening methods you use besides the obvious rivets. Any welding or brazing going on?
 
Really nice work!
I'm curious what fastening methods you use besides the obvious rivets. Any welding or brazing going on?
There's a little welding, and I use Alumaloy in a few key spots too. The welding is at the tips of the boosters to complete the cones, the small spacer under the cone too. The radiator section is held together with long rods as rivets, but the center of that is all welded together. There's an internal structure connected to the main round vent which ties into the top part of the main center piece. All of that is welded together. There are welds holding the long vents together as well. I use the Alumaloy where the long center snout ties into the bottom center piece, and also along the edges of the flaps after I carve a V groove and bend the edges up to 90 degrees. But all the rivets you see are legit rivets doing what rivets are meant to do!
 
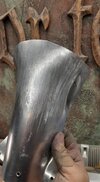
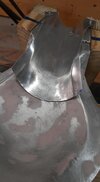
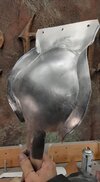
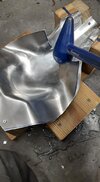
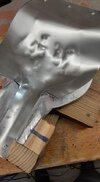
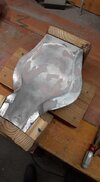
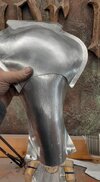
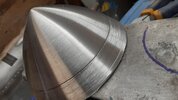
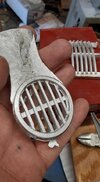
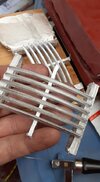
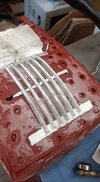
A few new pics. Working on upgrades to make the build a lot more accurate and a lot easier to reproduce the parts. These are cast in pewter. The nosecones I made by putting a huge chunk of plastic on the lathe and got it to the right taper. Then I made a fairly complicated two part mold that I was able to pour enough pewter into to force the pewter up the walls and into the right shape. The other parts are made by hand from aluminum, and then simpler two part molds are made from them. These parts are shown literally out of the mold, first try, without any cleanup done to them. I am also trying to cast the top radiator section, but I ran out of the mold material and I am waiting on new stuff to arrive before I can pour the second half of the molds. Even though my design is very accurate, none of the parts from the original plastic version are interchangeable. The boosters on the original are 7" diameter, and mine are 7.25".
 

Attachments

  • 20201104_180023.jpg
    20201104_180023.jpg
    218.3 KB · Views: 158
  • 124038853_206530364165163_6708524116189309758_n.jpg
    124038853_206530364165163_6708524116189309758_n.jpg
    59.8 KB · Views: 175
  • 124097861_206530344165165_1398556402147616049_n.jpg
    124097861_206530344165165_1398556402147616049_n.jpg
    53.7 KB · Views: 179
  • 124849659_206530297498503_1094454359213937155_n.jpg
    124849659_206530297498503_1094454359213937155_n.jpg
    64.8 KB · Views: 183
Small update. Nosecones came out excellent. Color is a custom mix of Cerakoat gold and burnt bronze. I made a huge mistake threading the top prong on the finlets rather than the lower one. Now I have to make corresponding square holes in the pewter nosecones. Could have saved a full day of work if I thought ahead and threaded the lower prong. I will have these bolted into pairs in 2 days.
20201216_151310.jpg
20201220_170757.jpg
20201221_133424.jpg
20201227_162051.jpg
20201228_151116.jpg
 
Man,You have some mad skills. I can see why you used pop rivets. I have bucked a few rivets while helping build an experimental airframe and empennage. Clecos are a great aide when doing this kind of work. You may be making minimum wage with that amount of work.
Kudos to you!
 
Killing it!

Hey what’s the name of your Etsy shop?
Shop name is ArmorTemplates but I don't have these for sale on there currently. These four are already sold. I wanted to take a little time between builds to make some updates and upgrades (the molds, etc) and people hunt me down trying to buy these even though they aren't listed anywhere.
 
These pics may be out of order but you get the idea. I was able to have a fellow YouTuber (BuilderCreator) make a hammerform for me out of 1" thick aluminum. I had sent him a buck for him to copy and produce the part. I tested it out today and hammered out one cowl section and one lower cowl section. These are WAY more accurate than my previous version (see the first post in this thread). Note how flawless the transition is between the two parts where they come together. These parts still need a little clean up but they are the final piece to the puzzle needed to finish these jetpacks. I will be using these parts to make a mold to make the vent in the center and cast those in pewter like the other vents. Only another 10 days or so before these are available.
 

Attachments

  • 157170271_4171666466179487_7070526982107972903_n.jpg
    157170271_4171666466179487_7070526982107972903_n.jpg
    49.1 KB · Views: 134
  • 157247879_4171666402846160_1037846479043846804_n.jpg
    157247879_4171666402846160_1037846479043846804_n.jpg
    35.3 KB · Views: 143
  • 156939093_4171666346179499_3178614560460973057_n.jpg
    156939093_4171666346179499_3178614560460973057_n.jpg
    44.6 KB · Views: 127
  • 157040223_4171666259512841_6349216532240827042_n.jpg
    157040223_4171666259512841_6349216532240827042_n.jpg
    50 KB · Views: 141
  • 157195714_4171666179512849_4128560567934647108_n.jpg
    157195714_4171666179512849_4128560567934647108_n.jpg
    44 KB · Views: 140
  • 156946470_4171666119512855_2145908108734077037_n.jpg
    156946470_4171666119512855_2145908108734077037_n.jpg
    46.5 KB · Views: 131
  • 157410910_4171666549512812_4497113800607321199_n.jpg
    157410910_4171666549512812_4497113800607321199_n.jpg
    58.1 KB · Views: 136

Your message may be considered spam for the following reasons:

If you wish to reply despite these issues, check the box below before replying.
Be aware that malicious compliance may result in more severe penalties.
Back
Top