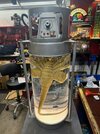
A few years ago, my local TAP plastics had a giant acrylic tube they were selling at a solid discount due to some cosmetic damage. Building a facehugger tank had been on my list of projects for a long time so I purchased the tube. Naturally, instead of getting started on the build, I just constantly moved the tube around for two years and even managed put a nice crack in it when I dropped it once. Anyway, after an appropriate level or procrastination, I have finished the build and am excited to share it!


My goal was to have a semi-screen accurate version of the tank, but would still have room for some artistic license. The the overall prop is 35" tall altogether and the acrylic part of the tank is 12" OD. Despite the (repaired) crack, it safely holds 10 gallons of water. The crack gives the prop some cool weathered character, but it definitely made me nervous the first time I filled it with water. The prop has air bubbles driven from an external aquarium pump and is lit from LEDs in the base of the tank that are encased in resin and shine through an acrylic white base to diffuse the light.
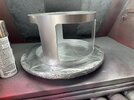
The top and bottom "end caps" of the tank are 12" cake pans that fit well, looked decent, and provided good structural integrity. For the upper section of the prop, the protective shroud is made from cintra plastic sheet and the "control block" on top is of acrylic construction. The control block has more going on than the screen version, but I felt there needed to be a bit more visual interest there, hence the various greebles and accoutrements. The lights are currently powered by a battery and the mini-switches on the lower left can be used to toggle the indicator lights from red to green or turn off all of the lights.


The support posts on either side of the tank are made of 1/2" EMT conduit and I made little Delrin treaded inserts to be able to bolt them to the support tabs that come off the side of the tank. These tabs are made from 1/8" aluminum and are bolted/epoxied to the top and bottom end caps. I wanted to make them looks like they had been welded in place, so I tried a bit of faux welding bead with some epoxy putty that turned out decently well.


Here is a photo from the base of the tank where I installed the LEDs and a photo from the back side of the prop where you can see where the air pump connects, the power plug and the drainage valve that I installed to make emptying the tank a non-horrible task.
For those curious, the facehugger is store-bought. I don't have the skill to make a one that wouldn't look terrible, so I am happy to have just bought one. It is latex covered, so I coated it in epoxy to hopefully keep it from disintegrating in the water. We'll see how that works out in the long term. I added a bit of alge control chemical to the water to hopefully keep things from growing in the tank. It has now been running for about a month with fully clear water, so we'll see how it goes and how often a full cleaning/water change is required. I may not keep it filled all the time if that becomes too much of a hassle.


Anyway, it was a fun build. The lighting and bubbles required a suprising amount of work to figure out, but I am pretty happy overall. As with any of my projects, if you have any questions or if I can provide any lessons learned for your own version, please let me know.
My goal was to have a semi-screen accurate version of the tank, but would still have room for some artistic license. The the overall prop is 35" tall altogether and the acrylic part of the tank is 12" OD. Despite the (repaired) crack, it safely holds 10 gallons of water. The crack gives the prop some cool weathered character, but it definitely made me nervous the first time I filled it with water. The prop has air bubbles driven from an external aquarium pump and is lit from LEDs in the base of the tank that are encased in resin and shine through an acrylic white base to diffuse the light.
The top and bottom "end caps" of the tank are 12" cake pans that fit well, looked decent, and provided good structural integrity. For the upper section of the prop, the protective shroud is made from cintra plastic sheet and the "control block" on top is of acrylic construction. The control block has more going on than the screen version, but I felt there needed to be a bit more visual interest there, hence the various greebles and accoutrements. The lights are currently powered by a battery and the mini-switches on the lower left can be used to toggle the indicator lights from red to green or turn off all of the lights.
The support posts on either side of the tank are made of 1/2" EMT conduit and I made little Delrin treaded inserts to be able to bolt them to the support tabs that come off the side of the tank. These tabs are made from 1/8" aluminum and are bolted/epoxied to the top and bottom end caps. I wanted to make them looks like they had been welded in place, so I tried a bit of faux welding bead with some epoxy putty that turned out decently well.
Here is a photo from the base of the tank where I installed the LEDs and a photo from the back side of the prop where you can see where the air pump connects, the power plug and the drainage valve that I installed to make emptying the tank a non-horrible task.
For those curious, the facehugger is store-bought. I don't have the skill to make a one that wouldn't look terrible, so I am happy to have just bought one. It is latex covered, so I coated it in epoxy to hopefully keep it from disintegrating in the water. We'll see how that works out in the long term. I added a bit of alge control chemical to the water to hopefully keep things from growing in the tank. It has now been running for about a month with fully clear water, so we'll see how it goes and how often a full cleaning/water change is required. I may not keep it filled all the time if that becomes too much of a hassle.
Anyway, it was a fun build. The lighting and bubbles required a suprising amount of work to figure out, but I am pretty happy overall. As with any of my projects, if you have any questions or if I can provide any lessons learned for your own version, please let me know.