Advice Needed for Greedo Blaster Build

history Hunter

Well-Known Member
RPF PREMIUM MEMBER
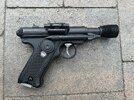
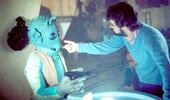
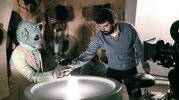
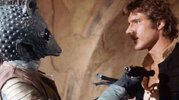
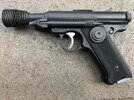
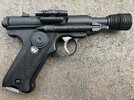
I'm in the process of building a Greedo blaster, using an Airsoft gun as a base, and would appreciate guidance from anyone with information or the inclination to help. Here is a brief picture the "prototype" I've built so far. I've used a combination of metal and 3D printed parts, and I have not weathered it yet, so it's as new as a gift on Empire Day in the Greedo household. I'm aware that there were likely two guns used in filming, thanks to archive footage shared with me by some generous RPF members. Things I know I need to work on:

1) Installing the site bar that sits on top of the barrel.​
2) Weathering.​
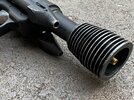
3) The muzzle heat-sink is not attached yet, and will be better positioned than it is in the photo. It's a tad too "close" to the receiver - just waiting on some friction tape to come in the mail!​

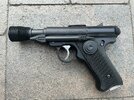
Here are the things I'd like help on:

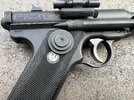
1) Do I thicken the trigger housing? This is the model with no bull barrel, and it seems from archive footage that there were two guns used: one with a bull barrel, and one with a tapered barrel. I think the idea of a thick trigger housing may due to camera angles, but would appreciate comments.
2) Is the trigger black? It's virtually impossible to tell in the archive footage due to Greedo's finger. The original MK1 has a silver trigger, so I'm thinking of leaving it alone as-is. Why would they paint it black anyway?
3) What should I do with the Ruger logo on the grip?​
I am happy to share close-up photos of any part for comments. I used a brass air-pump nozzle for the laser nozzle at the muzzle.
 

Attachments

  • 0EC43E57-D8F6-4468-950B-F14FFD85EEEF_1_201_a.jpeg
    0EC43E57-D8F6-4468-950B-F14FFD85EEEF_1_201_a.jpeg
    6.6 MB · Views: 100
  • 3DACD8F3-664D-421A-85ED-3599E5BFF2E5_1_201_a.jpeg
    3DACD8F3-664D-421A-85ED-3599E5BFF2E5_1_201_a.jpeg
    5.9 MB · Views: 110
Here are some archive shots, thanks to one of my RPF buddies!
 

Attachments

  • CD8FD0DA-2632-482E-BD7C-8108CF84D0CE_4_5005_c.jpeg
    CD8FD0DA-2632-482E-BD7C-8108CF84D0CE_4_5005_c.jpeg
    60.2 KB · Views: 106
  • 6F441C1C-59DF-4873-8B7A-E1EBB8AC0E1F.jpeg
    6F441C1C-59DF-4873-8B7A-E1EBB8AC0E1F.jpeg
    49.6 KB · Views: 103
  • 385B80AE-9D30-4ADC-A0A2-02E37F8A55C6.jpeg
    385B80AE-9D30-4ADC-A0A2-02E37F8A55C6.jpeg
    230.4 KB · Views: 100
  • 56E3B17F-DBBD-4F58-B9CF-53085076BC75.jpeg
    56E3B17F-DBBD-4F58-B9CF-53085076BC75.jpeg
    275.6 KB · Views: 96
Here is my converted airsoft:

Some of my parts, like the bull barrel, I got here: CSB Props by toolguy301 - Shapeways Shops

The thick trigger guard is from Corellianexports.

The real prop is not a real gun. They most likely took a real gun, made a cast, and then cut it up... possible recast it with the thickened trigger guard, then took that cast and added the greeblies.

Like the rebel trooper blaster in A New Hope, the trigger guard was thickened in this type of process and the trigger was removed. Maybe because it did not cast well or in Greedo's case, they needed the space for the big fingers.

FYI: Research thread...
 
Cool, thanks for the input. As I make prop guns, I often don't go for 100% screen accuracy, but rather, prefer to make blasters that look and feel real. I'm not entirely convinced that the trigger was enlarged (could be camera angle), but I can see both sides of the issue, and have opted not to thicken my trigger guard. I also noted that they seemed to have two guns - a bull barrel, and a regular sized one. I opted for the regular one in my build. THANK YOU for the link to "Greedo blaster Discussion" - I will read it with great interest. Couple of questions remain:

1) What should I do with the ruger logo? I'm thinking of coloring it black.
2) What about the trigger color? Leave it alone, or paint black?

I'm going to weather mine, but it does look neat in the "new" stage - right out of the box!

In both cases, I would go black. Since neither detail stands out on the prop, i would make them as subtle as possible.

You can see the thickened trigger guard clearly throughout the discussion thread.

I too go with idealized especially when it comes to weathering. There really is not an attempt to weather blasters. If a part is metal and it gets beat up, so be it, but when you have parts that are cast or model parts they are simply painted and they do not try to give it a faux metal look. So as you can see from my replica, I choose to believe the muzzle fins were worn metal even though these are plastic and have no wear on the actual prop. But I also know that in the SWU, they use plastic/composits so not all things on a blaster are metal so I pick and choose what might get the worn metal look and what does not but still have worn dirty look. One of my pet peeves in replica blasters is that some people just go too crazy with the faux metal worn, dirt, and/or rust look.
 
Here's some shots of my Greedo blaster:

IMG_3074.JPG IMG_3075.JPG IMG_3076.JPG IMG_3085.JPG

I also used an airsoft as the base. I was lucky enough to find one that had a chrome finish. I painted it satin black. The grips, rear site and model kit parts are real.
 
my airsoft had a satin finish from the factory, and I like it better than the bright blue finish. Also, does anyone know a good source for a part I can use on the trigger? After reading, I think I will go possibly with a thicker trigger, but was just lazy because I didn’t wanna make one. I think fitting will require some minor use of Bondo or something like that, but would like to know if anyone 3-D print a base part?

I to only like very minor weathering, get a tiny bit of work last night very subtle, and I like the result.
 
I am still waiting for metal tubing to house site parts, I have a 3-D piece of tubing, but I don’t like it so I am going to be using Brass stock for that.
 
My work so far.
 

Attachments

  • 8C47EF4E-2D78-4D2A-85B1-32A990F34AFB.jpeg
    8C47EF4E-2D78-4D2A-85B1-32A990F34AFB.jpeg
    5.7 MB · Views: 76
  • E794A7A3-8587-40C0-B833-A42953CDD565.jpeg
    E794A7A3-8587-40C0-B833-A42953CDD565.jpeg
    2.1 MB · Views: 74
  • 8F6171B2-983C-4412-B7E6-78C6051A6F4E.jpeg
    8F6171B2-983C-4412-B7E6-78C6051A6F4E.jpeg
    5.2 MB · Views: 76
  • BB2C5806-BA03-4C9A-8D4E-598E244C26A2.jpeg
    BB2C5806-BA03-4C9A-8D4E-598E244C26A2.jpeg
    6.2 MB · Views: 84
Here's a link to my build:


I can cast a trigger guard in black resin if you're interested. Just send me a pm.
 

Your message may be considered spam for the following reasons:

If you wish to reply despite these issues, check the box below before replying.
Be aware that malicious compliance may result in more severe penalties.
Back
Top