You are using an out of date browser. It may not display this or other websites correctly.
You should upgrade or use an alternative browser.
You should upgrade or use an alternative browser.
3x Slave 1 Model Kit Builds with Archive-X
- Thread starter skahtul
- Start date
And now it's time to address the lower hull or skirt. The chipping came out way too pronounced but as I am literally just using this kit to practice, I don't plan to spend the time to fix it. Also, I need to touch up the ramps as there was some masking fluid in a few spots that I could not see until I tore a bunch of the ramp-up ")
I started by breaking out the reference and putting down the mask:


Then I threw down the Aurore Pink and put on some more masking once the paint was dry:

With the additional masking dry I finished up the base colors by putting on a few layers of Boxcar Red:

I started by breaking out the reference and putting down the mask:
Then I threw down the Aurore Pink and put on some more masking once the paint was dry:
With the additional masking dry I finished up the base colors by putting on a few layers of Boxcar Red:
The last part for this section of the ship was the ramps, which I need to touch up once everything sits for a bit:

Once that was all dry, I tore off the masking which is when I discovered I had used a bit too much...


The combination of my lighting, camera and the contrasting colors makes this look very toy-like at this stage, but I can take care of that:

Once that was all dry, I tore off the masking which is when I discovered I had used a bit too much...
The combination of my lighting, camera and the contrasting colors makes this look very toy-like at this stage, but I can take care of that:
Okay, time to take care of that toy/cartoon look. I started with a dusting of Dark Grime. Below is a shot right before I applied that first dusting layer. You have to be careful with Dark Grime as it will cover up and mute things in a hurry.

After the Dark Grime which is already getting closer to what I am looking for:

After the Dark Grime, I did some brushwork using Lark Dark Grey and Surface Grey to add a few details. After that, it's all airbrush work tp add highlights and a few more details.
Here it is after the brushwork but before the final airbrush work:

This is basically the finished product for this part of the ship. I started with some airbrush work to shade certain areas, and add some extra weathering and damage to the ship. After that I took my favorite finalizing color Light Earth and gave it a very light dusting to bring it all home:


As usual, the camera does not pick it up 100% and the lower parts of the skirt and a few other areas look more muted than they really are.
After the Dark Grime which is already getting closer to what I am looking for:
After the Dark Grime, I did some brushwork using Lark Dark Grey and Surface Grey to add a few details. After that, it's all airbrush work tp add highlights and a few more details.
Here it is after the brushwork but before the final airbrush work:
This is basically the finished product for this part of the ship. I started with some airbrush work to shade certain areas, and add some extra weathering and damage to the ship. After that I took my favorite finalizing color Light Earth and gave it a very light dusting to bring it all home:
As usual, the camera does not pick it up 100% and the lower parts of the skirt and a few other areas look more muted than they really are.
Attachments
Gans
Sr Member
I know your not going all out on matching but here some pics I took if you haven't seen them
Slave 1 model from Star Wars Identities - Sydney 2019
Slave 1 model from Star Wars Identities - Sydney 2019
I know your not going all out on matching but here some pics I took if you haven't seen them
Slave 1 model from Star Wars Identities - Sydney 2019
Awesome, thanks! No, I did not come across those ones yet but they will be great when I build up the fine molds version as I will be trying for a bit more accuracy.
That mist coat really makes a big difference
Yeah, for sure. I feel the Light Earth really sets it off and make it look like an 'old' model thats been sitting in storage for a long time
Bubble Ape
Member
Awesome paint job you got there sir, realistic looks on slave-1 is quite hard to obtain and you're getting it
Thanks, it's a lot to unpack for sure!Awesome paint job you got there sir, realistic looks on slave-1 is quite hard to obtain and you're getting it
And the paint job continues... Seriously, I never thought it would take this long to paint a single ship! The layering, masking, dusting, re-layering, re-masking, dusting, touch up, etc. Taking way longer than expected but I am also having a lot of fun as I feel like I am unearthing some cool new ideas on how to paint my kits. I never appreciated how much the color underneath would affect subsequent layers and saturation.
Case in point, as you will see below, the wings and back section really turned out amazing by first putting down the Armour Yellow followed by just the right amount of Reefer White. Not sure how it looks on camera, but in real life, it's my favorite part of this entire build so far.
Okay, onto the final stages, wings, and engine area! Try as I might, I could not figure out a good way to mask these areas off with tape so I broke out the paint mask, this is slowly replacing my need for tape in certain situations.
Once that masking dries, throw down some Reefer White. Put this on thin and light and move around the wings a lot. There is a 'creaminess' you are trying to get here and it's easy to go too far.

Creaminess achieved
After the Reefer White, I applied a light coat of the DS Surface Grey to the upper section near the 'dish', the engine shroud, and the midsection at the very bottom. I followed up with a bit of SP Dark Grey for a bit of pre-weathering.


Creaminess achieved
After the Reefer White, I applied a light coat of the DS Surface Grey to the upper section near the 'dish', the engine shroud, and the midsection at the very bottom. I followed up with a bit of SP Dark Grey for a bit of pre-weathering.
It's at this point that I start to break out all my final weathering paints which include enamel washes, oil washes, Tamiya Weather Master sets, and a few other paint types. Now as I understand it ILM did not use many, if any washes but I really like the way some of them, especially the oil add authenticity to the mechanical parts. I used to use more of an Adam Savage approach and give it all up and then wipe it down but I find it just changes the overall hues way too much. Since then I have developed more of a targeted approach so we will see how that goes here.
The tools for weathering have been selected, this is literally my favorite part of the build and the reason I like building models... As I have attempted to emulate (poorly) the techniques that I think ILM used sometimes this stage has changed a lot as it's not all about washes and kind of happens more along the way which is in itself very interesting.
I went with a Tamiya flat black for the cockpit since I am not doing an interior for this project.

I went with a Tamiya flat black for the cockpit since I am not doing an interior for this project.
Not really sure why, but I thought I would share a bit of my office. These are pretty much my 'tools' of the trade that I use for all my builds.

This is just one wall of my office where I do the majority of my work. I would like to note that the lamp shown below has been a game changer. The best light really is light that is above and behind you and this lamp allows me to put light where ever I want.

Lastly, this is where I take most of my pictures, something I am constantly trying to improve on:

This is just one wall of my office where I do the majority of my work. I would like to note that the lamp shown below has been a game changer. The best light really is light that is above and behind you and this lamp allows me to put light where ever I want.
Lastly, this is where I take most of my pictures, something I am constantly trying to improve on:
Analyzer
Master Member
Love the weathering and chipping!
The only thing I wonder is if that yellow green on the hull should be more of a grey green with less yellow? ike that face on picture in Sculpting a Galaxy (can't find it online, but below is a similar hue)
Ot maybe that is just my preference
Maybe it has more to do with the lighting?

Of course, maybe it is accurate, and I have seen replicas that match the color you have like this one
I am kind of torn how to approach mine

The only thing I wonder is if that yellow green on the hull should be more of a grey green with less yellow? ike that face on picture in Sculpting a Galaxy (can't find it online, but below is a similar hue)
Ot maybe that is just my preference
Maybe it has more to do with the lighting?
Of course, maybe it is accurate, and I have seen replicas that match the color you have like this one
I am kind of torn how to approach mine
Love the weathering and chipping!
The only thing I wonder is if that yellow green on the hull should be more of a grey green with less yellow? ike that face on picture in Sculpting a Galaxy (can't find it online, but below is a similar hue)
Ot maybe that is just my preference
Maybe it has more to do with the lighting?
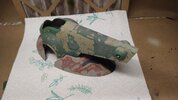
View attachment 1565278
Of course, maybe it is accurate, and I have seen replicas that match the color you have like this one
I am kind of torn how to approach mine
View attachment 1565279
Yes, agreed 100% and that was my thought when flipping through my Sculpting a Galaxy book.
That is one of the things I will change up in the next build for sure. I did not have light green on hand to mix but that is on the way now. Also, I see a bit of green around the skirt in that second image, not sure I have seen that before.
I discovered later that the Light Reefer Grey, followed by the Olive Oxide and then hit with the darker Coach Green was a great match. So I will probably try that and the light green over grey and see where it lands.
Similar threads
- Replies
- 2
- Views
- 319
- Replies
- 1
- Views
- 265