3d Printed Doctor Who Props by Doctor Octoroc (building & finishing thread)

Status
Not open for further replies.
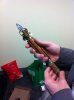
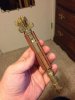
Well, after three coats of acrylic metallic gold brushed on, the texture was offset enough that I felt safe giving the main parts a couple of coats of Krylon clear gloss acrylic spray, and it turned out not bad at all...it smoothed things out considerably! So once everything's painted (I still have to do the "wood" grips) I'll start weathering it (Doc, any drybrushing tips will be greatly appreciated, as I'm a bit of a novice with it) and then figuring out the electronics. Progress is slow but steady...

Cool! As far as dry brushing, the key is to put a small amount of paint on a mixing palette (a piece of paper works fine, that's what I used) and then mix it around as if you were mixing two colors. The whole concept of dry brushing is that the paint is practically dry when you apply it, so less paint the better to start off with and you can use more on the next passes if that doesn't seem like enough. Feel free to use a crappy brush, even if the bristles come out - they'll add some extra nicks in the finish once it dries and you pull them out! Quick back and forth motion across the piece is key, and to start, only the tip of the brush running across. You can push it into the piece more and more once you see how the effect is coming along. Ease into it slowly until you see the desired effect.

To recap: Small amount of paint, practically dry, quick back and forth movements with the tip, and ease into heavier application until you see the effect you want. Once you get the hang of it, you can reach the same consistency over the whole piece, but even if it's not perfect, that'll only add to the effect - that's the beauty of dry brushing, it's supposed to look weathered and worn!

It's up to you if you want to run sideways across the piece or up and down along it - I generally go at an angle at opposite directions and cross hatch, unless you have a specific directional wear for the item - in this case, I'd stick with random and diagonal so it looks naturally worn down - if you go too horizontal it may look manufactured, and if you go too vertical it could fill in the grooves too well and it will eliminate the effect.

Another tip is to do a dark base coat (the color of the wear) first, then the lighter over coat (color of the actual material before wear). This way you can lay on the dry brushing heavier and what is left unpainted will be the wear. If you've already done a light over coat (color of the piece before wear) then go very light on the dark dry brushing.

Hope that helps. Youtube I'm sure has some video tutorials, so you can get a feel for the way it looks to do what I described above lol.
 
Last edited:
Cool! As far as dry brushing, the key is to put a small amount of paint on a mixing palette (a piece of paper works fine, that's what I used) and then mix it around as if you were mixing two colors. The whole concept of dry brushing is that the paint is practically dry when you apply it, so less paint the better to start off with and you can use more on the next passes if that doesn't seem like enough. Feel free to use a crappy brush, even if the bristles come out - they'll add some extra nicks in the finish once it dries and you pull them out! Quick back and forth motion across the piece is key, and to start, only the tip of the brush running across. You can push it into the piece more and more once you see how the effect is coming along. Ease into it slowly until you see the desired effect.

To recap: Small amount of paint, practically dry, quick back and forth movements with the tip, and ease into heavier application until you see the effect you want. Once you get the hang of it, you can reach the same consistency over the whole piece, but even if it's not perfect, that'll only add to the effect - that's the beauty of dry brushing, it's supposed to look weathered and worn!

It's up to you if you want to run sideways across the piece or up and down along it - I generally go at an angle at opposite directions and cross hatch, unless you have a specific directional wear for the item - in this case, I'd stick with random and diagonal so it looks naturally worn down - if you go too horizontal it may look manufactured, and if you go too vertical it could fill in the grooves too well and it will eliminate the effect.

Another tip is to do a dark base coat (the color of the wear) first, then the lighter over coat (color of the actual material before wear). This way you can lay on the dry brushing heavier and what is left unpainted will be the wear. If you've already done a light over coat (color of the piece before wear) then go very light on the dark dry brushing.

Hope that helps. Youtube I'm sure has some video tutorials, so you can get a feel for the way it looks to do what I described above lol.

Thanks for the quick tutorial! I think I get the idea...and the nice thing about the Alternate 8th sonic is that all of the pictures I've ever seen of it have been ones where it's looked well-used--the other sonics we see in DW for the most part look fairly well-maintained until they die violent deaths, but this one looks like it's seen constant heavy-duty action...
I'll have to look at some old brass items to see how I want to weather this and the best colors to use for wear...and I found a paint color called "Patina" that I think will work perfectly for me when I get to that stage...
 
Something I stumbled upon tonight that I wanted to share with everyone who's putting electronics into their Alternate 8th Sonic:

Doctor Who Paul McGann new costume and panel - Armageddon - YouTube

This was the unveiling of Paul McGann's "new look" as the 8th Doctor...I'll be honest, I haven't actually watched the entire clip, but at around the 47-second mark you'll see why I felt the need to pass this on--we see the alternate sonic in activated mode, and it sounds as though Weta quite literally just used the sound chip from the CO 11th Sonic...this may be old news to some folks, but it stopped me in my tracks...
 
...and it might be for naught in my case, because I'm trying to VERY carefully string the electronics from the CO 11th Sonic through the super-slim body of the Alt 8th Sonic, and at least for me it's turning out to me almost impossible. Falling back to Plan B and rigging her for just the light...but I'll keep the CO electronics handy just in case one of you folks come up with a solution...
 
Unless Im mistaken, It was just one guy from Weta who made it, so it wouldn't surprise me at all if he just cannibalized a CO 11th for the sound. Im definitely going to be trying it! but it might be a bit down the road as I haven't even started to paint or anything yet! But good find!!! I was going to try and a trans temporal since it has more sounds, but i didn't even know that his made sound!
 
Okay, I'm tabling the electronics for a while--a few ideas are brewing but I need to re-acquaint myself with the art of soldering first--but I went forward with painting and weathering and I'm eager to hear what everyone thinks. I gave the "brass" parts of mine three coats of FolkArt Metallic Gold acrylic, then a couple of coats of Krylon clear gloss spray. The "wooden" grips got a single coat of Apple Barrel Real Brown gloss acrylic and then also got the Krylon clear coat (it looks more like wood than the photo lets on...the grain isn't really that prominent on the actual prop, so I'm not sweating it). Before attaching the grips, I did a little dry-brushing with Apple Barrel Black acrylic--I tried to be as light as I could--and then used some VERY watered-down Folk Art Patina acrylic on select spots. I used FolkArt Metallic Copper for the emitter wires (not in the picture) and the small "handle" on the bottom section. I glued the grips onto the main body and put everything else together save for the emitter bulb and cables and button assembly to test-fit it all, and figured I'd snap a picture to share; it's below (I'm editing this post because I thought the pics would be formatted in the text, and my browser's being stupid for some reason), side-by-side with the pic of the original McGann prop I used for reference.
 

Attachments

  • SonicMcGannBF.jpg
    SonicMcGannBF.jpg
    161.1 KB · Views: 725
  • SonicMcGannInProgress.JPG
    SonicMcGannInProgress.JPG
    2.7 MB · Views: 545
Last edited:
I'm finally going to be going out and buying some paint for my 10th sonic. I don't really know much of anything about paint, or painting for that matter. I've read mention of both acrylic and enamel paints in this thread. Is one better than the other? How are they different in terms of being used for this?

Oh and @ TickTockMan, I don't know much about the 8th doctors sonic but I'd say it's looking good!
 
Okay, I'm tabling the electronics for a while--a few ideas are brewing but I need to re-acquaint myself with the art of soldering first--but I went forward with painting and weathering and I'm eager to hear what everyone thinks. I gave the "brass" parts of mine three coats of FolkArt Metallic Gold acrylic, then a couple of coats of Krylon clear gloss spray. The "wooden" grips got a single coat of Apple Barrel Real Brown gloss acrylic and then also got the Krylon clear coat (it looks more like wood than the photo lets on...the grain isn't really that prominent on the actual prop, so I'm not sweating it). Before attaching the grips, I did a little dry-brushing with Apple Barrel Black acrylic--I tried to be as light as I could--and then used some VERY watered-down Folk Art Patina acrylic on select spots. I used FolkArt Metallic Copper for the emitter wires (not in the picture) and the small "handle" on the bottom section. I glued the grips onto the main body and put everything else together save for the emitter bulb and cables and button assembly to test-fit it all, and figured I'd snap a picture to share; it's below (I'm editing this post because I thought the pics would be formatted in the text, and my browser's being stupid for some reason), side-by-side with the pic of the original McGann prop I used for reference.

Looks great! I still haven't got my paints yet. Need to see how bad bills & life have obliterated my fundage first.
 
Looks great! I still haven't got my paints yet. Need to see how bad bills & life have obliterated my fundage first.

Thanks! As I've probably mentioned before, I don't have any real craft stores in my area, so all of the paints I listed above were found at Wal-Mart...for a 2-ounce bottle, it's less than two bucks, so you can get a decent variety of colors there without breaking the bank...
 
I'm finally going to be going out and buying some paint for my 10th sonic. I don't really know much of anything about paint, or painting for that matter. I've read mention of both acrylic and enamel paints in this thread. Is one better than the other? How are they different in terms of being used for this?

Oh and @ TickTockMan, I don't know much about the 8th doctors sonic but I'd say it's looking good!

The best way I can describe the difference between the two in working with both is that acrylic lays more the way you brush it on (and tends to show brush strokes more prominently if you don't lay it on even) while enamel fills in on its own a bit. If you're less experienced, using enamels will do you better to have a finer paint job, but on the down side they're not as easy to clean up if you make mistakes - you'll have to be careful with your application. Acrylics are also more likely to chip off in the case of dings, so you'll need a clear topcoat to protect it - of course I'd use a varnish or lacquer over either kind of paint anyway, it's just smarter to protect the finish.

And TickTock, looking great!!!
 
And TickTock, looking great!!!
Thanks, Doc--it wouldn't have been possible without you! I just realized that I might have been thinking about the electronics all wrong...I was thinking just in terms of the narrow main body, but looking at the design as a whole, I could probably run the speaker up into the top section with no problem at all...those little slits along the fins would be perfect for letting the sound out! So with that and the LED in the top piece, I could put the circuit board in the main body just above the switch and run the battery wires down to the tail end...it just might work!
Oh, and here's a thought for those who are looking to customize their sonics a bit...most of you have probably seen the poster for the 50th Anniversary Special "Day of the Doctor"...If you look closely, John Hurt's Doctor (whatever he's supposed to be...I'm leaning toward an aged 8th Doctor myself, but we'll find out soon enough) is wielding a RED sonic...I took a look at the highest-resolution images I could find, but I couldn't really see any detail beyond the color, so the question comes up--might the Hurt Doctor be using an embryonic version of the design Christopher Eccleston used as the Ninth, or is this perhaps a variant of the Alternate 8th sonic...or perhaps an entirely different design? Again, we'll find out for sure in November, but if any of you wanted to do something a little different, this could be a good jumping-off point for some conjectural paint jobs or electronics setups...
 
Thanks, Doc--it wouldn't have been possible without you! I just realized that I might have been thinking about the electronics all wrong...I was thinking just in terms of the narrow main body, but looking at the design as a whole, I could probably run the speaker up into the top section with no problem at all...those little slits along the fins would be perfect for letting the sound out! So with that and the LED in the top piece, I could put the circuit board in the main body just above the switch and run the battery wires down to the tail end...it just might work!

I had the same methodology, and indeed it will work to do it like this, but when I had the circuit assembled and began closing the screwdriver up - it was too much! I couldn't for the life of me get everything to fit. I realized that WIRE LENGTH is CRUCIAL! I'm sure the Lightsaber guys already know, but keep those wires short! Between trying to MAKE everything fit and the process of pulling everything apart to shorten my wires I ended up destroying the CO sound circuit and am now waiting for a Build Your Own Sonic core to replace it...

I hate sitting down to work on a prop during a nice, relaxing afternoon, only to systematically destroy my own work and set myself back a few weeks... :facepalm

If only I'd kept the wires shorter! :lol

Great paint work, TickTockMan! Those metallics came out looking great! Hope you enjoy more success with the electronics than I!
 
I've found standard wood sealer , or filler spray primer very good for sealing the fairly porous Shapeways material , after a light coat or spray a gentle sanding, will key the surface and make for a stable surface , I must say I do use a base coat either white or grey , first before I use anything else as this tend to show up the surface detail better and makes for a better finish


Sent from my iPad using Tapatalk HD
 
I had the same methodology, and indeed it will work to do it like this, but when I had the circuit assembled and began closing the screwdriver up - it was too much! I couldn't for the life of me get everything to fit. I realized that WIRE LENGTH is CRUCIAL! I'm sure the Lightsaber guys already know, but keep those wires short! Between trying to MAKE everything fit and the process of pulling everything apart to shorten my wires I ended up destroying the CO sound circuit and am now waiting for a Build Your Own Sonic core to replace it...

I hate sitting down to work on a prop during a nice, relaxing afternoon, only to systematically destroy my own work and set myself back a few weeks... :facepalm

If only I'd kept the wires shorter! :lol

Great paint work, TickTockMan! Those metallics came out looking great! Hope you enjoy more success with the electronics than I!

Thanks, and thanks for the heads-up about the electronics! I'm definitely proceeding with caution. What lengths would you suggest for the LED and speaker wires?
 
That is awesome TickTockMan!!! I hope mine turns out that well!
Ive got 1 coat of pain on at the moment. How are the colors? I think I need to get some darker paint for the coppery bits


That is awesome TickTockMan!!! I hope mine turns out that well!
Ive got 1 coat of pain on at the moment. How are the colors? I think I need to get some darker paint for the coppery bits
http://farm8.staticflickr.com/7288/9765843561_25d8c0ca47.jpg

http://farm6.staticflickr.com/5349/9766065404_902cd15b65.jpg

Thanks! Yours is looking good as well. That's just about how mine looked after the first coat...the texture will smooth out a little bit after 2-3 coats, and that's when I gave mine a couple of clear coats before weathering it. I used a darker color for the emitter wires, but actually the color you're using brings out the detail better than what I used.

I'm still debating whether or not to try painting the inside of the emitter bulb or just leave it clear and let the LED do the work...
 
I'm still debating whether or not to try painting the inside of the emitter bulb or just leave it clear and let the LED do the work...

I was thinking about that as well. A coat or two of the Tamiya clear I used on all the FUD emitter bulbs and lenses would look nice on the inside - the problem is getting a good, consistent coating on just the inside of the bulb where it would mimic that bluish hue on the actual prop just right...a small brush will easily fit inside from the bottom (at least one less than 5mm in diamete since that's how big the hole is to allow for a 5mm LED to fit through), but it would be a real tedious operation to paint the full inside wall of that bulb.
 
I was thinking about that as well. A coat or two of the Tamiya clear I used on all the FUD emitter bulbs and lenses would look nice on the inside - the problem is getting a good, consistent coating on just the inside of the bulb where it would mimic that bluish hue on the actual prop just right...a small brush will easily fit inside from the bottom (at least one less than 5mm in diamete since that's how big the hole is to allow for a 5mm LED to fit through), but it would be a real tedious operation to paint the full inside wall of that bulb.

Yeah...plus, there's the task of making sure the waxy residue is off of the inside surface...I used dish detergent in hot water and cleaned out the inside with a Q-tip as best I could, but I don't know if I got it all out. I think I'm just going to leave mine as is...
 
Ok, I figure I would show what I have done with my 8th Doctor Sonic.

All you guys and your pennywhistles are looking good, but I decided not to start on that one yet. (if you don't get the reference, then you need to send me your screwdrivers for failure to know your 8th Doctor)

Here is my painted up 8th Doctor Sonic.
20130916_192052.jpg


Now I hear you all saying, "but TND, that Sonic is sooooooooo boring!!!!"

BUT I SAY NAY!!!!!

Can your sonic do this?????
20130916_192026.jpg


That's right, collapsible, spring loaded goodness.

Seriously, this was a fun project for today. Now I need to paint the 9th A and the 8th Alt in the next few weeks, but I am still in the planning stages for those. Thanks again to Doc Octoroc for making this run happen. Now you guys and your 8th alts, hurry up and finish so I can steal how you are detailing yours!!!
 
Thanks, and thanks for the heads-up about the electronics! I'm definitely proceeding with caution. What lengths would you suggest for the LED and speaker wires?

Truthfully, I'm not totally sure yet, but mostly likely no more than an inch long in most cases. I'm pretty sure the speaker, sound chip, and LED should all fit inside the top 'winged' section - albeit snugly. I imagine those wires are going to have to be annoyingly short...or thin. Alternatively I can also see how either the speaker or the sound chip (probably the speaker is easiest, if I remember the sizes right) could fit inside the handle (in front of the switch), and the other in the collar of the winged section.

Would still end up with annoyingly short wires - pain for assembly...but then there's probably enough space where the wires to the LED are running (into the bulb) to put a little extra length in and make assembly easier. Hope that made sense. I'm very tired! :wacko

When I get my replacement electronics I'll try to be of more help!

I love seeing everyone's progress! This is a fun project, and kinda feels like a group build in many ways.

The Next Doctor, very clever with the springiness! I don't see that nearly often enough with the usual 8th Sonic!
 
Status
Not open for further replies.
Back
Top