KingJawa
Active Member
Ok gang, after completing yet another LONG run of Han Solo's it's time I started a helpful hint builders thread. Many of the members here have asked me to post a blog thread which will help them in their journey of building the incredible Han in Carbonite prop.
The Han Solo in Carbonite has and always will be one of my favorite props from the Star Wars saga. I wanted to create a fun,affordable prop for everyone to enjoy. Here is my building tips that I hope will serve you well on your build.
Step # 1
When you receive your HIC from me you will notice the prop is in three sections: The head,mid section,and legs. It's a good idea to have a game plan and decide where and what you want this prop for. Example: Hanging on a garage door, or displaying in your man cave. This is an important step and will make things easier when you decide what your going to use as a mounting surface.
Step # 2
Decide what you will use as a mounting surface. I have used everything from sheet rock, to 1/2 thick plywood. For display purposes I suggest a good strong sturdy surface,high density fiberboard is also a good choice. Be creative here, you can mount this to just about any flat surface.
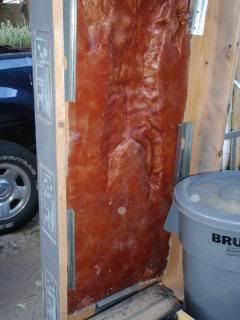
This example was done using 1/2 thick plywood

Once you have these steps in check you can start with some of the prep work.
DON'T RUSH YOUR BUILD!!!
The HIC is an eye catching prop, you don't want to half ass it and have regrets. Take your time and do it the right way, this will eliminate having to redo things, and just makes life easier.
Step # 3 - Prepping your friend
The 1st thing I like to do in prepping my Han is to wash the hands with warm water and soap. I've had to apply a good amount of mold release to these areas,washing helps the paint adhere better. Once this is done give those hands a nice LIGHT sanding.
BE CAREFUL WITH THIS STEP, THREAT THOSE HANDS LIKE YOUR 1ST BORN!!!
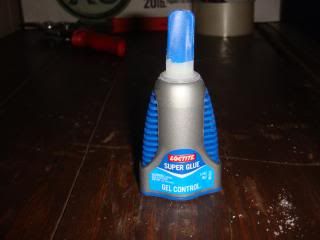
In the event you damage a finger, I strongly suggest using LocTite glue, it is the BEST glue for bonding roto casting resin. This glue dries clear,and is cheap. It can be purchased at any Home Depot of Lowe's for around $5-$7 bucks.
This is the kind I suggest using,there is a bunch of different kinds on the market. This one dries in like 5 seconds.
Step # 4 - Your Mounting Board
Decide on the overall size you want this prop to be. My HIC stands around 7" tall, but my dimensions may be off. I've heard numerous numbers thrown around over the yrs, but I'm not really sure what the EXACT size is. Most folks go with around 6" mounting boards, however this may not be screen accurate. You may want to check previous building blogs to determine the size.
This display HIC was reinforced with fiberglass mat, it was primarily used for 501st charity events. We needed to the prop to be strong,sturdy,and durable. The only downside to doing this, it's EXTREMELY HEAVY!!!

Step # 5 Attaching your HIC to mounting surface
Your HIC can be mounted using various materials, I like to use drywall screws. Remember this prop is lightweight so you don't need a ton of screws, just enough to keep him in place. All screw heads should be filled with bondo and sanded flush. The cut seams should also be filled with bondo,and yet again sanded flush. Trim any excess resin off at this step, a box cutter should be all you need. Take your time and make clean cuts,a sharp blade is always a good thing.
If you need to trim any of the flex foam ( on the backside of your HIC ) a box cutter or drywall knife is ideal for this. Keep in mind your HIC will compress when you screw him down,the foam does have some give, so don't fret if it's a bit high in some spots. Remember caulking,or bondo can also fix those areas too.
I use this hobby knife to cut the flex foam, I think it's used for cutting balsa wood.

Step # 6 Filling seams and gaps
This can be a bit tricky, but I really like to use silicone caulking to fill the outer edges of my Han. Buy the waterproof kind for bathrooms ( not the indoor outdoor kind ),it dries super fast,and is water resistant. Fill those areas around the body, I like to spread the caulking in to the body using rubber gloves. By doing so, you can fill in all those gaps,and give your HIC a clean tight bond.
Here you can see the outer areas of the HIC are filled using silicone caulking. Don't worry if you have big gaps to fill, the silicone is awesome for sealing these areas up. Go slow when applying, and use a rubber glove. Makes life a lot easier.

Step # 7 Priming your HIC
I like to use automotive primier on this rotocast resin. It bonds extremely well, and is not runny. If I can find a can I will post pix,any car store should carry it ( Pep Boys etc ). I suggest at least TWO even light coats,before final paint is applied.
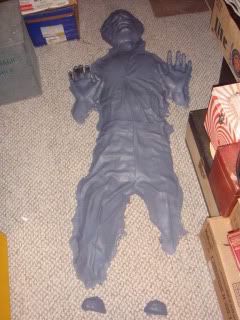
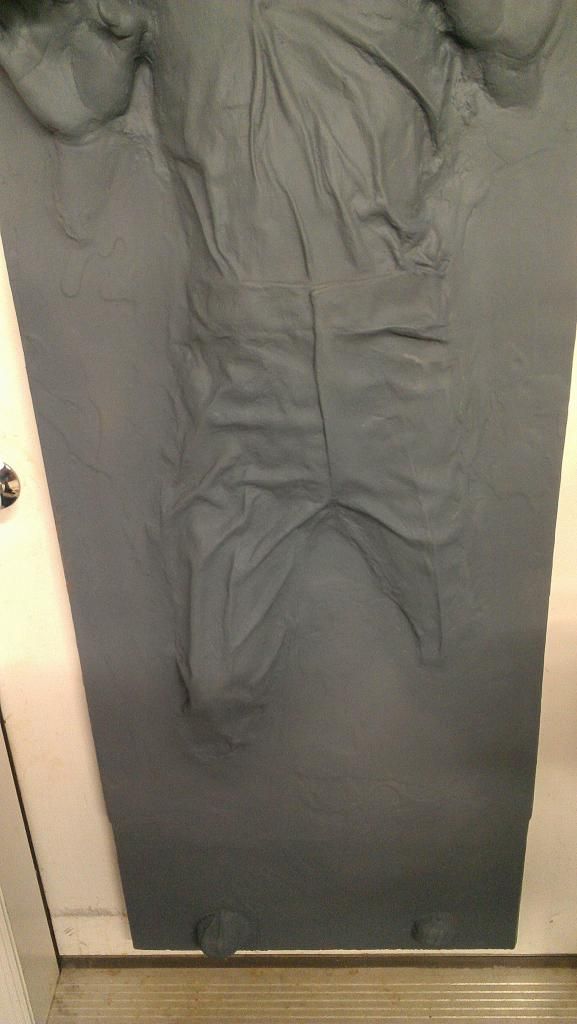
This HIC was primed using three coats of automotive primer. As you can see, the coating is even with NO runs. Light even coats are what your looking to achieve. If you spray heavy coats you will be sanding your butt off. Take your time and do it right.
Step # 8 Adding Carbonite Details
I've been asked this question a billion times, "How do you get the Carbonite effect"?????? Well, I find Elmer's Wood glue to be the best choice for recreating the Carbonite look. I simply pool the glue up in areas surrounding the cast and let dry. It's that easy. The only down side is the glue takes awhile to fully cure. Be patient with this step, if done correctly you can achieve an awesome effect in very little time. Again, the wood glue can be purchased at any Home Depot or Lowe's stores. I believe it's in the paint section off hand.
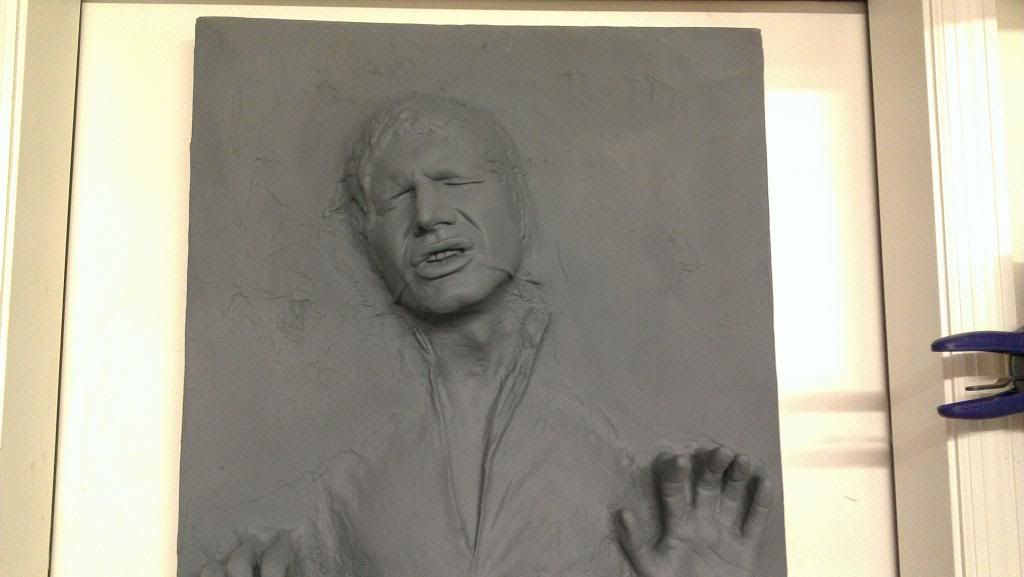
These details were added using Elmer's Wood Glue, as you can see it really "pops" when it's primed ( please note : final color has not been applied at this step )
Step # 9 Mounting the feet
I like to use a quick bond epoxy for this step. Once the feet are secure give a light seam of silicone to the outer edges. This will be more then enough to hold them in place. Remember the bigger of the two feet is Han's right foot,so it should be on the left side if looking straight on.
In this picture you will see the proper placement of the feet. Again,epoxy and a little silicone. This step is VERY easy.
Step # 10 Applying Finishing Color
Again,another debate......I like to use Rustoleum Gun Metal. I feel it gives the desired look,but again it's an ongoing debate. Choose a color you think is best.
Remember,these are just MY tips. There is no wrong or right way to build your HIC, be creative use what you have. I'm a big supporter of "budget building", I always like to see what ingenious ideas folks come with. If you've purchased a kit from me and you have your own thoughts and tips, I encourage you to please share them. Again, there is no wrong or right way.......I know I sound like Yoda")
I'm going to try and get some pix posted this weekend to help with this thread. I wanted to get a basic tutorial going so folks can get things rolling.
PLEASE,PLEASE,PLEASE KEEP THIS THREAD AS A BUILDERS GUIDE, DO NOT POST "HEY I WANT TO PURCHASE A HAN".
If you want to place an order just send me a private pm,thank you
Helpful Materials CheckList :
Drywall
1/2 thick plywood
Drywall screws
Waterproof silicone caulking
LocTite glue
Box cutter/ drywall knife
Automotive Primier
Rustoleum Gun Metal Paint
Bondo
Elmer's Wood Glue
Epoxy Glue
Sandpaper, various grades
The Han Solo in Carbonite has and always will be one of my favorite props from the Star Wars saga. I wanted to create a fun,affordable prop for everyone to enjoy. Here is my building tips that I hope will serve you well on your build.
Step # 1
When you receive your HIC from me you will notice the prop is in three sections: The head,mid section,and legs. It's a good idea to have a game plan and decide where and what you want this prop for. Example: Hanging on a garage door, or displaying in your man cave. This is an important step and will make things easier when you decide what your going to use as a mounting surface.
Step # 2
Decide what you will use as a mounting surface. I have used everything from sheet rock, to 1/2 thick plywood. For display purposes I suggest a good strong sturdy surface,high density fiberboard is also a good choice. Be creative here, you can mount this to just about any flat surface.
This example was done using 1/2 thick plywood

Once you have these steps in check you can start with some of the prep work.
DON'T RUSH YOUR BUILD!!!
The HIC is an eye catching prop, you don't want to half ass it and have regrets. Take your time and do it the right way, this will eliminate having to redo things, and just makes life easier.
Step # 3 - Prepping your friend
The 1st thing I like to do in prepping my Han is to wash the hands with warm water and soap. I've had to apply a good amount of mold release to these areas,washing helps the paint adhere better. Once this is done give those hands a nice LIGHT sanding.
BE CAREFUL WITH THIS STEP, THREAT THOSE HANDS LIKE YOUR 1ST BORN!!!
In the event you damage a finger, I strongly suggest using LocTite glue, it is the BEST glue for bonding roto casting resin. This glue dries clear,and is cheap. It can be purchased at any Home Depot of Lowe's for around $5-$7 bucks.
This is the kind I suggest using,there is a bunch of different kinds on the market. This one dries in like 5 seconds.

Step # 4 - Your Mounting Board
Decide on the overall size you want this prop to be. My HIC stands around 7" tall, but my dimensions may be off. I've heard numerous numbers thrown around over the yrs, but I'm not really sure what the EXACT size is. Most folks go with around 6" mounting boards, however this may not be screen accurate. You may want to check previous building blogs to determine the size.
This display HIC was reinforced with fiberglass mat, it was primarily used for 501st charity events. We needed to the prop to be strong,sturdy,and durable. The only downside to doing this, it's EXTREMELY HEAVY!!!
Step # 5 Attaching your HIC to mounting surface
Your HIC can be mounted using various materials, I like to use drywall screws. Remember this prop is lightweight so you don't need a ton of screws, just enough to keep him in place. All screw heads should be filled with bondo and sanded flush. The cut seams should also be filled with bondo,and yet again sanded flush. Trim any excess resin off at this step, a box cutter should be all you need. Take your time and make clean cuts,a sharp blade is always a good thing.
If you need to trim any of the flex foam ( on the backside of your HIC ) a box cutter or drywall knife is ideal for this. Keep in mind your HIC will compress when you screw him down,the foam does have some give, so don't fret if it's a bit high in some spots. Remember caulking,or bondo can also fix those areas too.
I use this hobby knife to cut the flex foam, I think it's used for cutting balsa wood.

Step # 6 Filling seams and gaps
This can be a bit tricky, but I really like to use silicone caulking to fill the outer edges of my Han. Buy the waterproof kind for bathrooms ( not the indoor outdoor kind ),it dries super fast,and is water resistant. Fill those areas around the body, I like to spread the caulking in to the body using rubber gloves. By doing so, you can fill in all those gaps,and give your HIC a clean tight bond.
Here you can see the outer areas of the HIC are filled using silicone caulking. Don't worry if you have big gaps to fill, the silicone is awesome for sealing these areas up. Go slow when applying, and use a rubber glove. Makes life a lot easier.

Step # 7 Priming your HIC
I like to use automotive primier on this rotocast resin. It bonds extremely well, and is not runny. If I can find a can I will post pix,any car store should carry it ( Pep Boys etc ). I suggest at least TWO even light coats,before final paint is applied.
This HIC was primed using three coats of automotive primer. As you can see, the coating is even with NO runs. Light even coats are what your looking to achieve. If you spray heavy coats you will be sanding your butt off. Take your time and do it right.

Step # 8 Adding Carbonite Details
I've been asked this question a billion times, "How do you get the Carbonite effect"?????? Well, I find Elmer's Wood glue to be the best choice for recreating the Carbonite look. I simply pool the glue up in areas surrounding the cast and let dry. It's that easy. The only down side is the glue takes awhile to fully cure. Be patient with this step, if done correctly you can achieve an awesome effect in very little time. Again, the wood glue can be purchased at any Home Depot or Lowe's stores. I believe it's in the paint section off hand.
These details were added using Elmer's Wood Glue, as you can see it really "pops" when it's primed ( please note : final color has not been applied at this step )

Step # 9 Mounting the feet
I like to use a quick bond epoxy for this step. Once the feet are secure give a light seam of silicone to the outer edges. This will be more then enough to hold them in place. Remember the bigger of the two feet is Han's right foot,so it should be on the left side if looking straight on.
In this picture you will see the proper placement of the feet. Again,epoxy and a little silicone. This step is VERY easy.

Step # 10 Applying Finishing Color
Again,another debate......I like to use Rustoleum Gun Metal. I feel it gives the desired look,but again it's an ongoing debate. Choose a color you think is best.
Remember,these are just MY tips. There is no wrong or right way to build your HIC, be creative use what you have. I'm a big supporter of "budget building", I always like to see what ingenious ideas folks come with. If you've purchased a kit from me and you have your own thoughts and tips, I encourage you to please share them. Again, there is no wrong or right way.......I know I sound like Yoda
I'm going to try and get some pix posted this weekend to help with this thread. I wanted to get a basic tutorial going so folks can get things rolling.
PLEASE,PLEASE,PLEASE KEEP THIS THREAD AS A BUILDERS GUIDE, DO NOT POST "HEY I WANT TO PURCHASE A HAN".
If you want to place an order just send me a private pm,thank you
Helpful Materials CheckList :
Drywall
1/2 thick plywood
Drywall screws
Waterproof silicone caulking
LocTite glue
Box cutter/ drywall knife
Automotive Primier
Rustoleum Gun Metal Paint
Bondo
Elmer's Wood Glue
Epoxy Glue
Sandpaper, various grades
Last edited: