Propsjonnyb
Well-Known Member
The 11th Doctor's Sonic.
http://www.therpf.com/asset.php?fid=219200&uid=8861&d=1378310113
Objective
I was challenged to produce a working accurate copy of the Nick Robbato 11th Doctor Sonic Screwdriver
Goals
To achieve at least 95%or more accuracy
To use the CO toy soundboard and power supply to provide lights and sound effects and to use the Wand Companies static Sonic Remote control as donors to facilitate the project
Solution
There were three main challenges , although the first was really was split into two, one to convert the static unit into a working replica, and two to remove the 'innards" of the static and replace them with a 'working' core and fixing the head to allow the replica to extend and deploy the claws, that were fixed on the remote, three was - what could be done to improve the toys poor sound and also could improvements be made to the core.
Before I started, I reviewed all the postings regarding the 11th Doctor's Sonic throughout the Replica Prop Forum, many of which offer extremely good and helpful advice on how to approach a conversion , I publicly acknowledge that I have used a number of these to save 're-inventing the Wheel'.
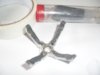
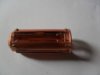
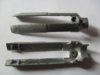
Firstly the remote was deconstructed into its component parts , to do this the piece was separated into its respective half's. The bottom half comes as one piece, the components are removed in this order , the copper end cap is normally spot glued on , a sharp bladed knife, inserted and rocked will loosen the cap, next is the handle and copper washer , then the black leather effect handle , the outer core was separated and kept , the inner 'core' was removed and discarded. The top half is disassembled , slightly differently as it comes as one solid piece with a copper locking ring to join the two half's together. Remove and retain the ring, the claws are fixed to the main assembly and are removed one at a time by removing the lower pivot pin, this can be done using a fine centre punch and a hammer, as each pin is removed the claw can be prized away, each claw needs to be filed down at each end where the pivot point was, until smooth.
http://www.therpf.com/asset.php?fid=219202&uid=8861&d=1378310178
Now the claws are removed you can see the nut & screw that hold the head together' remove and keep the nut and screw , the head splits into two, 'arm" pieces leaving a copper core cylinder and a black inner core.
http://www.therpf.com/asset.php?fid=219207&uid=8861&d=1378310356
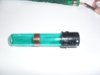
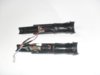
The black core end piece is cut off and retained - discard the remainder, the cylinder and arms need to be cut and filed down , to allow free movement , so the 'arms' that will hold the emitter head and core , can freely extend up and down. There is a lot of cutting and filing to be done and care must be taken to get this right or your sonic will not extend and retract properly , allow at least two days to this task alone ( it is that important to get right) the black end piece that was removed is glued to the bottom of the copper cylinder after adding an inner acrylic tube liner . The claws can be re-fitted to the head using the 'bracket' method outlined on the forum pages , you can see that the hollow claws have been filled with epoxy, but be careful not to cover the pivot point or they will not work , I preferred to use the claw holder available on Shapeways site and a custom set of tension springs , the effect is the same (you can use small cut down (steel only) safety pins - they do work! ) just make sure that everything in the head is secure.
http://www.therpf.com/asset.php?fid=219206&uid=8861&d=1378310330
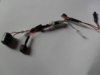
I now turned my attention to the CO toy and carefully removed the soundboard, power supply and led. Since the speaker on the toy is so small, I devised an additional fix and 'soundbox' made out of acryllic tube which effectually doubled the output sound . I also added an additional connector to the board and battery pack , making the power pack replaceable.
http://www.therpf.com/asset.php?fid=219208&uid=8861&d=1378310388
http://www.therpf.com/asset.php?fid=219205&uid=8861&d=1378310302
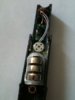
To the outer 'inner core' piece I re-fitted the bottom switch and the copper button . A further micro button switch was fitted to add to the inner core, these two switches were connected together and then connected to the switch position on the sound board and tested. The battery pack & sound board were the fitted in place inside the outer handle . I also added a high power 3mm green led replacing the CO toys original.
http://www.therpf.com/asset.php?fid=219204&uid=8861&d=1378310258
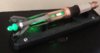
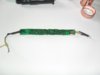
I wanted to add an additional feature to the core that's never been done before, since the Dr Who story line was/is that the TARDIS 'grows' the sonic, and the TARDIS console glows an emerald green, I tried to replicate this effect - after many failed attempts I ended up using two UV LEDs and a UV reactive fluorescent acrylic which makes the inner core and emitter head glow the same as the TARDIS core and the filming props head , I have developed this much, much further now , which means I can offer a core that is now very organic looking, adding a unique effect to an almost perfect prop replica.
http://www.therpf.com/asset.php?fid=210484&uid=8861&d=1375980446
The emitter core is then connected to the led to go in the emitter head and also connected to the sound board led connections and tested , the new core is fitted to the head with the emitter in place , and slid over the copper cylinder, the top and bottom pieces are re-connected, making sure the top half has it connection ring in place , the retained screws are reconnected securing the two halves together and the retaining rings screwed down and the sonic replica is finished.
Since the switch on the handle is never seen on screen , it was decided to hide this behind the faux leather handle in the same position , it is still easy useable and completely functional .
Since the inner core of the copper cylinder is fitted within the colored acrylic tube , this allows the emitter core to slide easily up and down, the connecting wires are secured to the inner black core with hot glue, this stops the core flying out if you flick it very hard also the copper core also has retaining lugs to 'lock' it in place .
The copper core was weathered to resemble the filming prop with the addition of faux rivet heads drilled out on the sonic remotes copper cure arms. A final addition was to add a grub screw to the emitter tip
A simple flick of the wrist will cause the head and inner core to extend and to " lock" and the claws to spring open , all the sound effects of the CO toy work by multiple presses of either the" hidden" button or the button on the base .
To close the remote - clasp the claws and apply gentle pressure - the emitter core will slide back into the handle and the claws will " lock" closed with a final gentle push.
The final result is vey close to the filming prop , it is only the limitation of the original manufacturing process that lets it down slightly , my intention is to remake the copper cylinder and the two part head and arms as per Nick Robatto's prop, meaning I will cast them as separate pewter castings , electroplate them and assemble them to finally replicate Nick' construction .
http://www.therpf.com/asset.php?fid=219200&uid=8861&d=1378310113
Objective
I was challenged to produce a working accurate copy of the Nick Robbato 11th Doctor Sonic Screwdriver
Goals
To achieve at least 95%or more accuracy
To use the CO toy soundboard and power supply to provide lights and sound effects and to use the Wand Companies static Sonic Remote control as donors to facilitate the project
Solution
There were three main challenges , although the first was really was split into two, one to convert the static unit into a working replica, and two to remove the 'innards" of the static and replace them with a 'working' core and fixing the head to allow the replica to extend and deploy the claws, that were fixed on the remote, three was - what could be done to improve the toys poor sound and also could improvements be made to the core.
Before I started, I reviewed all the postings regarding the 11th Doctor's Sonic throughout the Replica Prop Forum, many of which offer extremely good and helpful advice on how to approach a conversion , I publicly acknowledge that I have used a number of these to save 're-inventing the Wheel'.
Firstly the remote was deconstructed into its component parts , to do this the piece was separated into its respective half's. The bottom half comes as one piece, the components are removed in this order , the copper end cap is normally spot glued on , a sharp bladed knife, inserted and rocked will loosen the cap, next is the handle and copper washer , then the black leather effect handle , the outer core was separated and kept , the inner 'core' was removed and discarded. The top half is disassembled , slightly differently as it comes as one solid piece with a copper locking ring to join the two half's together. Remove and retain the ring, the claws are fixed to the main assembly and are removed one at a time by removing the lower pivot pin, this can be done using a fine centre punch and a hammer, as each pin is removed the claw can be prized away, each claw needs to be filed down at each end where the pivot point was, until smooth.
http://www.therpf.com/asset.php?fid=219202&uid=8861&d=1378310178
Now the claws are removed you can see the nut & screw that hold the head together' remove and keep the nut and screw , the head splits into two, 'arm" pieces leaving a copper core cylinder and a black inner core.
http://www.therpf.com/asset.php?fid=219207&uid=8861&d=1378310356
The black core end piece is cut off and retained - discard the remainder, the cylinder and arms need to be cut and filed down , to allow free movement , so the 'arms' that will hold the emitter head and core , can freely extend up and down. There is a lot of cutting and filing to be done and care must be taken to get this right or your sonic will not extend and retract properly , allow at least two days to this task alone ( it is that important to get right) the black end piece that was removed is glued to the bottom of the copper cylinder after adding an inner acrylic tube liner . The claws can be re-fitted to the head using the 'bracket' method outlined on the forum pages , you can see that the hollow claws have been filled with epoxy, but be careful not to cover the pivot point or they will not work , I preferred to use the claw holder available on Shapeways site and a custom set of tension springs , the effect is the same (you can use small cut down (steel only) safety pins - they do work! ) just make sure that everything in the head is secure.
http://www.therpf.com/asset.php?fid=219206&uid=8861&d=1378310330
I now turned my attention to the CO toy and carefully removed the soundboard, power supply and led. Since the speaker on the toy is so small, I devised an additional fix and 'soundbox' made out of acryllic tube which effectually doubled the output sound . I also added an additional connector to the board and battery pack , making the power pack replaceable.
http://www.therpf.com/asset.php?fid=219208&uid=8861&d=1378310388
http://www.therpf.com/asset.php?fid=219205&uid=8861&d=1378310302
To the outer 'inner core' piece I re-fitted the bottom switch and the copper button . A further micro button switch was fitted to add to the inner core, these two switches were connected together and then connected to the switch position on the sound board and tested. The battery pack & sound board were the fitted in place inside the outer handle . I also added a high power 3mm green led replacing the CO toys original.
http://www.therpf.com/asset.php?fid=219204&uid=8861&d=1378310258
I wanted to add an additional feature to the core that's never been done before, since the Dr Who story line was/is that the TARDIS 'grows' the sonic, and the TARDIS console glows an emerald green, I tried to replicate this effect - after many failed attempts I ended up using two UV LEDs and a UV reactive fluorescent acrylic which makes the inner core and emitter head glow the same as the TARDIS core and the filming props head , I have developed this much, much further now , which means I can offer a core that is now very organic looking, adding a unique effect to an almost perfect prop replica.
http://www.therpf.com/asset.php?fid=210484&uid=8861&d=1375980446
The emitter core is then connected to the led to go in the emitter head and also connected to the sound board led connections and tested , the new core is fitted to the head with the emitter in place , and slid over the copper cylinder, the top and bottom pieces are re-connected, making sure the top half has it connection ring in place , the retained screws are reconnected securing the two halves together and the retaining rings screwed down and the sonic replica is finished.
Since the switch on the handle is never seen on screen , it was decided to hide this behind the faux leather handle in the same position , it is still easy useable and completely functional .
Since the inner core of the copper cylinder is fitted within the colored acrylic tube , this allows the emitter core to slide easily up and down, the connecting wires are secured to the inner black core with hot glue, this stops the core flying out if you flick it very hard also the copper core also has retaining lugs to 'lock' it in place .
The copper core was weathered to resemble the filming prop with the addition of faux rivet heads drilled out on the sonic remotes copper cure arms. A final addition was to add a grub screw to the emitter tip
A simple flick of the wrist will cause the head and inner core to extend and to " lock" and the claws to spring open , all the sound effects of the CO toy work by multiple presses of either the" hidden" button or the button on the base .
To close the remote - clasp the claws and apply gentle pressure - the emitter core will slide back into the handle and the claws will " lock" closed with a final gentle push.
The final result is vey close to the filming prop , it is only the limitation of the original manufacturing process that lets it down slightly , my intention is to remake the copper cylinder and the two part head and arms as per Nick Robatto's prop, meaning I will cast them as separate pewter castings , electroplate them and assemble them to finally replicate Nick' construction .