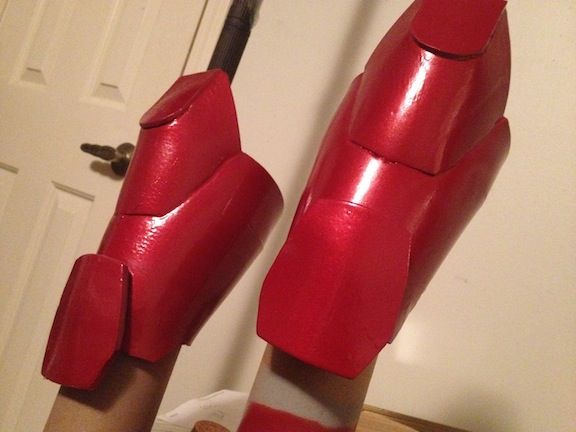
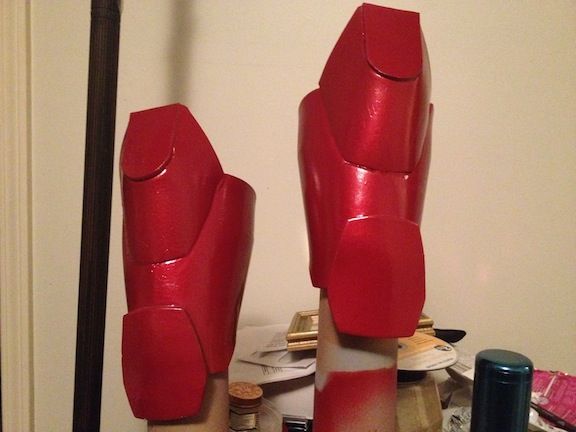
WIP first Iron Man Mark III (plastic-coated) foam build: Getting a bit pic heavy

Re: WIP first Iron Man foam build+knowledge share

By the way, sorry this is the link to the bevel cutter:

http://www.amazon.com/Logan-WC-6010...id=1346362192&sr=8-1&keywords=foamwerks+bevel

you can also get it at Jo-ann stores if you have one in town. They have a ton of discounts too. just a tip: be sure that you get replacement blades and keep them sharp, and be sure you adjust the blade length deep enough to cut 99% to 100% of the way through the foam. Practice on scrap! :)
 
Re: WIP first Iron Man foam build+knowledge share

Man, I very much appreciate the compliments, especially coming from you... your blue mark VI is unreal! Great work.

Yes, the smoothcast I just bought a BUNCH of chip brushes... you will go through them like crazy. It is, as far as I know, exactly like Xrobots method, except for I only had 321. So I did the tests, which seem to be holding up after 48 hrs of curing on the legs.

If you plan on using the 321, I would say just be prepared to work quickly and carefully. that stuff gets thick quick, which makes it tough to keep smooth. I think I literally used about a tsp of part A and be for each "outing" on the leg. you just have to get a feel for it... after you first slather it on, keep brushing lightly to smooth as well as you can, and do it in good lighting so you can watch for drips. this will save you time in sanding. I feel like as soon as it gets gell-y, it's hard to keep a smooth layer, because it certainly doesn't self-level like the 65D.

Anyway, take your time with letting the layers dry, and be prepared to do at least some light sanding. For me, it worked out great... the left leg is not finished painting, I actually had to go buy more red... but I think it turned out smoother than the right (pictured).

anyway dude sorry I get long winded. Good luck and thanks again, can't wait to see what you come up with!(y)thumbsup

Hey thanks for the compliments man. And don't worry about the long responses... the detail in the information you provide helps out everyone here! Thanks for the tips!
 
Re: WIP first Iron Man foam build+knowledge share

Hey thanks for the compliments man. And don't worry about the long responses... the detail in the information you provide helps out everyone here! Thanks for the tips!

Cool dude thanks. I figure if you feel like reading it, I'll include some good details for clarity's sake.

On that note, I wanted to add that it is not a total pain to use the 321, I hope I didn't make it sound like that. It was pretty easy actually. Part of the point I wanted to also make was that using small amounts at a time will help you not waste it... and I think you'll find that just a brush-full goes a LONG way. just pay attention to what you're doing :cheers
 
Re: WIP first Iron Man foam build+knowledge share

By the way, sorry this is the link to the bevel cutter:

Amazon.com: Foamwerks Straight/Bevel Cutter: Arts, Crafts & Sewing

you can also get it at Jo-ann stores if you have one in town. They have a ton of discounts too. just a tip: be sure that you get replacement blades and keep them sharp, and be sure you adjust the blade length deep enough to cut 99% to 100% of the way through the foam. Practice on scrap! :)
Thank you just got one.I had been looking for these everywhere locally with no luck.
 
Re: WIP first Iron Man foam build+knowledge share

Thank you just got one.I had been looking for these everywhere locally with no luck.

No problem man, I am always glad to help. So you know, if you look at that fourth pic on page one of this thread, you will see the little marks or "notches" on next to the blade on the cutter. If you're using 6mm foam, I generally used it right where you see the blade there... just a little bit past the second notch. You'll see what I mean when you get it.

to do cuts as in the seventh pic down, you want the blade a hair above the top notch. when I say this I mean the top edge of the blade, closest to the handle. I hope this makes sense. Also, if you're cutting around curves, just be careful and be sure the blade is sharp enough and take your TIME!! that's a good starting point anyway. (y)thumbsup:thumbsup
 
Re: WIP first Iron Man foam build+knowledge share

Guys, I'm beginning to want to get some 65D. Though the 321 does work fairly well, it's a little too annoying to work with. i'll see how the forearms look tomorrow. Hmmmmm
 
Re: WIP first Iron Man foam build+knowledge share

Let me know if this is asking for too much, but would you be able to take pics of your pieces after each layer of smoothcast and before/after sanding? I'm really curious as too how thing your coats are if your piece still have good flex.
 
Re: WIP first Iron Man foam build+knowledge share

Let me know if this is asking for too much, but would you be able to take pics of your pieces after each layer of smoothcast and before/after sanding? I'm really curious as too how thing your coats are if your piece still have good flex.

haaaa ok man! I will on the next pieces. Not bad for foam huh? Man I go back and forth on the 321... the lower forearms actually turned out great... 2 things: the clearcoat I have is kind of hard to work with. at first it was great, but I can't figure out what I'm doing wrong. I keep getting this "mist" of clearcoat that sits on top while I'm still working on the same coat. I'm guessing because it is kind of humid and it's fairly fast drying. I dont know.

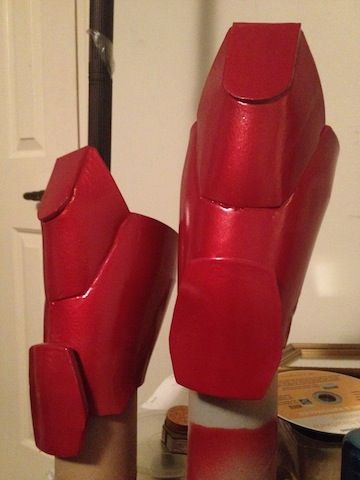
Thanks for your encouragement that means alot coming from you! ok so here's the forearms. I tried to take a few different pics to show the finish... it's hard to capture. again the color is MUCH deeper than it looks. and more metallic. anyways...

d3c14aed.jpg


ac0b95eb.jpg


7cf35632.jpg


I did sand with 500 grit after the first 321 coat but I'm actually not sure it's necessary. Plus I forgot to mention I think it does help to turn the pieces as they dry from the 321 a little if you can. I just coat them with 321 and go back around them very lightly brushing until it's pretty even.
 
Re: WIP first Iron Man foam build+knowledge share

Let me know if this is asking for too much, but would you be able to take pics of your pieces after each layer of smoothcast and before/after sanding? I'm really curious as too how thing your coats are if your piece still have good flex.

Sorry I meant to also say that they have pretty good flex still, similar to my test pieces. In fact I would say they are more flexible than not. Almost the same flex as coating the foam in pva, only slightly more rigid. very lightweight still, doesn't feel like heavy plastic.

The coats are pretty dang thin, in fact in my mind all i want is a plastic layer that the duplicolor can simulate the look of metal on. so far doesn't seem like it is going to crack at all, just crease maybe if you bend it inward too hard.
 
Last edited:
Re: WIP first Iron Man foam build+knowledge share

Me and my buddy watched all of the Tut vids from xrobots, stealth, etc...and everything is awesome EXCEPT Smooth-on 65D!!! Xrobots made it look so easy in the video, but we are havig a terrible time with the 65D. No matter what you do, it goes on super thin, but needs a lot of difficult sanding...I personally think yours looks great, but beware of the 65D. He's pretty well versed in painting and filling and such, and he's having a hard time. We both have stuck with 4 layers of MOD podge (diluted 3:1) 2-3 layers of plasti-dip, adhesive promotor, primer, paint, and lots of clearcoat. not bad at all. Nice work!
 
Re: WIP first Iron Man foam build+knowledge share

JUST TO CLARIFY, the sanding wasnt a problem, it was the fact that when you try to sand it, it pulls up layer by layer...any advice?
 
Re: WIP first Iron Man foam build+knowledge share

Me and my buddy watched all of the Tut vids from xrobots, stealth, etc...and everything is awesome EXCEPT Smooth-on 65D!!! Xrobots made it look so easy in the video, but we are havig a terrible time with the 65D. No matter what you do, it goes on super thin, but needs a lot of difficult sanding...I personally think yours looks great, but beware of the 65D. He's pretty well versed in painting and filling and such, and he's having a hard time. We both have stuck with 4 layers of MOD podge (diluted 3:1) 2-3 layers of plasti-dip, adhesive promotor, primer, paint, and lots of clearcoat. not bad at all. Nice work!

Man thanks for the input and the compliments! Well, it just so happens that I can't afford the 65D right now haha... while at the same time I felt very good about the forearms with very little sanding. In fact, as soon as the first layer dried, I considered not even sanding, though it did have some tiny bubbles/holes. The only reason I sanded the forearms is that I felt like I had to:) The 321 is good but it takes practice painting it on, so as to not have runs and or drips.

It's very good for smaller areas, but it ends up taking a lot of plastic cups and chip brushes. But so far the RESULT has been pretty dang nice.

I have been running some tests on 6mm foam with the exact method you are referring to. I just kind of put it off. Only difference is that I used modpodge spray, and attempted to "heat seal" the foam with a hair dryer ahead of time. On my first attempt, it ended up easily cracking when I applied any flex to it. I am now in the middle of more tests. I have several questions about that method and clear coat in general if you wouldn't mind helping me out, seeing that you've had success with it. Here's a few:

1.) how much time did you leave between coats of all materials (mod, plasti, adhesion, etc.)
2.) I assume the humidity affects the drying, etc... what environment are you working in as far as wind, humidity, temperature, etc.?
3.) On the Clearcoat, I have great results and I have mixed results. Docholiday recommended Krylon triple thick Clear Glaze, which looks great, and worked well at first, but sometimes I get patchy, cloudy areas, and sometimes I have the problem of a tiny mist of the clearcoat laying on top of the layer I just sprayed on... does this make sense? I guess it was fairly humid in the garage when I laid it down, but it's also done that in less humid conditions.
4.) What spraying technique do you use when clearcoating... for example, do you use a back and forth continuous spray, etc.? I am following the can directions, going left to right all up and down the piece I'm working on.

Sorry for the huge response, thank you for your words and input!!(y)thumbsup:thumbsup
 
Re: WIP first Iron Man foam build+knowledge share

JUST TO CLARIFY, the sanding wasnt a problem, it was the fact that when you try to sand it, it pulls up layer by layer...any advice?

Well, I will say first of all, are you using 321 or are you still using 65D? What I do is dab a little on the head of my brush, then lay and spread it fairly quickly but carefully. As I go around a piece, I hold it up to a light source to check for runs and patchy areas, etc. I try to keep my brush VERY lightly going over the piece in long strokes as I lay it down bit by bit, and if you keep turning the piece carefully, it will smooth itself out. I think the key is to keep checking it for runs, etc., to get it as clean as you can before even attempting sanding.

I'm not sure what you mean by "layer by layer," I find it difficult when sanding to tell if I'm actually getting down into the PVA under the 321...so I might try to not even sand in the future, or at least keep it very minimal. I'm guessing your problem may be that you need a finer grit, like up in the 500s, or perhaps REALLY be sure the plastic is dry before sanding. Could you please clarify what you mean by "layer by layer?" Thanks man!! (y)thumbsup
 
Re: WIP first Iron Man foam build+knowledge share

the key is the mod podge LIQUID. not the spray. I made the same mistake. The bottle is $7.99 at walmart or Hobby Lobby. I bought a box of cheap brushes from Harbor Freight in advance lol I didnt heat the foam with the dryer, because the idea of the mod podge/ water mix id to absorb into the foam (4-6 layers) to retain the shape you worked on previously. If you heat it, you warp the shape and melt some of the hot glue. As far as the clearcot spray, he used clearcoat for PLASTIC BUMPERS at autozone...its designed to flex and not crack. its pretty legit. NEVER continuously spray. shoot slightly before you hit the piece left and right and dont let off until you are a couple inches off of it. ( follow-through with the motion to carry the spray pattern). Thanks again
 
Re: WIP first Iron Man foam build+knowledge share

Try Krylon Low Oder Clear Finish Gloss. It says it's applicable for craft foam so I wouldn't it flexes a bit. Latex based too I believe.
 
Re: WIP first Iron Man foam build+knowledge share

the key is the mod podge LIQUID. not the spray. I made the same mistake. The bottle is $7.99 at walmart or Hobby Lobby. I bought a box of cheap brushes from Harbor Freight in advance lol I didnt heat the foam with the dryer, because the idea of the mod podge/ water mix id to absorb into the foam (4-6 layers) to retain the shape you worked on previously. If you heat it, you warp the shape and melt some of the hot glue. As far as the clearcot spray, he used clearcoat for PLASTIC BUMPERS at autozone...its designed to flex and not crack. its pretty legit. NEVER continuously spray. shoot slightly before you hit the piece left and right and dont let off until you are a couple inches off of it. ( follow-through with the motion to carry the spray pattern). Thanks again

Awesome thanks. I don't spray continuously, I was just wondering if I should haha

I'm going to try to do the mod liquid, if my current test doesn't work. as far as clearcoat, I'm thinking the problem might be with the conditions where I am, but I'm willing to try a new one. I'm about to be tired of buying new materials and testing, so I hope something works more simply soon haa thanks dude
 
Re: WIP first Iron Man foam build+knowledge share

Try Krylon Low Oder Clear Finish Gloss. It says it's applicable for craft foam so I wouldn't it flexes a bit. Latex based too I believe.

ok man thank you I might try that if I can find it cheap. So you've used it with good results? (y)thumbsup
 
Re: WIP first Iron Man foam build+knowledge share

You can see pics of my foam build of my Mk VI suit and judge for yourself. I put the suit through a beating cause I didn't really care about it hahah. It was just something I made really quick to wear to avengers.
http://www.therpf.com/f24/iron-man-mk-iv-photoshoot-added-7-a-147062/

I used the "best step anti fatigure mats" for most of the suit and wandy foam for the neck and hands. Type of foam your using does make a difference. The process I used to paint was smearing on one layer of modpodge with my fingers (wearing a glove, more layers probably would be better), plastidip x 2-3, duplicolor adhesion promoter x 2-3 (though i heard bulldog is good but never tested myself), paint, then 2 layers of the gloss after the paint had dried for a day or two. My technique the the gloss was actually quite different. I oversprayed then lightly spread it over my pieces with a paper towel cause basically without the gloss my armor pieces looked super dull. Just spraying still looked dull. For some reason smearing helped it.

Btw if you wanted to try out the 65d, you can always buy a trial kit. I personally buy my stuff from reynolds cause they're shipping is cheaper for me.
 
Re: WIP first Iron Man foam build+knowledge share

I know this is a dark picture but you can see the dull pieces vs the gloss treated pieces. Chest/back has no gloss coat

319744_10100875976582734_1711645437_n.jpg
 
This thread is more than 9 years old.

Your message may be considered spam for the following reasons:

  1. This thread hasn't been active in some time. A new post in this thread might not contribute constructively to this discussion after so long.
If you wish to reply despite these issues, check the box below before replying.
Be aware that malicious compliance may result in more severe penalties.
Back
Top