Thanks for the info on the paint Studio Kitbash. I'll try Archive X for the paint. I'm getting ready to start working on the nose of the model.Jkirkon: Ah, much better, I can stop OD'ing on my OCD meds now...
Pulled Porkins: The blue is Floquil #60127 GN Big Sky Blue, available from Archive X or if you get lucky in a vintage bottle on Ebay from time to time.
You are using an out of date browser. It may not display this or other websites correctly.
You should upgrade or use an alternative browser.
You should upgrade or use an alternative browser.
The One-Stop Y-Wing Thread
- Thread starter DaveG
- Start date
Carnet
Well-Known Member
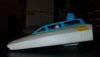
This is Archive-X Big Sky Blue misted over Reefer White then misted with Dark Lark.Thanks for the info on the paint Studio Kitbash. I'll try Archive X for the paint. I'm getting ready to start working on the nose of the model.
Attachments
Wow, that looks so realistic as if it has seen a lot of action in battle and use. I don't think my airbrushing skills are quite up to speed to accomplish this look but I may practice on some scrap pieces to see if I can get something close, the 3 paint color combo gives it such detail and life, outstanding job!This is Archive-X Big Sky Blue misted over Reefer White then misted with Dark Lark.
Carnet
Well-Known Member
Thank you very much.Wow, that looks so realistic as if it has seen a lot of action in battle and use. I don't think my airbrushing skills are quite up to speed to accomplish this look but I may practice on some scrap pieces to see if I can get something close, the 3 paint color combo gives it such detail and life, outstanding job!
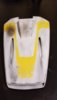
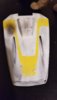
Hey guy's thanks for all of the paint info and subject matter expertise but I had my first setback with the build. I had a hard time trying to locate the correct colors in above mentioned paint brands so ended up going with a Badger (Model Flex) brand of Railway train colors that were an exact match on the codes but I was a little worried because they were a water based acrylic. I've always used Tamiya Paints up to this build and I decided to give these a shot. I washed all of the parts before I started the build to ensure they had no contamination on them. Everything went fine with the primer, the black under coat and the reefer white I applied to the head the craft and it looked great. I waited a day for the paint to get a good cure and dry time before I started to mask (Tamiya yellow tape) for the SP yellow armor stripes. I put down the top masking around the cockpit and it was looking great. I was almost ready to spray when I decided to move one of the lines over a bit to match the other side, that's when I noticed the entire paint all the way down to the resin base lifted. I pulled the rest of the masking off and the paint just started lifting in chunks and strips. I removed all of the remaining paint except the underside of the head where it seemed to adhere quite well, it would not come off at all with the Duct Tape method I used on the topside. I'm not sure what to think, how could I get such good adhesion on one side but not the other. I'm thinking about just mixing my Tamiya paints to get a close match for the required colors and shy away from the water based acrylics. Anyone have any suggestions or past experiences like this? I've never had this happen on any other model I've ever built and I'm using a very low tack masking tape to top it off. The Badger paints said they were compatible with resin so I'm think it the base resin must have something really adhered to that the prewashing didn't remove on the topside of the head section. I'll probably just have to give the whole thing a good light sanding I guess. I'd really appreciate any help on this if anyone has any suggestions or let me know if I screwed up by not prepping it right to begin with. I am a rookie at these resin builds.
Thanks,
PULLED PORKINS
Thanks,
PULLED PORKINS
Last edited:
ytech
New Member
Excellent thread and source of information! Much focus is on details and how to get them, assemble them or the finish of them.
Is there any good source discussing or even defining more basic properties of the Y-wing, the proportions of it?
Length is often mentioned (16.24m?...) and sometimes width, but part from that? Engine diameter/width, cockpit overall length/width, wings, body. The closest thing I've come so far is to measure with a screen ruler on some of the studio models and replicas pictured...
Excellent thread and source of information! Much focus is on details and how to get them, assemble them or the finish of them.
Is there any good source discussing or even defining more basic properties of the Y-wing, the proportions of it?
Length is often mentioned (16.24m?...) and sometimes width, but part from that? Engine diameter/width, cockpit overall length/width, wings, body. The closest thing I've come so far is to measure with a screen ruler on some of the studio models and replicas pictured...
@studiokitbash had a thread on exactly that...I don’t remember the thread title though.
ytech
New Member
@studiokitbash had a thread on exactly that...I don’t remember the thread title though.
After some confused searching I found this **post** by Studio Kitbash - is this what you were thinking of? Not a thread, but a post and yes... it IS beautiful! <3
The Y-Wing "Green Leader" Project - NOW OPEN SOURCE!
I like the radiator in the front. Very ILM.
 www.therpf.com
dtssyst
Sr Member
Production images (I wish they were higher resolution)...


These are from Nice-n Model...


I have tried to explain in detail my personal approach to building this replica.
Link to my build thread
Link to resized fuselage files (page 3 of my build thread)
I hope the above helps.
These are from Nice-n Model...
I have tried to explain in detail my personal approach to building this replica.
Link to my build thread
Link to resized fuselage files (page 3 of my build thread)
I hope the above helps.
After some confused searching I found this **post** by Studio Kitbash - is this what you were thinking of? Not a thread, but a post and yes... it IS beautiful! <3

The Y-Wing "Green Leader" Project - NOW OPEN SOURCE!
I like the radiator in the front. Very ILM.
That’s the post I was referring to.
ytech
New Member
I hope the above helps.
Yes, YES it does! Thank you so, so much!
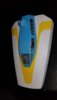
Hey guys I finally got the paint to stick! It took 3 attempts but I got it. I ended up washing the whole thing with a 75/25 acetone water mix and that must have done the trick. I mixed up some Tamiya paint and got the Reefer White perfect but the GN Blue sky mix came out a little dark, going to mix up a lighter batch and shoot it again. Have some fitment issues with the bottom and end of the cockpit but those will be easy enough to fix.
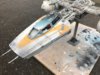
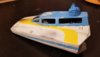
Hey does anyone have any tips on laying down blast effects. I could use some expert advise on this subject. Here's a couple of work in progress pictures, not sure if I got the stripes dimensional correct but it looks good I think and with some weathering and fade of effects of the yellow and blue it should look a lot better. Will have to redo the visor on the pilot also, it's way too tall. It covers his whole face. Oh well it's a learning experience right.
Hey does anyone have any tips on laying down blast effects. I could use some expert advise on this subject. Here's a couple of work in progress pictures, not sure if I got the stripes dimensional correct but it looks good I think and with some weathering and fade of effects of the yellow and blue it should look a lot better. Will have to redo the visor on the pilot also, it's way too tall. It covers his whole face. Oh well it's a learning experience right.
Attachments
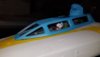
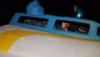
Hey guy's just a few progress photo's I'd like to post and ask if anyone has tried making windows for the canopy and if so what technique was used. I still have some more weathering and panel line enhancements to do on the nose piece but I think it's getting there.
Attachments

Hey PP,
Great to see your build but at this point it would be better if you started a dedicated thread for your build rather than post in this one. The One-Stop Y-Wing Thread is intended as a reference thread for finding information and links to other build threads, as can be seen on the first post. Thanks!
Great to see your build but at this point it would be better if you started a dedicated thread for your build rather than post in this one. The One-Stop Y-Wing Thread is intended as a reference thread for finding information and links to other build threads, as can be seen on the first post. Thanks!
Okay Dave, my apologies. One question though, do I have to be a premium member before I can proceed with a build thread? If so no worries, once the membership requirements are met I will start a build thread. Thanks for guiding me down the right path.Hey PP,
Great to see your build but at this point it would be better if you started a dedicated thread for your build rather than post in this one. The One-Stop Y-Wing Thread is intended as a reference thread for finding information and links to other build threads, as can be seen on the first post. Thanks!
Okay, thanks Dave!
David3
Sr Member
Hi guys, just wondering if anyone knows the color scheme used on the full size Y-Wing in the cut scene from Return of the Jedi with the Falcon and the Y-wing on Tatooine?
I think I read somewhere here in another thread (thought it was this one) it was Gold leader colors but can't find the info again.
Wanting to paint up my 1/72 Y-wing in the same colors to go with the Bandai Falcon as a bit of a homage to the scene.
I think I read somewhere here in another thread (thought it was this one) it was Gold leader colors but can't find the info again.
Wanting to paint up my 1/72 Y-wing in the same colors to go with the Bandai Falcon as a bit of a homage to the scene.
Similar threads
- Replies
- 18
- Views
- 2,543
- Replies
- 2
- Views
- 477
- Replies
- 3
- Views
- 250
- Replies
- 3
- Views
- 646