Terrahawks Battletank (small filming model replica)

ONeilthebrush

New Member
Hi all,

First time post here after being a member for quite a while. So hello!
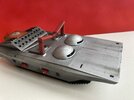
A recent serendipitous series of events has led to me to attempt to replicate the ‘Battletank’ from Terrahawks. The fact that the past few weeks have been the 40th anniversary of the shows first airing is complete co-incidence.

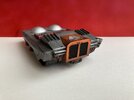
The build should in the most part be quite straightforward as the shape is hardly complex and is pretty much a series of sloping panels with detailing drawn on.

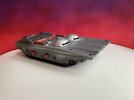
From what I can gather from the web two initial models were constructed. These were both based on Tamiya Leopard (‘1‘– it was 1983) chassis’. One at 1:16 and one at 1:35. The 1:16 Tamiya is way out of my price range so I’m having a go with the much cheaper 1:35 kit.

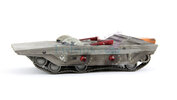
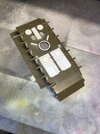
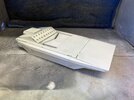
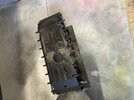
I have had a few exchanges with Terrahawks (and Gerry Anderson in general ) model builder extraordinaire David Sissons to try and get some pointers. He has very helpfully passed me over some images he took a few years ago of the original small filming model – which was in pretty bad condition. I have also obtained some of the ‘blueprints’ which were widely available in the mid 80’s and have resized them to match the 1:35th chassis. So along with the obligatory trawl of the internet I reckon I have enough imagery to use as a starting point.

As a slight aside whilst the blueprints are noted to not be 100% correct. However once I had resized them based on axle separation on the kit part, the drawing plotted out such that the model will be around 9 inches in length - the small studio model has been referred to as the '9 inch model' so it looks like the scaling worked!

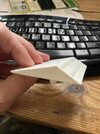
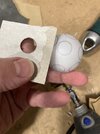
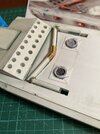
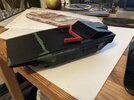
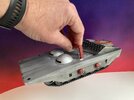
There are a few key parts that I feel I need to get sorted before tackling the build proper so after dry fitting the chassis and running gear the first section to tackle is the ‘recovery bar’. Whilst never used in the series the idea here was that the Battletank was deployed from ‘Battlehawk’ – the series version of Thunderbird 2; and could be recovered through the use of a goalpost like attachment on the tank and a recovery hook extended from Battlehawk. Very similar to ‘hook-a duck’ at the local fair!

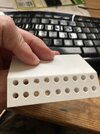
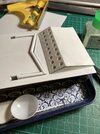
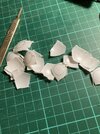
Anyway the bar needs to be recessed into the top of the tank and so seems like the most obvious place to start….. It has an odd oval cross section so I'm looking to construct from a combination of Evergreen strip.

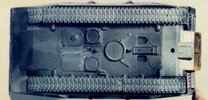
I’ll be reaching out here at some point soon for some kit-part identification as the underside of the small tank was kit bashed as it was primarily viewed from underneath.

The UK IMPS show is local to me in a few weeks time, and as I work better with a deadline I have a really bad idea to try and get this finished as a competition entry..
 
Last edited:
So, it quickly become apparent that the first thing that need sorting is the setting out and spacing of the flat top plate. The main features being the missile launcher, recovery bar and ‘Megazoids’.

Terrahawks Wiki refers to the unit on the top as a 'missile launcher'; and whilst the show never featured anything other than some pyro flashes it really does look like it should fire something akin to surface to surface missiles. Hence I imagine that the missiles would sit in the compartment with missile tubes aligned parallel to the slope of the launcher?

I’m sure there must be an easier way to mark out two rows of circles and cut them out in acrylic, but I lost an evening getting the front panel to look okay with the two rows approximately aligned! It also took a while to get to a point where I was happy with the spacing and the size of the holes. In the end they are 4.8mm holes drilled by hand. The surface detail around these openings is all but absent on the small scale filming model but the larger model has something that I can replicate fairly easily (I hope!).

To add a bit of detail I used some acrylic tubes here – on the 1:35 model these opening appear to be simply blanked off as the model was never intended to be used for close up work (so I gather anyway). The larger filming model appears to have used a similar idea as it is possible to view 'down' into the tubes from a few angles. I think it adds a bit more detail to what would be a fairly simple model. I did have to drill out the tube to get it all to match the ID, which was a bit 'interesting'.

They (the tubes) were roughly cut to a similar length - which was a mistake but I will come back to that issue later in the build! I intend to try and paint these tubes prior to final assembly to avoid trying to either spraying at angles or attempting to get a paintbrush down the tube.

I've also include an image here from when the original ('1:35th') model came up for auction in the event that people are wondering what this thing is..
 

Attachments

  • IMG_5910.JPG
    IMG_5910.JPG
    1.8 MB · Views: 83
  • IMG_5912.JPG
    IMG_5912.JPG
    1.6 MB · Views: 85
  • Battletank 1 35 filming model 4.jpg
    Battletank 1 35 filming model 4.jpg
    123.1 KB · Views: 83
Last edited:
Also if you are here (many thanks) Has anyone got any ideas as to the source of these greeblies on the underside of the filming model (these are on the 1:35th scale chassis.
 

Attachments

  • Battletank 10 1_35.jpg
    Battletank 10 1_35.jpg
    75.2 KB · Views: 60
Things have progressed. As has the learning curve!

The body is perhaps around 80% complete now and I’m happy with how it is coming along. It’s not the world’s greatest filming replica but when compared to the actual filming model (the small one) it’s actually pretty good (generally) in my opinion.

This is all hand cut sheet styrene and needs some cleaning up, but I'm starting to think it will be a passible attempt once painted silver.

It is very stark as the filming models famously had very little detail on them prior to filming - The detail added when the production team pointed out that a flat silver model would not film very well. I intend to replicate the show finish by drawing on all of the panel details with a pencil once I have a few coats of a base colour laid down.

The plans I am working from appear to have been drawn from the larger 20in model and some of the scaling doesn’t work that well - notably the recovery bar and associated ‘slot’. Interestingly, the studio model recovery bar (on the small model) doesn’t appear to be flat with the chassis in any images I can locate, so I think this was possibly an issue at the time.

I have detailed the bottom of the chassis based on the image I posted above. I haven’t managed to identify any kit parts, so all of this has been made using sheet styrene and some aluminum mesh. Primed using a Games Workshop rattle can it looks okay. I made a mistake here as the plan only shows 50% of the base cut down the middle. I replicated this without checking the photos and hence some of the detailing isn't quite correct, but eh oh!

As the recovery bar is hinged and does ‘work’ I need to give some thought to sequencing of construction and painting. Most likely the bar will have to be painted and protected prior to the top and bottom halves getting glued.

Next up are the side thrusters and some detailing on the top of the missile pod.
 

Attachments

  • IMG_5973.JPG
    IMG_5973.JPG
    2.5 MB · Views: 56
  • IMG_5976.JPG
    IMG_5976.JPG
    5 MB · Views: 61
  • IMG_5977.JPG
    IMG_5977.JPG
    7.1 MB · Views: 59
Last edited:
I saw the completed model at Telford today. You did a great job!
Cheers - I'm chuffed to have gotten a nod from the judges for it. I'll post some more build pics and the final piece in the next day or so. I really enjoyed the show, spent hours talking to people about plastic nonsense.
 
Sorry – life and the IPMS show got in the way!

It’s funny how the simple details gave me the most trouble. The hubcabs ad Megazoid ‘bodies’. The hubcaps are dished on the large model and whilst I’m not 100% convinced that they were (dished) on the smaller filming model I had decided I wanted to try and achieve a similar look. I tried various attempts to make something passable with thin styrene sheet however, In the end I made a template of the wheel inner circumference in card and then held a ping pong ball in the hole, cutting off the section that stood proud. This was all done pretty quickly by hand and I’m sure I could have got a better result by holding the various component parts and template down on a table more securely whilst cutting.

Ultimately the Megazoids were created in the same manner as the hubcaps, with the ‘eye slot’ opening cut out by hand. I’m not sure what type of plastic (ABS?) ping pong balls are made from, but they didn’t like being sanded and are probably the parts I would have liked to have dealt with better.

The side thrusters were EMA plastic hemispheres with holes drilled in by hand at an angle. Fortunately, I somehow managed to get them all looking similar at the first attempt.

The recovery bar was ultimately made using the ‘negative piece that was cut from the top plate to make the insertion hole. This was increased in thickness using some 1mm strips and sandwiched between 2mm quarter round strips because my local model shops didn’t have 4mm semi-circular strip stock.

has additional detail that I assumed is supposed to represent piping or a flexible joint in the arm. On the large-scale model this is quite detailed but on the smaller model it’s pretty rough so I wasn’t too worried about this. The studio model looks like it might be made from string or cord as it appears to be fraying in the auction images. I replicated this with 0.5mm wire wrapped over the completed bar.

A few other details were made from plastic card, and by this point I had about 24 hours before the IPMS show…. I do so like a deadline.

The transfers were made from an image found online with a bit of very basic photo editing and then hand drawing on a few details once printed off on white waterslide paper. I used ‘Experts Choice’ which is a product I have not used previously, and I gave them a light coat of Mr Hobby Flat coat out of the printer (not the recommended sealer). Other details/were made from black insulation tape and white letter labels cut approximately to shape.

Painting started with a black GW basecoat to highlight (the many) flaws and then a basecoat of Tamiya from a rattle can. I then airbrushed mixes of Vallejo metallics and black. I then I went back over with just black to add the missile launcher burn marks The orange is Vallejo again; David Sisson did put me onto the screen accurate VW Brilliant Orange but I ran out of time to order some and simply raided my existing paint stash.

Normally I paint miniatures, so I spend relatively little time building and an age painting, so this was a bit odd to be the other way around. With the help of a hairdryer the painting process took about an hour!

Finally I drew on the panel lines – which made a huge difference.

Overall I’m pleased with how it came out. It’s a bit rough in places and I could certainly make a better version (perhaps the one with the turret?) having gone through the process once. I also had a good look at Dave Howard’s impressive studio scale R/C version over the weekend and whilst I do want to have a go at the large scale version there were certainly some details that I could and would copy in a smaller scale if I have another go.
 

Attachments

  • IMG_5923.JPG
    IMG_5923.JPG
    1.1 MB · Views: 33
  • IMG_5956.jpeg
    IMG_5956.jpeg
    549.3 KB · Views: 33
  • IMG_5924.JPG
    IMG_5924.JPG
    1.8 MB · Views: 38
  • IMG_5925.JPG
    IMG_5925.JPG
    1.9 MB · Views: 35
  • IMG_6185.jpeg
    IMG_6185.jpeg
    546.7 KB · Views: 40
  • IMG_6186.JPEG
    IMG_6186.JPEG
    646.8 KB · Views: 32
Last edited:
Great photos. Yes, I was surprised to see two Battletanks at Telford :) Thanks for the comprehensive write up on the build. I've never scratch built anything myself, so it's inspiring to see what can be done.
 
Great photos. Yes, I was surprised to see two Battletanks at Telford :) Thanks for the comprehensive write up on the build. I've never scratch built anything myself, so it's inspiring to see what can be done.
Thanks for the kind words. You are referring to Dave Howard's epically awesome full scale remote version. I spoke with him on Saturday for a very long time. If I can locate a 1:16 Tamiya Leopard (the base of the big model) for a reasonable price I'm sooooo building a large version!
 

Your message may be considered spam for the following reasons:

If you wish to reply despite these issues, check the box below before replying.
Be aware that malicious compliance may result in more severe penalties.
Back
Top