JBCosplay
New Member
I've been around the forums here for a while but only recently made an account and with my current build I figured it was about time I start my own thread!
This build initially started almost a year ago however I only started making progress this summer. I stopped in order to finish other costumes for DragonCon this past Labor Day weekend. Now I'm back on the grind to hopefully finish in time for the Dreamhack Atlanta Cosplay contest.
I always loved Reinhardt because of his larger then life armor and probably because I hate myself a little and want always want a bit of a challenge. There are definitely some amazing Rein builders already. I chose the Crusader skin from his cinematic short for its great details and it's one of the few skins that he doesn't have a helmet on. Here are a few forums I keep going back to for inspiration and learning as I'm going through this build. I've almost completed the entire legs and have started working on the torso. With a month and a half to go I'm hitting hella con crunch time!
Overwatch: Reinhardt 'Uprising Skin' - FINISHED!
COMPLETE! "It's About Time!" Starcraft II Jim Raynor Armor *PIC HEAVY*
Sylgian's 40K Space Marine [Completed!]
I first started out by ripping the game models and importing it into Blender. From there I was able to export the selected armor pieces into Pepakura for unfolding. I then had a long process of moving cut lines and where parts separated in the Pepakura software. Then finally after scaling to life size I tested it in the ArmorSmith software and I was happy to find I could fit decently in it!
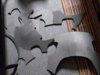
I wanted to start from the bottom up so the feet were first. I cut out all the patterns and created outlines of the feet in plywood. I covered the bottom with foam then separated at the toe bend for a nature step look. The feet outer shells were attached then hinges were placed to connect the two halves of the feet back together. I also found PVC flange 3D files for mounting. I knew I was going to make my stilts out of PVC so they were perfect. I did however have to scale them down since I was using 3/4" and they were originally meant for 1" PVC.
1" PVC Pipe Flange 3D files found here on Thingiverse


The next step was to create the stilts and shin parts that would surround them. From the ArmorSmith software I knew I was going to need 16" stilts for my head to be in the right spot above the torso. So I made a basic 4 leg pair of stilts with a back pieces that hugs my calf up to below my knee so I don't twist my ankles. I took some inspiration from how snowboard bindings work for keeping your feet locked in through your ankle. You'll also notice I used a fair amount of Kwik Seal to cover all the seam lines for the big odd shapes so far. Even though some of the parts of the shin will be covered since it is made of 3 layers I still wanted a clean overall look. Next up was the knee and as well I added a foot platform for the stilts I could stand on and attach straps to.


I need to take more pictures of my progress and will have that up by the end of the weekend!
This build initially started almost a year ago however I only started making progress this summer. I stopped in order to finish other costumes for DragonCon this past Labor Day weekend. Now I'm back on the grind to hopefully finish in time for the Dreamhack Atlanta Cosplay contest.
I always loved Reinhardt because of his larger then life armor and probably because I hate myself a little and want always want a bit of a challenge. There are definitely some amazing Rein builders already. I chose the Crusader skin from his cinematic short for its great details and it's one of the few skins that he doesn't have a helmet on. Here are a few forums I keep going back to for inspiration and learning as I'm going through this build. I've almost completed the entire legs and have started working on the torso. With a month and a half to go I'm hitting hella con crunch time!
Overwatch: Reinhardt 'Uprising Skin' - FINISHED!
COMPLETE! "It's About Time!" Starcraft II Jim Raynor Armor *PIC HEAVY*
Sylgian's 40K Space Marine [Completed!]
I first started out by ripping the game models and importing it into Blender. From there I was able to export the selected armor pieces into Pepakura for unfolding. I then had a long process of moving cut lines and where parts separated in the Pepakura software. Then finally after scaling to life size I tested it in the ArmorSmith software and I was happy to find I could fit decently in it!
I wanted to start from the bottom up so the feet were first. I cut out all the patterns and created outlines of the feet in plywood. I covered the bottom with foam then separated at the toe bend for a nature step look. The feet outer shells were attached then hinges were placed to connect the two halves of the feet back together. I also found PVC flange 3D files for mounting. I knew I was going to make my stilts out of PVC so they were perfect. I did however have to scale them down since I was using 3/4" and they were originally meant for 1" PVC.
1" PVC Pipe Flange 3D files found here on Thingiverse
The next step was to create the stilts and shin parts that would surround them. From the ArmorSmith software I knew I was going to need 16" stilts for my head to be in the right spot above the torso. So I made a basic 4 leg pair of stilts with a back pieces that hugs my calf up to below my knee so I don't twist my ankles. I took some inspiration from how snowboard bindings work for keeping your feet locked in through your ankle. You'll also notice I used a fair amount of Kwik Seal to cover all the seam lines for the big odd shapes so far. Even though some of the parts of the shin will be covered since it is made of 3 layers I still wanted a clean overall look. Next up was the knee and as well I added a foot platform for the stilts I could stand on and attach straps to.
I need to take more pictures of my progress and will have that up by the end of the weekend!
")