You are using an out of date browser. It may not display this or other websites correctly.
You should upgrade or use an alternative browser.
You should upgrade or use an alternative browser.
My Star Lord Outfit Build
- Thread starter StarLordGoG
- Start date
@ErkNinja, The Steel thickness i used is 3/16" flat bar stock. You can get that at any Lowes hardware store.
I got a Drinkman, Walkman look alike today. Will be doing some mods to it soon. Also picked up some paint for it. This is cheapist way to make a prop walkman. I will be putting an MP3 player on the inside once i get one. I have a pair of headphones coming to,


I got a Drinkman, Walkman look alike today. Will be doing some mods to it soon. Also picked up some paint for it. This is cheapist way to make a prop walkman. I will be putting an MP3 player on the inside once i get one. I have a pair of headphones coming to,
Ok time for progress update,
Friday i had a setback with my sculped buckle so i had to create a new one.
I finally got the silicone mold made and i set my metal bracket and pored the resin. I added a resin color dye black, just so if it got damaged it wouldnt be noticed.
Also worked on my drinkman, got it fitted for an ipod shuffle and filled the hole and added a button. I am currently painting it.
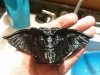
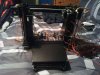
Ok here are couple of pictures of my progress on the belt buckle and my fake sony walkman.
First up is my buckle. I added some black dye to the resin. Then sprayed a couple of coats of flat black acrylic enamel paint. I then lightly added Rub N Buff using a old pair of denim jeans. The second picture is a little blurry as my hand moved when taking the picture. You can see the metal loop that imbedded into resin. Now that my buckle is done, i can print off my templetes for the belt and cut the leather and sew it together. Im hoping to do that this weekend but i been feeling a little under the weather the last couple of days.


Here is my fake sony walkman. I have the vinyl stickers, but have not put them on yet. I will do that this weekend. I desided to use a Ipod Shuffle as the charging port is the audio port and the controls face the back so as not to be seen while clipped onto the belt. i created a fake front for the tape with the Awesome Mix 1 label that someone posted. I reused the label that came with the drinkman as a background.


First up is my buckle. I added some black dye to the resin. Then sprayed a couple of coats of flat black acrylic enamel paint. I then lightly added Rub N Buff using a old pair of denim jeans. The second picture is a little blurry as my hand moved when taking the picture. You can see the metal loop that imbedded into resin. Now that my buckle is done, i can print off my templetes for the belt and cut the leather and sew it together. Im hoping to do that this weekend but i been feeling a little under the weather the last couple of days.
Here is my fake sony walkman. I have the vinyl stickers, but have not put them on yet. I will do that this weekend. I desided to use a Ipod Shuffle as the charging port is the audio port and the controls face the back so as not to be seen while clipped onto the belt. i created a fake front for the tape with the Awesome Mix 1 label that someone posted. I reused the label that came with the drinkman as a background.
Ok been busy with work and my projects. I finished my belt and got some part in the mail for my bag project. This weekend its work on my boots ")
For now here is picture of my belt front and back plus my bag parts


I ordered the stainless steel buckle, but i also ordered the carbon steel and should be getting them soon. I found couple D-rings around the house that should work. Oh and on my belt i made a few adjustments from my pattern, my leather is in 2 parts and are attached to the metal loops on my buckle. Oh and i need one last touch, adding a leather loop on the back for the extra belt length
For now here is picture of my belt front and back plus my bag parts
I ordered the stainless steel buckle, but i also ordered the carbon steel and should be getting them soon. I found couple D-rings around the house that should work. Oh and on my belt i made a few adjustments from my pattern, my leather is in 2 parts and are attached to the metal loops on my buckle. Oh and i need one last touch, adding a leather loop on the back for the extra belt length
Last edited:
Ok yesterday i took my belt into work to show my co-work and they were stun that i created this by hand no 3D printing or anything
I took couple extra pictures for every one.


I took couple extra pictures for every one.
Saber Concepts
Well-Known Member
Very nice work on the belt. I am attempting to make one myself. I am using a belt that I purchased at DragonCon as a base and using a combination of leather and pleather to overlay the base belt. I am just lacking the motivation to actually start working on it. LOL I am also having problems sourcing the rectangle rings on the back of the boot. Does anyone know what the dimensions are on those and where to get them?
Saber Concepts, Thanks, Im in the same boat with my boots, just lacking the motivation, but im starting on the this weekend, plus working on pattern for the bag as i have parts for that coming in couple weeks. Not sure of the size they used in the movie but the ones i got are 3/4" that i purchased from Tandy Leather model number 1137-03 "Strap Keeper Loop 3/4in" they come as a 10pk.
Last edited by a moderator:
Ok here is a progress of my buckle for the Bag.
Here is my steps, get a small pot as shown in photo, a way to prop the buckle so the hole thing is not submerst in water. Fill pot to just a about the blue part maybe an 1/8" over. Bring pot water to a simmer, not to hot as to melt the plastic and to were you can dip your finger in and not burn. 100degF is good. Next add your Black RIT dye, for the this small pot i added about 7 tablespoons. Next place buckle in dye water, i had 4 buckles so i taped them together and used the other end in one as a handle. Now the hard part, have to wait, for me i left it in for 1.5 hours. I would check it every 30min. tell the right color is achieved. The Dye does its best in hot water. After you get the color, wash off the buckle in warm water, you may need to use a small shop towel to wipe off any residue from the metal buckle. Thats it easy and simple. You can see in the photo the buckles next to each other, one with the blue and the one that was dye black


Then Step two,
I painted the buckle with a enamel flat black paint for metal. I let set for awhile, then i used Oderless Mineral Spirits and cotton swabs to then rub off the paint to give it a worn look.

I do have 4 buckles i will be doing this to. At first i thought i might need the 4 as i was not sure if i was going to damage any of them, but they are good.
Here is my steps, get a small pot as shown in photo, a way to prop the buckle so the hole thing is not submerst in water. Fill pot to just a about the blue part maybe an 1/8" over. Bring pot water to a simmer, not to hot as to melt the plastic and to were you can dip your finger in and not burn. 100degF is good. Next add your Black RIT dye, for the this small pot i added about 7 tablespoons. Next place buckle in dye water, i had 4 buckles so i taped them together and used the other end in one as a handle. Now the hard part, have to wait, for me i left it in for 1.5 hours. I would check it every 30min. tell the right color is achieved. The Dye does its best in hot water. After you get the color, wash off the buckle in warm water, you may need to use a small shop towel to wipe off any residue from the metal buckle. Thats it easy and simple. You can see in the photo the buckles next to each other, one with the blue and the one that was dye black
Then Step two,
I painted the buckle with a enamel flat black paint for metal. I let set for awhile, then i used Oderless Mineral Spirits and cotton swabs to then rub off the paint to give it a worn look.
I do have 4 buckles i will be doing this to. At first i thought i might need the 4 as i was not sure if i was going to damage any of them, but they are good.
Staar Lord Maan
Well-Known Member
Ok so i worked on my D-rings this mid morning and afternoon. I made them out of steel as thats all i had. I painted them a flat black then sanded them down to give a worn look. I had to give them a clear coat to protect the steel from rust.
View attachment 370739
Hey, do you have the dimensions of these things?
Ok i havent posted for couple weeks. Been pretty busy around the house, fixing this and fixing that. I been working on the pattern for my boots and got some leather cut out. Also Ordered the parts and fabric for the bag.
Here is what i have so far on the boots. I got all the leather peace cut for the one boot, as i want to make sure they all fit together before cutting the others out. I so far have 5 peaces sewn together and Shin guard glued up.


Here are some parts i got for the bag. I got the fabric and templets from Soulinertia. And the oval eyelts and punch from china. The USPS gave me a scare as the first set of eyelts got lost, which the seller shipped new ones and got them, took about a month to get. I have all the rivets and snaps ill be using for the bag.


Oh and i am going to be investing in a new 3D Printer. Looking at getting the Makergear M2


Here is what i have so far on the boots. I got all the leather peace cut for the one boot, as i want to make sure they all fit together before cutting the others out. I so far have 5 peaces sewn together and Shin guard glued up.
Here are some parts i got for the bag. I got the fabric and templets from Soulinertia. And the oval eyelts and punch from china. The USPS gave me a scare as the first set of eyelts got lost, which the seller shipped new ones and got them, took about a month to get. I have all the rivets and snaps ill be using for the bag.
Oh and i am going to be investing in a new 3D Printer. Looking at getting the Makergear M2
Last edited by a moderator:
Did you just cut the oval shapes out of leather for your boots by hand? Looks great!
Thanks, The knee guards i used oval punch i got from Tandy. But the backs, i used a circle punch on the ends then cut straight line to tangent. I spent a good day on them cuts
Did you just cut the oval shapes out of leather for your boots by hand? Looks great!
Thought id add some more to my thread. Been busy with other things around the house and havent worked on my project much.
I did work on my boots some more this weekend. Plus i ordered a 3D printer and software.

It is soft pliable leather and have to add some stiffer leather on the inside and also have to punch to holes for the lace up in front. Then i will sew and affix the front. Then last will be to mount it to the base shoe and sole.
I did work on my boots some more this weekend. Plus i ordered a 3D printer and software.
It is soft pliable leather and have to add some stiffer leather on the inside and also have to punch to holes for the lace up in front. Then i will sew and affix the front. Then last will be to mount it to the base shoe and sole.
LouisIV, Thanks. I to am working on figuring out the best approach so im alittle slow on putting things together.
- - - Updated - - -
Over my Thanksgiving weekend i ended up getting sick with a cold But the happy news is i finally got my 3D Printer YEAH!!
so the days i wasn't sick last weekend, i put together my 3D Printer.
All the Parts as a Kit

Assembled

so im alittle slow on putting things together.Hey man, just wanted to say great stuff and thanks for all the updates. I'm trying to figure out the best approach for putting these things together and your posts are helping.
- - - Updated - - -
Over my Thanksgiving weekend i ended up getting sick with a cold
But the happy news is i finally got my 3D Printer YEAH!!so the days i wasn't sick last weekend, i put together my 3D Printer.
All the Parts as a Kit
Assembled
Last edited by a moderator:
Was it pretty easy to set up? Have you tried printing anything yet?
Similar threads
- Replies
- 0
- Views
- 669
- Replies
- 3
- Views
- 959
- Replies
- 5
- Views
- 382