My 3D Printed Hellraiser 1987 Lament Cube (was: "Paint Roller for Raised Surfaces")

Astyanax

Sr Member
RPF PREMIUM MEMBER
Hello!

I am working on painting a 3D-printed resin model where I have a bunch of raised texture on a flat surface (Hellraiser Lament Configuration puzzle box):
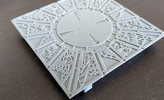
1692899817885.png

I need to paint gold on the raised part, but black or brown on the lower surfaces. I've done some research, and identified a few techniques that may or may not work:

1. Start with a dark base coat, then simply brush (or drybrush) paint the gold on top, carefully. (The hard way)
2. Paint the gold first, don't worry about staying in the lines, then use a thick wash for the darker colors.
3. Paint the gold messy, then dipping in a dark wash, then wiping off the top surfaces.
4. Use a foam brush or swab and almost drybrush the gold across the top.
5. Use a gold marker (not good for larger surfaces).

But I was thinking, it sure would be easier if there were some sort of "paint roller" that was rigid enough not to drop paint in the lower areas.

So you modelmaking experts, can you tell this newbie how you might tackle such a challenge? Of course I am printing extra so I can experiment as well. :)

UPDATE: Further research uncovered the thing that is a rubber roller. I may give that a try, as it seems rigid enough. Still interested in anyone else's preferred techniques!

Thank you so much!

Bill
 
Last edited:
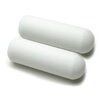
Foam rollers and a gentle touch might do the trick. Available at home improvement stores.
Very inexpensive for a kit. Base it in the darker colour, apply the gold with roller then the wash
to age.
 

Attachments

  • Redtree-Industries-36065-Mini-Paint-Roller-Foam-Refill-4-Twin-Pack_49486474-1ae3-4f21-8e98-d7a...jpg
    Redtree-Industries-36065-Mini-Paint-Roller-Foam-Refill-4-Twin-Pack_49486474-1ae3-4f21-8e98-d7a...jpg
    38.7 KB · Views: 44
Foam rollers and a gentle touch might do the trick. Available at home improvement stores.
Very inexpensive for a kit.

Thank you! I did consider foam rollers; it's the "gentle touch" part that worries me...but it can't hurt to experiment. :)
 
The only thing with a roller, even a smooth one is you may end up with a very finely textured matt paint surface, not the shiny gold you are probably looking for..
 
The only thing with a roller, even a smooth one is you may end up with a very finely textured matt paint surface, not the shiny gold you are probably looking for..

Hmm, interesting. That makes sense, because the roller wants to pick up paint as well as lay it down...time to experiment!
 
Why a roller?

Just paint it all black.

Next, put a thin layer of gold paint on a flat surface. Gently place the square on the flat surface with gold paint. Gently lift it up.
Repeat for all sides.

Ah yes, sometimes the simplest approach is the best. Adding to the list of things to try; I will certainly report back my progress.
Thank you!
 
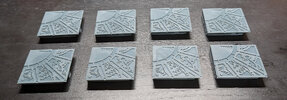
Okay, it has taken me a few days to get rolling, but I'm excited to figure out which of these techniques works best, as they will come in handy in the future! I've got 8 10 sample pieces printed in resin, and lightly wet-sanded with 600-grit.

PXL_20230916_185557118.jpg

These are the painting methods I'm going to try:
  1. Spray gold (after primer), then use a thick black acrylic wash.
  2. Spray gold (after primer), then dip the whole piece in thinned black acrylic, wipe off the top.
  3. Spray black, then drybrush gold paint a few times with a paintbrush.
  4. Spray black, then drybrush gold paint a few times with a foam brush.
  5. Spray black, then go over it with a gold marker.
  6. Spray black, then use gold paint with a foam roller.
  7. Spray black, then use gold paint with a rubber roller.
  8. Spray black, then use adhesive pen and real gold leaf material (never done this!).
  9. Spray black, then dip on a flat surface painted gold.
  10. BONUS: Spray black, then rubber-stamp the gold paint using a stamp block.
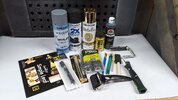
I will use rattle cans (primer) for the base layer, and acrylics for the top coat, so there's no conflict between the paints. The spray gold will go on a thin layer of primer. These are my tools:

PXL_20230916_191349516.jpg

I will post each completed square with my thoughts as it's done. Next update in a couple days!

Bill
 
Last edited:
Paint darker color freely, then create vinyl masks for lower surfaces with a cutting plotter (you already have the files), apply them and paint the gold... Longer, but more accurate.
 
Paint darker color freely, then create vinyl masks for lower surfaces with a cutting plotter (you already have the files), apply them and paint the gold... Longer, but more accurate.

Yeah, I thought about masking, but there are many, many tiny sections, plus micro holes everywhere that appear to be about 0.2 mm in diameter. Masking those becomes infeasible.

Although there might be a hybrid solution there: mask off the large and medium sections, and use a dark wash for the tiny ones. But sadly, I don't have a vinyl cutter.
 
Stamping is the answer. A fancier term is these days is "pad printing." Check out crafting videos on stamping and die-cutting. You can get a flat rubber stamp material that will hold paint and transfer it to the raised surfaces almost perfectly. With a roller, there's always a chance that applying too much could get it down into the crevices where you don't want it. Instead, you use the roller to apply paint to the stamp pad.
 
Stamping is the answer. A fancier term is these days is "pad printing." Check out crafting videos on stamping and die-cutting. You can get a flat rubber stamp material that will hold paint and transfer it to the raised surfaces almost perfectly. With a roller, there's always a chance that applying too much could get it down into the crevices where you don't want it. Instead, you use the roller to apply paint to the stamp pad.

Okay, now you've got my attention. I did some quick looking into it, and you might be on to something. So I picked up some pink rubber stamp blocks from Amazon, and will glue one to some scrap wood for gripping.

I've edited my previous post to add this to the test methods.

Thank you!!!!
 
This is a back burner project for me, but I've considered printing out the raised detail seperately as a thin piece (fdm on a PEI or glass surface face down). Having done other thin things I know it's very sturdy with great surface quality and it would be possible to make a few alignment pegs if need be. Not sure how well the little holes would turn out, but I would be more reluctant to trust a thin part like this on a resin printer. Anyway - painting would be a cinch this way. Worth a try?
 
This is a back burner project for me, but I've considered printing out the raised detail seperately as a thin piece (fdm on a PEI or glass surface face down). Having done other thin things I know it's very sturdy with great surface quality and it would be possible to make a few alignment pegs if need be. Not sure how well the little holes would turn out, but I would be more reluctant to trust a thin part like this on a resin printer. Anyway - painting would be a cinch this way. Worth a try?

Hmm, interesting. You're right, it would be fragile, but resin's the only way I'm going to get the details fine enough. It's conceivable with the right support. In my case, the thickness would be one millimeter.

Unfortunately, I do not have the software the separate things that way (I think I'd need ChituBox Pro to do booleans), But if I don't get any satisfaction from the other methods, I might give it a try.

Another challenge might be gluing it back together, as epoxy and CA are likely to cause squeeze-out somewhere, and spray adhesive is guaranteed to get on the edges.

Thanks!
 
Unfortunately, I do not have the software the separate things that way (I think I'd need ChituBox Pro to do booleans), But if I don't get any satisfaction from the other methods, I might give it a try.

If you want to try you could do the cut in meshmixer or even simpler in prusaslicer which are both free. Could do it in a min in prusaslicer. There is a tool for putting a chosen face flat on the print surface and a cut tool. Then you could resize the height of the part you want to keep to exactly 1mm.
Another challenge might be gluing it back together, as epoxy and CA are likely to cause squeeze-out somewhere, and spray adhesive is guaranteed to get on the edges.
I see your point about the glue, but you could always roll it on ;)
 
If you want to try you could do the cut in meshmixer or even simpler in prusaslicer which are both free. Could do it in a min in prusaslicer. There is a tool for putting a chosen face flat on the print surface and a cut tool. Then you could resize the height of the part you want to keep to exactly 1mm.

Yeah, fair points. I've had bad luck with Meshmixer, as it always seems to alter the geometry on me, but PrusaSlicer is definitely something I've not played with.

I see your point about the glue, but you could always roll it on ;)

Yes, but doesn't that take us back to the same dilemma? How to apply a substance evenly to one surface only? I'm a worse gluer than I am a painter, and that's saying something! ;)

I definitely would not rule out this approach, just hoping it doesn't have to come to that. :)
 

Your message may be considered spam for the following reasons:

If you wish to reply despite these issues, check the box below before replying.
Be aware that malicious compliance may result in more severe penalties.
Back
Top