1/48 MiM Gunstar - Now with 3D Printed details!

Redfinger

Well-Known Member
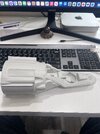
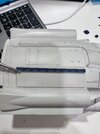
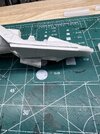
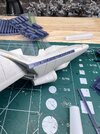
I recently acquired a 1/48 Gunstar from Monsters in Motion. I do believe it is an original and not a recast. There is a certificate of “authenticity”.

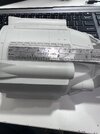
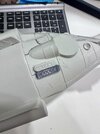
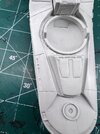
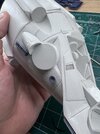
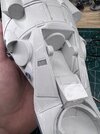
Anyway, the kit is rough. Lots of detail is soft, damaged or missing

I believe it was originally modeled by Randy Cooper. I can post more photos later, but I want to give this kit some love as I have a soft spot for the movie.

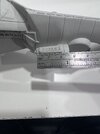
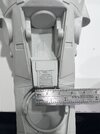
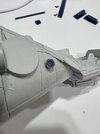
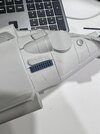
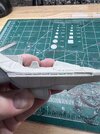
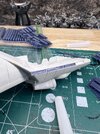
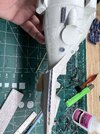
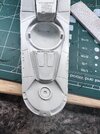
Does anyone recognize some of these detail parts? I think the smaller part was likely 1:700 scale photoetch battleship hand rails, but I am not sure what the larger railing looking part is from.

Of course, another alternative is to not try and replicate the original detail, but just go a new direction all together.

Any thoughts?
 

Attachments

  • IMG_0902.jpeg
    IMG_0902.jpeg
    1.4 MB · Views: 130
  • IMG_0903.jpeg
    IMG_0903.jpeg
    1.2 MB · Views: 115
  • IMG_0904.jpeg
    IMG_0904.jpeg
    1.1 MB · Views: 118
  • IMG_0905.jpeg
    IMG_0905.jpeg
    1.2 MB · Views: 124
Nothing jumps out at me, but I'd just use Evergreen Styrene parts to replace some detail and fill in some of the pinholes in the larger parts. Regardless of the issues, it's a nice score.

TazMan2000
I think I found the part, it looks like it may have came from a NorthStar photoetch set, 1/700 scale perforated steel support beams. Sadly, it seems like one one has that in stock and that NorthStar is no longer around.

So, I think this will push me is the direction of doing some custom detailing.
 
Although a pain, it would be straight forward to make a pattern for the existing detail, sand off the damaged features then scratch up replacements from sheet styrene. Essentially it all looks like 'little ladders' which should be pretty simple to make. Going this route would likely be less hassle than attempting to repair the casting damage.

Nice find, I also congratulate you, I'm a 1/48 and 'Last Starfighter' fan and have been looking for just such a kit.

Cheers!
R./ Robert
 
Spent some time on TinkerCad making and editing some 3d stuff to try and recreate something that looks a little better and repair some of the miscast details. Not trying to do much by way of accuracy here, just going with what feels right and to give the ship a little better detail.

Not sure which vent style I am going to go with though for the details near the gun, the Gundam style, or the vent that looks more like the original.
 

Attachments

  • IMG_0917.jpeg
    IMG_0917.jpeg
    1.7 MB · Views: 74
  • IMG_0918.jpeg
    IMG_0918.jpeg
    1.6 MB · Views: 65
  • IMG_0919.jpeg
    IMG_0919.jpeg
    1.8 MB · Views: 70
  • IMG_0920.jpeg
    IMG_0920.jpeg
    1.8 MB · Views: 74
Work continues on the Gunstar. These side trenches along the nose of the ship had a lot of miscast detail. I started sanding it down and realized I would need to remove it all and star over.

There also seems to be a misalignment in the molds as the edges don’t line up now. I will need to build out the upper edge of the trench on one side, and the lower edge on the other.

I will likely design and print a detail strip that I can put inside this trench, I think that will be the most straightforward way to do, and I am feeling a little more confident in my 3d design skills to make something.
 

Attachments

  • IMG_0932.jpeg
    IMG_0932.jpeg
    1.5 MB · Views: 42
  • IMG_0934.jpeg
    IMG_0934.jpeg
    1.7 MB · Views: 47
  • IMG_0933.jpeg
    IMG_0933.jpeg
    1.4 MB · Views: 46
Made up some trench details, something with some greebles, and something more in line with the original.

Not sure which way I am going to go.
 

Attachments

  • IMG_0935.jpeg
    IMG_0935.jpeg
    1.7 MB · Views: 47
  • IMG_0936.jpeg
    IMG_0936.jpeg
    1.6 MB · Views: 42
Work continues. Lots of rescribing panel lines and details to give them a crisp edge again. Also got around to securing some of the resin and photoetch bits for added detail.

Still lots of sanding and filling.
 

Attachments

  • IMG_0943.jpeg
    IMG_0943.jpeg
    1.2 MB · Views: 38
  • IMG_0942.jpeg
    IMG_0942.jpeg
    1.4 MB · Views: 37
  • IMG_0941.jpeg
    IMG_0941.jpeg
    1.6 MB · Views: 31
  • IMG_0939.jpeg
    IMG_0939.jpeg
    1.7 MB · Views: 36
Last edited:
More work on the MIM Gunstar 1. The main body is getting pretty close to done. The original concept art shows a fin or vent on the underside of the cockpit, I think I will be adding this detail.

The vacuformed canopy was horrible. So I used some 3d printing and styrene to scratch a new one. Happy with the results so far.

One of the outriggers was damaged in shipping. Roto-Casting can make for some thin, fragile walls. So repairing this is my next goal.

I have taken some liberties with the details, but I think it adds some visual interest and stays true to the original.
IMG_0985.jpeg
IMG_0898.jpeg
 
The new canopy is a perfect fit. Looks great. Nice work on that and all of the other details.
Thanks, getting that canopy right took some trial and error. I am hoping to get some more pics up this weekend, I am getting pretty close to having assembly done!
 

Your message may be considered spam for the following reasons:

If you wish to reply despite these issues, check the box below before replying.
Be aware that malicious compliance may result in more severe penalties.
Back
Top