HI folks. I seem to be having issues uploading on this site at the moment, so please bear with me.
Well its been a while since i posted anything on here. Ive had projects coming out of my ears these last few months, some of them have been real long term painting jobs which im glad to say are coming to an end now. So as ever, not being one to have a gap between projects i'm starting the Merlin At-At.
On inspection it looks to be very good. I must say they did a great job on the casting. Some air holes in the belly surface cast but nothing to bother a resin model enthusiast/masochist like me.
So i started a trial assembly and noticed a few things which no one seems to mention !.
So being nice and quiet, not wanting to make the model look bad or upset anyone, heres a quick recap on my findings.
Firstly the leg joints are splined together, great if you know which pose you want, not good if you fancy posing it without taking each joint apart every time you adjust them, especially the neck joints which are hidden inside the flexible tube.
But the main elephant in the room is, the legs are not the correct length, both in relation top top bottom and overall length !. Did someone drop the ball here, that can’t be right, right!
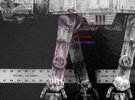
I took my favourite reference of the original hero model and overlayed the lengths from my Master Replicas version to check if it was in the ballpark. Relative sizes of top and lower legs are pretty much spot on. It seems the MR version is pretty good for comparison. Next I measured up the Merlin version and overlayed that onto the same image, and they are well out in both proportion and length. Heres a quick image to hopefully show the differences to the filming miniature.
Whats up with the feet !. All the feet have been cast in the unweighted position, ie, not compressed down as seen on the original. Why someone would mould these as an "in flight" all feet off the ground option is beyond me, so im now thinking about redoing those as well !!
Next is the somewhat unspoken but very important issue of longevity. In my humble opinion there simply isn’t enough reinforcement in the legs for the model to last over the years. Most collectors of studio scale models keep them for over 10 years+, I have some here which are much older ! Sad I know LOL. My reasoning is the resin is so very soft that I believe it cannot be straight and true in those areas for any length of time. Im guessing/ hoping I'm wrong, and everyone who's built one so far has a nice straight AT-AT in 5 years time, but i would wager against it.
On inspection the legs were already suffering from misalignment/deflection due to curing issues in the resin where the thick meets the thin (as normal for most resin kits and curable using hot water and some careful bending) and also slightly bent. This really infuriates me as a model maker. If anything is supposed to be straight, it takes minimal deflection to make it look “wonky” and I hate that. So it didn’t take me long to realise that I needed to start again and completely re-make the legs. Such is my life of obsession.
Big C has the crown for the best looking set of legs on this forum and was a great inspiration to get me started on this Cheers Big C. Nice legs man !!!
So I sat and measured away to get the files I needed.
Starting from scratch with a multi layered Perspex build in mind, I decided I would like moving pistons, infinite adjustability on each joint with no splines. I knew there is simply too much micro sized internal engineering to add using a laser cutter and perspex as a build medium, but I could definitely add some functionality to the details. So I took advantage of the original screws visible on the inside surface of the legs and used them as fulcrums for the internal piston actuator arm. I know the pistons wont move with the joints, but they add bit of "playability" for posing. Main joints are simply locked using Allen keys with a magnetic cover on each joint. All very simple like.
So far i have these.
Well its been a while since i posted anything on here. Ive had projects coming out of my ears these last few months, some of them have been real long term painting jobs which im glad to say are coming to an end now. So as ever, not being one to have a gap between projects i'm starting the Merlin At-At.
On inspection it looks to be very good. I must say they did a great job on the casting. Some air holes in the belly surface cast but nothing to bother a resin model enthusiast/masochist like me.
So i started a trial assembly and noticed a few things which no one seems to mention !.
So being nice and quiet, not wanting to make the model look bad or upset anyone, heres a quick recap on my findings.
Firstly the leg joints are splined together, great if you know which pose you want, not good if you fancy posing it without taking each joint apart every time you adjust them, especially the neck joints which are hidden inside the flexible tube.
But the main elephant in the room is, the legs are not the correct length, both in relation top top bottom and overall length !. Did someone drop the ball here, that can’t be right, right!
I took my favourite reference of the original hero model and overlayed the lengths from my Master Replicas version to check if it was in the ballpark. Relative sizes of top and lower legs are pretty much spot on. It seems the MR version is pretty good for comparison. Next I measured up the Merlin version and overlayed that onto the same image, and they are well out in both proportion and length. Heres a quick image to hopefully show the differences to the filming miniature.
Whats up with the feet !. All the feet have been cast in the unweighted position, ie, not compressed down as seen on the original. Why someone would mould these as an "in flight" all feet off the ground option is beyond me, so im now thinking about redoing those as well !!
Next is the somewhat unspoken but very important issue of longevity. In my humble opinion there simply isn’t enough reinforcement in the legs for the model to last over the years. Most collectors of studio scale models keep them for over 10 years+, I have some here which are much older ! Sad I know LOL. My reasoning is the resin is so very soft that I believe it cannot be straight and true in those areas for any length of time. Im guessing/ hoping I'm wrong, and everyone who's built one so far has a nice straight AT-AT in 5 years time, but i would wager against it.
On inspection the legs were already suffering from misalignment/deflection due to curing issues in the resin where the thick meets the thin (as normal for most resin kits and curable using hot water and some careful bending) and also slightly bent. This really infuriates me as a model maker. If anything is supposed to be straight, it takes minimal deflection to make it look “wonky” and I hate that. So it didn’t take me long to realise that I needed to start again and completely re-make the legs. Such is my life of obsession.
Big C has the crown for the best looking set of legs on this forum and was a great inspiration to get me started on this Cheers Big C. Nice legs man !!!
So I sat and measured away to get the files I needed.
Starting from scratch with a multi layered Perspex build in mind, I decided I would like moving pistons, infinite adjustability on each joint with no splines. I knew there is simply too much micro sized internal engineering to add using a laser cutter and perspex as a build medium, but I could definitely add some functionality to the details. So I took advantage of the original screws visible on the inside surface of the legs and used them as fulcrums for the internal piston actuator arm. I know the pistons wont move with the joints, but they add bit of "playability" for posing. Main joints are simply locked using Allen keys with a magnetic cover on each joint. All very simple like.
So far i have these.
Attachments

Last edited:
")


