Ntyrrell
New Member
Hello Everyone,
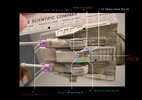
I am beginning to compile my SS AT-AT model kit parts list into a full breakdown and was wondering if anyones up for helping to identifying parts I'm missing. Looking around on the RPF theres a handfull of treads on SS AT-AT builds but many are so old now the pictures and info can't be seen. And may accounts/ makers are no longer active to ask questions too.
My plan is to make a full list of kits needed and a breakdown/ parts map similar to the outstanding work that Ogibendogy did with the Slave 1 map and reference.
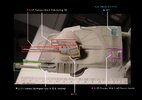
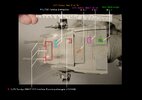
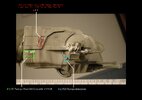
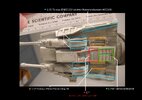
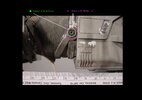
I've made progress on many parts of the AT-AT but thought I'd start this tread with the head, to hopefully get things moving then move onto the rest of the body.
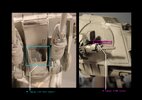
Honestly any help would be appreciated even if it's just to help ID one part.
Many thanks
Nick
I am beginning to compile my SS AT-AT model kit parts list into a full breakdown and was wondering if anyones up for helping to identifying parts I'm missing. Looking around on the RPF theres a handfull of treads on SS AT-AT builds but many are so old now the pictures and info can't be seen. And may accounts/ makers are no longer active to ask questions too.
My plan is to make a full list of kits needed and a breakdown/ parts map similar to the outstanding work that Ogibendogy did with the Slave 1 map and reference.
I've made progress on many parts of the AT-AT but thought I'd start this tread with the head, to hopefully get things moving then move onto the rest of the body.
Honestly any help would be appreciated even if it's just to help ID one part.
Many thanks
Nick