Jodo Kast Build

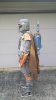
Been working on a number of the small things.


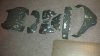
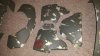
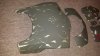
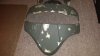
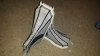
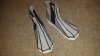
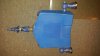
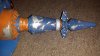
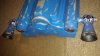
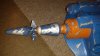
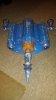
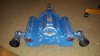
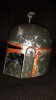
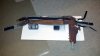
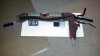
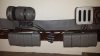
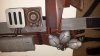
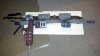
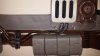
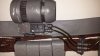
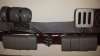
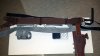
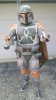
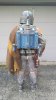
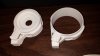
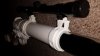
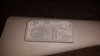
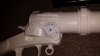
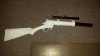
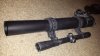
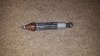
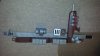
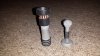
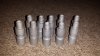
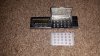
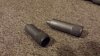
Finished up the Gauntlet rocket, flame thrower nozzles, key pad, knee/gauntlet darts, jetpack stabilizer & beacon.


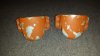
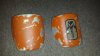
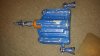
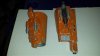
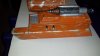
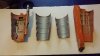
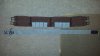
Tried my hand at some sewing. Finished up the ammo pouches & made up the belt the accessories are attached.


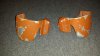
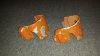
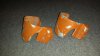
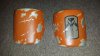
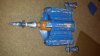
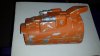
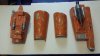
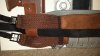
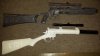
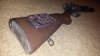
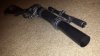
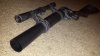
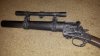
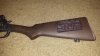
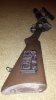
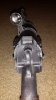
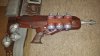
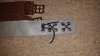
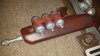
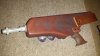
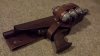
Finished up the holster adding some strapping to attach to the belt, strap to hold on the pistol grenades, & strap to hold the pistol in the holster. Went with a brown & did some washes to try & give it a leather look.
 

Attachments

  • 20150724_232401_zps25izzpoa.jpg
    20150724_232401_zps25izzpoa.jpg
    327.9 KB · Views: 56
  • 20150724_231740_zpsbtgqk2ja.jpg
    20150724_231740_zpsbtgqk2ja.jpg
    292.2 KB · Views: 58
  • 20150724_231837_zpsnf7lbj7g.jpg
    20150724_231837_zpsnf7lbj7g.jpg
    245.9 KB · Views: 57
  • 20150724_231649_zpshct3vpyn.jpg
    20150724_231649_zpshct3vpyn.jpg
    322.8 KB · Views: 59
  • 20150724_231610_zpsionowkvu.jpg
    20150724_231610_zpsionowkvu.jpg
    233.2 KB · Views: 64
  • 20150724_232044_zpsfylsve37.jpg
    20150724_232044_zpsfylsve37.jpg
    224.9 KB · Views: 51
  • 20150724_232559_zpss9tjmdvg.jpg
    20150724_232559_zpss9tjmdvg.jpg
    260.2 KB · Views: 52
  • 20150724_232723_zpsw6pq1ztl.jpg
    20150724_232723_zpsw6pq1ztl.jpg
    248.9 KB · Views: 48
  • 20150724_232500_zpsywkspkl1.jpg
    20150724_232500_zpsywkspkl1.jpg
    339.4 KB · Views: 61
  • 20150724_232803_zpsvpnvsmeo.jpg
    20150724_232803_zpsvpnvsmeo.jpg
    222.3 KB · Views: 48
  • 20150724_231858_zpsz3czhmrn.jpg
    20150724_231858_zpsz3czhmrn.jpg
    287.2 KB · Views: 63
  • 20150724_232113_zpszykqtdc3.jpg
    20150724_232113_zpszykqtdc3.jpg
    245.7 KB · Views: 54
  • 20150724_233129_zpsub7l92rw.jpg
    20150724_233129_zpsub7l92rw.jpg
    190.3 KB · Views: 53
Great work so far! The details you have printed are just fantastic. Way beyond most Jodo Cast builds. Well Done!
 
Great work so far! The details you have printed are just fantastic. Way beyond most Jodo Cast builds. Well Done!

Thank you for the kind words. There are a few really good Jodo's out there but I wanted to get as close to the comic as possible to bring him to life.

Got busy this weekend & got the armor painted. All was done with layering method. I had gone through the comic cells & made up templates for each piece & came up with a damage scheme that made sense. The symbol on the right chest plate was taken from the from cover of the comic with some liberties on the section that is covered. I made a stencil on frisket paper & spray painted this. Still need to do some misting & washes.
 

Attachments

  • 20150726_213302_zpsjyaieogb.jpg
    20150726_213302_zpsjyaieogb.jpg
    224.3 KB · Views: 44
  • 20150726_213315_zps3alkj5fr.jpg
    20150726_213315_zps3alkj5fr.jpg
    270.8 KB · Views: 50
  • 20150726_213326_zpsgcyyy0hf.jpg
    20150726_213326_zpsgcyyy0hf.jpg
    245.3 KB · Views: 53
  • 20150726_213202_zpsmjirqqu2.jpg
    20150726_213202_zpsmjirqqu2.jpg
    216.1 KB · Views: 42
  • 20150726_213350_zpsaknx9xub.jpg
    20150726_213350_zpsaknx9xub.jpg
    259.2 KB · Views: 44
The knee armor & the shoulder bells are now painted. This was done layered method like the rest of the armor. The skull for the left shoulder was painted on as well. Need to do some final weathering but the plan is to get all the armor pieces & gauntlets to that point so that I can work on that process at the same time. Right now I am in a painting mode, it is a little hot with some humidity but it has been dry so not perfect for painting but I will take it. Jetpack is next.
 

Attachments

  • 20150729_204151_zpsdukiievq.jpg
    20150729_204151_zpsdukiievq.jpg
    247.7 KB · Views: 52
  • 20150729_204201_zpstaqwsexv.jpg
    20150729_204201_zpstaqwsexv.jpg
    256.1 KB · Views: 50
  • 20150729_204211_zpskfqj7iju.jpg
    20150729_204211_zpskfqj7iju.jpg
    244.3 KB · Views: 35
  • 20150729_204228_zpszxy0jiex.jpg
    20150729_204228_zpszxy0jiex.jpg
    226.9 KB · Views: 53
  • 20150729_204054_zpshi5t8jgj.jpg
    20150729_204054_zpshi5t8jgj.jpg
    277.4 KB · Views: 51
  • 20150729_204121_zpslp1j6tsi.jpg
    20150729_204121_zpslp1j6tsi.jpg
    275.9 KB · Views: 49
Thanks getting close

It has been all about the jetpack this week getting it painted. Went with the monochromatic blue highlighted with the orange & red that is shown throughout the comic. The piano keys are going will be painted orange. Needs to be dirtied up yet. Also got a box in the mail with a new set of boots. For those wondering if my toe spikes will fit the 2015 version of MOW boots, yes they will, but I am debating to go with toe spikes or not to go with toe spikes. I keep thinking that the toe just looks naked without them even though the cover of TEOD is the only place you see the spikes on Jodo.
 

Attachments

  • 20150807_185210_zpsyuq427du.jpg
    20150807_185210_zpsyuq427du.jpg
    230.2 KB · Views: 60
  • 20150807_184829_zpskom32tbf.jpg
    20150807_184829_zpskom32tbf.jpg
    280.9 KB · Views: 55
  • 20150807_183001_zpse2e8tmej.jpg
    20150807_183001_zpse2e8tmej.jpg
    252.8 KB · Views: 54
  • 20150807_182924_zpsu4k6b7y0.jpg
    20150807_182924_zpsu4k6b7y0.jpg
    281.3 KB · Views: 47
  • 20150807_182857_zpsknkewbno.jpg
    20150807_182857_zpsknkewbno.jpg
    249 KB · Views: 60
  • 20150807_182815_zpsylkrujir.jpg
    20150807_182815_zpsylkrujir.jpg
    228.4 KB · Views: 49
  • 20150807_182804_zpsd8wxmyjd.jpg
    20150807_182804_zpsd8wxmyjd.jpg
    622.8 KB · Views: 59
  • 20150807_182736_zpshaolszeg.jpg
    20150807_182736_zpshaolszeg.jpg
    269.4 KB · Views: 57
  • 20150807_182716_zpshxvuwibz.jpg
    20150807_182716_zpshxvuwibz.jpg
    259.6 KB · Views: 46
  • 20150807_182700_zpsqpxfa2a8.jpg
    20150807_182700_zpsqpxfa2a8.jpg
    255.4 KB · Views: 57
  • Jetpack_Render_zps07593025.jpg
    Jetpack_Render_zps07593025.jpg
    435 KB · Views: 80
Last edited:
Thanks for the kind words, glad to get the jetpack painted takes so long to mask but short time to paint.

Decided to finish up painting the helmet ears, install the visor, fans, & hard hat suspension. Need to finish some final weathering yet.
 

Attachments

  • 20150809_220954_zpsmoffycjm.jpg
    20150809_220954_zpsmoffycjm.jpg
    707.1 KB · Views: 65
  • 20150809_220935_zpsrkva2jbw.jpg
    20150809_220935_zpsrkva2jbw.jpg
    264.1 KB · Views: 46
  • 20150809_220853_zpsjqecftef.jpg
    20150809_220853_zpsjqecftef.jpg
    292.5 KB · Views: 51
  • 20150809_220816_zpsab2f1mbn.jpg
    20150809_220816_zpsab2f1mbn.jpg
    305.3 KB · Views: 56
  • 20150809_220748_zps3pghma1t.jpg
    20150809_220748_zps3pghma1t.jpg
    270.9 KB · Views: 52
Helmet isn't done painted, kill stripes slipped my mind.

Gauntlets are finally painted.

I tried this product from Smooth On: http://www.smooth-on.com/index.php?cPath=1429

To coat the outside of the gauntlets to smooth out the outer surface & give it a hard shell. I have to say this is a great product & gives a smooth hard epoxy surface. Very small details would be lost using this product from what I could tell. It is thick & self leveling. After it dried I smoothed the surface using steel wool & then put a coat of primer. After the first coat of primer I did wet sand & did some spot filling, but over all very little work. The inside I used a coat of Smooth On 320 to seal the nylon & help with some rigidity.

Now the final weather will be done on all the painted pieces, washes & mists.

Dirtied up the flight suit, flak vest, neck seal, & cape.
 

Attachments

  • 20150816_120844_zps0dec300f.jpg
    20150816_120844_zps0dec300f.jpg
    134.8 KB · Views: 49
  • 20150816_120857_zpsosysqgml.jpg
    20150816_120857_zpsosysqgml.jpg
    151.3 KB · Views: 51
  • 20150816_120906_zpsscqprgit.jpg
    20150816_120906_zpsscqprgit.jpg
    154.2 KB · Views: 59
  • 20150816_121555_zpsh1mwhwbj.jpg
    20150816_121555_zpsh1mwhwbj.jpg
    147.1 KB · Views: 50
  • 20150816_121732_zpsl5qla6g3.jpg
    20150816_121732_zpsl5qla6g3.jpg
    139.6 KB · Views: 46
Last edited:
You don't understand how excited I am for this build. It brings me back to when I was a kid, love the progress!
 
I'm with haliwax. I've always thought that Jodo Kast was rad; all of the benefits of a Boba suit but with more freedom regarding battle damage, paint colors, etc. The 3d printed parts look great! I can't wait to see the finished product.
 
Thanks for the kind words.

Finished up the boots & have decided at this time to go without toe spikes. This is more representative of what is portrayed throughout the comic.

Finished up assembling the belts. Added the hoses & attached everything. Have a little bit of weathering to do yet.

The back of the girth belt I added 2 panels of faux suede to the front for support of the pouches & the section the grey belt goes over. These are sewed onto the girth belt.

For the holster I am going with a belt that will be hidden under the girth & grey belt. I don't have my Jodo armor quite ready to put on but was able to use my Boba cod piece & back plate to try everything on. The belt for the holster will sit just above the cod/back plate. The grey belt will pass through the strap on the holster & the girth belt will run behind it. This worked well with no sagging & felt very comfortable, which has been a concern of mine but with this set up I feel like it will work well.

The hoses are 1/4" O.D. with a piece of black insulated solid copper wire going through the center to give it a darker look & also allows for the hose to be bent & hold position. The connectors are a Watts push to connect plumbing connector.

The lone hose with the coupler will go to the rear of the left gauntlet with another coupler up near the short sleeve of the flight suit.
 

Attachments

  • 20150829_160934_zpsri88rllw.jpg
    20150829_160934_zpsri88rllw.jpg
    289.1 KB · Views: 52
  • 20150829_122046_zpsbqwtl08f.jpg
    20150829_122046_zpsbqwtl08f.jpg
    224.2 KB · Views: 49
  • 20150829_122028_zpsqnvvgnbq.jpg
    20150829_122028_zpsqnvvgnbq.jpg
    420.1 KB · Views: 49
  • 20150829_122007_zps1iiqhara.jpg
    20150829_122007_zps1iiqhara.jpg
    388.3 KB · Views: 42
  • 20150829_121801_zpsojq5g6wv.jpg
    20150829_121801_zpsojq5g6wv.jpg
    171.4 KB · Views: 48
  • 20150829_121735_zpsm1aolsyz.jpg
    20150829_121735_zpsm1aolsyz.jpg
    187.3 KB · Views: 44
  • 20150829_121719_zpsq6jev5wz.jpg
    20150829_121719_zpsq6jev5wz.jpg
    425.9 KB · Views: 56
  • 20150829_121646_zpspehaf21c.jpg
    20150829_121646_zpspehaf21c.jpg
    214.2 KB · Views: 41
  • 20150829_121641_zpsv4mwlmnt.jpg
    20150829_121641_zpsv4mwlmnt.jpg
    203 KB · Views: 40
  • 20150829_121633_zpsxx6j8m5u.jpg
    20150829_121633_zpsxx6j8m5u.jpg
    151.7 KB · Views: 44
  • Jodo_Kast_Belt_Front_Views_zps80cjbe2s.jpg
    Jodo_Kast_Belt_Front_Views_zps80cjbe2s.jpg
    253.9 KB · Views: 55
  • Jodo_Kast_Left_Gauntlet_Hose_zpsz7dh22dm.jpg
    Jodo_Kast_Left_Gauntlet_Hose_zpsz7dh22dm.jpg
    567.1 KB · Views: 60
  • 20150829_122126_zpsjhaatzvz.jpg
    20150829_122126_zpsjhaatzvz.jpg
    439.1 KB · Views: 45
  • 20150829_122052_zpsb2ilbqm6.jpg
    20150829_122052_zpsb2ilbqm6.jpg
    265.5 KB · Views: 46
  • Jodo_Kast_19_zpsl435wsad.jpg
    Jodo_Kast_19_zpsl435wsad.jpg
    218.7 KB · Views: 59
Finally completed Jodo Kast & suited up for photos.

I am using my ROTJ EE-3 right now but will be making a custom EE-3 that is more representative of the comic, just got some of the pieces this week.
 

Attachments

  • 20150912_181138_zpsh109fenp.jpg
    20150912_181138_zpsh109fenp.jpg
    279 KB · Views: 65
  • 20150912_180801_zpsg82a0ydp.jpg
    20150912_180801_zpsg82a0ydp.jpg
    319.1 KB · Views: 71
  • 20150912_175913_zpsunwkt9cu.jpg
    20150912_175913_zpsunwkt9cu.jpg
    308.2 KB · Views: 59
  • 20150912_175837_zpstm20dpl4.jpg
    20150912_175837_zpstm20dpl4.jpg
    304.9 KB · Views: 58
  • 20150912_175748_zps4dbhy5bg.jpg
    20150912_175748_zps4dbhy5bg.jpg
    268 KB · Views: 66
  • 20150912_175724_zpsleykbifg.jpg
    20150912_175724_zpsleykbifg.jpg
    299.6 KB · Views: 84
hey buddy! it came out awesome!! i love the cape, it came out perfect! some feel great now being completed, next big question? what are you going to tackle next??
 
Thank you for the kind words. I have gotten this 501st & Merc approved. After last weekend on 2 different troops I was called Boba Fett, & one of the troops there was an ESB Boba Fett trooping with me. It was so fun.

Well in order to complete this to my liking I have been waiting to get all the pieces to create a custom EE-3 close to what is in the comics with some creative interpretations. I got a kit from MLS as the base which is the Webley with a rifle stock instead of the "D" bracket. I decided to go about & design up the scope mounts to resemble what is in the comic & have the scope off center of the barrel. Made up a stock greeblie that is a mash up of pieces from the ESB Boba EE-3, which uses a portion of the center stock greeblie, 2/3 of a earth plug, & a portion of the connecting rod. Also designed up my interpretation of the breach greeblie disk with the connecting rod attached. These pieces were all 3D printed & the photos of how I received them from Shapeways. The bomb pieces from the ROTJ are cast from MLS that came with the Webley. The scope is a Simmons. The flash tube is a 1.5" diameter drain tube which will have slots put into it to make it more like the ESB EE-3. Photo with my ROTJ EE-3 to show comparison in size.

Paint up will be a wood grain look on the stock with the look of "Bluing" on the rest of the Webley breach & barrel. With a more metallic look on the scope rings.
 

Attachments

  • 20151003_163609_zpsib8qfkdm.jpg
    20151003_163609_zpsib8qfkdm.jpg
    484.6 KB · Views: 54
  • 20151003_163601_zpsreytqdiu.jpg
    20151003_163601_zpsreytqdiu.jpg
    166.1 KB · Views: 53
  • 20151003_163551_zpsyqvxnty2.jpg
    20151003_163551_zpsyqvxnty2.jpg
    344.3 KB · Views: 46
  • 20151003_143009_zpskcivf5mp.jpg
    20151003_143009_zpskcivf5mp.jpg
    124.1 KB · Views: 54
  • 20151003_142210_zpsx8tsiq6l.jpg
    20151003_142210_zpsx8tsiq6l.jpg
    239.3 KB · Views: 56
  • 20151003_141230_zpshlwsvbsf.jpg
    20151003_141230_zpshlwsvbsf.jpg
    136.7 KB · Views: 46
  • 20151003_141156_zpsbw967lgn.jpg
    20151003_141156_zpsbw967lgn.jpg
    98.9 KB · Views: 45
  • 20151003_141137_zpsffdyten4.jpg
    20151003_141137_zpsffdyten4.jpg
    124.6 KB · Views: 42
  • 20151003_141115_zpsmh2rn5cr.jpg
    20151003_141115_zpsmh2rn5cr.jpg
    235.2 KB · Views: 40
  • 20150818_000752_zps33klh034.jpg
    20150818_000752_zps33klh034.jpg
    158.2 KB · Views: 47
  • Jodo_Kast_09_zpsmerdxsfq.jpg
    Jodo_Kast_09_zpsmerdxsfq.jpg
    188 KB · Views: 63
  • Jodo_Kast_08_zpsummgzzn3.jpg
    Jodo_Kast_08_zpsummgzzn3.jpg
    259 KB · Views: 52
  • Jodo_Kast_02_zpsrmxwnzs2.jpg
    Jodo_Kast_02_zpsrmxwnzs2.jpg
    382.8 KB · Views: 56
Thank you for the kind words.

Assembled & painted my custom Jodo Kast specific EE-3. This was a great kit from MLS. Very minimal clean up & filling. For assembly of the barrel to the stock I used onlty 2 screws, one through the pivot area on the breach & the other goes through the release into the breach near the hammer, which is pretty well hidden in a recess. This turned out to be very solid & secure. Was initially going to just epoxy everything together & make it solid but came up with this approach so if for some reason, which you never know, it could be taken apart fairly easy.

The paint scheme is pretty much how the ESB EE-3 was done with a few slight differences. I wanted to mimic the movie used EE-3's which is evident with the use of the various greeblies that are present on both ESB & ROTJ versions, with some modified custom pieces. This to me gives it a more real world look. The big differences are the custom scope mounts that are designed to look like the comic reference, the rifle stock, & the custom stock greeblies.

The main portion of the EE-3 was painted flat black misted with some midnight blue, brown, & metallic aluminum. Then it was dry brushed with metallic aluminum to accent the high points.

The stock was painted with a few different tones of brown to break it up then did a couple of washes of grey/yellow & black. The stock greeblies are painted flat black with a mist of red & metallic aluminum then dry brushed with metallic aluminum. The tail portion of the stock is painted a copper/aluminum mix with misting of flat black.

The flash tube is just a 1.5" chrome/brass drain tube, but opted not to add any holes to it. The inside was painted flat black & the tip was misted with flat black, flat brown, & midngith blue to give the carbon residue.

Still need to make the strap to finish this up.
 

Attachments

  • 20151008_215122_zpssy85nrls.jpg
    20151008_215122_zpssy85nrls.jpg
    258 KB · Views: 37
  • 20151008_215022_zpsuvxiuu4w.jpg
    20151008_215022_zpsuvxiuu4w.jpg
    277 KB · Views: 44
  • 20151008_214937_zpszntdxchq.jpg
    20151008_214937_zpszntdxchq.jpg
    236.3 KB · Views: 39
  • 20151008_214913_zpscwhywqer.jpg
    20151008_214913_zpscwhywqer.jpg
    269.4 KB · Views: 36
  • 20151008_214827_zpsjxd4ooue.jpg
    20151008_214827_zpsjxd4ooue.jpg
    269.7 KB · Views: 45
  • 20151008_214820_zpspfqtydf8.jpg
    20151008_214820_zpspfqtydf8.jpg
    265.4 KB · Views: 33
  • 20151008_214835_zpsajtbxxgv.jpg
    20151008_214835_zpsajtbxxgv.jpg
    232 KB · Views: 38
  • 20151008_214735_zpsjn48d7pq.jpg
    20151008_214735_zpsjn48d7pq.jpg
    305.3 KB · Views: 39
  • 20151008_214729_zpsdbwulyek.jpg
    20151008_214729_zpsdbwulyek.jpg
    272.2 KB · Views: 49
  • 20151008_214718_zpspdpvzyj9.jpg
    20151008_214718_zpspdpvzyj9.jpg
    239.8 KB · Views: 36
  • 20151008_215419_zps9bof7ndg.jpg
    20151008_215419_zps9bof7ndg.jpg
    546.3 KB · Views: 36
  • 20151008_215441_zpstf41x3d7.jpg
    20151008_215441_zpstf41x3d7.jpg
    541.5 KB · Views: 39
This thread is more than 8 years old.

Your message may be considered spam for the following reasons:

  1. This thread hasn't been active in some time. A new post in this thread might not contribute constructively to this discussion after so long.
If you wish to reply despite these issues, check the box below before replying.
Be aware that malicious compliance may result in more severe penalties.
Back
Top