Jodo Kast Build

Thank you for the kind words.

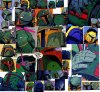
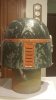
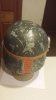
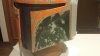
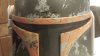
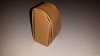
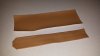
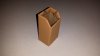
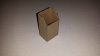
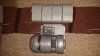
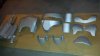
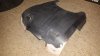
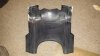
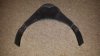
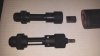
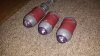
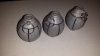
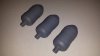
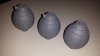
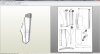
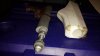
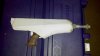
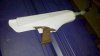
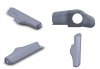
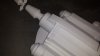
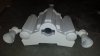
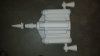
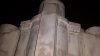
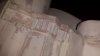
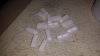
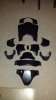
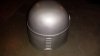
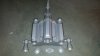
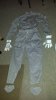
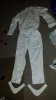
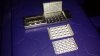
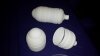
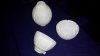
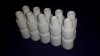
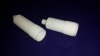
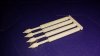
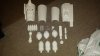
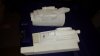
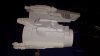
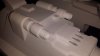
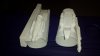
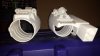
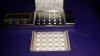
Been working on getting the jetpack ready for paint. Did a layer of spackle mixed with elmers glue over the entire pack & sanded it to smooth out things Added the 3D printed piano keys, just used super glue to attach them to the body. Then I did another light coat of resin over the entire pack. Sanded this all smooth then it was time for primer. After the first coat of primer did some spot fills & wet sanded it to smooth it out. Ready for paint. Primed & smoothed the fuel tank tops & bottoms, rocket, collar, grate, & thrusters.

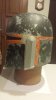
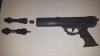
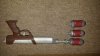
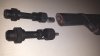
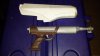
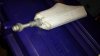
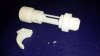
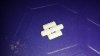
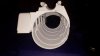
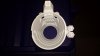
Got my light kit in for the rangefinder from Jc27 (TDH) yesterday. This one is white.

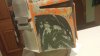
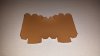
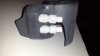
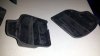
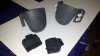
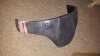
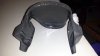
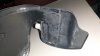
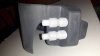
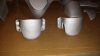
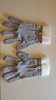
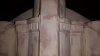
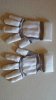
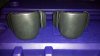
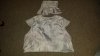
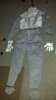
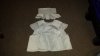
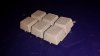
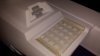
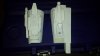
Also asked Major (TDH) to make me a custom set of gloves which came in today. These are great gloves. I had him make a couple of slight changes to make it more Jodo specific. The top pads are more square near the knuckles & have a slight bevel with 3 stitches instead of the radius & the 4 on Boba Fett's gloves. I went with grey & will darken the tackle twill to a light grey. I based this off the few view in the comic.

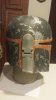
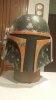
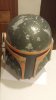
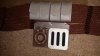
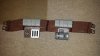
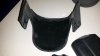
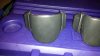
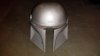
Also have the 2 belt accessory panels & helmet ready to paint.
 

Attachments

  • Gloves_zps1boqvdjs.jpg
    Gloves_zps1boqvdjs.jpg
    68.8 KB · Views: 70
  • 20150312_171807_zpstyd9u6cc.jpg
    20150312_171807_zpstyd9u6cc.jpg
    509 KB · Views: 60
  • 20150312_173502_zpsyansdt3l.jpg
    20150312_173502_zpsyansdt3l.jpg
    93.3 KB · Views: 65
  • 20150312_173405_zpsshqlegbb.jpg
    20150312_173405_zpsshqlegbb.jpg
    99.3 KB · Views: 63
  • 20150312_173216_zpsqirvehyb.jpg
    20150312_173216_zpsqirvehyb.jpg
    94.9 KB · Views: 75
  • 20150226_203030_zpsdxcyi0b5.jpg
    20150226_203030_zpsdxcyi0b5.jpg
    39.4 KB · Views: 53
  • 20150226_201241_zpsrrhk7vmh.jpg
    20150226_201241_zpsrrhk7vmh.jpg
    36.4 KB · Views: 48
  • 20150226_201221_zpsnpwjzkn6.jpg
    20150226_201221_zpsnpwjzkn6.jpg
    43.5 KB · Views: 53
  • 20150226_195849_zpsc4pkdhew.jpg
    20150226_195849_zpsc4pkdhew.jpg
    54.9 KB · Views: 65
  • 20150312_171749_zps9bo0onps.jpg
    20150312_171749_zps9bo0onps.jpg
    507 KB · Views: 71
Last edited:
The painting has begun. Jetpack, belt accessories, & helmet are all in a base coat of silver.

Received a box in the mail with my armor that I got from RKD (TDH). I had a special request to use his V1 knee armor & going with an inner & outer dart housing on each. This way I will have 4 darts on each knee. This is some great armor. Other than some trimming & sanding to get things to fit it shouldn't take long to be ready for paint. RKD was great to work with.
 

Attachments

  • 20150321_200121_zpsojgwekqk.jpg
    20150321_200121_zpsojgwekqk.jpg
    148.5 KB · Views: 63
  • 20150321_200116_zpsx9tlb939.jpg
    20150321_200116_zpsx9tlb939.jpg
    154.7 KB · Views: 61
  • 20150321_195631_zpsaoxf3mqr.jpg
    20150321_195631_zpsaoxf3mqr.jpg
    462.6 KB · Views: 57
  • 20150321_200838_zpsv55fwo9s.jpg
    20150321_200838_zpsv55fwo9s.jpg
    94.4 KB · Views: 66
  • 20150321_200919_zpsmf4hwgeg.jpg
    20150321_200919_zpsmf4hwgeg.jpg
    108.7 KB · Views: 63
  • 20150321_200756_zpsizoxyyrz.jpg
    20150321_200756_zpsizoxyyrz.jpg
    455.3 KB · Views: 65
  • 20150321_200741_zps89mcexgn.jpg
    20150321_200741_zps89mcexgn.jpg
    139.8 KB · Views: 73
  • Jodo_Kast_Left_Right_Knee_Armor_zpsycs2sgli.jpg
    Jodo_Kast_Left_Right_Knee_Armor_zpsycs2sgli.jpg
    54.2 KB · Views: 73
Removed the shin pouches & dyed my MOW flight suit, spats, flak vest, & neck seal. Decided to dye it in 2 phases. First go was using a mix called driftwood which was a mix of black & yellow which gave a nice dirty undertone. Doesn't show well but you can see some of this coloring where the flash washed out the legs. This was allowed to air dry overnight & then went & dyed it to a dark pearl grey with a mix of black & let air dry. Not too dark but definitely a nice grey. I didn't want to go too dark so the I could get some nice weathering tones & will darken it with that. Did the same process with the flak vest & neck seal which came out a light grey which is washed out in the photos. There are plans to make this rather dirty as well.

Went with the tackle twill instead of the cotton, wanted there to be some difference between the vest & the flight suit material & wanted to mimic the look of Boba Fett. This will be darkened more with the weathering. Can tell the color difference between the vest coloring & the white tackle twill on the gloves.
 

Attachments

  • 20150331_173912_zpsc4lh1nxi.jpg
    20150331_173912_zpsc4lh1nxi.jpg
    200.4 KB · Views: 62
  • 20150331_173752_zpsxz0mclty.jpg
    20150331_173752_zpsxz0mclty.jpg
    434.8 KB · Views: 63
  • 20150331_173546_zpsu3yvyyep.jpg
    20150331_173546_zpsu3yvyyep.jpg
    481.1 KB · Views: 70
  • 20150329_183331_zpsknlqpjbd.jpg
    20150329_183331_zpsknlqpjbd.jpg
    153 KB · Views: 51
  • 20150329_183218_zpseuys2kr5.jpg
    20150329_183218_zpseuys2kr5.jpg
    370.5 KB · Views: 66
Thanks for the kind words.

Received a package in the mail today from Shapeways. A bunch of 3D printed items. Had my gauntlets, darts, rocket (missing nose piece wasn't in the box), dental expander, gauntlet & knee darts, MQ-1 calculator pad with separate buttons, flame thrower nozzles, belt & pistol grenades, cod & collar/back armor attachment blocks, & trigger/barrel for Pulce 40. The dental files I have had these are what I call my V.1 set cause they now have the #15 on them where these don't.
 

Attachments

  • 20150401_191519_zps52z1dpsn.jpg
    20150401_191519_zps52z1dpsn.jpg
    192.6 KB · Views: 76
  • 20150401_190950_zpsv0rebhak.jpg
    20150401_190950_zpsv0rebhak.jpg
    148 KB · Views: 77
  • 20150401_173645_zpsjchn3o5i.jpg
    20150401_173645_zpsjchn3o5i.jpg
    73.2 KB · Views: 68
  • 20150401_173601_zpshwdef2ki.jpg
    20150401_173601_zpshwdef2ki.jpg
    73.3 KB · Views: 68
  • 20150401_173851_zpsoefsccia.jpg
    20150401_173851_zpsoefsccia.jpg
    141.3 KB · Views: 57
  • 20150401_173826_zpsm41opcof.jpg
    20150401_173826_zpsm41opcof.jpg
    71.6 KB · Views: 67
  • 20150401_173804_zpsjll7trcs.jpg
    20150401_173804_zpsjll7trcs.jpg
    90.5 KB · Views: 74
  • 20150401_174016_zpsmj3ltbtj.jpg
    20150401_174016_zpsmj3ltbtj.jpg
    194.4 KB · Views: 61
  • 20150401_173930_zpsfollrqll.jpg
    20150401_173930_zpsfollrqll.jpg
    152 KB · Views: 66
  • 20150401_173000_zpscctecrav.jpg
    20150401_173000_zpscctecrav.jpg
    188.7 KB · Views: 75
  • 20150401_190339_zpsrccki6rn.jpg
    20150401_190339_zpsrccki6rn.jpg
    79.4 KB · Views: 70
  • 20150401_190316_zps7dtk13fv.jpg
    20150401_190316_zps7dtk13fv.jpg
    70.9 KB · Views: 73
  • 20150401_184338_zpsfurh2qy4.jpg
    20150401_184338_zpsfurh2qy4.jpg
    108.7 KB · Views: 87
  • 20150401_190305_zpsvfryp9dt.jpg
    20150401_190305_zpsvfryp9dt.jpg
    96.1 KB · Views: 76
  • 20150401_190511_zpse7s2site.jpg
    20150401_190511_zpse7s2site.jpg
    87.3 KB · Views: 66
  • 20150401_190440_zps0sbbox6c.jpg
    20150401_190440_zps0sbbox6c.jpg
    134.5 KB · Views: 75
  • 20150401_190151_zpsvw31yazh.jpg
    20150401_190151_zpsvw31yazh.jpg
    88 KB · Views: 84
  • 20150401_183716_zpsez1513ao.jpg
    20150401_183716_zpsez1513ao.jpg
    80.7 KB · Views: 65
  • 20150401_183103_zpsjhvl9atk.jpg
    20150401_183103_zpsjhvl9atk.jpg
    85.6 KB · Views: 65
  • 20150401_191558_zpsmzqdhvlx.jpg
    20150401_191558_zpsmzqdhvlx.jpg
    170.7 KB · Views: 72
Those gauntlets look really clean, hard to believe they are 3 d printed! Looks like you have a lot of work to do, :)
 
those gauntlets are amazing!! i agree i cant believe they are 3d printed! wonder what they used to smooth them? acetone?
 
Thanks Lance, have a pile of things to work on now. The weather is warming so it is more conclusive for painting so will be a lot of painting in the next couple of weeks. I have gone through & created some color templates for the helmet & jetpack. Will be working on the armor as well. The helmet will be painted in the style of the ROTJ Boba Fett helmet but with Jodo Kast specific damage & colors.

These are as they would come off the machine other than cleaning the powder from them. There was nothing used to smooth them they do have a polishing process which will smooth the surface even more, but these didn't go through that process. These were printed at Shapeways on industrial printers which use a powder bed of sintered nylon & use a laser to melt the nylon to create the layers. I have been very impressed with the quality of the prints that I have been getting from Shapeways of late, I don't know if they have updated machines but the finish has been great with very minimal work to be done.
 
Nice to see a Jodo on the go, especially one of such a high standard. Will you be making the extra bits frinka venom darts as a separate piece, tree spikes on gauntlets and the viles from the end? (I just found my wonkie pulse 40 build from my jodo in a box today)
 
Last edited:
Thank you for the kind words. As for the extra bits I won't be incorporating the tree spikes into the gauntlets at this time, I couldn't come up with a good way to incorporate them & feel safe about it. Would be too worried about them popping out at an adverse time & poking someone, particularly little kids, while trooping.

The venom darts & the viles may get done down the road but would be more something that would be cool for static pieces but would be difficult to work make work when on a troop. Would be nice accessories though but I think they would be more accessories for a TEOD Boba Fett .

I plan on making the hypodermic needle piece that is being used when Jodo meets Dengar, that would be a cool piece to add to the belt to go with the neck collar.
 

Attachments

  • Jodo_Kast_12.jpg
    Jodo_Kast_12.jpg
    233.2 KB · Views: 49
  • Jodo_Kast_11.jpg
    Jodo_Kast_11.jpg
    338.2 KB · Views: 64
Thank you guys for the kind words.

Been a while but have gotten the helmet painted but still need to finish with some fine weathering details. I made up some templates based off the various views of the helmet throughout the comic. Consistency is very lacking, so took a good stab at using all the various damage displayed. I didn't want too clean of a helmet, just don't feel it would look right.

Also worked on the ammo pouches. Making functional pouches. Used chip board to make a box & glued vinyl over the top. I will be spray dying the vinyl gray & will be adding the stitching in the flap.
 

Attachments

  • Jodo_Kast_Helmet_Views_zpsx9gyg67s.jpg
    Jodo_Kast_Helmet_Views_zpsx9gyg67s.jpg
    984.2 KB · Views: 63
  • 20150614_194715_zpsjllmijor.jpg
    20150614_194715_zpsjllmijor.jpg
    231 KB · Views: 47
  • 20150614_194758_zpsz8c7yb1i.jpg
    20150614_194758_zpsz8c7yb1i.jpg
    238.7 KB · Views: 43
  • 20150614_194950_zpsixi7wcan.jpg
    20150614_194950_zpsixi7wcan.jpg
    235.9 KB · Views: 65
  • 20150614_195020_zpswtttt6g9.jpg
    20150614_195020_zpswtttt6g9.jpg
    243.1 KB · Views: 46
  • 20150614_195030_zpspncyig3v.jpg
    20150614_195030_zpspncyig3v.jpg
    210 KB · Views: 47
  • 20150614_195048_zpsob7lft1d.jpg
    20150614_195048_zpsob7lft1d.jpg
    210.1 KB · Views: 39
  • 20150614_195109_zps5m8opeum.jpg
    20150614_195109_zps5m8opeum.jpg
    151.2 KB · Views: 35
  • 20150614_195139_zps4omscvxv.jpg
    20150614_195139_zps4omscvxv.jpg
    157.8 KB · Views: 35
  • 20150614_195153_zps8afigdg7.jpg
    20150614_195153_zps8afigdg7.jpg
    158.5 KB · Views: 38
  • 20150510_124806_zpsbqegia1d.jpg
    20150510_124806_zpsbqegia1d.jpg
    115.4 KB · Views: 49
  • 20150510_124632_zpsb80fcp3f.jpg
    20150510_124632_zpsb80fcp3f.jpg
    89.5 KB · Views: 50
  • 20150510_124242_zpshp6qx0cs.jpg
    20150510_124242_zpshp6qx0cs.jpg
    94.7 KB · Views: 53
  • 20150510_124141_zpsm9rw5knp.jpg
    20150510_124141_zpsm9rw5knp.jpg
    90 KB · Views: 55
  • 20150510_124117_zpsepposubt.jpg
    20150510_124117_zpsepposubt.jpg
    95.2 KB · Views: 42
  • 20150510_124036_zpsxkf64ady.jpg
    20150510_124036_zpsxkf64ady.jpg
    91.3 KB · Views: 48
Some more progress. Decided to work on the belt some.


Used a vinyl spray paint on the ammo pouches to make them gray. Need to get the stitching done on the flaps.

Went with a brown girth belt from Dover.

Painted up the left & right belt accessories.
 

Attachments

  • 20150623_205233_zpsvx0yfb50.jpg
    20150623_205233_zpsvx0yfb50.jpg
    264.4 KB · Views: 42
  • 20150623_205215_zpsgyhruhnm.jpg
    20150623_205215_zpsgyhruhnm.jpg
    252.9 KB · Views: 47
  • 20150623_205201_zpsrg9hxcor.jpg
    20150623_205201_zpsrg9hxcor.jpg
    276.2 KB · Views: 39
Been busy in the last week working on a number of things.

Got the armor prepped to begin painting.

Had to add some pieces to the cod piece to make it over lap with the kidney plate. Used some pieces from a face shield due to being the same thickness & just as flexible these were epoxied to the inside of the cod piece. The upper & lower sides were heated & formed to match the cod piece. Used some Bondo to blend & fill.

For the back plate I had to add about .750" to the section that the collar piece would be attached. Use some face shield pieces for this & epoxied them. Used Bondo to blend & fill this in.

Assembled the knee armor. Going with 4 darts on each knee. Had to fully assemble these. Used epoxy to hold everything together.

Everything else was trimmed & sanded. Then primed & painted a base silver.

Worked on the 3 belt grenades & pistol grenades epoxying them together. Did some filling & sanding prior to priming. Painted the belt grenades in a light gray/white/black mix with a base silver. The pistol grenades went with a darker grey, red, & purplish color. Trying to emulate the comic coloring.

Worked on the side arm. Went with a Pulce from MLS. Very nice cast & recommend it. Went with a 3D printed barrel piece. The MLS pulse comes in 3 pieces, 2 piece barrel & the main body. The barrel threads onto the body via a 5/8" thread. I cut this off & made & recess adding a 5/16" threaded piece to screw the new barrel on. Wanted this cause wanted the hollow barrel & designed this to place the pistol grenades in the end of the barrel. Did all the prep work & went with a paint scheme similar to ESB Boba Fett.
 

Attachments

  • 20150703_154623_zpsbp2huvzt.jpg
    20150703_154623_zpsbp2huvzt.jpg
    304.7 KB · Views: 37
  • 20150703_154538_zpsjx9p26s6.jpg
    20150703_154538_zpsjx9p26s6.jpg
    323 KB · Views: 30
  • 20150703_154413_zpskg3zxkh2.jpg
    20150703_154413_zpskg3zxkh2.jpg
    294.4 KB · Views: 31
  • 20150703_154346_zpsldvd7mhv.jpg
    20150703_154346_zpsldvd7mhv.jpg
    305.4 KB · Views: 32
  • 20150706_204014_zpslugd4bcl.jpg
    20150706_204014_zpslugd4bcl.jpg
    146.5 KB · Views: 34
  • 20150703_224419_zpssyxlwg6l.jpg
    20150703_224419_zpssyxlwg6l.jpg
    255.1 KB · Views: 57
  • 20150703_224450_zpsqjn1nmpb.jpg
    20150703_224450_zpsqjn1nmpb.jpg
    242.9 KB · Views: 39
  • 20150703_224300_zpsgj9ec8kc.jpg
    20150703_224300_zpsgj9ec8kc.jpg
    267.9 KB · Views: 33
  • 20150703_224317_zpsogsklnog.jpg
    20150703_224317_zpsogsklnog.jpg
    286 KB · Views: 33
  • 20150705_223158_zpseo8yw4yp.jpg
    20150705_223158_zpseo8yw4yp.jpg
    248.1 KB · Views: 48
  • 20150705_223138_zpsm0i4ahbd.jpg
    20150705_223138_zpsm0i4ahbd.jpg
    282 KB · Views: 44
  • 20150706_205941_zpsq950aoeb.jpg
    20150706_205941_zpsq950aoeb.jpg
    323.2 KB · Views: 34
  • 20150706_204734_zpsmzmmvm1n.jpg
    20150706_204734_zpsmzmmvm1n.jpg
    126.5 KB · Views: 32
  • 20150705_224308_zpsuei53fd3.jpg
    20150705_224308_zpsuei53fd3.jpg
    96.5 KB · Views: 33
  • 20150705_224151_zpsqw4e8xhx.jpg
    20150705_224151_zpsqw4e8xhx.jpg
    97.7 KB · Views: 31
  • 20150703_154803_zpshqbhtqoh.jpg
    20150703_154803_zpshqbhtqoh.jpg
    300.6 KB · Views: 41
  • 20150703_154745_zpsxvwuejcv.jpg
    20150703_154745_zpsxvwuejcv.jpg
    315.7 KB · Views: 43
  • 20150703_154730_zpszqoavdnz.jpg
    20150703_154730_zpszqoavdnz.jpg
    324.7 KB · Views: 31
  • 20150706_205857_zpspl6kjmdc.jpg
    20150706_205857_zpspl6kjmdc.jpg
    292.7 KB · Views: 39
  • 20150705_223209_zpsjwi0zegr.jpg
    20150705_223209_zpsjwi0zegr.jpg
    273.4 KB · Views: 35
  • 20150706_203946_zpsrdllx1i8.jpg
    20150706_203946_zpsrdllx1i8.jpg
    119 KB · Views: 34
Last edited:
this is forming up real great!! I'm glad your still at it. you really nailed the paint job! and i love the greeblies on the belt. Jodo was very cool back in the day, glad to see your bringing him to life.
 
WOW, that is looking wonderful! What material did you choose for the prints.

I guess ultra detail for the MQ1 pad, but what for all the bigger part (white flexible?). How do you archieve such a clean and smooth surface, given the fact that the white standard plastic (IF that´s what you chose9 is pretty grainy/ textured...

Markus
 
this is forming up real great!! I'm glad your still at it. you really nailed the paint job! and i love the greeblies on the belt. Jodo was very cool back in the day, glad to see your bringing him to life.

Thank you & definitely still at it. Had some things come up that have slowed the momentum but getting back on track.

[QUOTEWOW, that is looking wonderful! What material did you choose for the prints.

I guess ultra detail for the MQ1 pad, but what for all the bigger part (white flexible?). How do you archieve such a clean and smooth surface, given the fact that the white standard plastic (IF that´s what you chose9 is pretty grainy/ textured...
][/QUOTE]

Thanks Markus, that is correct for the MQ-1 pad went with the ultra detail & everything else that is in the white it the strong, white, & flexible material. I was really impressed with how these printed. This was the best pieces that I have had printed to date. Yes there has been some work to smooth things but on a whole not bad.

Something that I have done is use Smooth Cast 320 on the inside of many of these pieces & the Smooth Cast will absorb into the printed material, which firms it up greatly & makes it very solid. For the outside surface I have been putting a couple of coats of matte clear coat helps seal the printed material & also absorbs into in as well as helping with some of the graininess. Good coat of primer with some wet sanding gives a pretty smooth finish. For the gauntlets I am going to try that new self leveling epoxy coating that is offered by Smooth On to give a smooth surface to see how this works. Keep trying different things to help improve the finish & make things go quicker.
 
Did a 3D design of the Nemrod holster based off of various reference photos, made a version to be pepped or 3D printed. The pep version I eliminated some details to simplify things. Opted to go with the pep version on this build cause of some mods that will have to be made in order to mount the pistol grenades on the side. This is just the card stock shell at this time but will be gluing chip board on the inner surfaces to firm it up then resin coating it. Planning on covering this in vinyl.
 

Attachments

  • Nemrod_Holster_Pepakura_zpsdbzzmwxq.jpg
    Nemrod_Holster_Pepakura_zpsdbzzmwxq.jpg
    156.6 KB · Views: 43
  • 20150708_054613_zpszl8tvckk.jpg
    20150708_054613_zpszl8tvckk.jpg
    132.7 KB · Views: 37
  • 20150708_054624_zpshhzygdjo.jpg
    20150708_054624_zpshhzygdjo.jpg
    132.8 KB · Views: 34
  • 20150708_054656_zpsv8sja88s.jpg
    20150708_054656_zpsv8sja88s.jpg
    373.5 KB · Views: 47
  • 20150708_054703_zps0nkhudgy.jpg
    20150708_054703_zps0nkhudgy.jpg
    370.4 KB · Views: 39
  • 20150708_054715_zpsvgonki5c.jpg
    20150708_054715_zpsvgonki5c.jpg
    133.7 KB · Views: 42
  • Nemrod_Holster_Views_zpsdvhmle8e.jpg
    Nemrod_Holster_Views_zpsdvhmle8e.jpg
    112.6 KB · Views: 44
This thread is more than 8 years old.

Your message may be considered spam for the following reasons:

  1. This thread hasn't been active in some time. A new post in this thread might not contribute constructively to this discussion after so long.
If you wish to reply despite these issues, check the box below before replying.
Be aware that malicious compliance may result in more severe penalties.
Back
Top