Immortan Joe - Fury Road / Furiosa (Boots Done 3/27)

MorbidCharlie

Sr Member
RPF PREMIUM MEMBER
Back in 2015 when Fury Road came out, I put together an Immortan Joe costume. I was still new to the whole cosplay scene, had very little experience making things and did my best. It was certainly nothing to be ashamed of, but it's 8 years later and I am much older and wiser. Joe still remains one of my favorite costumes and with the release of Furiosa I'm redoing the costume to bring it up to par with what I have learned over the years since Fury Road's release. My 2015 Joe:
1705470217814.png


I have to give a shout out to the shoulders of the giants I stand on who put in a ton of work on their own Joe costumes from here, If you plan on working on an Immortan costume, these threads are invaluable on identifying parts, documented builds and sharing of ideas.

ahoudini 's expansive research thread: Immortan Joe costume from Mad Max, Fury Road
Ein 's thread documenting his build and 3D models he shared: Immortan Joe Progress Log - 3d Models, W.I.P. photos, and Con Results!
logan74k 's research thread: Immortan Joe Build and Reference

As with all my builds, I'll document as I work on things and add to the main post to keep things in one tidy spot for anyone following along. A lot of the information that I will be posting has already been shared in one of the threads above, so credit where credit is due.

Armor:
3D modeled buck that will be used to vacuum form a clear plastic to create armor.
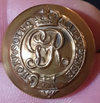
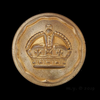
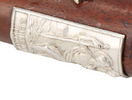
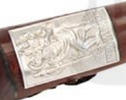
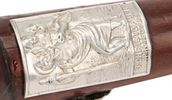
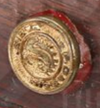
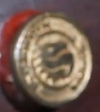
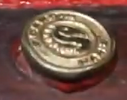
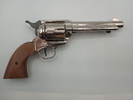
1705515489437.png
1705515535971.png

Revolvers:

Ruger Vaquero with pearlized grips. Using Bruni Singola Azione blank firing replica as replacement. Will paint grips with pearlized paint.
1705515632947.png
1705515647655.png
 

Attachments

  • 1705515650749.png
    1705515650749.png
    10.3 MB · Views: 39
Last edited:
The most difficult piece to tackle is certainly the armor. Theraforming off one of the Roman breast plates that can be purchased on Amazon is a popular way to go, but Joe's chest piece has slightly different details. I am currently working on a 3D model that will serve as a buck for vacuum forming.
1705471174853.png
 
praise be! I too am working in my Immortan costume, tho I have cheated and enlisted help for the armour. I'm still at the research, finding and gathering stage so this will be followed with interest
 
praise be! I too am working in my Immortan costume, tho I have cheated and enlisted help for the armour. I'm still at the research, finding and gathering stage so this will be followed with interest
If you have the time, the threads I listed have everything you need but if you're not super pressed for time, I'm going to regurgitate it in this thread for my own build.
 
One of Joe's revolvers is a stainless steel Ruger Vaquero with pearlized grip. First two images are from the IMFDB.
1705514674269.png
1705514702623.png


I found an extermely close replica: the Bruni Singola Azione. This is a blank firing gun, so it's not overly budget friendly (about $100 after shipping), but it's got the look, the heft and can be stripped like a real gun so I can remove the grips and "pearlize" them. I'm going to be using Turbo Dorks Pearly Gates paint to do so. Going to try and paint the black plastic pieces with a stainless steel paint as well.

1705515311420.jpeg
1705515342174.jpeg
 
Immortan Joe's iconic face mask.
This is the same mask I wore back in 2015, but it's been reworked. Thanks to Thunderhead Studio for the amazing paint job. It has held up after all these years. Also, thanks to Ein for the sculpt and cast of the mask.
I was still relatively new to cosplay and all the adjacent skills when I wore this back in 2015 and really screwed up a couple of spots on the mask. For some stupid reason, I drilled holes into where I *thought* the brass wiring was supposed to be and put little janky wires in place. Flash forward to now and being somewhat more skilled, I was able to fill in the holes with Milliput and insert some properly shaped wiring that I modeled and 3D printed. Some fussing with trying to match the paintwork from Thunderhead Studio, some brass paint for the new wiring and a little highlighting of the various screws and the mask is ready to wear through the gates of Valhalla!
1706042765900.png
1706042804857.png
1706042829673.png
 
Thank you for the kind words! I wish my skills had moved forward over the same time period as yours clearly have! Truly beautiful work! I plan to lurk and drool…
 
Fell down the rabbit hole the past 48 hours looking for everything on the war club. I had no idea there were so many different pieces attached to this thing.
There are still a few pieces I am trying to identify and likely a few that I will never be able to identify. To help point out where each piece is I have taken the Propstore images and made a little diagram identifying each piece.
1706498605207.png

1706498620682.png

1706498631548.png

1706501697055.png


1 - Seaforth Highlanders Regimental Cap Badge:
1706498660867.png

2 - Russia Kopek Coin:
1706498674161.png

3 - Unidentified gem. Common enough.
4 - France 5 Centimes Coin:
1706498687883.png

5 - "Tiger's Eye" - in the video where Hugh talks about the club, he says this is a tiger's eye (assuming gem) from India. To me it looks more like a fish eye used in taxidermy. Either way, this is likely a unique item that won't have an exact match.
6 - Random bit of debris. A shell or something with a pearl like finish. Another unique item.
7 - Tria Juncta In Uno Badge:
1706498696220.png

8 - Vintage NTC Transit Token:
1706498703173.png

9 - Random bit of debris - jade maybe? Another unique item.
10 - 1946 ½ Anna Coin:
1706498710065.png

11 - Unidentified Medallion. A Google image search pulls up many other medallions that are close, but have been unable to find an exact match.
1706501758509.png
1706501777523.png

12 - Italy 5 Lire:
1706498722527.png

13 - Skull with Rose Charm:
1706498728174.png

14 - Seaforth Highlanders Button:
1706498740838.png

15 - St. Christopher plaque - Sticker/magnet for vehicles. Only found one place online that even lists this, it's out of stock and they don't carry it anymore. https://www.stmartin.ie/.../st-christopher-car-plaque-rect/
1706632094495.jpeg

16 - Switzerland Rappen 1957 - most rappen have the same back, despite value.
1706498759348.png

17 - Unknown brooch. It looks to be an Asian style phoenix? Not finding a terribly close match, either. Possibly a unique item. Roughly 3" long.
1706501943817.png

18 - Sweden 10 Ore Coin:
1706498766664.png

19 - Random bit of debris. Possible something else was mounted here.
20 - Nissan emblem. No luck finding an exact match. Possibly off a car, possibly an enamel pin. Roughly 1 inch by .5 inches.
1706502075982.png

21 - Random bit of debris. Looks like a tooth to me.
22 - Norfolk Yeomanry Cap Badge:
1706498779364.png

23 - Kill ‘Em All Let God Sort ‘Em Out Badge:
1706498786416.png

24 - Random bit of debris. Small gemstone.
25 - 1929 Belgium 10 or 25 Centimes w/ Dutch Lettering:
1706498799950.png

26 - WW1 or WW2 Brass Button - a little unsure on this one. Some findings say it's a Royal Engineer button, others say it's a Colonel's button.
1706498872623.png

27 - Unidentified badge. Have been unable to find anything on this piece. Not certain it's a badge or pin. Roughly .75"
1706502101018.png
1706502115704.png

28 - 1960's British Scouts Tenderpad Badge:
1706498962345.png

29 - Death or Glory Badge:
1706498989537.png

30 - Canadian Royal Tank RTR Cap Badge:
1706499026601.png

31 - 1948 South African 3 Pence:
1706499077551.png

32 - 1965 Ireland 1 Flóirin - 2 Scillingí:
1706499107319.png

33 - Unidentified gem.
34 - Soviet Borders Guard Badge:
1706499198016.png

35 - Austria 10 Groschen:
1706500662264.png

36 - Royal Regiment of Wales “GWELL ANGAU NA CHYWILYDD” Cap Badge:
1706500706712.png

37 - Unidentified Star Gem.
38 - a vintage Pierre Cardin button from the 70s typically seen on their blazers.
1706674775551.png

39 - Viking Coin - Birka or Hedeby:
1706501309941.png

40 - Unidentified Terra Cotta Warrior Badge/Pin - a few similar, but can't seem to find this exact style.
1706502521833.png

41 - Enamel Sunbeam Motorcycle Badge:
1706501406863.png

42 - The Ayrshire, Earl of Carrick's Own Yeomanry, Button:
1706501566758.png

43 - 14th Punjab Regiment Badge:
1706501604020.png


If you happen to know what any of the unidentified pieces might be, let me know!
 

Attachments

  • 1706501432404.png
    1706501432404.png
    118.6 KB · Views: 33
  • 1706501462464.png
    1706501462464.png
    123.5 KB · Views: 24
  • 1706501796347.png
    1706501796347.png
    214 KB · Views: 44
  • 1706501884962.png
    1706501884962.png
    60.3 KB · Views: 47
  • 1706501906471.png
    1706501906471.png
    338.6 KB · Views: 49
  • 1706502347603.png
    1706502347603.png
    72.7 KB · Views: 57
  • 1706502422574.png
    1706502422574.png
    137.6 KB · Views: 57
  • 1706502488751.png
    1706502488751.png
    52.9 KB · Views: 56
Last edited:
Identified another piece today. On the diagram this is 38 - a vintage Pierre Cardin button from the 70s typically seen on their blazers.
1706674672968.png
 
I've given up on the search for the two remaining pieces I can't identify - the bird/phoenix brooch (17) and the odd face-like piece (27), so I modeled out a close approximation to 27.
1706981847180.png
1706981860465.png
1706981876753.png


The piece is only about 23mm big, so most of the detail won't be immediately visible anyway, but I'm a little OCD on trying to capture accuracy. On to printing this piece.
 
Club printed out and assembled. On to sanding and smoothing so it can be hydrodipped with a wood grain. Will be a bit before all of the trinkets arrive to be attached to it so on to other pieces after finishing/smoothing up the base.

1707339682210.png
 
Tweaking models for Joe so a lot of modeling, print, tweak, adjust model, reprint, etc.
Today, I knocked out the 3D model for Joe's shin guards. The hard parts are present just to check spacing. The model for the leather pieces will be used to laser cut the leather.

grieves.jpg
Shin Guards.jpg
 
Rather than using a real chain for the boots this time around, I modeled and 3D printed them. This makes them lighter and I can bend and twist them to conform to the boot sole. A hole was modeled into the middle of each base piece so that I can screw the pieces into the sole of the boot in addition to adhesive to keep it in place. The piston toe cap has been printed and fit to the boot as well.
For the boot sole, I carved out the shape of the sole of the boot onto 1" EVA floor mats and attached them to the bottom of the boot. This gives me more anchor space to attach the chain and as an added bonus, I get an extra inch of height.
I've also printed off portions of Joe's torso armor. These pieces are hollow and will be Dremeled out to test the fit and make sure my scaling is right.
1708623967813.png
1708623999219.png
1708624019122.png
1708624040224.png
1708624056770.png

1708624086486.png
1708624109994.png

1708624135483.png

1708624154166.png
 
And Joe's boots are done! The little riveted flaps on the side of the boot proved to be a bit of a challenge. I wanted to make sure the flaps stayed put, so using some clay foam, I formed a shape that the flaps would adhere to. After that, I punched in the rivets and mounted the flaps down with contact cement.
The rust on the chain was created using a mixture of acrylics browns with actual sand mixed in to give it grit.
On to the shin guards!

1711600153479.jpeg
1711600170236.jpeg
 
Easter Sunday painting! All of Joe's shin guard greeblies, pre-weathering.
If you didn't know, the lettered emblems are from various cars. The "XL" is from the Ford Cortina 240 XL, the "500" from the Ford Falcon 500, the "GX" from the Datsun 200B, and the "1100" from the Morris Minor 1000. All of these cars saw use in Australia where Mad Max movies take place.
These were all 3D printed, rattle canned with different silvers and the red hand painted into the GX emblem.
IMG_20240331_105551847.jpg
 

Your message may be considered spam for the following reasons:

If you wish to reply despite these issues, check the box below before replying.
Be aware that malicious compliance may result in more severe penalties.
Back
Top