That's Helagak's file found in his thread just a few posts down...
You are using an out of date browser. It may not display this or other websites correctly.
You should upgrade or use an alternative browser.
You should upgrade or use an alternative browser.
Guardians of the Galaxy Chris Pratt Star-Lord Costume Build (pic heavy)
- Thread starter DTLSchiller
- Start date
skrambles1987
New Member
This is what I got so far on my boots

OliverQueenIND
Well-Known Member

Jackal
Well-Known Member
Apprentice
New Member
Ah. Posted this on the wrong thread xD I was just trying to help out this other thread that is trying to figure out the costume as well.That's Helagak's file found in his thread just a few posts down...
DTLSchiller
Active Member
Well i got the shirt today and i have just about everything. I ordered my jets and helmet so there in the mail now. I also got paint for the airbrush (jets &helmet) and brass rods for the jets, now i just have to wait for them to arrive.
Here is what I have up to this point.
 Still need the boots and belt/holster.
What do you guys think?
Here is what I have up to this point.
Still need the boots and belt/holster.What do you guys think?
skrambles1987
New Member
Well do to unforeseen circumstances I will am in the market star lord replica mask if anyone as any suggestions i would love to know. And if they are putting them out before August 1st that would be awesome.
DTLSchiller
Active Member
Well do to unforeseen circumstances I will am in the market star lord replica mask if anyone as any suggestions i would love to know. And if they are putting them out before August 1st that would be awesome.
How much are you looking to spend?
skrambles1987
New Member
$250 - 300 ish I depending on shipping and all that mess.
DTLSchiller
Active Member
Davy sells a kit for $300, i just bought mine the other day. if you choose to get it, order soon so it can ship to you in time.
skrambles1987
New Member
Sounds good to me how to i get a hold of Davy? On RPF or does he has a different site?
DTLSchiller
Active Member
Its best to contact davy through his Facebook (https://www.facebook.com/dave.klakus), he is good about responding quickly.
Good Luck :thumbsup
p.s. you will still need to get paint to paint the helmet
Good Luck :thumbsup
p.s. you will still need to get paint to paint the helmet
skrambles1987
New Member
Here hoping he sees my post :unsure I don't mind painting i just hope i can get one Thanks for the lean i will keep working on the other parts until then.
DTLSchiller
Active Member
Send him a private message, he will see that usually within a day. And considering he casts them himself you should be able to get one.
grudgehammer
Active Member
Just a heads up on Davy: He's out of town on vacation until the 18th.
DTLSchiller
Active Member
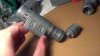
I got my jets today, they need a lot of work but they are cool!
First time having something 3d printed for me :cool

This is going to be a little work.
First time having something 3d printed for me :cool
This is going to be a little work.
DTLSchiller
Active Member
looks like fun....i ordered mine the other day also....did you order yours from kevin......
Yes i got mine from Kevin, they are great. I would suggest to do an acetone vapor bath on them. It gave my parts a crazy smooth surface.
DTLSchiller
Active Member
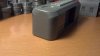
So yesterday I started working on my jets and I didn't know what was the best method to get them smooth for painting so I tried the two that I know.
The first of those was just simple sand paper which i spray glued to a scrap piece of wood.
 It gave good, but not perfect results
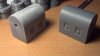
The next thing I tried was acetone vapor bath smoothing. I have never done this till now so I wanted to try with one part while sanding the rest.
 This was my first (very crude) setup. It only worked on the side closest to the acetone, but that side was very very smooth.
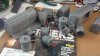
I decided to try this process on all my parts so I did my youtube research and drove to home depot before they closed to get a steel paint can and some magnets. I used the magnets to hold some paper towels on the sides of the can. ( this was the video I used as inspiration: https://www.youtube.com/watch?v=VvCEnA0NEG4)
 So the parts wouldn't stick to the lid of the can i cut out a circle out of roofing tin that I had laying around. After putting some parts on the (upside down) lid I pored a liberal amount of acetone in the can and turned it around so that the paper towels would absorb all of the liquid and placed it above the parts. I noticed right after I put down the can the hole thing got ice cold, it was just to Cool not to show you guys.
")
 I left all the parts in for 40 minutes then pulled them out and let them sit for about an hour. You can still see the build lines on each part but the surface is really smooth. After running all the parts through the process and letting there surfaces cure the results were awesome!
 I'm not sure the picture does it justice, but trust me its smooth.
Working on all these parts did teach me something about getting 3d parts finished and i suggest you think of this if you try.
ONLY sand parts that absolutely need it, even then take the grit count high. The best surfaces on my parts are the ones I did no sanding on. They are all smooth, but the sanded ones have a noticeably different feel to them and is frankly not as good.
The first of those was just simple sand paper which i spray glued to a scrap piece of wood.
It gave good, but not perfect results The next thing I tried was acetone vapor bath smoothing. I have never done this till now so I wanted to try with one part while sanding the rest.
This was my first (very crude) setup. It only worked on the side closest to the acetone, but that side was very very smooth. I decided to try this process on all my parts so I did my youtube research and drove to home depot before they closed to get a steel paint can and some magnets. I used the magnets to hold some paper towels on the sides of the can. ( this was the video I used as inspiration: https://www.youtube.com/watch?v=VvCEnA0NEG4)
So the parts wouldn't stick to the lid of the can i cut out a circle out of roofing tin that I had laying around. After putting some parts on the (upside down) lid I pored a liberal amount of acetone in the can and turned it around so that the paper towels would absorb all of the liquid and placed it above the parts. I noticed right after I put down the can the hole thing got ice cold, it was just to Cool not to show you guys. I left all the parts in for 40 minutes then pulled them out and let them sit for about an hour. You can still see the build lines on each part but the surface is really smooth. After running all the parts through the process and letting there surfaces cure the results were awesome!I'm not sure the picture does it justice, but trust me its smooth.Working on all these parts did teach me something about getting 3d parts finished and i suggest you think of this if you try.
ONLY sand parts that absolutely need it, even then take the grit count high. The best surfaces on my parts are the ones I did no sanding on. They are all smooth, but the sanded ones have a noticeably different feel to them and is frankly not as good.
Attachments
DTLSchiller
Active Member
Now on to making sure al the parts fit together.

To get all the parts to interlock together I used a hobby knife and a small file. It took a bit of work but i got it just right.

after every thing fit properly i started drilling holes and cutting the brass rods for the sides of the boosters.
 The brass took the longest time because I used snips to cut them but the sharp edges would not go into the holes so I had to file each end down by hand. Once it all fit I wanted to use my airbrush. Even though i had never used it prior I had a good idea what to do.
I got all the parts painted in an aluminum color and i officially love using the airbrush to paint.
 Although the painting was great things took a bit of a bad turn when I was cleaning the gun…
 Right as I was about to put the thing up "POP!" I blew a hole right in the air line.
I don't even know how it happened. All I do know is amazon here I come.
To get all the parts to interlock together I used a hobby knife and a small file. It took a bit of work but i got it just right.
after every thing fit properly i started drilling holes and cutting the brass rods for the sides of the boosters.
The brass took the longest time because I used snips to cut them but the sharp edges would not go into the holes so I had to file each end down by hand. Once it all fit I wanted to use my airbrush. Even though i had never used it prior I had a good idea what to do.I got all the parts painted in an aluminum color and i officially love using the airbrush to paint.
Although the painting was great things took a bit of a bad turn when I was cleaning the gun… Right as I was about to put the thing up "POP!" I blew a hole right in the air line.I don't even know how it happened. All I do know is amazon here I come.
Similar threads
- Replies
- 4
- Views
- 669
- Replies
- 4
- Views
- 604
- Replies
- 0
- Views
- 252
- Replies
- 0
- Views
- 224
- Replies
- 3
- Views
- 959