Batman 1989 Vault weapons display

Both! I put in 1 drop each of blue and black dye into my resin, and then I'm using a lot of rattle cans for enamel grey, matte ink blue, and satin black. Just lightly dusting a few puffs all around with reach color, layering over and over. The effect I want is that the vault is probably most black, but perhaps under a floodlight it gives off a grey shine.

Edit: I think this is it.
 

Attachments

  • IMG_3236.jpeg
    IMG_3236.jpeg
    696.3 KB · Views: 83
  • tempImage4hpXPd.png
    tempImage4hpXPd.png
    3.6 MB · Views: 82
  • IMG_8421.jpeg
    IMG_8421.jpeg
    349.7 KB · Views: 86
  • IMG_8420.jpeg
    IMG_8420.jpeg
    1.1 MB · Views: 102
Last edited:
Some different angles
 

Attachments

  • IMG_3258.jpeg
    IMG_3258.jpeg
    250.5 KB · Views: 64
  • IMG_3259.jpeg
    IMG_3259.jpeg
    302.9 KB · Views: 66
  • IMG_3260.jpeg
    IMG_3260.jpeg
    392.1 KB · Views: 60
Threw on a ton of satin and semigloss poly, then rubbed some wax on. Still got more polishing to go.

Also I’m considering making the deadbolts even shorter. At this length I wonder if they look too spiky to really communicate “locks”
 

Attachments

  • IMG_3271.jpeg
    IMG_3271.jpeg
    537.1 KB · Views: 76
  • IMG_3270.jpeg
    IMG_3270.jpeg
    280.4 KB · Views: 72
  • IMG_3278.jpeg
    IMG_3278.jpeg
    469.6 KB · Views: 69
  • IMG_3281.jpeg
    IMG_3281.jpeg
    599.9 KB · Views: 67
  • IMG_3276.jpeg
    IMG_3276.jpeg
    358.9 KB · Views: 64
  • IMG_3281.jpeg
    IMG_3281.jpeg
    630.1 KB · Views: 64
Last edited:
Superb! For what it is worth: I think the deadbolts look good - I like the length in relation to the closest bevel.
 
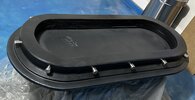
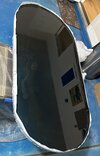
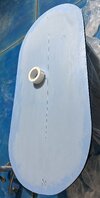
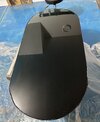
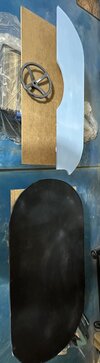
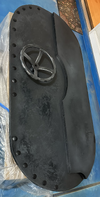
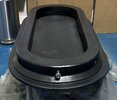
Turning my attention to the reverse side today. First, I had to chisel off the hardened beads from where it dripped while brushing resin on the front side.

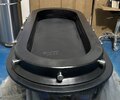
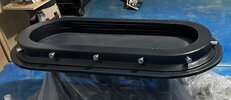
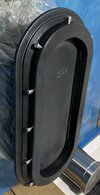
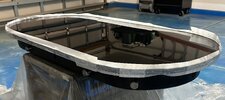
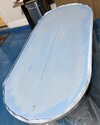
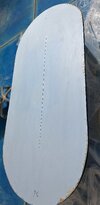
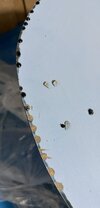
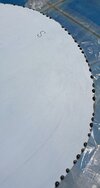
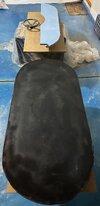
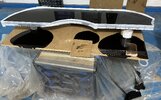
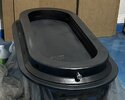
Then sand, prime the edge again, and lay down resin tape for the edges. I was skeptical about this method for containing the resin at the edge, but seems to be working great. It took about 88 ounces to cover the back side. I had a bit of a scare since my mixing bucket only holds 56 ounces, and since it took about 36 to cover the inside, I thought 56 should be enough for the outside. So after emptying out my bucket, I was in a bit of a rush to get the other 32 ounces mixed up before the first batch could start hardening. Consequently, I didn't do as good a job mixing in the black dye on the second batch, and you can see the lighter colored streak in the photo. It doesn't really matter, as it's all getting sanded and painted over anyway. The tint in the resin is really just to help provide an under color.

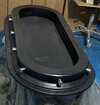
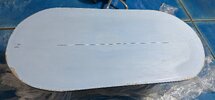
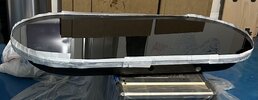
I think it came out great. I've learned for big, flat surface pours, use lots of denatured alcohol spray to help it level.

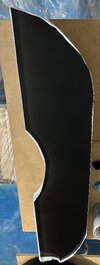
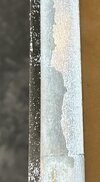
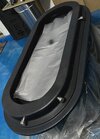
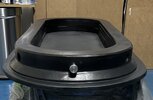
Waiting at least 12 hours to peel the tape off and see how it did. I'll probably give it the full 48 hours of cure time before sanding and prepping this side for further details.
 

Attachments

  • IMG_3302.jpeg
    IMG_3302.jpeg
    516.3 KB · Views: 62
  • IMG_3301.jpeg
    IMG_3301.jpeg
    978.2 KB · Views: 64
  • IMG_3300.jpeg
    IMG_3300.jpeg
    1.2 MB · Views: 57
  • IMG_3299.jpeg
    IMG_3299.jpeg
    1.3 MB · Views: 59
  • IMG_3298.jpeg
    IMG_3298.jpeg
    1.3 MB · Views: 58
  • IMG_3297.jpeg
    IMG_3297.jpeg
    1.6 MB · Views: 64
  • IMG_3296.jpeg
    IMG_3296.jpeg
    1.4 MB · Views: 61
  • IMG_3295.jpeg
    IMG_3295.jpeg
    1.1 MB · Views: 56
  • IMG_3294.jpeg
    IMG_3294.jpeg
    1.3 MB · Views: 57
  • IMG_3303.jpeg
    IMG_3303.jpeg
    343.1 KB · Views: 53
Looking good. So are you making the whole vault, or just the door? Where is this going to go relative to your Batman Begins armoire?
 
Should I build the bottom hinge that’s part of the half-door overlay or just keep it rounded?

Pros:

- Accurate

- Might help support the door as a partial stand

- Part of the overall asymmetric character and quirkiness of vAnton Furst’s design

Cons:
- Definitely not building the upper hinge, so may look weird with just the bottom one

- May also look weird when viewed from the weapons side, since it breaks up the roundness of the shape

- Increases the total width, where space for this massive build is already limited
 

Attachments

  • IMG_3308.jpeg
    IMG_3308.jpeg
    1.3 MB · Views: 77
Thanks for the feedback. I'm leaning toward "no hinges."

And I finally found a frame that shows the bottom of the foam layout... and indeed the smoke capsules are the lowest item in the door. Lot of empty space at the bottom. I feel good about my plan to put the chest emblem there.

I pulled the resin tape off today and the hardening went great. There's a couple of rough spots on the right edge that will go away with sanding, and I'll need to blend the resin edge in with the MDF edge and repaint to make them seamless.
 

Attachments

  • Screen Shot 2023-04-27 at 10.59.00 AM.png
    Screen Shot 2023-04-27 at 10.59.00 AM.png
    5.1 MB · Views: 95
  • IMG_3313.jpeg
    IMG_3313.jpeg
    1.3 MB · Views: 87
Got a little more work to hide that seam in the overlay panel. Also my wheel might be a tad large, but I’m OK with that.
 

Attachments

  • IMG_3333.jpeg
    IMG_3333.jpeg
    1.1 MB · Views: 65
  • IMG_3336.jpeg
    IMG_3336.jpeg
    654.2 KB · Views: 63
  • IMG_3335.jpeg
    IMG_3335.jpeg
    1.1 MB · Views: 49
Resin for overlay poured.

Also I’m trying another wheel.
 

Attachments

  • IMG_3338.jpeg
    IMG_3338.jpeg
    680.7 KB · Views: 47
  • IMG_3337.jpeg
    IMG_3337.jpeg
    470.6 KB · Views: 54
Well that's less than ideal!

I had the piece elevated on some paint cans with some shims to try to counter the incline of the garage floor so it wouldn't all pool at one end. However, after the last adjustment, the resin began slowly flowing toward the low end to re-level, which shifted the weight of the whole thing, which in a domino effect threw it off balance, causing the tape to buckle and it just poured over the side like a breaking dam.

Fortunately, I didn't lose too much in the spill and the remaining resin was enough to get a good, consistent coat over it all, about 1/8" thick.

So after staying up late until it hardened enough that I was confident it wouldn't be a huge(-r) mess in the morning, I let it sit overnight.
 

Attachments

  • IMG_3339.jpeg
    IMG_3339.jpeg
    1.3 MB · Views: 61
  • IMG_3343.jpeg
    IMG_3343.jpeg
    230.2 KB · Views: 60
Today, peeled off the tape, trimmed the flash, sanded and prepped for attachment. Next steps will be blending it into the rest of the edge and marking the spots for the rivets down the left side.

The grey is only an artifact from sanding, but I kind of like it.
 

Attachments

  • IMG_3347.jpeg
    IMG_3347.jpeg
    1.4 MB · Views: 59
Zeroing in on the right color.

The wheel situation is this:
Adjusting for my other scale differences, my wheel should be 9.275", but that's not really a size I can find. My closest choices are this one (10.25") or another comparable model that's 7.875". So on a linear scale, the 10.25" one is closer to 9.275", but I wonder if visually it would just look better for it to be a little undersized than oversized? I'll have the smaller wheel in a couple of days to be able to compare.

This photo does show the wheel in the correct position. A smaller wheel would have the same axle location.
 

Attachments

  • IMG_3360.jpeg
    IMG_3360.jpeg
    1.7 MB · Views: 53
Zeroing in on the right color.

The wheel situation is this:
Adjusting for my other scale differences, my wheel should be 9.275", but that's not really a size I can find. My closest choices are this one (10.25") or another comparable model that's 7.875". So on a linear scale, the 10.25" one is closer to 9.275", but I wonder if visually it would just look better for it to be a little undersized than oversized? I'll have the smaller wheel in a couple of days to be able to compare.

This photo does show the wheel in the correct position. A smaller wheel would have the same axle location.
Personally, I would go with the larger of the two, as it is closer to the true size. I think the smaller one would look too small in comparison to the larger one looking just slightly too big.
 

Your message may be considered spam for the following reasons:

If you wish to reply despite these issues, check the box below before replying.
Be aware that malicious compliance may result in more severe penalties.
Back
Top