You are using an out of date browser. It may not display this or other websites correctly.
You should upgrade or use an alternative browser.
You should upgrade or use an alternative browser.
ANH Hero DL-44 Discussion - Three ANH Greeblies Found
- Thread starter deadbolt
- Start date
Darth Lars
Master Member
Shouldn't the bull barrel and scope be somewhat more glossy than the Mauser and the scope mount?Satin black enamel. Not gloss
I find that the scope is somewhat more blue and the Mauser somewhat more brown.
nope... the original props had blued steel finish... MAYBE the barrel was black OX... but it looks like blued steel to me. It's still debated whether the lower frame was painted due to no one really knowing how the mystery disc is achieved, so that may be painted. The scope mount cross bar is clearly painted. The scope is standard finish for the HW 3x: Blued steel and painted brass.


Now for you aluminum kit folks... I'd try aluminum black before painting.
Now for you aluminum kit folks... I'd try aluminum black before painting.
Did mine last night with Blacken-It on the Denix and brass and Aluminum Black on the aluminum and it came out really well. I used satin black enamel on the scope and it looks OK, but I may strip it and try the Blacken-It, instead. Still needs "sight" and antennae greeblies.
Sent from my iPad using Tapatalk HD


Sent from my iPad using Tapatalk HD
Last edited:
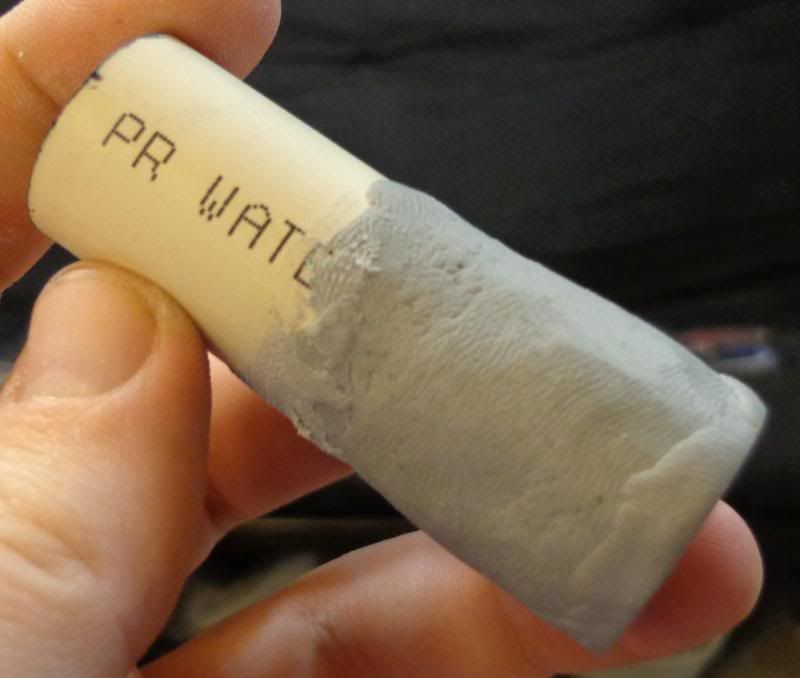
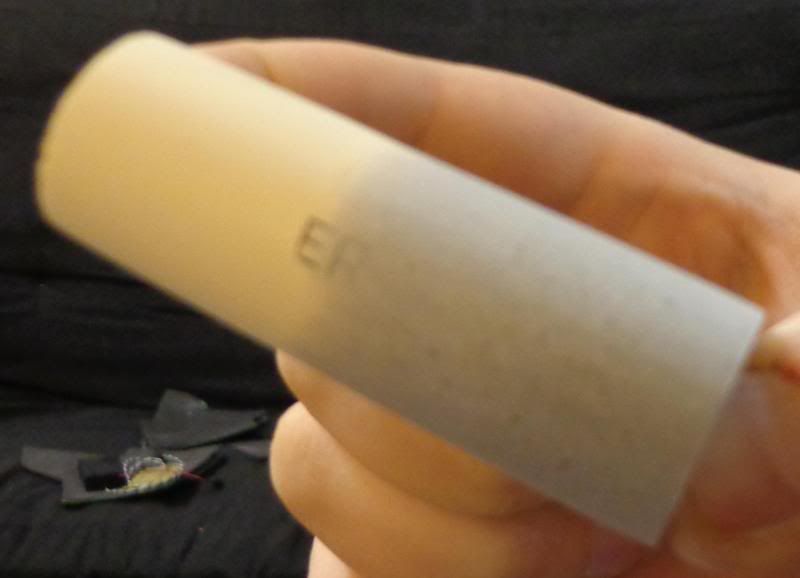
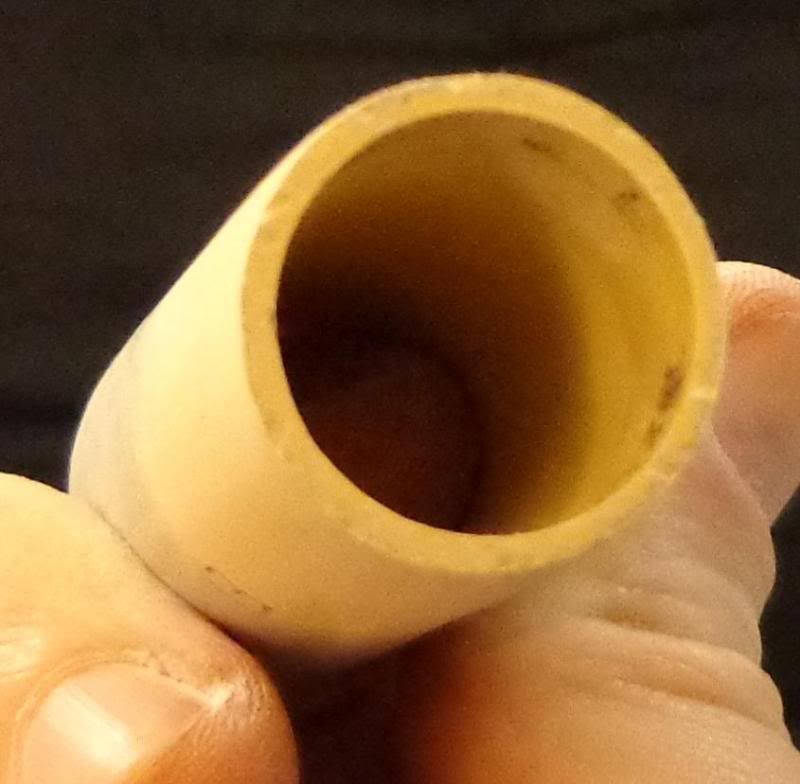
Since I missed the run, I'm making my bull barrel from scratch. PVC pipe and two-part plumbers' epoxy putty.
Side view, before:
...and after:
The receiver end, before:
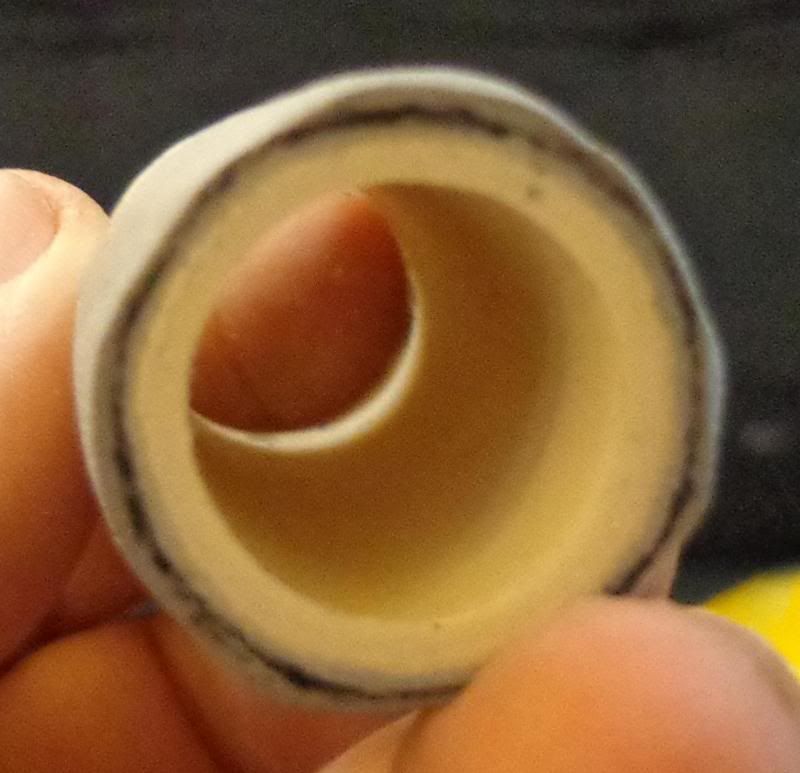
...and after:

The other end, before:
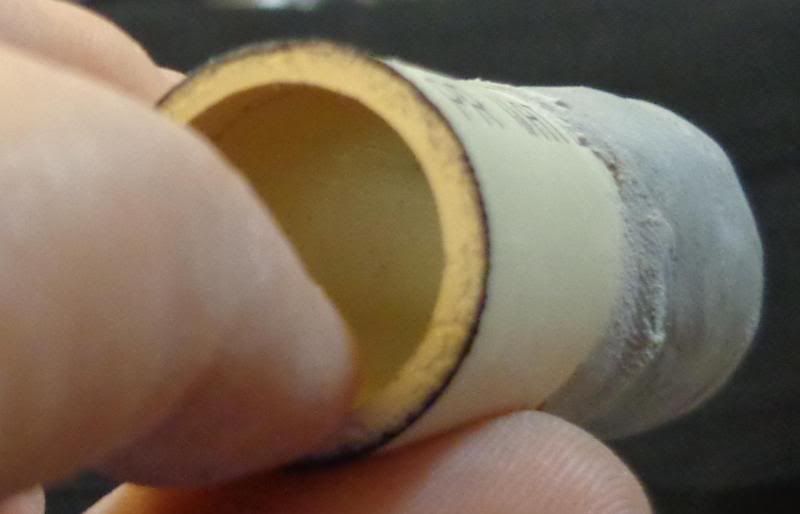
...and after:
Next is filler primer and sanding, repeated a few times. I'll flatten the bottom once I've got the breech readied. And speaking of...
jheilman had let his partially-modded Denix to gather dust for over a year since getting his MGC. He generously let me buy it from him. I have always loved the challenge of maing a silk purse out of a pig's ear. And the Denix is pret-ty piggy. Oy... A couple comparison shots of the Denix against my own C96:
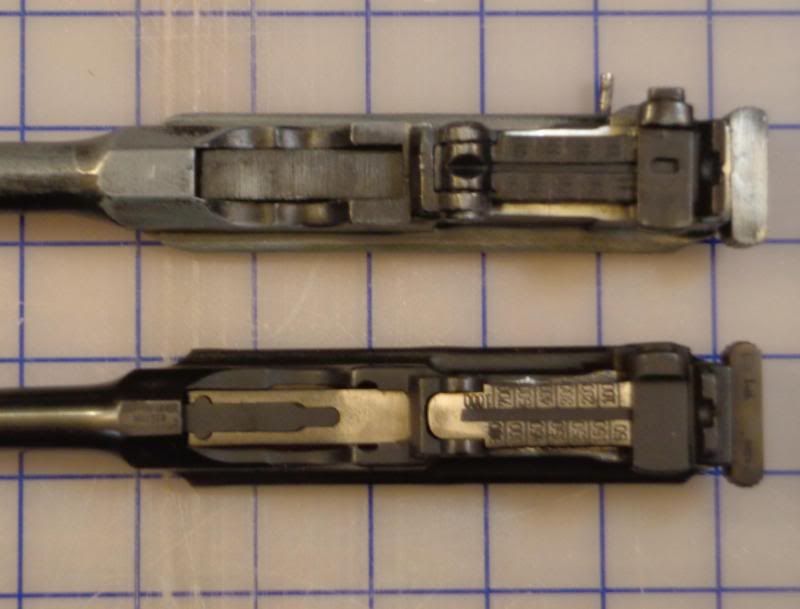
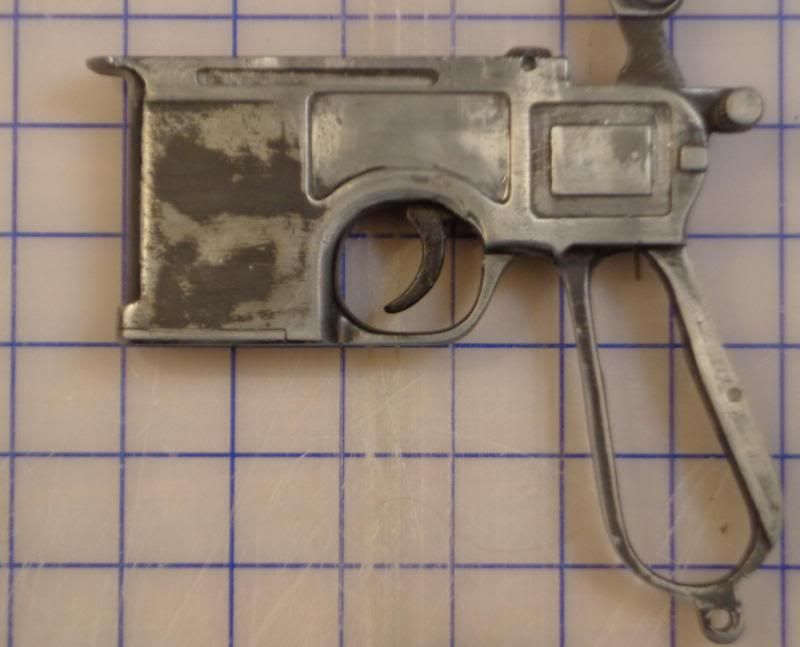
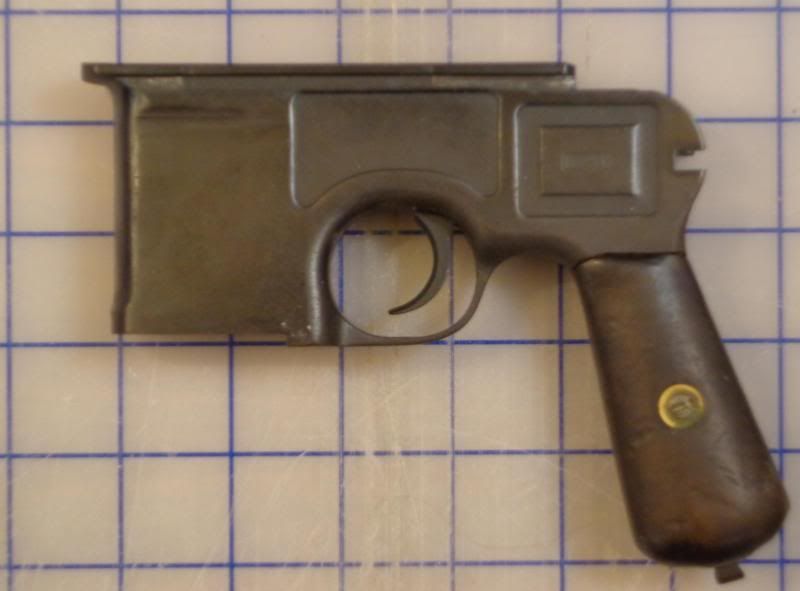
I'm impressed at how well some parts line up, and astonished at how badly off other parts are. I've got a lot of grinding to do. The grip frame is at the wrong angle, too. Anyone know how well it bends? I need to get it angled a little further back. As I said earlier, I'm doing my own take on a Merr-Sonn. If I can ever finagle up a recoil booster and holeless flash hider, I intend to make it able to thread into the end of the bull barrel, so I can turn he Model 44 into the Power 5.") And, because those cast resin props were a pretty undifferentiated black, including the grips, I decided to skip the usual grooved style and get some replicas of early variant "guttapercha"/phenolic resin grips scales Mauser offered:
And, because those cast resin props were a pretty undifferentiated black, including the grips, I decided to skip the usual grooved style and get some replicas of early variant "guttapercha"/phenolic resin grips scales Mauser offered:
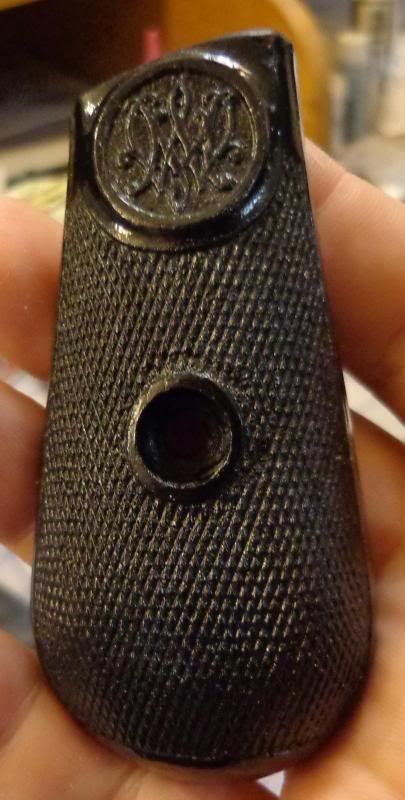
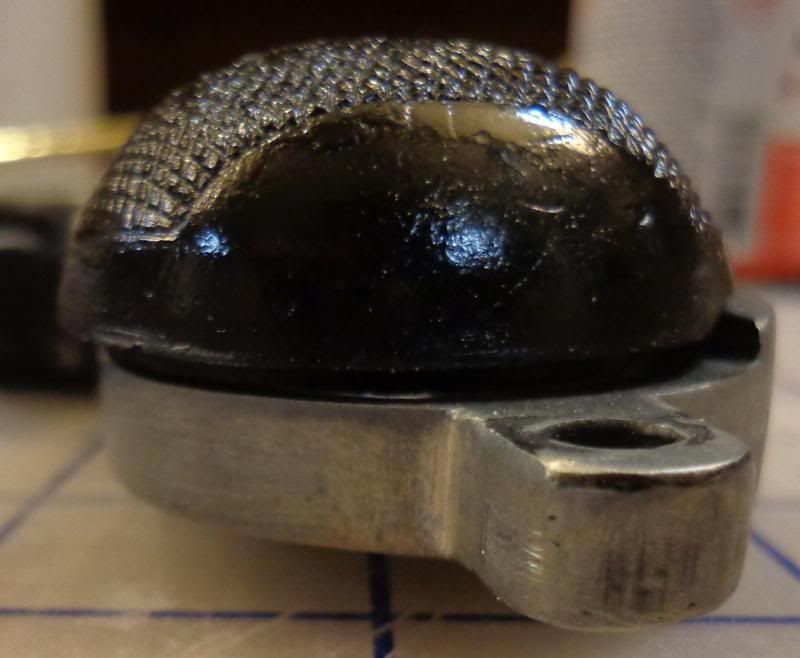
I like the checkered grip texture and the 'WM' monogram (for Waffenfabrik Mauser). I intend to smooth out the monogram and inset a cut Imperial cog there. Here's one of the scales relative to the Denix's grip frame:

...overlaid:
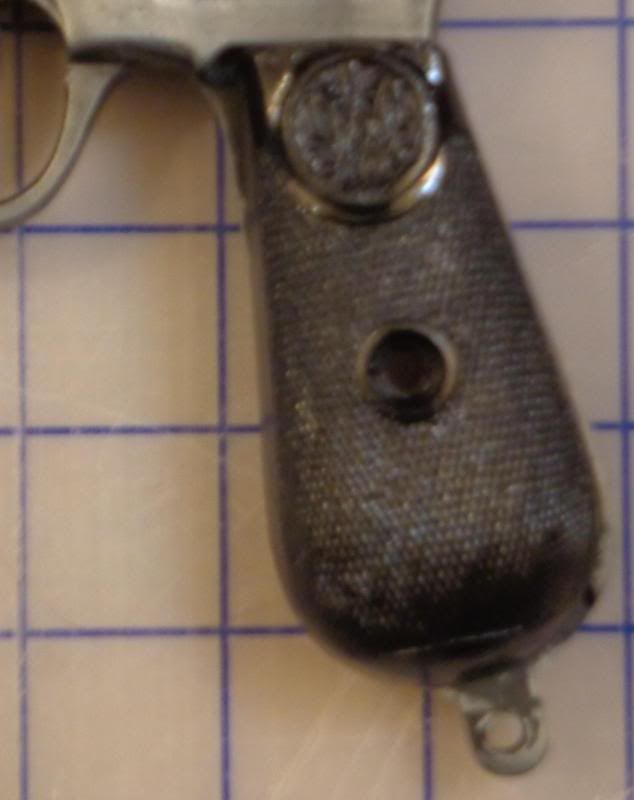
...and end-on:
So yeah, I have some work to do. *chuckle* I also have a bit of T-track on the way, and plan to get the pully/disc and the cylinder halves and pushrods out of part of my February costume budget. Only things I haven't gotten at least sourced are the recoil booster and flash hider, and that stupid plug-and-cord along the top.
--Jonah
Side view, before:
...and after:
The receiver end, before:
...and after:
The other end, before:
...and after:
Next is filler primer and sanding, repeated a few times. I'll flatten the bottom once I've got the breech readied. And speaking of...
jheilman had let his partially-modded Denix to gather dust for over a year since getting his MGC. He generously let me buy it from him. I have always loved the challenge of maing a silk purse out of a pig's ear. And the Denix is pret-ty piggy. Oy... A couple comparison shots of the Denix against my own C96:
I'm impressed at how well some parts line up, and astonished at how badly off other parts are. I've got a lot of grinding to do. The grip frame is at the wrong angle, too. Anyone know how well it bends? I need to get it angled a little further back. As I said earlier, I'm doing my own take on a Merr-Sonn. If I can ever finagle up a recoil booster and holeless flash hider, I intend to make it able to thread into the end of the bull barrel, so I can turn he Model 44 into the Power 5.
And, because those cast resin props were a pretty undifferentiated black, including the grips, I decided to skip the usual grooved style and get some replicas of early variant "guttapercha"/phenolic resin grips scales Mauser offered:
I like the checkered grip texture and the 'WM' monogram (for Waffenfabrik Mauser). I intend to smooth out the monogram and inset a cut Imperial cog there. Here's one of the scales relative to the Denix's grip frame:
...overlaid:
...and end-on:
So yeah, I have some work to do. *chuckle* I also have a bit of T-track on the way, and plan to get the pully/disc and the cylinder halves and pushrods out of part of my February costume budget. Only things I haven't gotten at least sourced are the recoil booster and flash hider, and that stupid plug-and-cord along the top.
--Jonah
Darth Lars
Master Member
The Mauser still looks more brownish and the scope more blueish.nope... the original props had blued steel finish... MAYBE the barrel was black OX... but it looks like blued steel to me.
Original Mausers are blued, but there are many different types of steel alloys, and there are a few different ways to hot-blue a steel part. Plus, the Mauser could have been oiled differently.
Gatekeeper
Sr Member
When bluing steel, the resulting color can be anything from brownish to dark plum, depending on 1)carbon content and 2)oil treament.
(In reality, the term "bluing" is kinda misleading - the process actually blackens steel - it's the oiling that brings out the blue shade.)
(In reality, the term "bluing" is kinda misleading - the process actually blackens steel - it's the oiling that brings out the blue shade.)
Not well at all. It's likely to break if bended.The grip frame is at the wrong angle, too. Anyone know how well it bends?
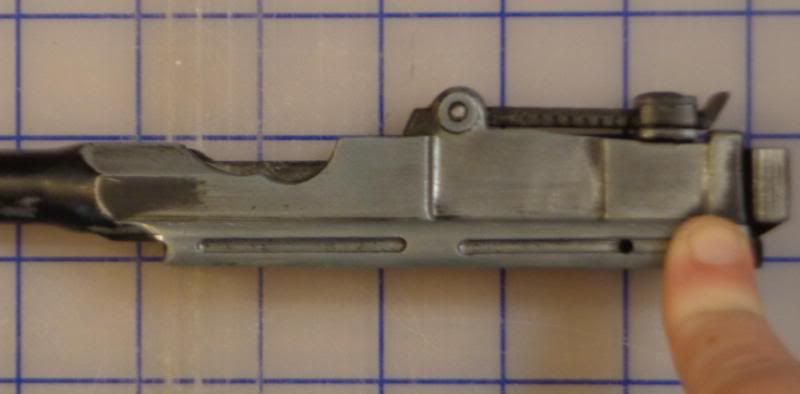
I wasn't really intending to dive into this thing just yet, but the inaccuracies were starting to bug me and the front sight was keeping me from test-fitting the bull barrel, so I took a hacksaw to the barrel. Dear Denix, thank you so much for making the barrel solid -- makes it tons easier to saw through. :rolleyes Then I started on the next bit back -- the breech, side rails, and the bottom cut-out... Some time with hacksaw, Dremel, calipers, and elbow grease later, I've got a pretty good start on roughing in where things should actually be:
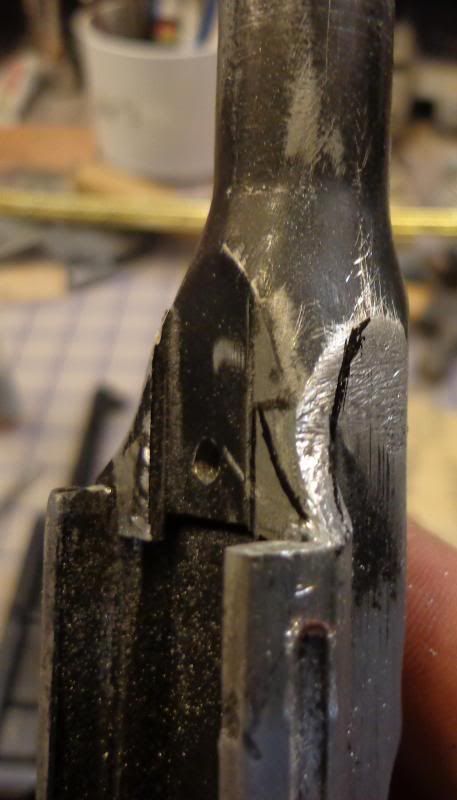
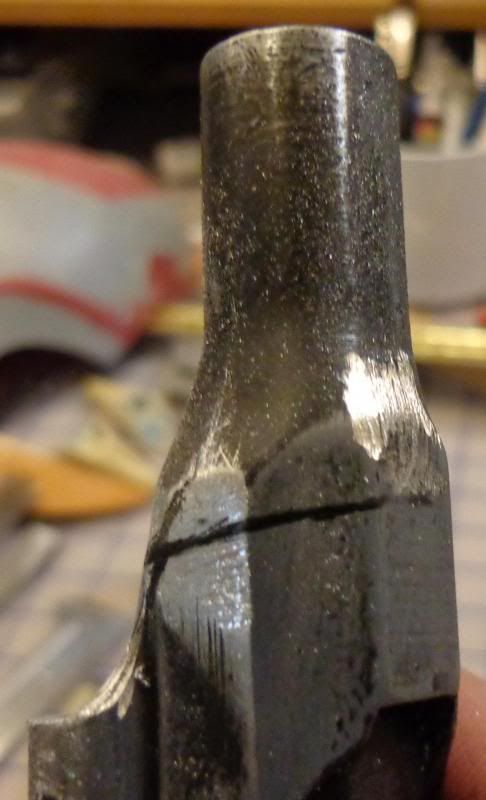
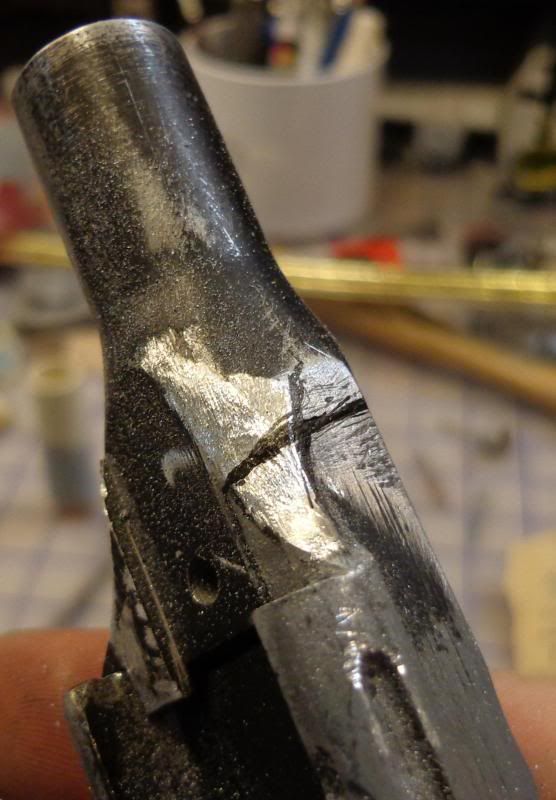
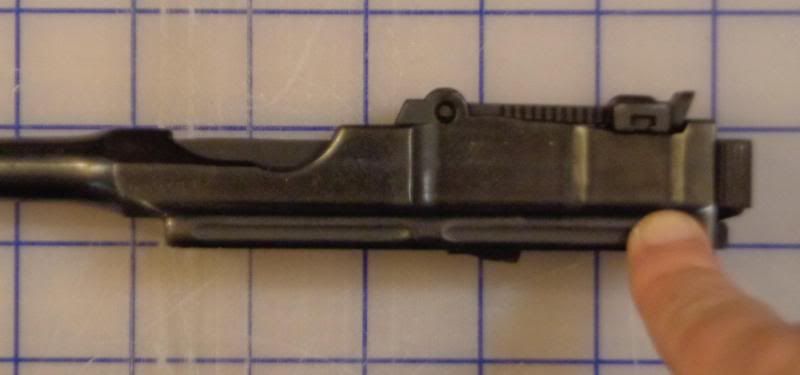
Here, y'all can see the worked-on left side compared to the unmodified right side:
...and side-by-side with my Mauser:
And here are a couple with th ebull barrel loosely fitted. Not all the way to the breech -- still much work to do yet, but it looks about the right size, and I have an idea where I'll need to flatten the bottom:
Damn my compulsions. Gonna get this receiver bashed into shape. A question -- how have folks who have worked on these gotten the bolt out? Is the spring anything like in a real Mauser's bolt?
--Jonah
Here, y'all can see the worked-on left side compared to the unmodified right side:
...and side-by-side with my Mauser:
And here are a couple with th ebull barrel loosely fitted. Not all the way to the breech -- still much work to do yet, but it looks about the right size, and I have an idea where I'll need to flatten the bottom:
Damn my compulsions.
Gonna get this receiver bashed into shape. A question -- how have folks who have worked on these gotten the bolt out? Is the spring anything like in a real Mauser's bolt?--Jonah
Everybody's builds are looking awesome!
I just saw an article that the actor who played Chewbacca posted some personal pics from the filming, very cool,
Chewbacca tweets great old 'Star Wars' photos - TODAY.com
forgot to put his name in: Peter Mayhew
I just saw an article that the actor who played Chewbacca posted some personal pics from the filming, very cool,
Chewbacca tweets great old 'Star Wars' photos - TODAY.com
forgot to put his name in: Peter Mayhew
Last edited:
kpax
Sr Member
The bolt comes out easy enough but the "spring/firing pin" stay in. I think that is peened in. You can grind the would be (screw/firing pin) down from the bolt side to let the hammer sit flatter but it stays in. I think you would have to drill it out to remove the spring etc.
I left it in.
maybe someone has tried to take it out?
I left it in.
maybe someone has tried to take it out?
I wasn't really intending to dive into this thing just yet, but the inaccuracies were starting to bug me and the front sight was keeping me from test-fitting the bull barrel, so I took a hacksaw to the barrel. Dear Denix, thank you so much for making the barrel solid -- makes it tons easier to saw through. :rolleyes Then I started on the next bit back -- the breech, side rails, and the bottom cut-out... Some time with hacksaw, Dremel, calipers, and elbow grease later, I've got a pretty good start on roughing in where things should actually be:
http://i118.photobucket.com/albums/o95/Adabiel/Officer/DSC00157_zpsc29056ad.jpg
http://i118.photobucket.com/albums/o95/Adabiel/Officer/DSC00158_zpsc1cb4b8a.jpg
http://i118.photobucket.com/albums/o95/Adabiel/Officer/DSC00159_zps3bc7baec.jpg
http://i118.photobucket.com/albums/o95/Adabiel/Officer/DSC00160_zps526b5f1b.jpg
Here, y'all can see the worked-on left side compared to the unmodified right side:
http://i118.photobucket.com/albums/o95/Adabiel/Officer/DSC00162_zps0f2c54c5.jpg
...and side-by-side with my Mauser:
http://i118.photobucket.com/albums/o95/Adabiel/Officer/DSC00163_zpsce9c4db8.jpg
And here are a couple with th ebull barrel loosely fitted. Not all the way to the breech -- still much work to do yet, but it looks about the right size, and I have an idea where I'll need to flatten the bottom:
http://i118.photobucket.com/albums/o95/Adabiel/Officer/DSC00164_zpse59165eb.jpg
http://i118.photobucket.com/albums/o95/Adabiel/Officer/DSC00165_zpsf4ef423c.jpg
Damn my compulsions.
--Jonah
kpax
Sr Member
...so jealous!
In my experience...there's no such thing as luck...
In my experience...there's no such thing as luck...
Real Mauser on the way... project live fire will commence soon. ^_^ Wish me luck
Real Mauser on the way... project live fire will commence soon. ^_^ Wish me luck
Awesome!!! Good Luck! keep us posted!
Real Mauser on the way... project live fire will commence soon. ^_^ Wish me luck
NOW I understand the background of your most recent PM
Give me some time to sort things out...
Markus
deadbolt
Sr Member
Great looking builds, everyone!
In case any of you guys can use it, here's a 3d model of a basic Merr Sonn barrel with the booster attached and sized to fit the MGC or Denix. I didn't upload this one to shapeways due to their terms, but here's a link to download the model so it can be printed elsewhere.
Scroll down to the Click here to start download link on the following page. I'm not a big fan of using free file-upload sites, be sure not to click the wrong download link and accidentally download spyware/malware!
Merr Sonn Barrel - 3d Model
-Carson
Last edited:
VFX Freak
Sr Member
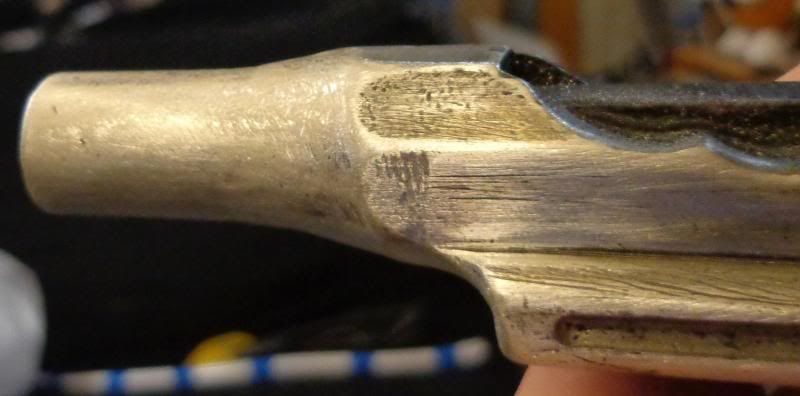
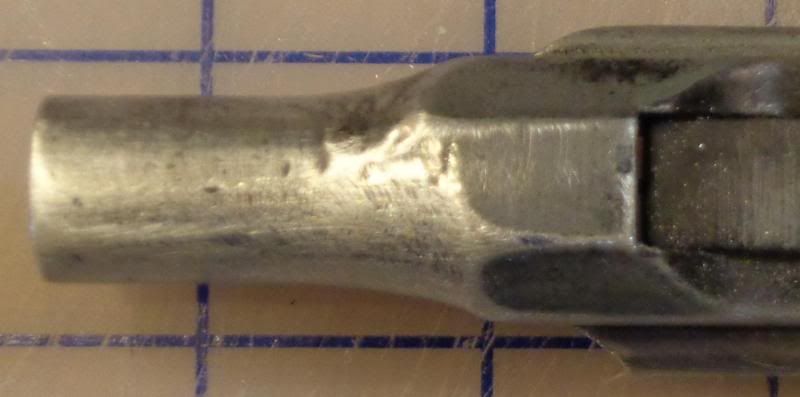
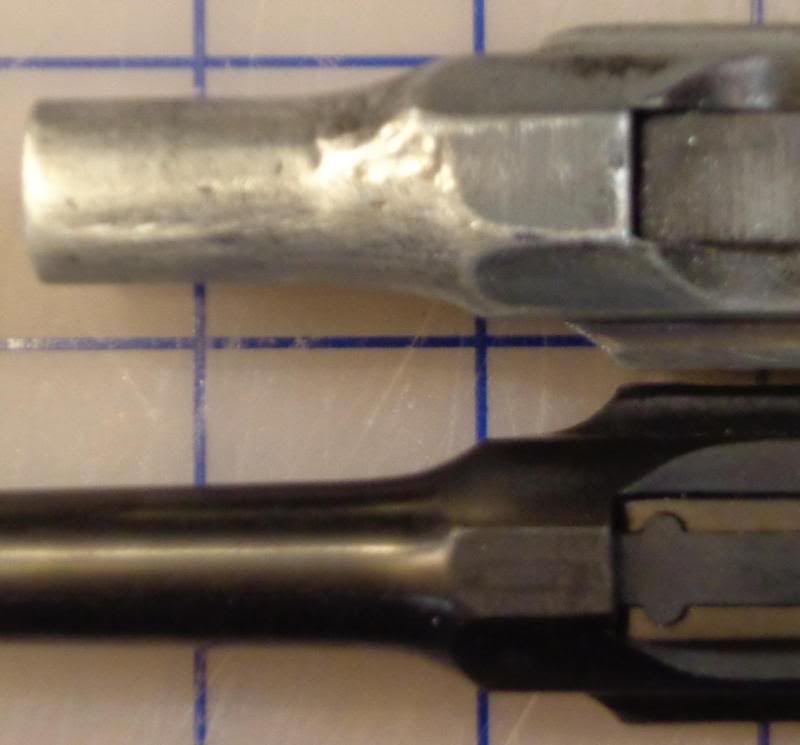
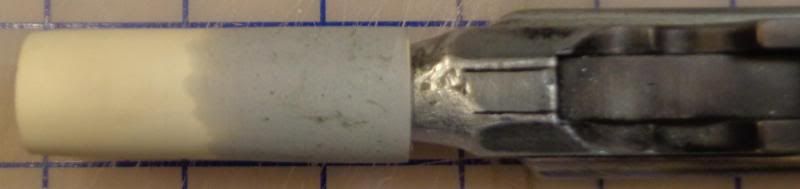
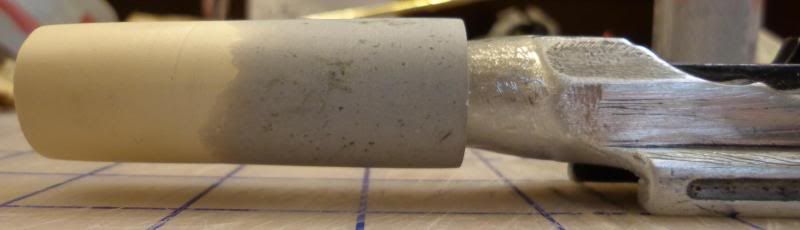
scottjua, I'm in the middle of building a firing version with a real Mauser as well. A long way to go but here are a couple of pix:
I drilled three dimples around the barrel so the bull barrel would have a better grip to survive the forces of firing real rounds. I got the parts in steel and aluminum in case there are mass/inertia/recoil issues when I fire it.

The DEC pieces fit perfectly without any modification, (aside from cutting the barrel of course).


So far so good.

And now it's time to mount the scope. I've discussed this with Pat and I'll probably silver solder or braze the threaded rods in place since I can't have a nut sticking out inside the magazine chamber. The trick will be to get enough surface area for a good bond along with making sure the threaded rods are parallel to each other and perpendicular to the long axis. I'm curious to know what you're planning.
Looking forward to seeing your build.
I drilled three dimples around the barrel so the bull barrel would have a better grip to survive the forces of firing real rounds. I got the parts in steel and aluminum in case there are mass/inertia/recoil issues when I fire it.
The DEC pieces fit perfectly without any modification, (aside from cutting the barrel of course).
So far so good.
And now it's time to mount the scope. I've discussed this with Pat and I'll probably silver solder or braze the threaded rods in place since I can't have a nut sticking out inside the magazine chamber. The trick will be to get enough surface area for a good bond along with making sure the threaded rods are parallel to each other and perpendicular to the long axis. I'm curious to know what you're planning.
Looking forward to seeing your build.
Real Mauser on the way... project live fire will commence soon. ^_^ Wish me luck
Similar threads
- Replies
- 0
- Views
- 209
- Replies
- 19
- Views
- 1,419
- Replies
- 38
- Views
- 2,175