You are using an out of date browser. It may not display this or other websites correctly.
You should upgrade or use an alternative browser.
You should upgrade or use an alternative browser.
1:1 Millennium Falcon Cockpit Replica - Group Build
- Thread starter SteveStarkiller
- Start date
Hi Gang,
Thanks for the words of encouragement... You guys and gals really are the best!") It was one of those moments I had to just walk away and rethink (the extreme heat didn't help either). Of course, that didn't stop me. I spent several hours in front of the computer trying to figure out measurements and where to go from here. With that said...
It was one of those moments I had to just walk away and rethink (the extreme heat didn't help either). Of course, that didn't stop me. I spent several hours in front of the computer trying to figure out measurements and where to go from here. With that said...
I'm switching gears and I'm going to build the front window. This will help me determine all the correct angles / fudging I'll have to do. What we see between the skin and the interior will be a non-issue - there will def be some fudging going on. It would be one thing if I were working from a set of actual blueprints and I didn't read what was in front of me. I'm working from Starkillers 3D model (which we ALL know is friggin masterpiece!) which is a totally different animal and I, from time to time, get lost in the translation.
BUT... what do we do? We shake it off and move forward! It will be nice to start working on a new part of the cockpit! So... as always...
More to Follow!
Thanks for the words of encouragement... You guys and gals really are the best!
It was one of those moments I had to just walk away and rethink (the extreme heat didn't help either). Of course, that didn't stop me. I spent several hours in front of the computer trying to figure out measurements and where to go from here. With that said... I'm switching gears and I'm going to build the front window. This will help me determine all the correct angles / fudging I'll have to do. What we see between the skin and the interior will be a non-issue - there will def be some fudging going on. It would be one thing if I were working from a set of actual blueprints and I didn't read what was in front of me. I'm working from Starkillers 3D model (which we ALL know is friggin masterpiece!) which is a totally different animal and I, from time to time, get lost in the translation.
BUT... what do we do? We shake it off and move forward! It will be nice to start working on a new part of the cockpit! So... as always...
More to Follow!
Hey Greg... actually I don't think you messed up... But I do believe you may have made an incorrect assumption. Your cockpit floor isn't the bottom of the window exterior. Since it's inside, the exterior would actually extend about 2-3 feet below the floor level. Try your calculations again and see what happens when you compensate for a lower exterior.
Hey Greg... actually I don't think you messed up... But I do believe you may have made an incorrect assumption. Your cockpit floor isn't the bottom of the window exterior. Since it's inside, the exterior would actually extend about 2-3 feet below the floor level. Try your calculations again and see what happens when you compensate for a lower exterior.
You are correct - the floor is fine up to about 6-10inches from the window. As we all know, the cockpit nose is basically a cone. I can't build the entire cockpit so I have/had to "cut it" off somewhere. I decided to cut it off JUST below the front window. I REALLY want everybody to be able to see the familiar window when they approach it.
The issue is the lower panels below the shelf. If you remember, I added several 6" high risers (based on a behind the scene image from ANH) along the edges of the cockpit. I thought / assumed that the 6" risers would be clear of the outer skin frame - I was off by 3-4 inches on each side. Then it dawned on me... the original designers never had to build an actual FULL SCALE cockpit with both interior and matching exterior. I don't think anyone actually has? This is what got me in trouble!
Note the long rectangular risers
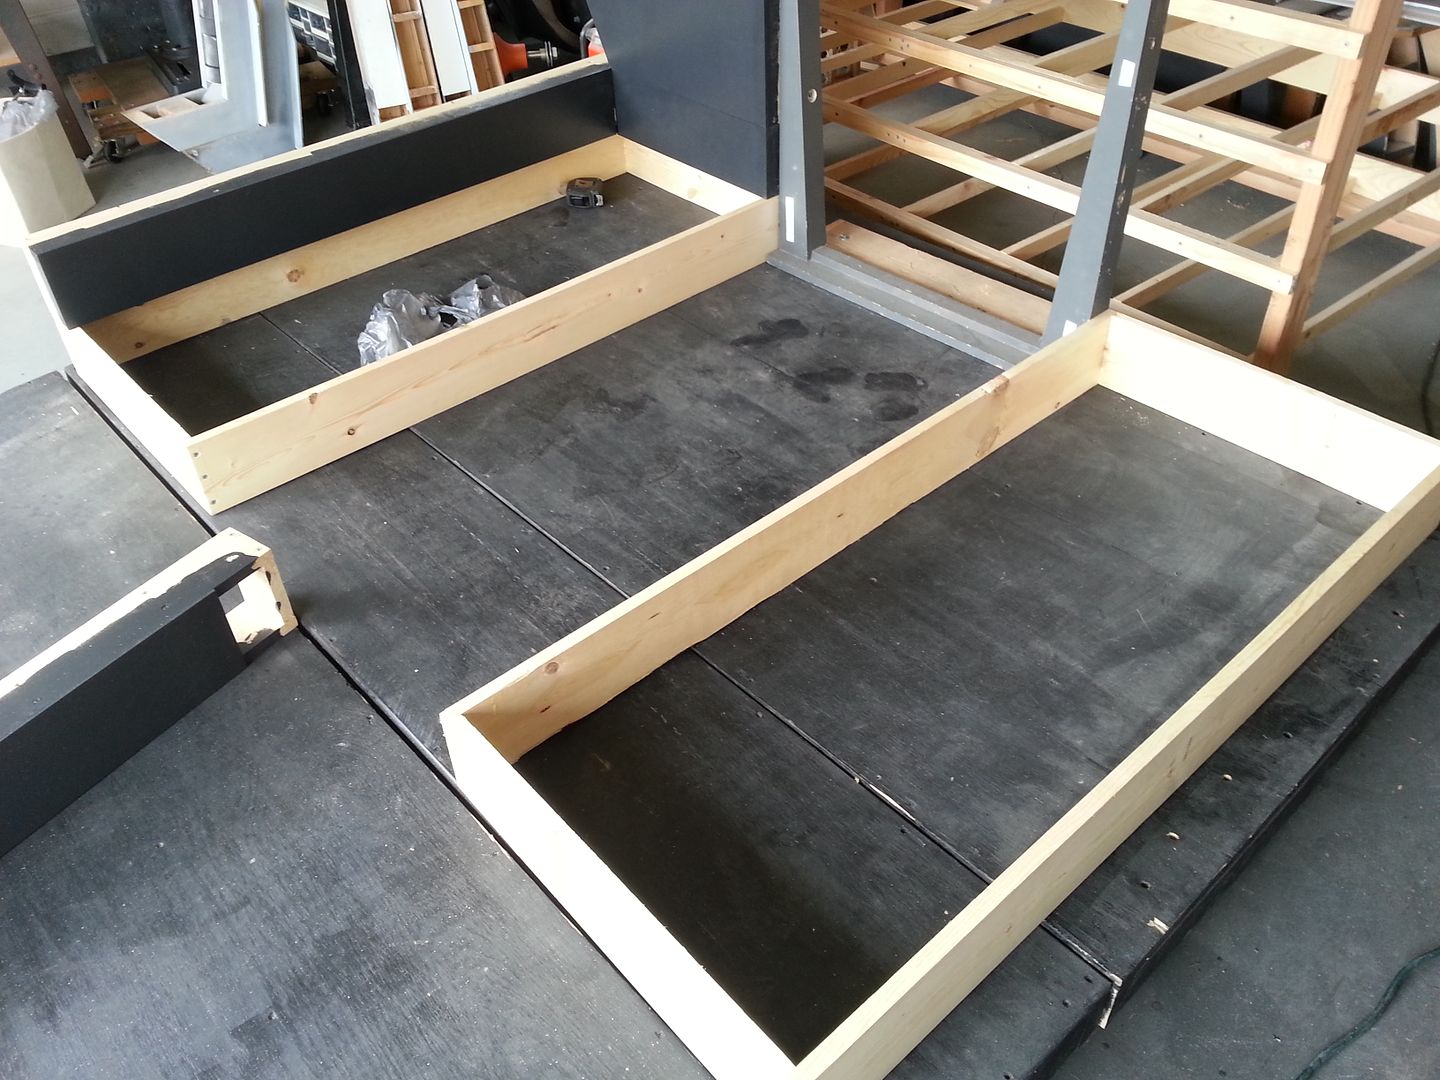
After looking around the build... the 6" risers will be removed and the panels that mount above will once again extend inward toward the center of the cockpit (note the angle on the lower backwall panel) and attach to the nav chair riser platforms. This "should" take care of the main cockpit. It was decided that's where the outer skin will start- this also leaves us room for wiring underneath. Daniel and I have been chatting about welding a frame for the skin. If we can create a simple (HA) frame this would DEF help determine all the existing angles. However, the new center console platforms will also have to be mod'd to fit the new angles. This will reduce the amount of footwell space - but it is what it is...
As I mentioned, I'm going to build the front nose section, reattach everything and then work backwards from there. I should have all this figured out. Fortunately, the changes to the nose panels will be minimal. Cutting the build off at the bottom of the window doesn't leave enough room to really do anything / worry about - I hope that made sense.
From what I can tell (I'm also thinking out loud)... the existing two lower nose panels will be cut in half at a diagonal (wider toward the rear) where a new "lower" portion of the panel will be designed and angled in toward the center. This will resolve the nose skin issue and then everything else should fall into place. I HOPE!
WHEW... Hope that made sense...
- - - Updated - - -
Greg, I have to ask.
Have there been any car accidents out in front of your house on days when you have the garage door open?
- - - Updated - - -
and now you know why the cockpit from the Holiday Special had cutouts for Peter Mayhew's legs. Ahh, reconciling sets with models is fun, huh?
No accidents yet as I live in a cul de sac. But I have had MANY slow downs and a few folks even pop in to say hello. It is amazing... you build a spaceship and suddenly you're the "Go To" guy for all household repairs.
Glad I was able to help bro!
Thank you, Sir! And thanks for the feedback! I'll figure this monster out!
Bugstomper
New Member
You are correct - the floor is fine up to about 6-10inches from the window. As we all know, the cockpit nose is basically a cone. I can't build the entire cockpit so I have/had to "cut it" off somewhere. I decided to cut it off JUST below the front window. I REALLY want everybody to be able to see the familiar window when they approach it.
The issue is the lower panels below the shelf. If you remember, I added several 6" high risers (based on a behind the scene image from ANH) along the edges of the cockpit. I thought / assumed that the 6" risers would be clear of the outer skin frame - I was off by 3-4 inches on each side. Then it dawned on me... the original designers never had to build an actual FULL SCALE cockpit with both interior and matching exterior. I don't think anyone actually has? This is what got me in trouble!
After looking around the build... the 6" risers will be removed and the panels that mount above will once again extend inward toward the center of the cockpit (note the angle on the lower backwall panel) and attach to the nav chair riser platforms. This "should" take care of the main cockpit. It was decided that's where the outer skin will start- this also leaves us room for wiring underneath. Daniel and I have been chatting about welding a frame for the skin. If we can create a simple (HA) frame this would DEF help determine all the existing angles.
As I mentioned, I'm going to build the front nose section, reattach everything and then work backwards from there. I should have all this figured out. Fortunately, the changes to the nose panels will be minimal. Cutting the build off at the bottom of the window doesn't leave enough room to really do anything / worry about - I hope that made sense.
From what I can tell (I'm also thinking out loud)... the existing two lower nose panels will be cut in half at a diagonal (wider toward the rear) where a new "lower" portion of the panel will be designed and angled in toward the center. This will resolve the nose skin issue and then everything else should fall into place. I HOPE!
WHEW... Hope that made sense...
Sure, the ESB-Set was cut off below that window as well.
But i understand you want to go without the vertical supports, right?

The front window frame will have to be reinforced to keep the sides from sagging - a welded steel frame should help a lot.
At least you don't need random parts to be removable for filming...
However, the new center console platforms will also have to be mod'd to fit the new angles. This will reduce the amount of footwell space - but it is what it is...
Since you are dealing with the legroom and platform design again - i noticed a difference in height of the bucket seats between the sets.
Apparently they had one less step/level on the floor from ESB onward.

I think they also moved the whole console and bucket seats backwards - eating up most of the room won by adding the 15" extension...
This increases legroom as well as the room between seats and the side-shelf but most characters are unable to look out the side window!
Also notice how the top of the center console appears to "cut" the circular front window on a different level.
What is your take on that?
Stick with the ANH pedestal or lower/move it like the later installments (which might be better suited for public display).
OMG... I NEVER noticed the platform difference between ANH and ESB... WOW! I am not on my game this week and it's only Monday! EXCELLENT CATCH!
I'm now seeing ALL the major differences. You are correct, the removal of the upper console platform is a HUGE change and they DEF pulled the console back toward the rear. Since we're going for the ESB version, it looks like I'm removing that extra platform (one less thing to load up).
As far as supporting the front window, I was planning to let it rest directly on the platform or build a support platform for it. This should take care of the weight distibution and allow the side panels enough support. Also, you can def see how the lower panels are more angled to accomodate the window and seem to integrate right into the floor. It's going to be very interesting how this plays out. It's interesting - there are 5 basic sides to the geometry.
I'm also considering making a metal frame for the canopy itself. Not sure how realistic that is - that's a LOT of weight. BUT... if the front window is properly secured to the platform it just might work.
WOW - thanks for opening my eyes!
Last edited:
Wavey
Sr Member
Keeping stability in mind, so it doesn't roll away when on show, I'm liking the look of the ESB set in the first photo Bugstomper posted as (with some imagination) it appears like the full cockpit on a fuselage trestle. That's pretty much how I've pictured the finished piece but skinned. Maybe a mix of the two exterior ideas will make it easier to fit the outside panels and still give the impression of the full rounded underside but without needing to add that extra few feet. It's very much like a display you would see at a 'cockpit fest' ....at Tosche Station, for instance.
I'm pretty sure too that in reality that the platform that the seats sit on towards the front is not very wide and allows the person sitting in the seat to dangle their feet over the edge where some kind of pedals would be for steering or flying the ship is.
If you look at the pic above, HF's legs are stretched out pretty far - I dont think there was much room. I really want to include a footwell but it really all depends on how these lower panels fit together. Also, looking at everything going it doesn't surprise me they pulled the console and seats back ~8". It must be a tight fit.
We'll figure it all out.
- - - Updated - - -
In that side-by-side, it also looks like they got rid of the track that the bucket seats slid in, which kind of explains the awkward climbing out of the seat that Ford does after the "We're in trouble," line.
Access to the seats has always been a concern of mine. They would either whack the console when turned or there just wasn't enough space to get in and out. I would to know hoe Peter Mayhew got in and out. They must have a track system or a type of easy latching system to keep it in place.
Also, just so you know...
When the rear cockpit door slides open, it also penetrates the outer hull (at the bottom).
I found this out when doing my full scale CAD model...
Hey M,
I discovered with our door that it too could only go so far before whacking the outer hull. And if you notice in the pic below, the EPVII cockpit door does exactly the same thing. It doesn't open all the way either
OUCH... I think I broke my brain with all this early morning thinking!
- - - Updated - - -
See? Everything is going to be alright! Thanks to the help of the members of this wonderful forum
You are correct, Sir! Now if I can just get all you guys to come over and turn you loose!
Last edited:
Keeping stability in mind, so it doesn't roll away when on show, I'm liking the look of the ESB set in the first photo Bugstomper posted as (with some imagination) it appears like the full cockpit on a fuselage trestle. That's pretty much how I've pictured the finished piece but skinned. Maybe a mix of the two exterior ideas will make it easier to fit the outside panels and still give the impression of the full rounded underside but without needing to add that extra few feet. It's very much like a display you would see at a 'cockpit fest' ....at Tosche Station, for instance.
And that's exactly why I chopped the cockpit off at the bottom of the front window (that and it wouldnt fit in the garage). For all intent and purposes, the platform / floor is the lowest point of the cockpit. Now I just have to figure out exacly how the lower nose panels all fit together. As far as the exterior, we're going to wrap the skin to the lowest point and then simply put a skirt all the way around hiding the platforms. But I do like the idea of it nestled in some sort of "carriage". We could def have fun with that design - but that's a lot more stuff to load up and store.
It's interesting to think about, had I built it to size, there would have been steps leading up to the cockpit door - which would have been COOL! But it would also make it VERY difficult to build part of the cockpit corridor.
It's interesting to think about, had I built it to size, there would have been steps leading up to the cockpit door - which would have been COOL! But it would also make it VERY difficult to build part of the cockpit corridor.
If you were really adventurous, you would have built it completely on a gimble and had people pay to ride! LOL!
If you were really adventurous, you would have built it completely on a gimble and had people pay to ride! LOL!
We thought about that very early on in the build. We would still be saving for the gimble itself... How awesome would that have been... or could be?
We thought about that very early on in the build. We would still be saving for the gimble itself... How awesome would that have been... or could be?
That would be incredibly cool bro! Jump in and all the controls work... if you pull back on the stick the cockpit would pull up... and push down and it would go down... banking and turning... my gawd that would be so freakin awesome!!
Bugstomper
New Member
Something like this?I do like the idea of it nestled in some sort of "carriage". We could def have fun with that design - but that's a lot more stuff to load up and store.

Why not install it directly on a trailer? - no need to dismantle and reassemble it every time!

You wouldn't even be the first Greg to do that either: (http://www.gregwilsontrailers.com.au/reconnator-spaceships) :lol

I know, you are concerned about getting it into exhibition locations but most of them do have large gates and the rest will be happy to tear down a wall for you
Similar threads
- Replies
- 2
- Views
- 882
- Replies
- 6
- Views
- 648
- Replies
- 8
- Views
- 578
- Replies
- 11
- Views
- 1,113
- Replies
- 4
- Views
- 2,355