My Life-Size Han Solo In Carbonite Project - 2nd Attempt

I put a quick layer of primer on so I could start testing some colors. Here is an up-close of the carbonite. I am using a color called Satin Nickel Metallic, I went back and forth between this and my first choice, but I kinda like this. It's a nice silver metallic, but not to strong or shiny.

HPIM5717.JPG

HPIM5718.JPG

However, I do need your input for the case color. I have also gone back and forth with that as well. I was going to go with a color called Anodized Bronze, see below.

HPIM5724.JPG

In the next picture I also tested the Charcoal Metallic (which is what I used on the carbonite for my first project, see post 1), and Medium Gray (which is below the Bronze color).

HPIM5722.JPG

The panels will be aluminum (you can see where I tested that).

I need some suggestions here, should I paint the entire case silver and use the Metallic Color from post 1 on the carbonite? Should I stick with the Satin Nickel Metallic for the front panel? Should the whole case be that color?

This is making me mental.
 
Last edited:
Wow that is fantastic ,Oh I always wanted one of those ,do you make those for other people like me ,I would love to own one like that ????
 
Great progress on this , lovin your attention to detail :thumbsup

Good friend of mine has done one of this but has not done the comtrol panels yet , where is the best place to look for reference pics for these? thanks in advance if you can help :)
 
I was able to make some progress today with the panels. I primed them all and started spraying the aluminum. I really like the color, looks sharp against the gray. I drilled the holes for the LEDs and will work on the greeblie covers for the main panel shortly. I also picked up some brushed steel handles from Lowe's for .97 each. I know they are only on the upper right hand panel, but I am going to put them on 4 panels, two on each side.

I also cut out the slot where the green back lit piece will go.

Where the two larger LED holes are, I decided on using two of those metal LED holders to add something extra.

HPIM5733.JPG

HPIM5738.JPG

I also worked on the other detail pieces for the first panel. I was originally going to use Bright Metallic Silver, but it ended up looking too close to the aluminum. So I decided on a Krylon color called Brushed Nickel. Not a whole lot of contrast, but just enough and I like the look. I was going to try Rub n Buff, but I have never used it and never got around to getting any.

HPIM5739.JPG

I also got the first two coats of the cabinet sprayed. I am very pleased with color I picked, Dark Charcoal Grey in Gloss. I went back and forth with colors for this part but this is exactly the color I was looking for. It will contrast nicely with the front panel that will be sprayed Satin Metallic Nickel (I may also combine that color with the one I was originally going to use for the front, Charcoal Metallic). I'm glad I did not go with a metallic color for the cabinet.

You can see the right half is sprayed gray compared to the left half which is still primer.

HPIM5736.JPG

Here you can see the contrast I was looking for between the cabinet and side panels.

HPIM5741.JPG
 
Last edited:
My ultimate goal would be to have it on the replica (or similar) wall as stated by propologist above but also have the front hinged and use the interior space as a media cabinet to hold CDs/DVDs etc.
 
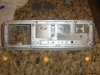
Here is more progress on the main panel.

I went to Lowe's and bought a roll of metal sheeting. I cut pieces to fit in the 3 spaces and drilled holes in the two that will have LEDs. You won't see the metal too much on this first panel because of the greeblies that go over two of the panels (the primed pieces in the first photo below the panel). However, on all the other panels they will be fully exposed. It looks much better in person, and does not blend in as much as it appears in the photos.

HPIM5744.JPG

I started adding the other details and the two metal LED holders. The Satin Nickel does contrast very nicely with the aluminum, but again, hard to tell by the photos.

HPIM5749.JPG

HPIM5746.JPG

Here are two side views that really show off the details. In the last picture I placed the two primed pieces on the panel to give you an idea, they will light up from below.

HPIM5749.JPG

HPIM5747.JPG

I did find some Rub N Buff today, and I used it on one of the "T" details (last picture, lower left hand corner). The stuff is pretty cool, never used it before, but it looks too much like the aluminum, so I probably won't be using it.

Less anyone think otherwise, I am borrowing, or will be borrowing, many ideas and techniques from a few other members on this board and others (Bobamaker, D.Nguyen, etc). Much respect to them.
 

Attachments

  • HPIM5745.JPG
    HPIM5745.JPG
    2.6 MB · Views: 145
Last edited:
Allow me to clarify, as it seems at least one person was butt hurt by something that I wrote which was taken the wrong way. In the interest of not side tracking my thread, I will say this:

VashDStampede's panels are some of the best panels I have seen (edit: "for the money"). Yes, I know there are some incredible panels out there, some are cast in metal, some are machined, yes, some of them are outstanding. But for the MONEY, the set I got I couldn't be happier with. I don't believe I could have bought a better set for the price I paid. In fact, this entire project of mine is costing less than what I have seen some side panels and greeblies go for.

I may be new to this forum, but not to the hobby.

Thanks.
 
Last edited:
Looks incredible man..
I'm in awe.
If I ever have a big enough space to work on one of these, i'd love to do it. Just hope when that time comes, I can still find some of the materials. *sigh*

Loving watching the progress!
 
Trying to finish up this panel and did a little more work. I originally planned on using an electroluminescent panel, but it was going to cost me about $35. Too expensive and too bright.

I decided to use one solid green LED (thus saving about $34). I was going to use one of my flashing LEDs, but it blinked too fast compared to the screen version and I didn't like it.

To finish the panel I printed a grid pattern on some transparent film (I know, it's not screen accurate). I then cut out a piece of Plexiglas and mounted the grid to the front. On the other side of the glass I added a sheet of frosted velum-like paper.

1a (1).JPG

1a (2).JPG

I then bought one of those plastic capsules you see in the coin machines.

3.JPG

I partially filled it with hot glue, trimmed it, and placed the LED behind it. I did this to help diffuse and spread the light.

6.JPG

4.JPG

5.JPG

To give you an idea of how well it works, here is a shot of the panel with the LED alone directly behind the glass. It is very focused and bright, and the light is way too strong in the middle of the glass.

HPIM5760.JPG

And here is how it looks after putting the LED behind the glued capsule. It has a softer glow and a more evenly distributed effect.

HPIM5761.JPG

I think it came out nice.
 
Last edited:
Very nice indeed!

My Han is still in 4 pieces in the attic. Man i need to get on with that.

So many projects lol.


Great work, love the lighting to!

lewis
 
That is one awesome display. And I agree with chuckybaby555. Would be awesome to have that as a door to a Home Theater.

Chris
 
This thread is more than 5 years old.

Your message may be considered spam for the following reasons:

  1. This thread hasn't been active in some time. A new post in this thread might not contribute constructively to this discussion after so long.
If you wish to reply despite these issues, check the box below before replying.
Be aware that malicious compliance may result in more severe penalties.
Back
Top