maboot38
Well-Known Member
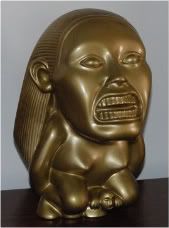
I converted this vinyl idol coin bank to a solid prop:
Here is a tutorial on how you can make your own without having to pay someone $500 for one (unless you want to spend that!). The bank is actually a mirror image of the original prop, as it is not 100% symmetrical, but there is nothing that can be done about that, and if someone calls you out on it, you have permission to slap them.
First, you gotta get yourself one of these banks. They are about $20. Todd Coyle sells them at http://www.toddscostumes.com, but I bought mine for the same price at Newbury Comics.
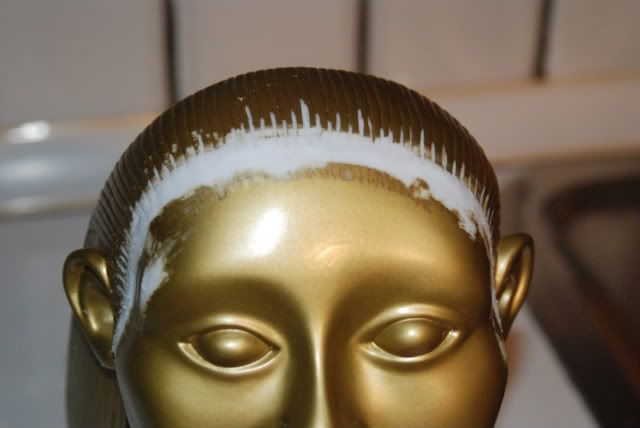
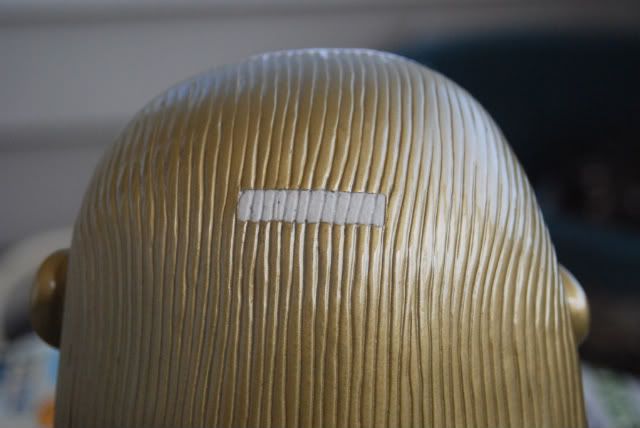
Once you have the bank, you will notice that there is a band across the hairline. That will have to go, since the original prop had no headband. To remove this, I used a dremmel tool with a sandpaper bit to remove the excess vinyl. Then I changed the bit on the dremmel to use a cutting disc to extend the hair lines onto where the headband was.
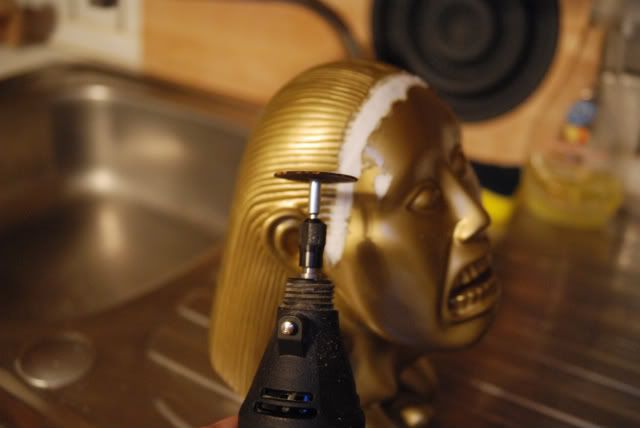
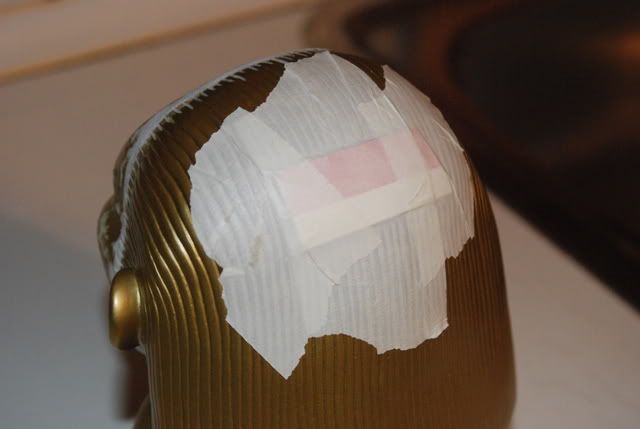
After removing the headband and extending the hairlines, you need to sand the worked area smooth so that it will appear smooth once painted.
Now to make the idol solid, instead of soft and flexible, you'll need to fill it with plaster. I used plaster of Paris from Home Depot. First tape a piece of cardboard over the coin slot on the back of the head so that the plaster won't pour out it when inverted. You'll want enough plaster filling the hole so that you can carve grooves in the plaster to match those on the rest of the head. After covering the coin slot, invert the head and mount it securely in something that will allow it to remain level but upside down while the plaster is drying, and will allow easy pouring. I used a beer sixpack box with 4 of the six bottle slots combined to one big area, and secured it with masking tape.
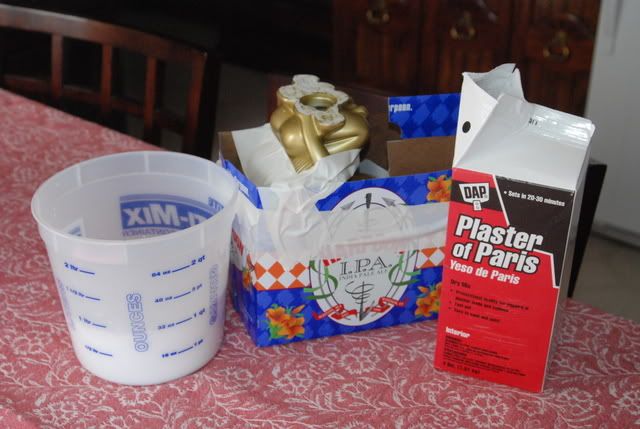
It may not appear to be necessary, but I needed all of the contents of the plaster box pictured. When pouring the plaster you will need to pour a little, then tap the idol against a surface to pack the plaster in. Repeat this by pouring in a little, then packing it in, then pouring more, until you are not able to pack it down anymore. There should be a little excess plaster sticking out of the bottom hole. No need to wipe it away. Allow the idol to sit inverted for a few days until the plaster solidifies (it may still appear to be slightly moist, but will be dry enough to work with.
Cut the excess plaster away from the bottom of the idol, then stand it up and remove the tape and cardboard from the coin slot. Carefully trim the plaster to match the markings on the back of the head.
If you wish, acrylic filler spray can be used to further smooth out the plaster/coin slot coverup. Once the coin slot is blended, spray a coat of primer over the idol to better hold the metallic spray paint.
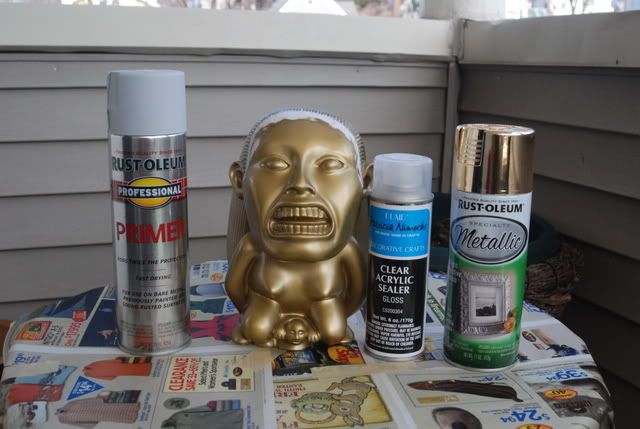

Allow the primer to dry, then gently spray on a coat of the metallic paint. Make sure to hit it from all angles, so that you get into all her naughty bits, but not so much that the paint runs. Allow the first coat to dry, then apply a second one. You should end up with a nice metallic sheen on the thing. Let it dry for 24 hours before handling it, because you WILL get fingerprints in it if you aren't careful.
Once you are finished, it should look something like this:
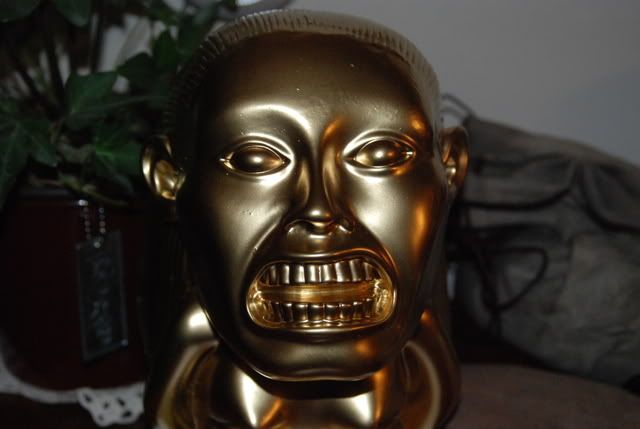

Not perfectly SA, but a hundred times better than when we started!
As for the bottom of the idol, I would just leave it unpainted and untreated for as long as possible until the remaining moisture has seeped out of the plaster (it has been months now and there is still a tiny amount of moisture detectable. It might even be a good idea to keep it on a paper towel or other absorbent surface to draw out any excess moisture. Once you feel like the base is fully secure, you can paint the bottom if you would like. My idol bottom is unpainted, but I did sand off the copyright stuff that was printed on there. Shhhhhh!
Here is a tutorial on how you can make your own without having to pay someone $500 for one (unless you want to spend that!). The bank is actually a mirror image of the original prop, as it is not 100% symmetrical, but there is nothing that can be done about that, and if someone calls you out on it, you have permission to slap them.
First, you gotta get yourself one of these banks. They are about $20. Todd Coyle sells them at http://www.toddscostumes.com, but I bought mine for the same price at Newbury Comics.
Once you have the bank, you will notice that there is a band across the hairline. That will have to go, since the original prop had no headband. To remove this, I used a dremmel tool with a sandpaper bit to remove the excess vinyl. Then I changed the bit on the dremmel to use a cutting disc to extend the hair lines onto where the headband was.
After removing the headband and extending the hairlines, you need to sand the worked area smooth so that it will appear smooth once painted.
Now to make the idol solid, instead of soft and flexible, you'll need to fill it with plaster. I used plaster of Paris from Home Depot. First tape a piece of cardboard over the coin slot on the back of the head so that the plaster won't pour out it when inverted. You'll want enough plaster filling the hole so that you can carve grooves in the plaster to match those on the rest of the head. After covering the coin slot, invert the head and mount it securely in something that will allow it to remain level but upside down while the plaster is drying, and will allow easy pouring. I used a beer sixpack box with 4 of the six bottle slots combined to one big area, and secured it with masking tape.
It may not appear to be necessary, but I needed all of the contents of the plaster box pictured. When pouring the plaster you will need to pour a little, then tap the idol against a surface to pack the plaster in. Repeat this by pouring in a little, then packing it in, then pouring more, until you are not able to pack it down anymore. There should be a little excess plaster sticking out of the bottom hole. No need to wipe it away. Allow the idol to sit inverted for a few days until the plaster solidifies (it may still appear to be slightly moist, but will be dry enough to work with.
Cut the excess plaster away from the bottom of the idol, then stand it up and remove the tape and cardboard from the coin slot. Carefully trim the plaster to match the markings on the back of the head.
If you wish, acrylic filler spray can be used to further smooth out the plaster/coin slot coverup. Once the coin slot is blended, spray a coat of primer over the idol to better hold the metallic spray paint.
Allow the primer to dry, then gently spray on a coat of the metallic paint. Make sure to hit it from all angles, so that you get into all her naughty bits, but not so much that the paint runs. Allow the first coat to dry, then apply a second one. You should end up with a nice metallic sheen on the thing. Let it dry for 24 hours before handling it, because you WILL get fingerprints in it if you aren't careful.
Once you are finished, it should look something like this:
Not perfectly SA, but a hundred times better than when we started!
As for the bottom of the idol, I would just leave it unpainted and untreated for as long as possible until the remaining moisture has seeped out of the plaster (it has been months now and there is still a tiny amount of moisture detectable. It might even be a good idea to keep it on a paper towel or other absorbent surface to draw out any excess moisture. Once you feel like the base is fully secure, you can paint the bottom if you would like. My idol bottom is unpainted, but I did sand off the copyright stuff that was printed on there. Shhhhhh!
Last edited:
")