Demetrios2177
Well-Known Member
Hey, all!
I’ve always been fascinated with the laser gun seen in Moonraker (the ‘good guys’ one rather than the Drax laser pistol), and I’m quite sure that one day I’ll actually build it.
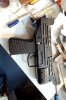
For now, however, I’ve started building a shorter version of the gun from bits and parts that I already had in my boxes; mostly due to the fact that I had a toy Uzi lying around that had a far too small grip. I’ve dremelled that off and glued the remaining body to an airsoft Micro Uzi.


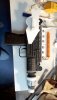
(It's an ugly seam, but I won't bother with it, since it will disappear under the "shark" panels)
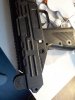
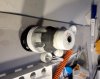
As you can see, the forward grip thing is about half the length of the original part, which is good, because, at the moment, all I had to make the nozzle from was a cylinder from a broken airsoft revolver. The original nozzle is wider, I think, so I found that this size fit very well into the overall "shorter than" idea.


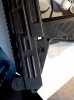
After some more dremelling, I managed to insert a sawn-off piece of plastic tubing. To fill the gaps, I’ve been using what I call ABS putty. Whenever there are pieces of ABS plastic that would normally go into the bin, I collect them and dissolve them in acetone, turning them into a black goo that can be used as putty.
It’s quite a toxic endeavour, so I keep my workspace very well ventilated, but the result works well, I think. When the acetone has evaporated, the goo forms a solid chunk of plastic that can be easily sanded into shape. Of course, with such a thick layer, it takes two or three days for the putty to harden thoroughly.
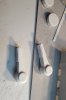
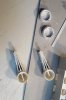
The rest of the build is relatively easy. Since I’ve had it in my mind that I wouldn’t want to buy any new materials for the gun (apart from some spray colour later on), I made the lever thingies that go on the sides of the gun (onto those strange shark shapes) from some old bottle caps that were, luckily, made from styrene. That, some strips of styrene and some clippings from Evergreen did the trick.


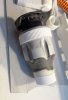
The two round knob things are made from caps of milk packages. The plastic is some hard PVC, so I’ve inserted a styrene strip inside and fixed it with CA glue. Likewise, I CA-glued some more styrene sheet on the tops of the caps to hide the company logo (I have an odd sense of humour, but a laser gun made by ALDI would go too far).

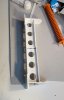
What is next is the sight thing. As you can see, I’ve started on the base of that with more ABS and styrene plastic. The front grille I will probably make from sheet styrene as well, and for the rear bit, I’ll have to rummage through my greeble boxes. I will take several liberties with the sight, as I have with the rest of the gun. It’s a fun build, after many years in which I hadn’t done any scratch building at all.
So far, this is a first impression:

I hope you like it, and, of course, I will keep you updated as the build comes together.
Cheers, folks!
I’ve always been fascinated with the laser gun seen in Moonraker (the ‘good guys’ one rather than the Drax laser pistol), and I’m quite sure that one day I’ll actually build it.
For now, however, I’ve started building a shorter version of the gun from bits and parts that I already had in my boxes; mostly due to the fact that I had a toy Uzi lying around that had a far too small grip. I’ve dremelled that off and glued the remaining body to an airsoft Micro Uzi.
(It's an ugly seam, but I won't bother with it, since it will disappear under the "shark" panels)
As you can see, the forward grip thing is about half the length of the original part, which is good, because, at the moment, all I had to make the nozzle from was a cylinder from a broken airsoft revolver. The original nozzle is wider, I think, so I found that this size fit very well into the overall "shorter than" idea.
After some more dremelling, I managed to insert a sawn-off piece of plastic tubing. To fill the gaps, I’ve been using what I call ABS putty. Whenever there are pieces of ABS plastic that would normally go into the bin, I collect them and dissolve them in acetone, turning them into a black goo that can be used as putty.
It’s quite a toxic endeavour, so I keep my workspace very well ventilated, but the result works well, I think. When the acetone has evaporated, the goo forms a solid chunk of plastic that can be easily sanded into shape. Of course, with such a thick layer, it takes two or three days for the putty to harden thoroughly.
The rest of the build is relatively easy. Since I’ve had it in my mind that I wouldn’t want to buy any new materials for the gun (apart from some spray colour later on), I made the lever thingies that go on the sides of the gun (onto those strange shark shapes) from some old bottle caps that were, luckily, made from styrene. That, some strips of styrene and some clippings from Evergreen did the trick.
The two round knob things are made from caps of milk packages. The plastic is some hard PVC, so I’ve inserted a styrene strip inside and fixed it with CA glue. Likewise, I CA-glued some more styrene sheet on the tops of the caps to hide the company logo (I have an odd sense of humour, but a laser gun made by ALDI would go too far).
What is next is the sight thing. As you can see, I’ve started on the base of that with more ABS and styrene plastic. The front grille I will probably make from sheet styrene as well, and for the rear bit, I’ll have to rummage through my greeble boxes. I will take several liberties with the sight, as I have with the rest of the gun. It’s a fun build, after many years in which I hadn’t done any scratch building at all.
So far, this is a first impression:
I hope you like it, and, of course, I will keep you updated as the build comes together.
Cheers, folks!
Attachments
Last edited: