19yellow72
New Member
***Miniature. Oops.
Just a preface. I've been trying to compose this now for over an hour. For some reason the RPF keeps kicking me off and I have to start all over again.
I'm sure this was much more entertaining and witty the first time around.
So here we go. I'm a frequent admirer of ALL your work on here. But I don't post my own too much because...lazy. Some of you may have seen my mini-proton pack or Tardis. Recently I decided I needed my own MeowMeow. So I set to work making my own Mjölnir. I should have posted as I was going. And I planned on it. But of course I never did. So now you're getting it all at once. And in a few separate posts because I'm afraid of being logged off again mid post. So here we go!
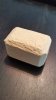
I started off with creating the mallet part. I chose to build it out of 9 pieces of balsa. I know i could have made this out of one larger piece. But the smaller ones had a certain softness that made it easier to shape.

So here you go. My very own block of wood. Not much to look at. But like I said, from this point it was very easy to shape, cut, and sand.

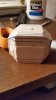
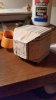
The basic shape is there. You can see all the guide lines I drew on it so I knew where to cut and where not to. The ends, at this point, need to be cut down a bit. However the basic shape is there.

Tada! A wooden mallet. I use Elmer's wood filler because it's so easy to sand. It also dries fairly quickly. For me, it's easy to work with and very forgiving if you make any mistakes. Plus it's light weight. I don't end up with a heavy master when I'm all done.

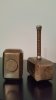
And here it is painted and ALMOST ready to be molded. The only things missing here are the disc on top and the scrolling patterns need to be scribed into the edges. Plus I will drill a small hole for the handle to slide into.
Also, as you can see, I used those images of the hammer as a template and guide while I was working on this scale. If any one knows the artist, I'd love to give them credit.

And here it is with the disc on top. You can see the handle next to it. I built them separate with the intention to mold them separately. I figured it would be easier to detail and paint them apart rather that one solid piece.

The handle I made out of a solid piece of balsa which I just rounded and added a bottom piece to. The bottom is mostly made out of shaped elmers wood filler. I'm telling you, that stuff is good. The top of the handle is designed to slide into the mallet. It'll give it more strength than just gluing something flush to it.

more to come! I'm afraid of being kicked off again...
Just a preface. I've been trying to compose this now for over an hour. For some reason the RPF keeps kicking me off and I have to start all over again.
I'm sure this was much more entertaining and witty the first time around.
So here we go. I'm a frequent admirer of ALL your work on here. But I don't post my own too much because...lazy. Some of you may have seen my mini-proton pack or Tardis. Recently I decided I needed my own MeowMeow. So I set to work making my own Mjölnir. I should have posted as I was going. And I planned on it. But of course I never did. So now you're getting it all at once. And in a few separate posts because I'm afraid of being logged off again mid post. So here we go!
I started off with creating the mallet part. I chose to build it out of 9 pieces of balsa. I know i could have made this out of one larger piece. But the smaller ones had a certain softness that made it easier to shape.
So here you go. My very own block of wood. Not much to look at. But like I said, from this point it was very easy to shape, cut, and sand.
The basic shape is there. You can see all the guide lines I drew on it so I knew where to cut and where not to. The ends, at this point, need to be cut down a bit. However the basic shape is there.
Tada! A wooden mallet. I use Elmer's wood filler because it's so easy to sand. It also dries fairly quickly. For me, it's easy to work with and very forgiving if you make any mistakes. Plus it's light weight. I don't end up with a heavy master when I'm all done.
Also, as you can see, I used those images of the hammer as a template and guide while I was working on this scale. If any one knows the artist, I'd love to give them credit.
And here it is with the disc on top. You can see the handle next to it. I built them separate with the intention to mold them separately. I figured it would be easier to detail and paint them apart rather that one solid piece.
The handle I made out of a solid piece of balsa which I just rounded and added a bottom piece to. The bottom is mostly made out of shaped elmers wood filler. I'm telling you, that stuff is good. The top of the handle is designed to slide into the mallet. It'll give it more strength than just gluing something flush to it.
more to come! I'm afraid of being kicked off again...
Attachments
Last edited: