Hey everyone!
It's been a while since I've posted anything here. Just a few days ago I managed to finish my Graflex build that I first started 6 years ago. For a long time the bubbles and grips were just replica parts, and there was no D ring because I was scared to drill the Graflex body when I was younger. I've been working in a metal shop the last few years, and so any trepidation I had about messing up the drilling was now gone. This also means that I've gotten pretty good with a mill, lathe, and belt grinder, which I used to finish this build off.
Before showing off any photos I want to thank fellow RPF members kalkamel and Serenity! Without their help I wouldn't have gotten the rest of the vintage parts I needed to finish this build off. Thanks to them the journey is finally over!
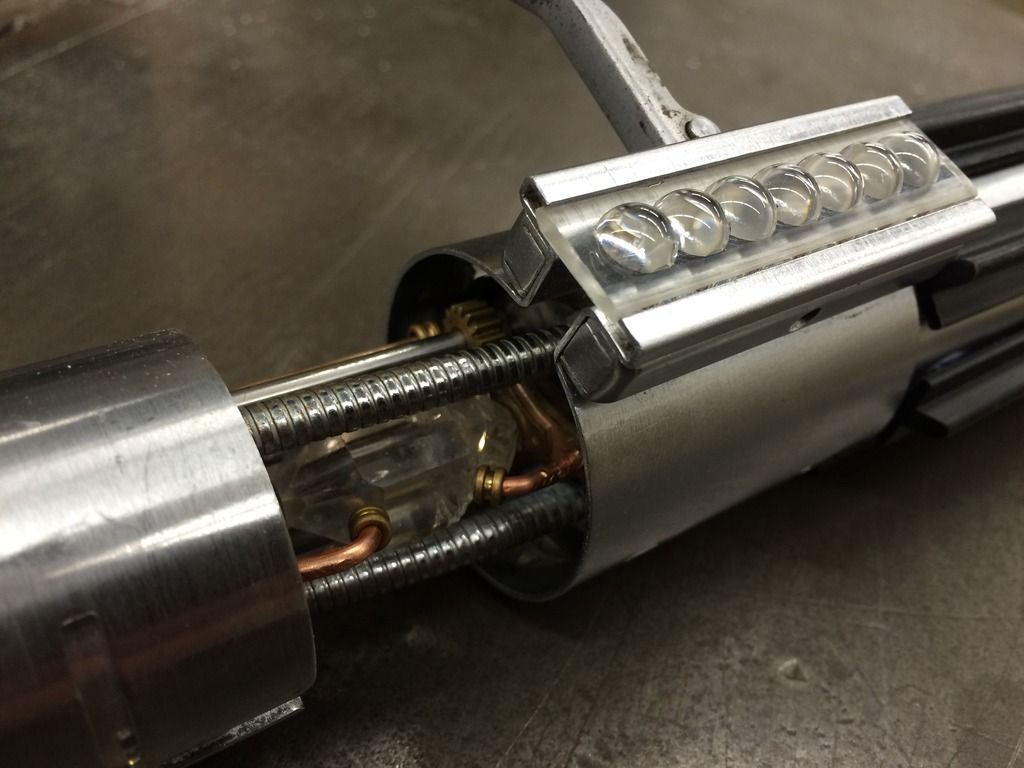
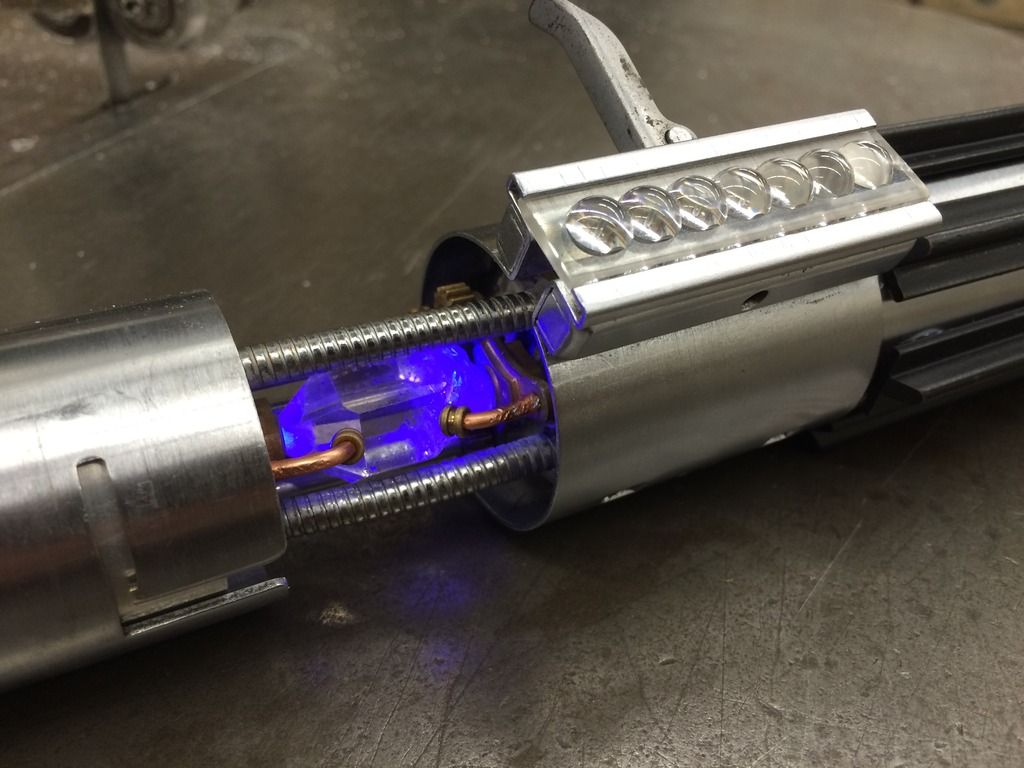
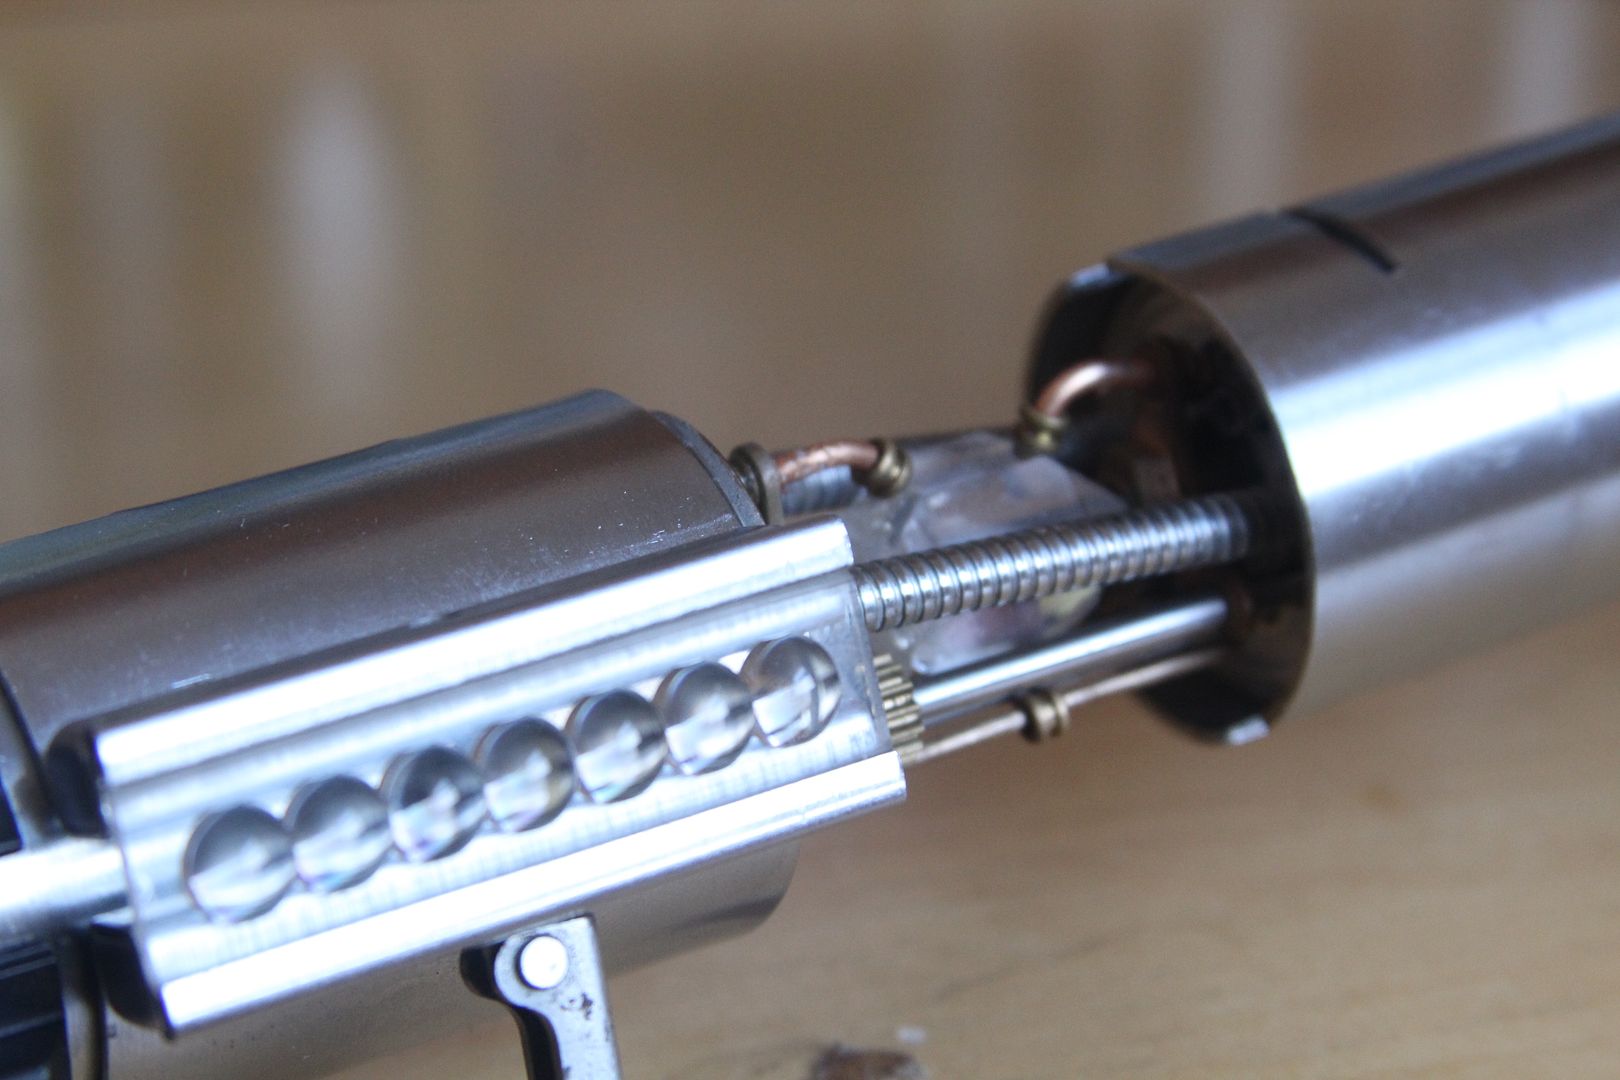
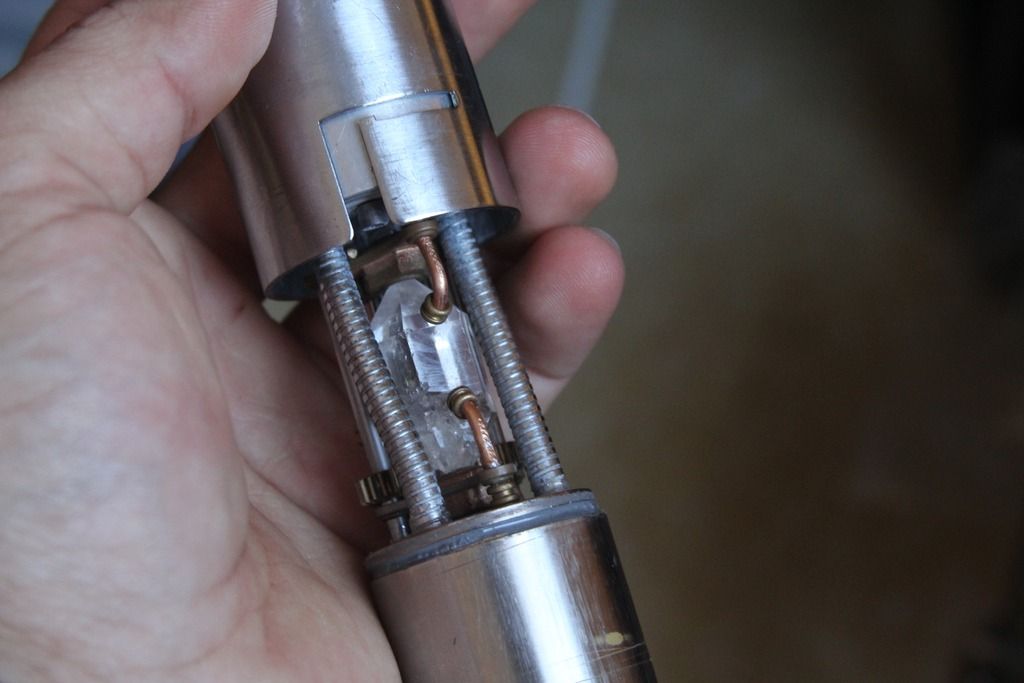
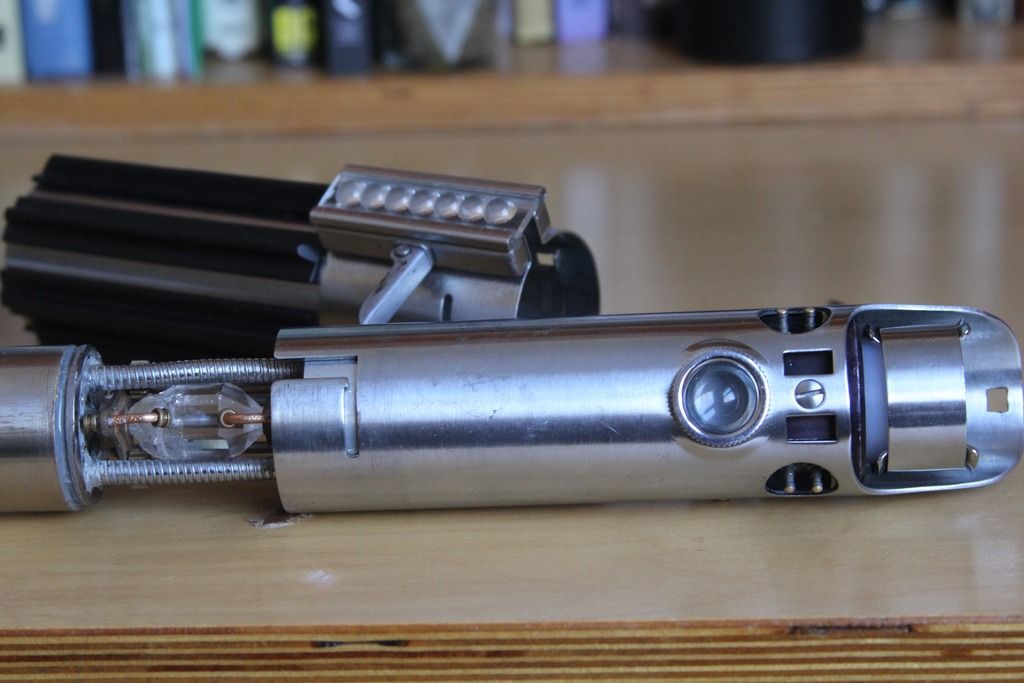
This build began in high school when I got a vintage Graflex and some random rubber grips from eBay and a replica bubble strip from rebelscum. I have had awful luck with those bubble strips and three of them have broken for me, with a hairline crack starting in between two of the bubbles on my last one. I created a crystal chamber and blade for the saber with an MR Luke ANH board, four NiMh batteries, a recharge port, and speaker built in to the bottom. The blade I wired together from about 100 LEDs and used a DIN plug ala Slothfurnace to mate it all together. After I was done I pretty much just let the saber sit in my display shelf for the next few years, before I did anything new to it.
So without further ado, picture time!
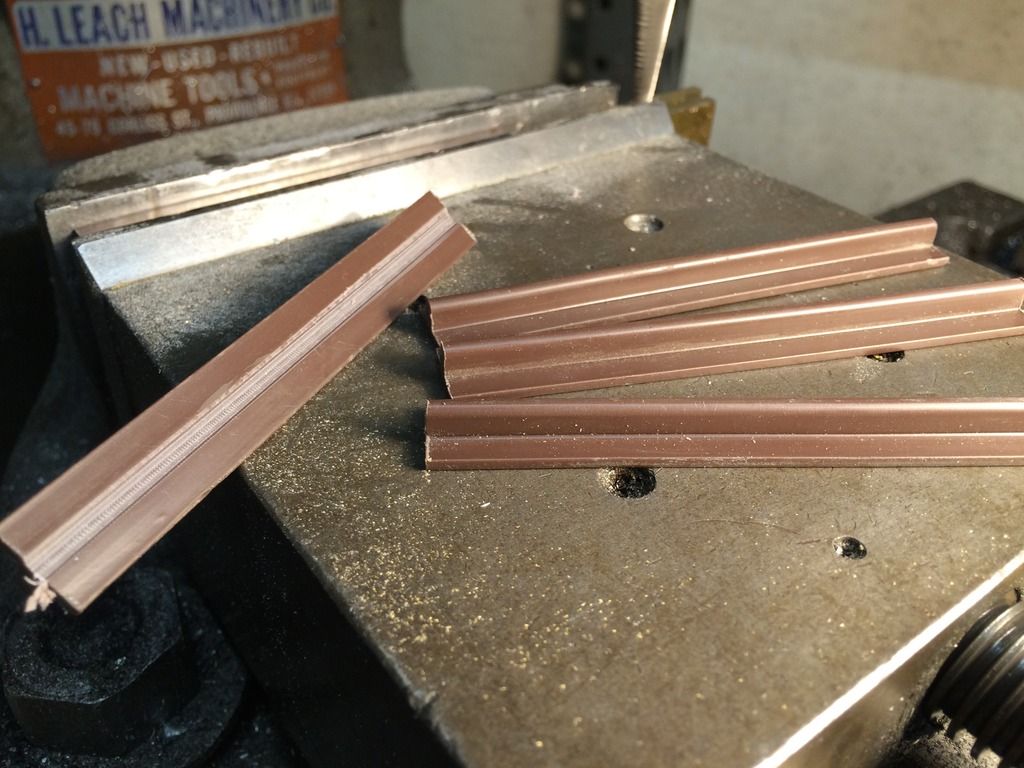
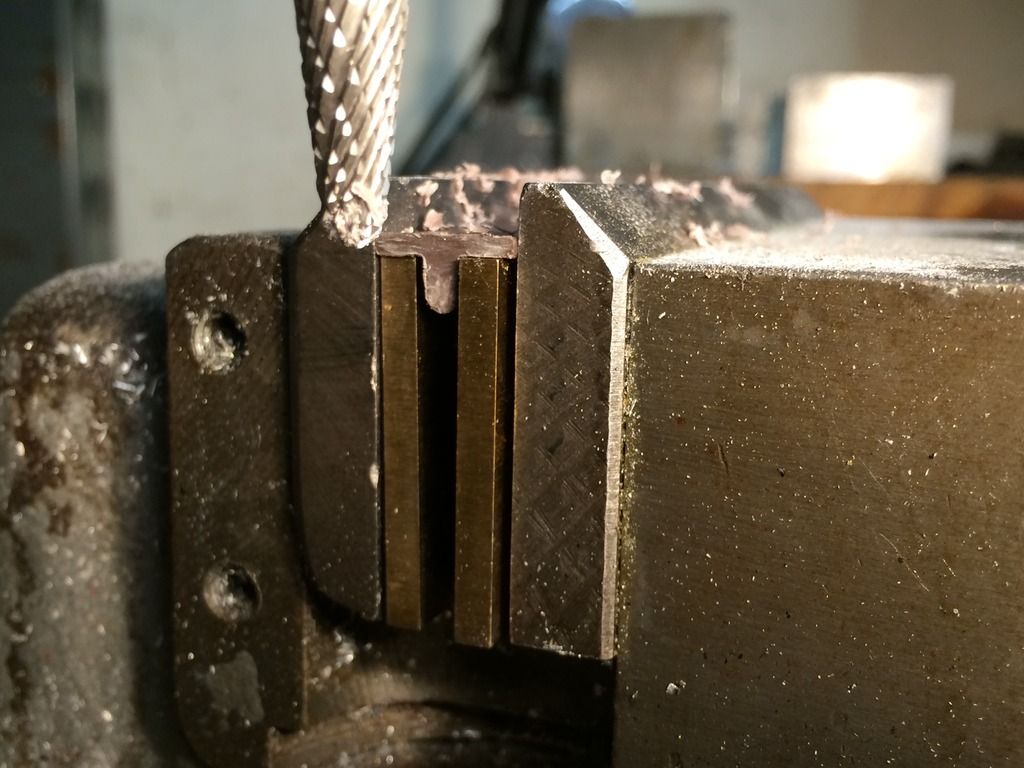
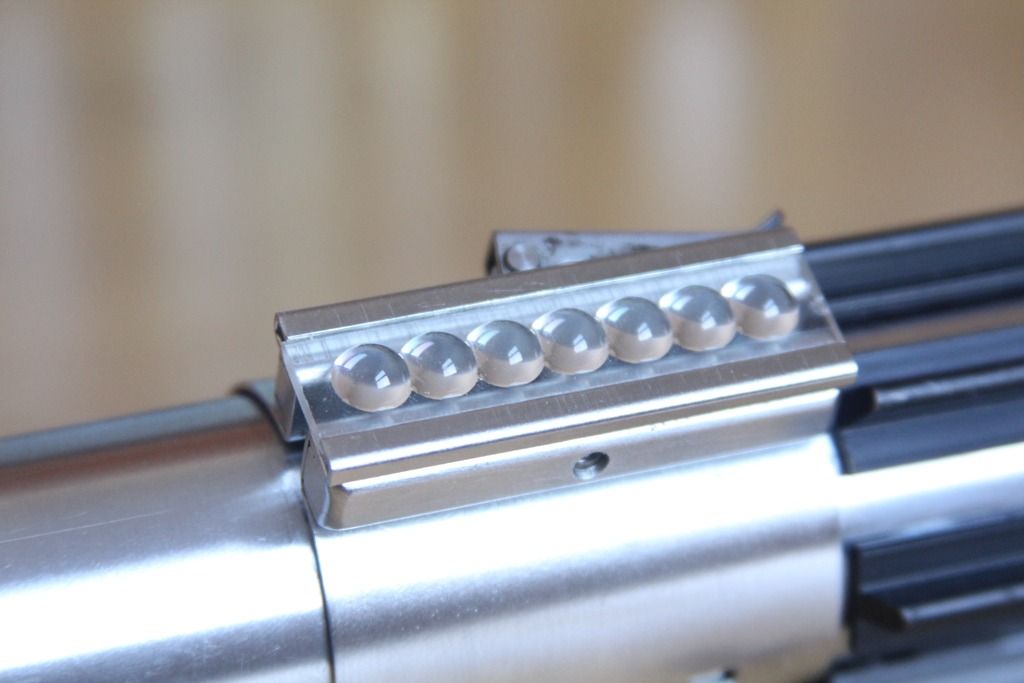
I received the T track still rolled up from Kal, so I heated it and straightened on a piece of angle iron and then cut the pieces to length. I then use the mill to create a channel underneath the grips to make them fit on the Graflex tube.
Here you can get a pretty good idea of how I did the channels.
Ended up pretty good!
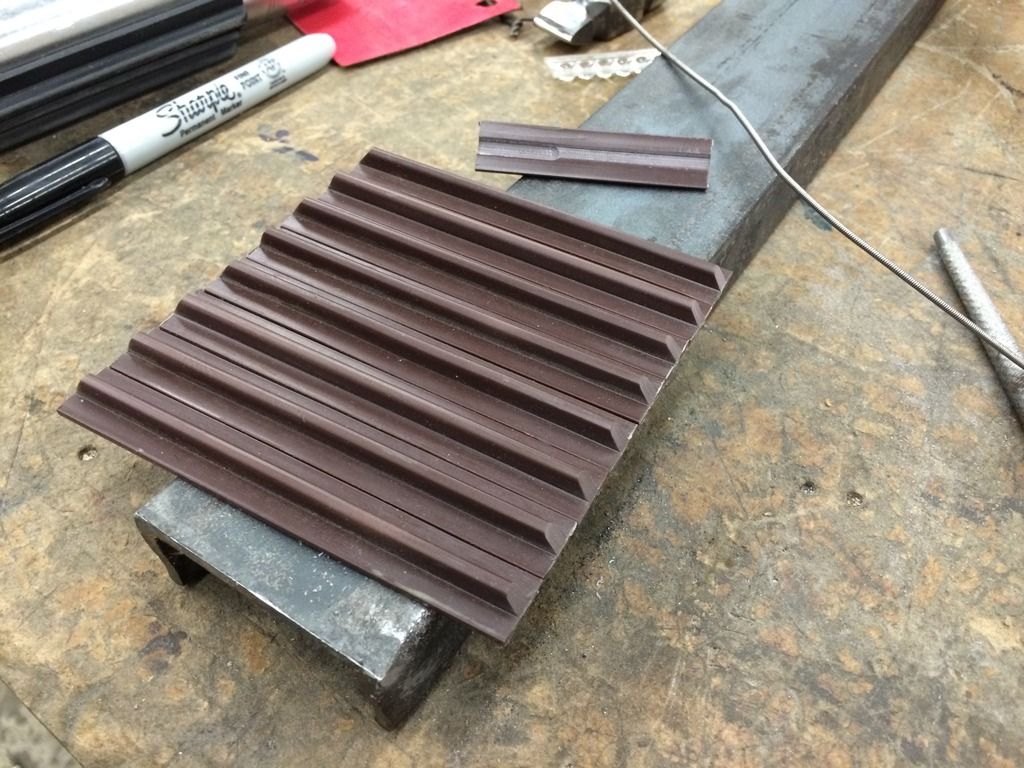
Had enough for a set of 8 grips, in the background you can see the piece I had left over from the testing with the mill. I did the angles freehand with the belt grinder. That was the easiest part!
Now that the grips were shaped and cut and true etc. I painted them. I had read on the forum somewhere that a set of grips were found on some saber from the trilogy that had brown peaking out behind the black paint I think, and decided I liked the idea. Instead of using primer I just painted two coats of black spray paint over the grips and waited a day for them to dry.
After that I epoxied them to the handle. the Massachusetts winter has been weird, but at times cold, and I took the saber out of my bag one day and saw that one grip was missing, much like that one photo of Luke's saber from the beginning of filming in Norway. I ended up super gluing them onto the saber after the rest popped off.
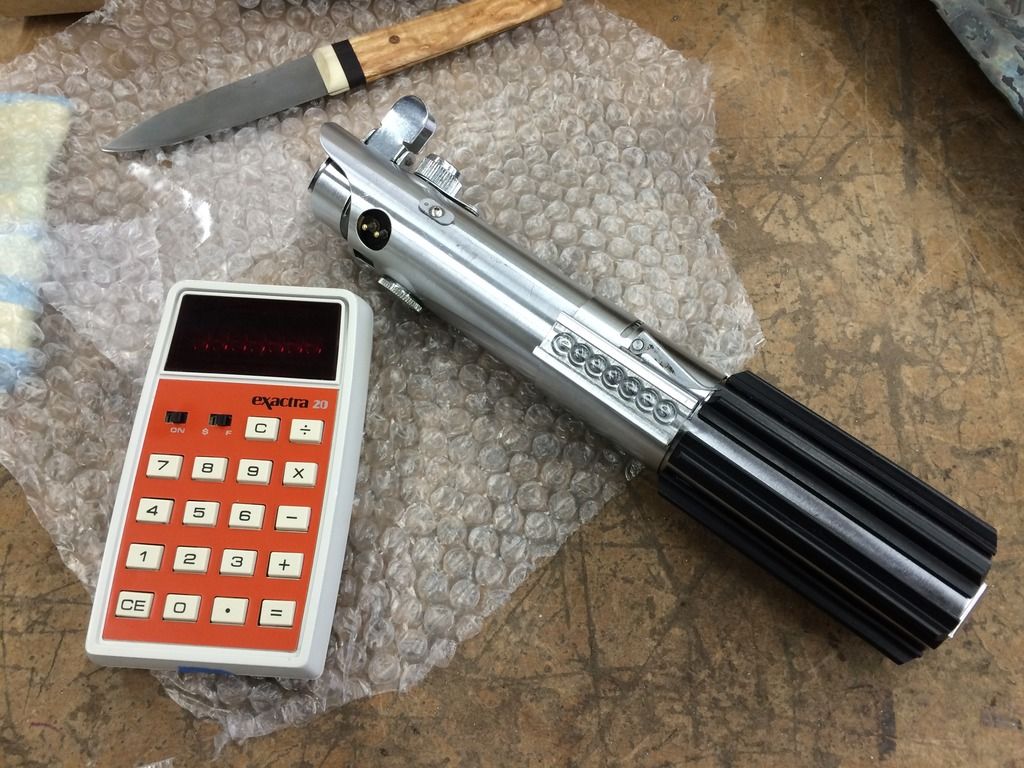
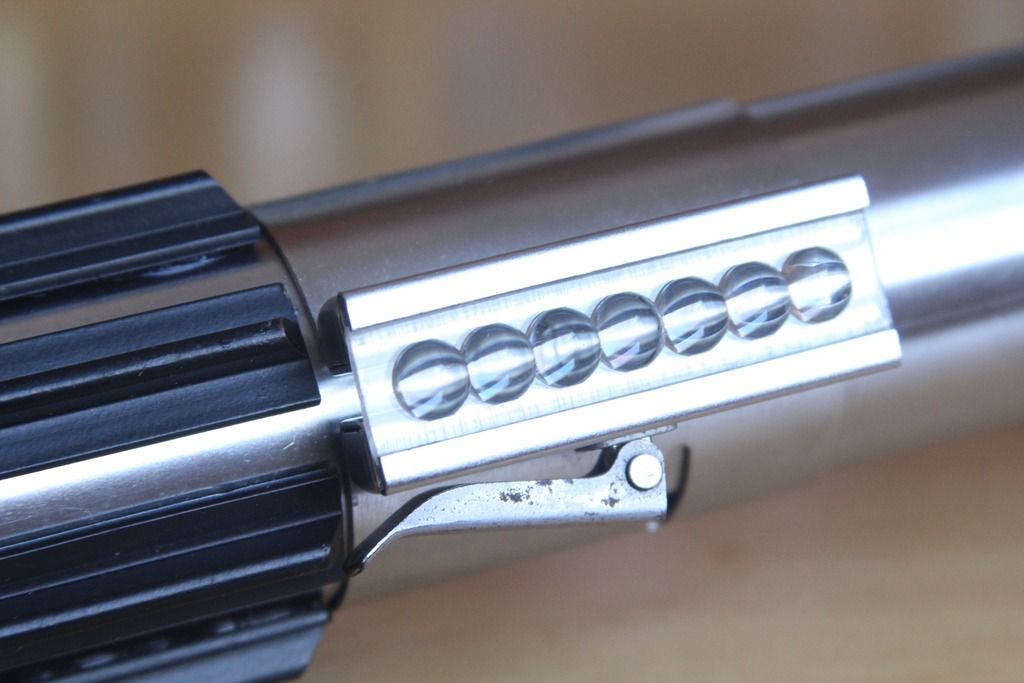
So now the saber had grips and needed a fitting bubble strip! I put an add in the WTB forum and shortly received word from Serenity. Charlie and I worked out a deal and a few days later I had this sweet Exactra 20 in my hands! It still works beautifully and I replaced the original strip with a replica that had the tabs on it to use as a calculator again.
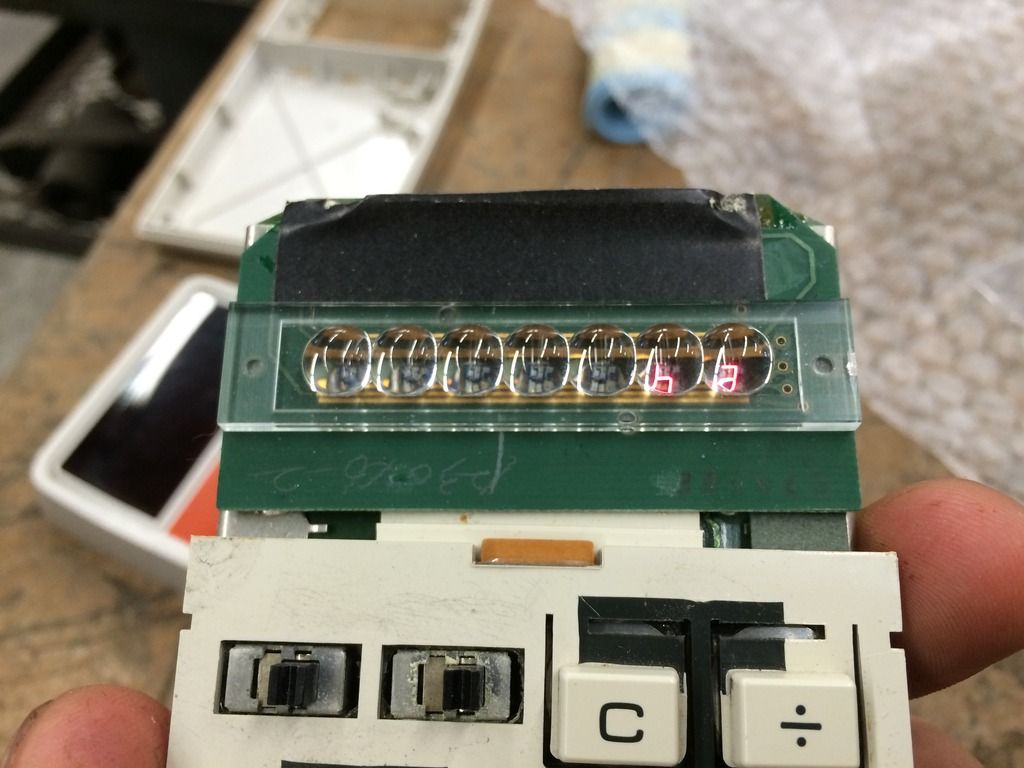
When it arrived I cut open the package before even getting to the shop where I was going to work on it because I was so excited to for the last piece of the puzzle! At this point I think I had one of Roy's bubbles in there.
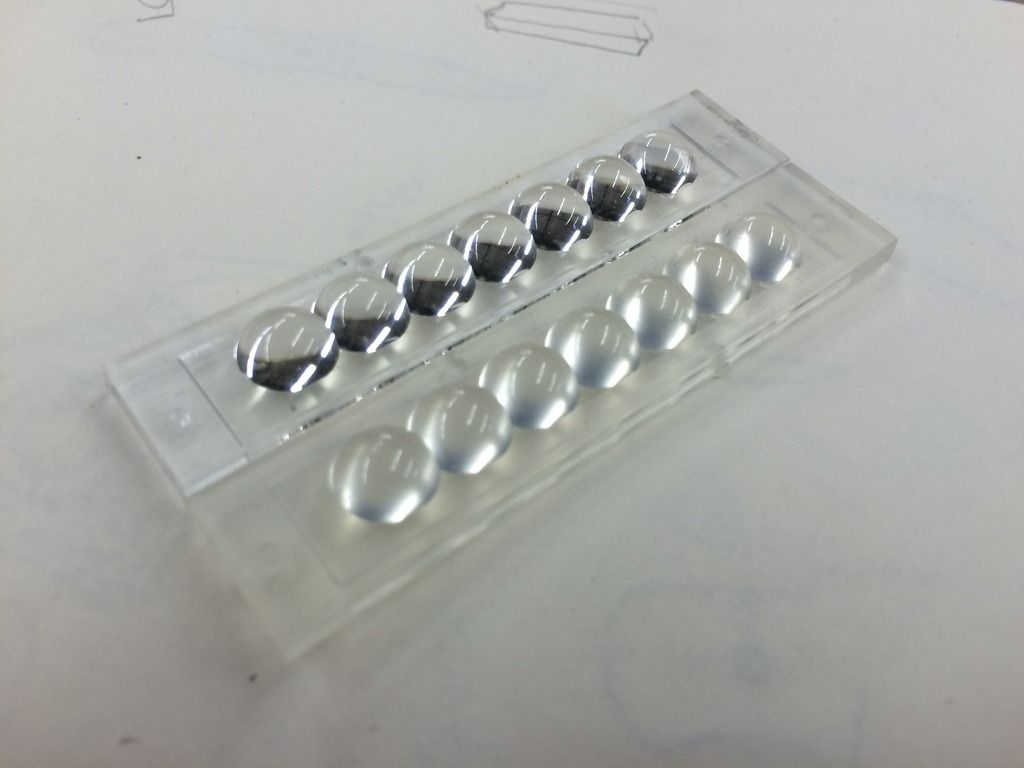
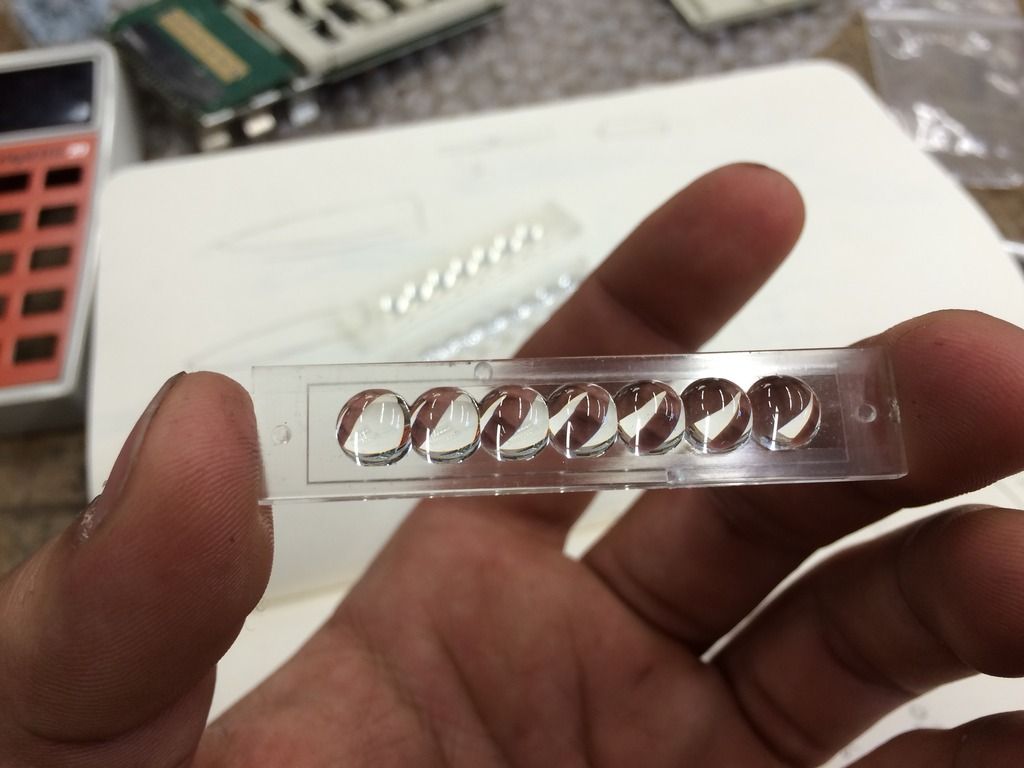
They're beautiful bubbles with flattened edges, the backing is clear. I had been skeptical at first about the clarity of original bubbles. They are AMAZINGLY clear, and the material is robust and beautiful to work.
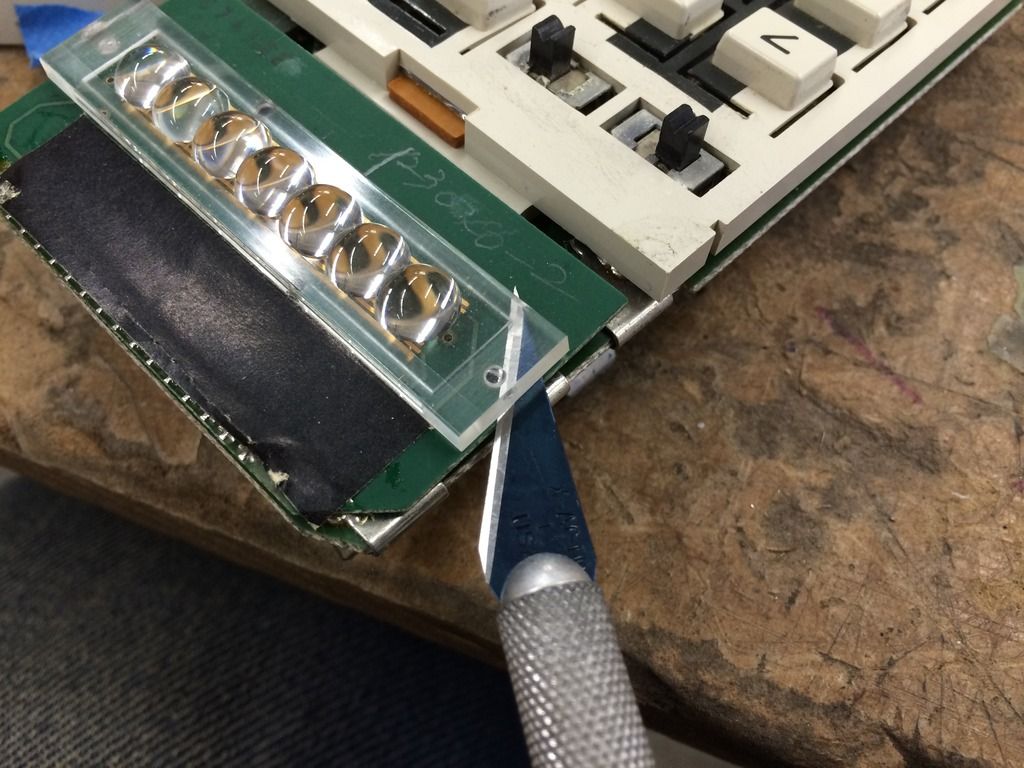
I used an exacto to break the tabs and remove the bubble strip, being careful not to damage the LED display underneath.
Here's a comparison between the best bubble strip I had seen till now (and now currently in the calculator) on the right, and the original on the left. I really cannot stress how perfect the original bubbles are.
The strip ready to be sanded down and then cut to length. I used blue painters tape as a backing and YOU NEED TO DO THIS. I could have easily scratched the bubble and have had to polish it again, which I could do, but why bother if you can just be really careful and get it right the first time?
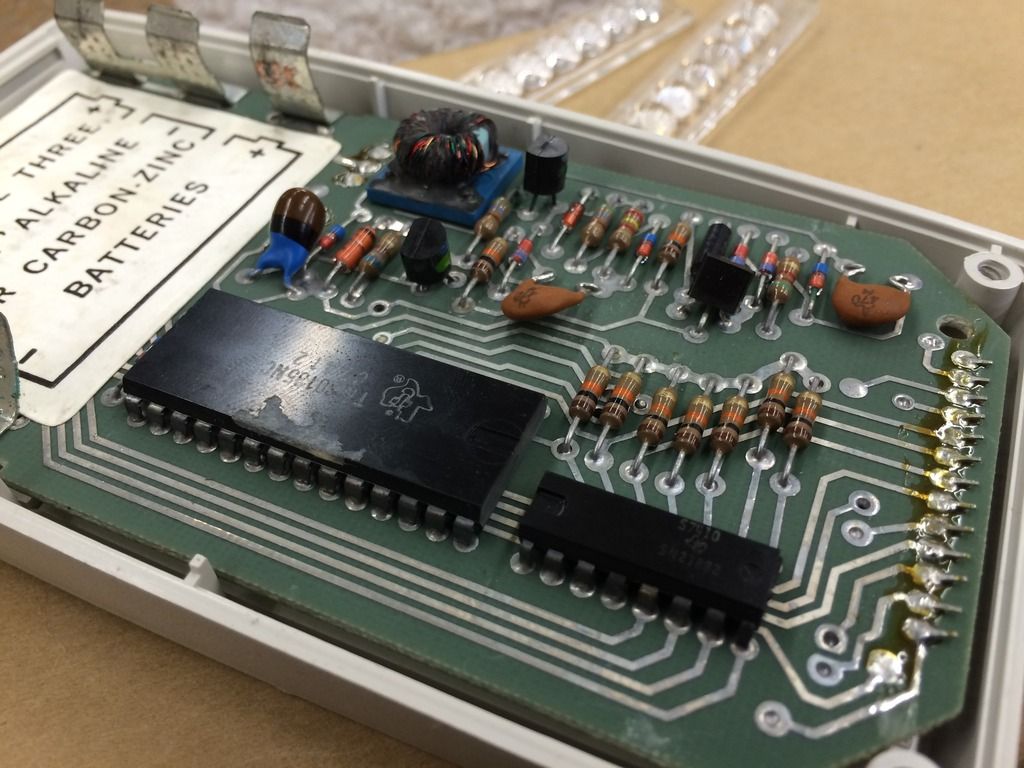
I couldn't resist the shot of the back of the calculator. These things are beautiful on the inside!
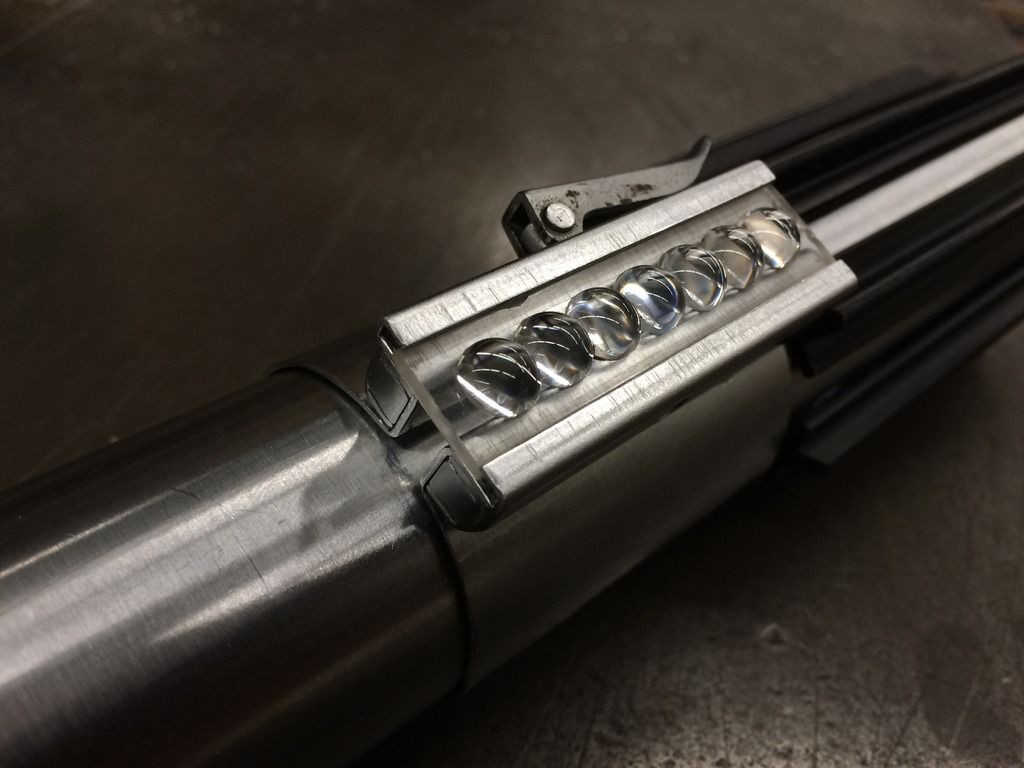
So it took me the better part of an hour to sand and finish the strip, but once it was done and I held it in my hands, years of slow work and tinkering came to a close!
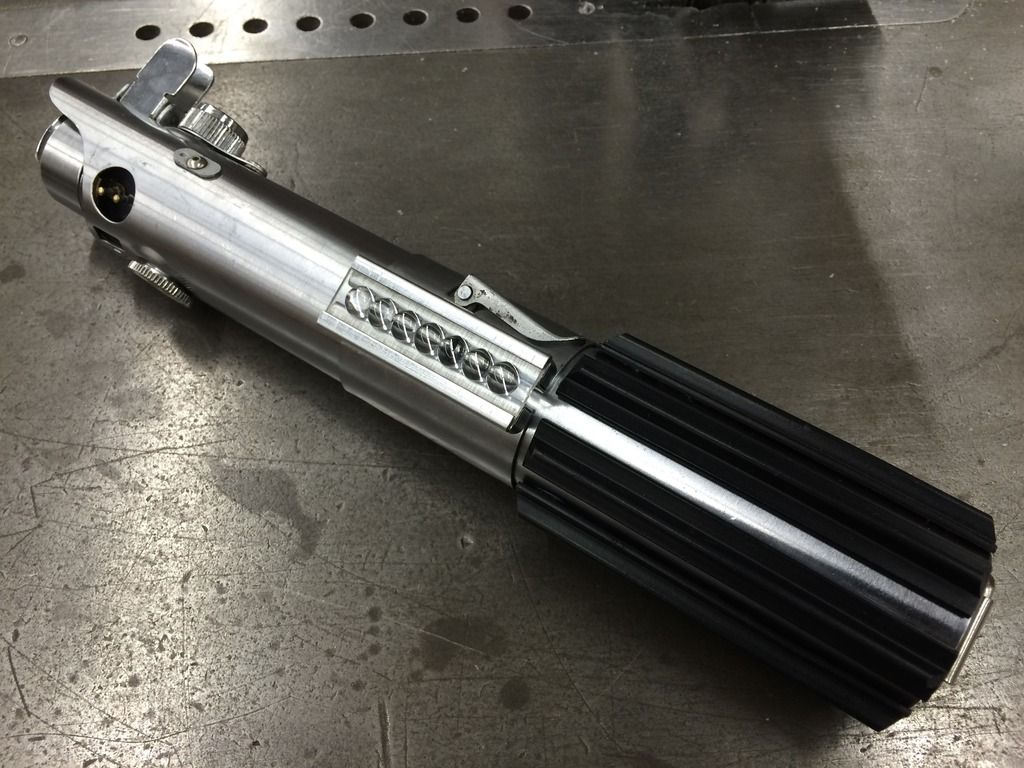
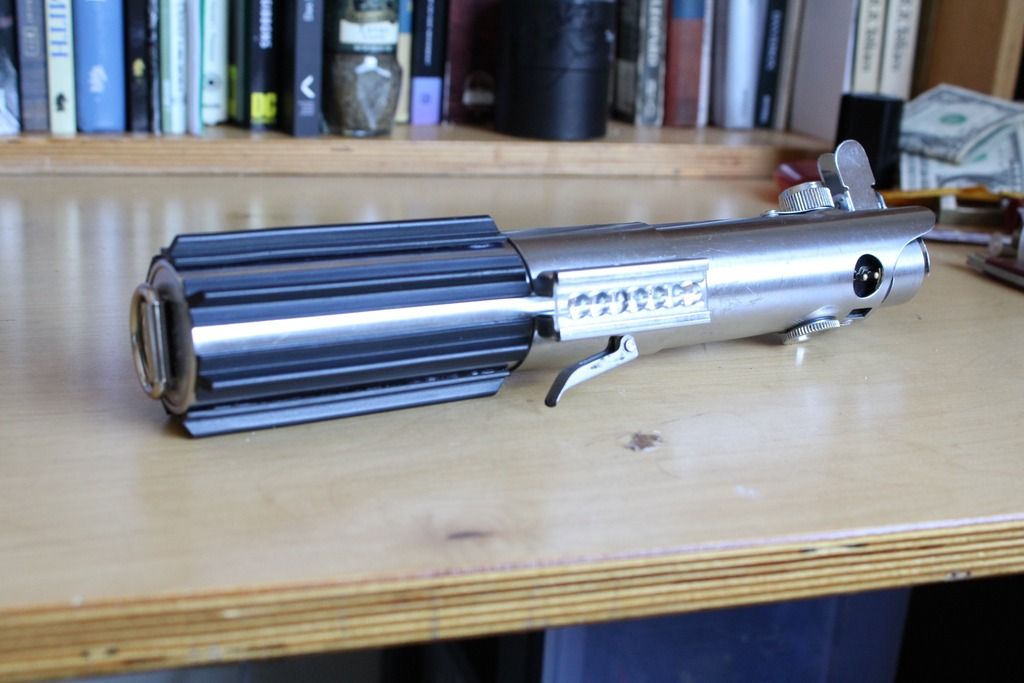
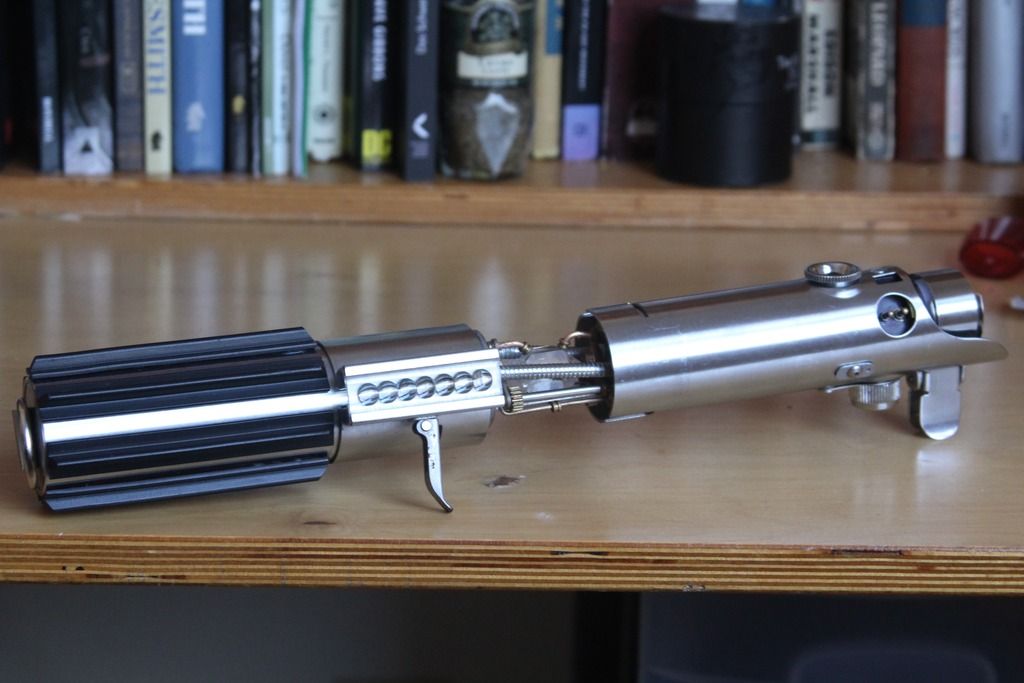
I'm proud to present my vintage parts Luke ANH saber! please excuse the picture dump this thing is just so pretty.
These shots I took this morning, with a proper camera and not my iPhone:
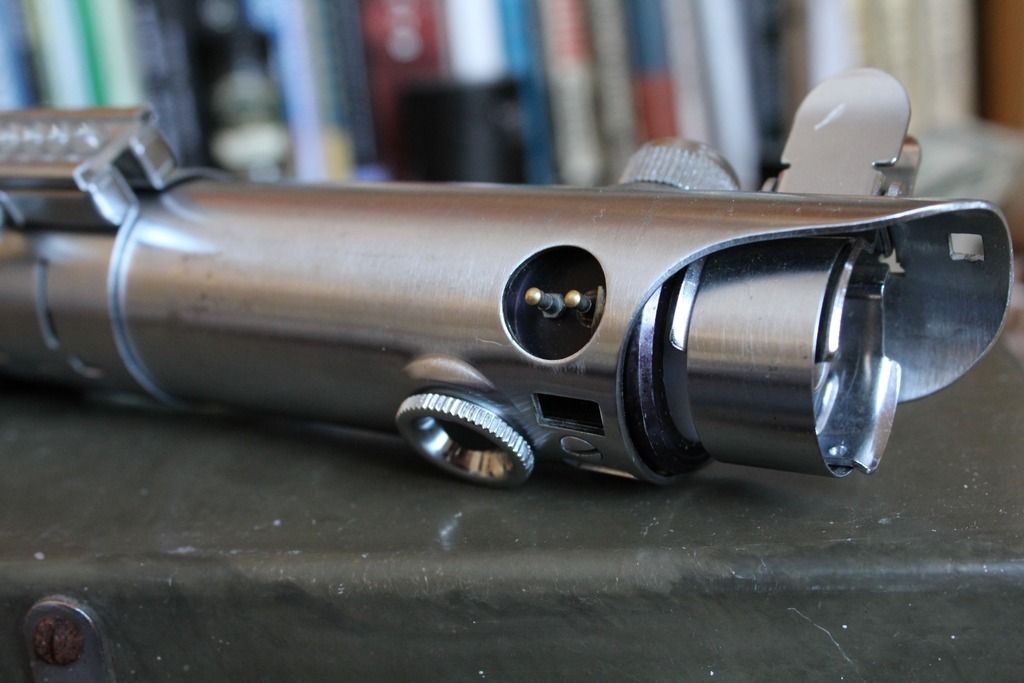
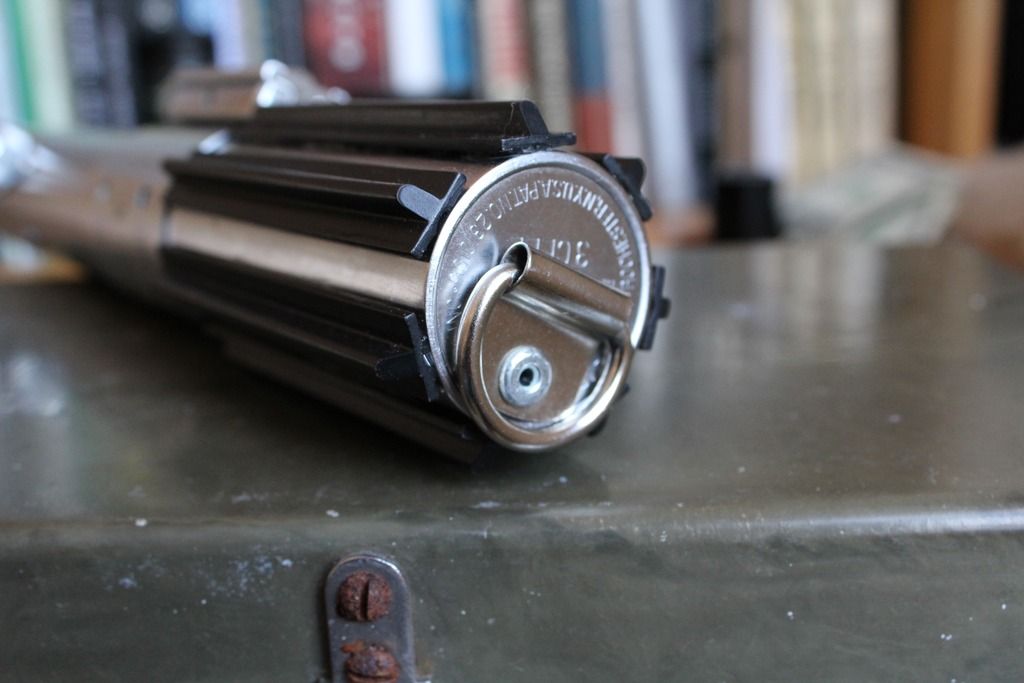
An attempt at the 'toe pic'
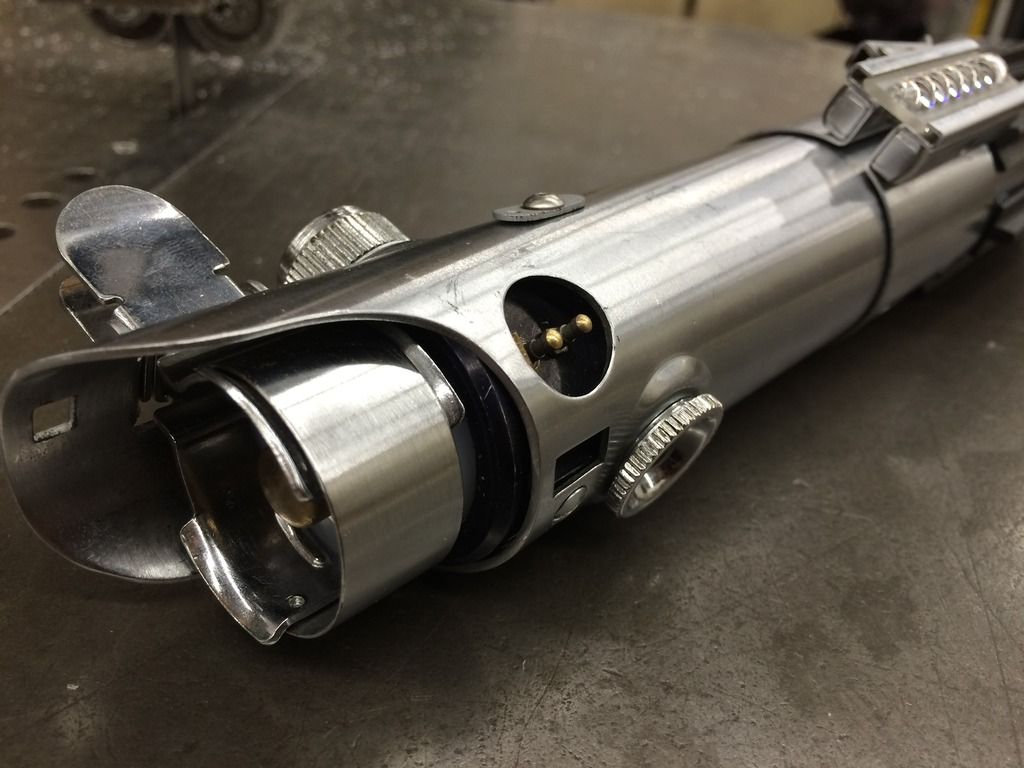
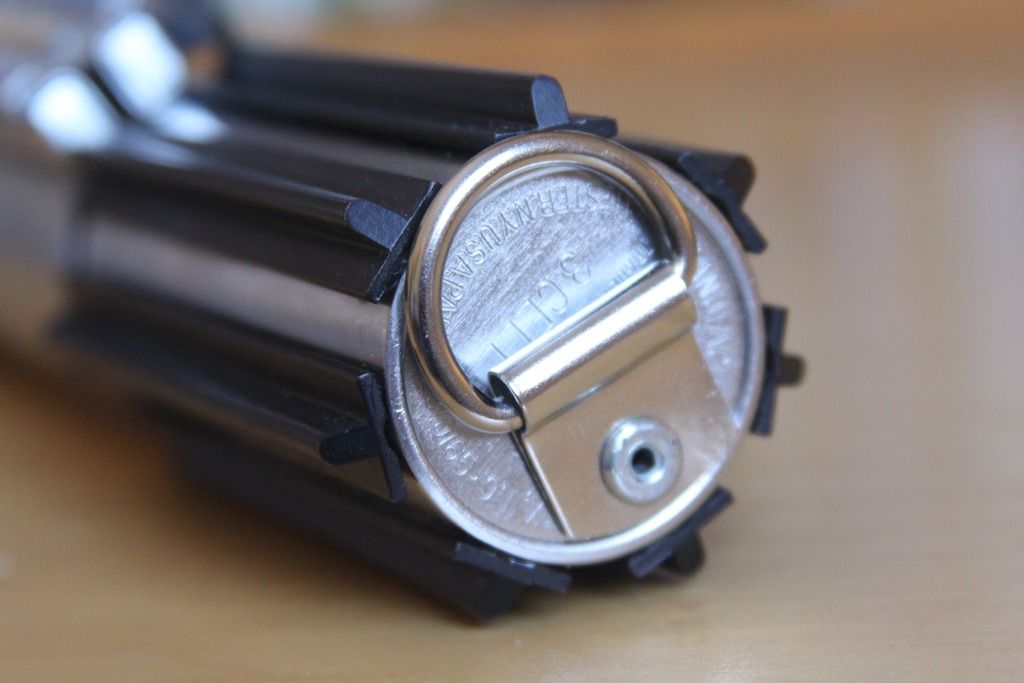
My custom D ring. I found a 1977 Dutch army rations box and it had beautiful D rings on it one of which I salvaged. The clip I made myself and riveted to the bottom.
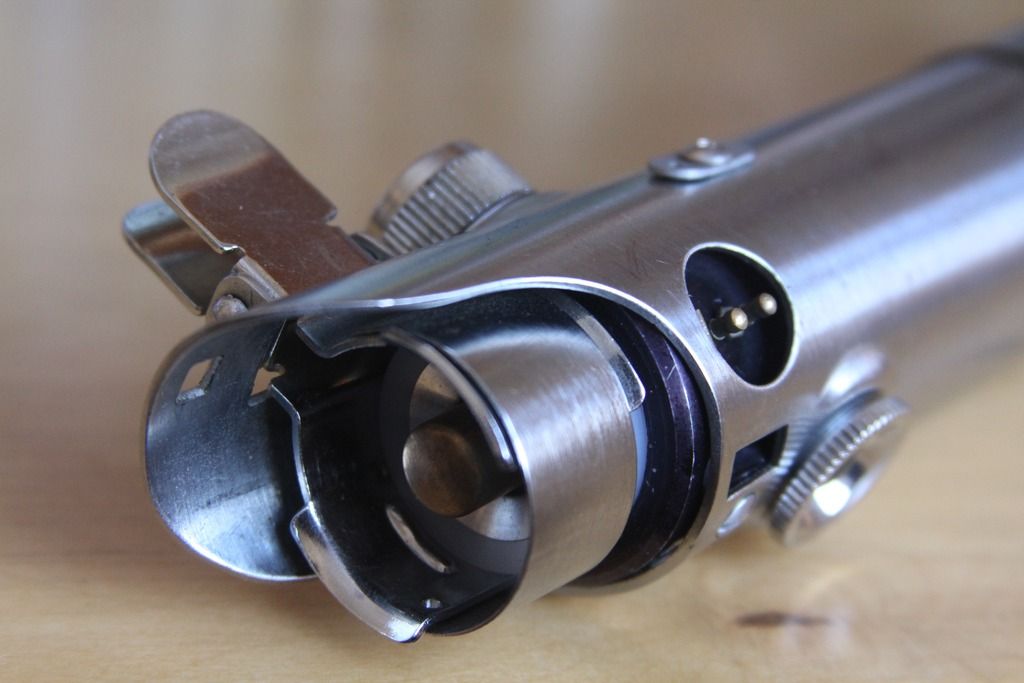
Here's the saber with one of the blade plugs my great friend JaxAndTheMoon and I are making currently.
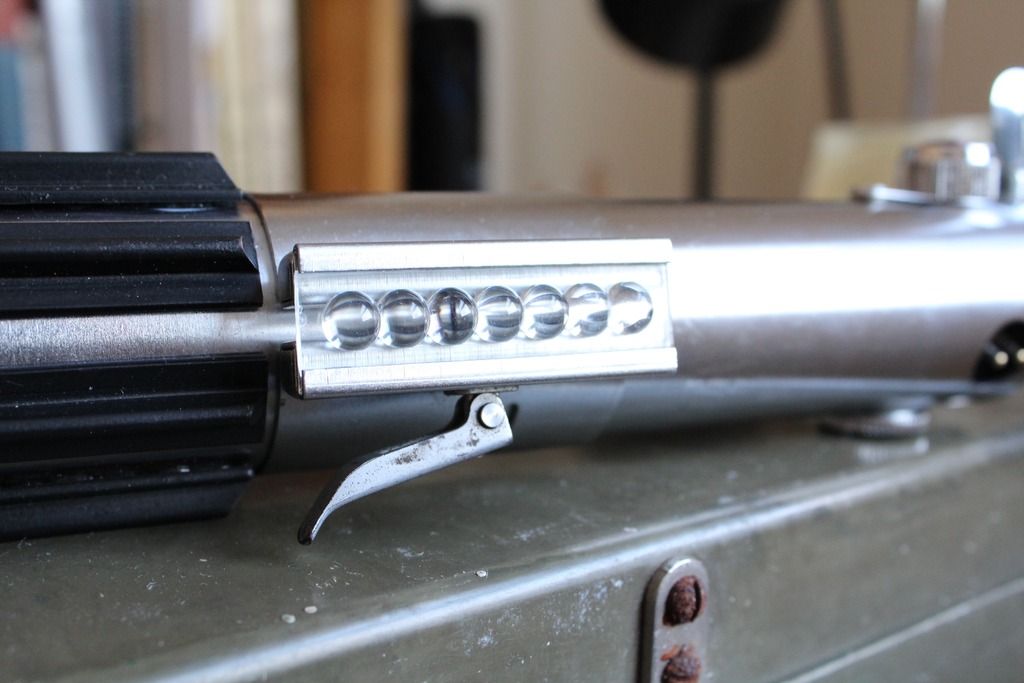
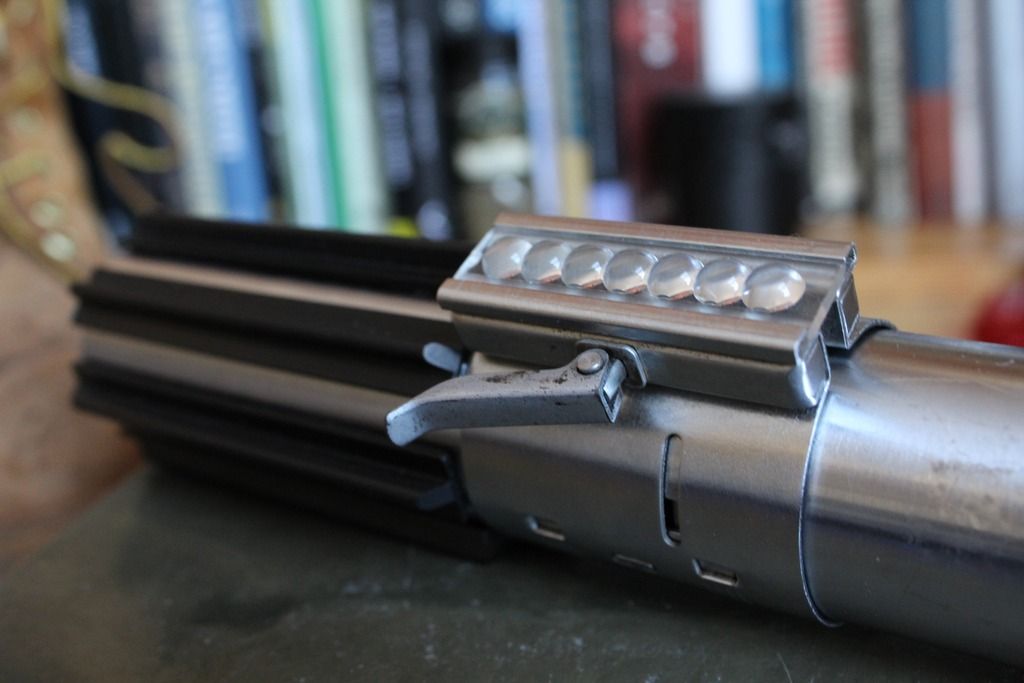
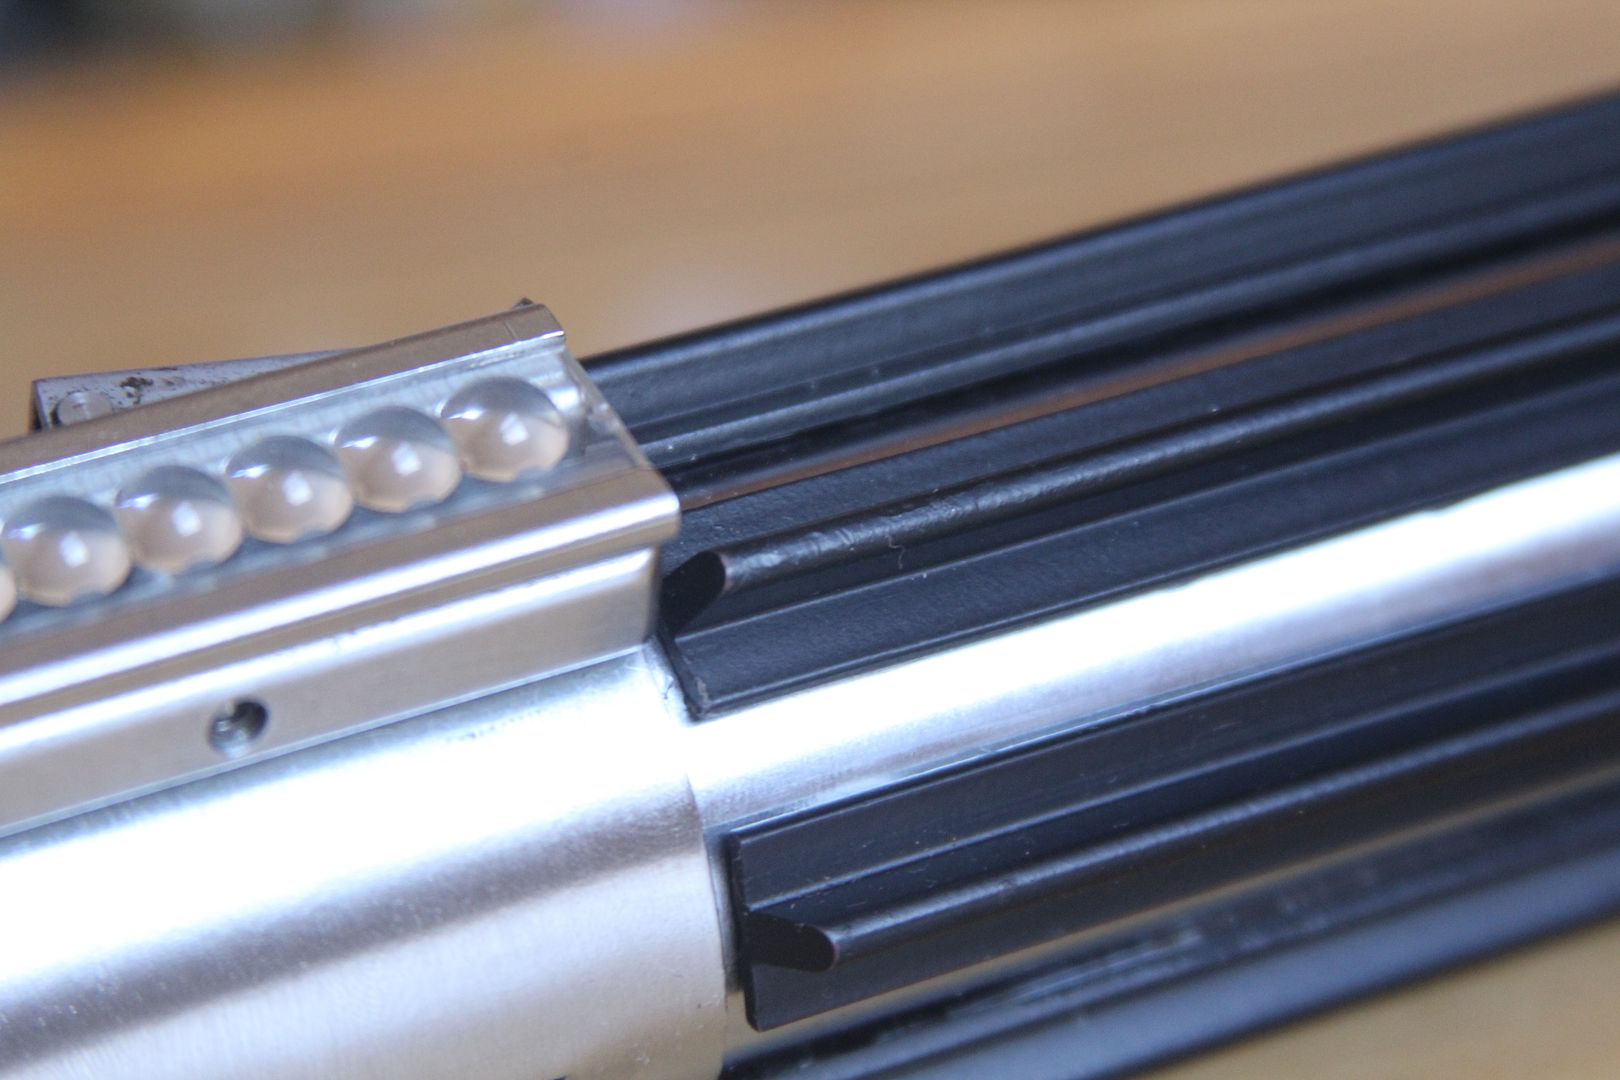
Here you can see the brown of the grips just peeking out at the corners of the grips, which I absolutely love the look of.


Again, I'm sorry for the photo dump, but I hope you guys enjoy this as much as I do, and I'd love to hear any thoughts or comments!
-Mili
It's been a while since I've posted anything here. Just a few days ago I managed to finish my Graflex build that I first started 6 years ago. For a long time the bubbles and grips were just replica parts, and there was no D ring because I was scared to drill the Graflex body when I was younger. I've been working in a metal shop the last few years, and so any trepidation I had about messing up the drilling was now gone. This also means that I've gotten pretty good with a mill, lathe, and belt grinder, which I used to finish this build off.
Before showing off any photos I want to thank fellow RPF members kalkamel and Serenity! Without their help I wouldn't have gotten the rest of the vintage parts I needed to finish this build off. Thanks to them the journey is finally over!
This build began in high school when I got a vintage Graflex and some random rubber grips from eBay and a replica bubble strip from rebelscum. I have had awful luck with those bubble strips and three of them have broken for me, with a hairline crack starting in between two of the bubbles on my last one. I created a crystal chamber and blade for the saber with an MR Luke ANH board, four NiMh batteries, a recharge port, and speaker built in to the bottom. The blade I wired together from about 100 LEDs and used a DIN plug ala Slothfurnace to mate it all together. After I was done I pretty much just let the saber sit in my display shelf for the next few years, before I did anything new to it.
So without further ado, picture time!
I received the T track still rolled up from Kal, so I heated it and straightened on a piece of angle iron and then cut the pieces to length. I then use the mill to create a channel underneath the grips to make them fit on the Graflex tube.

Here you can get a pretty good idea of how I did the channels.

Ended up pretty good!

Had enough for a set of 8 grips, in the background you can see the piece I had left over from the testing with the mill. I did the angles freehand with the belt grinder. That was the easiest part!

Now that the grips were shaped and cut and true etc. I painted them. I had read on the forum somewhere that a set of grips were found on some saber from the trilogy that had brown peaking out behind the black paint I think, and decided I liked the idea. Instead of using primer I just painted two coats of black spray paint over the grips and waited a day for them to dry.
After that I epoxied them to the handle. the Massachusetts winter has been weird, but at times cold, and I took the saber out of my bag one day and saw that one grip was missing, much like that one photo of Luke's saber from the beginning of filming in Norway. I ended up super gluing them onto the saber after the rest popped off.
So now the saber had grips and needed a fitting bubble strip! I put an add in the WTB forum and shortly received word from Serenity. Charlie and I worked out a deal and a few days later I had this sweet Exactra 20 in my hands! It still works beautifully and I replaced the original strip with a replica that had the tabs on it to use as a calculator again.
When it arrived I cut open the package before even getting to the shop where I was going to work on it because I was so excited to for the last piece of the puzzle! At this point I think I had one of Roy's bubbles in there.

They're beautiful bubbles with flattened edges, the backing is clear. I had been skeptical at first about the clarity of original bubbles. They are AMAZINGLY clear, and the material is robust and beautiful to work.

I used an exacto to break the tabs and remove the bubble strip, being careful not to damage the LED display underneath.

Here's a comparison between the best bubble strip I had seen till now (and now currently in the calculator) on the right, and the original on the left. I really cannot stress how perfect the original bubbles are.

The strip ready to be sanded down and then cut to length. I used blue painters tape as a backing and YOU NEED TO DO THIS. I could have easily scratched the bubble and have had to polish it again, which I could do, but why bother if you can just be really careful and get it right the first time?

I couldn't resist the shot of the back of the calculator. These things are beautiful on the inside!

So it took me the better part of an hour to sand and finish the strip, but once it was done and I held it in my hands, years of slow work and tinkering came to a close!
I'm proud to present my vintage parts Luke ANH saber! please excuse the picture dump this thing is just so pretty.


These shots I took this morning, with a proper camera and not my iPhone:

An attempt at the 'toe pic'


My custom D ring. I found a 1977 Dutch army rations box and it had beautiful D rings on it one of which I salvaged. The clip I made myself and riveted to the bottom.

Here's the saber with one of the blade plugs my great friend JaxAndTheMoon and I are making currently.

Here you can see the brown of the grips just peeking out at the corners of the grips, which I absolutely love the look of.


Again, I'm sorry for the photo dump, but I hope you guys enjoy this as much as I do, and I'd love to hear any thoughts or comments!
-Mili
Last edited:
")