You are using an out of date browser. It may not display this or other websites correctly.
You should upgrade or use an alternative browser.
You should upgrade or use an alternative browser.
Phaser 1 Kit Buildup plus MM P2 Restoration
- Thread starter asalaw
- Start date
asalaw
Sr Member
Re: John Long Phaser 1 Kit Buildup plus MM P2 Restoration
Yeah, it's all fun and games... Fortunately I wear glasses. I just wasn't ready for the facial bombardment. That stuff really throws off chips when you do any machining to it! Thanks for the compliment!Glad to see you did'nt put your eye out.
Great thread!!!
asalaw
Sr Member
Re: John Long Phaser 1 Kit Buildup plus MM P2 Restoration
Hey folks, got sucked into PS/Illustrator creating laser templates for the handle, plus it took me some time to get packed for the shop because I was switching out a lot of tools and materials. Not to mention the Lovecraftian horror that was the cat box.
It's after six pm now, so I'm going to bag it today and go early tomorrow.
Next Session: The Handle
• Laser cut the popsicle sticks in wood
• Laser cut a wood template for the brass bottom plate which I'll do on the metal bandsaw, the knee mill, and probably hand-finish
• Create the brass handle (cut 0.010" brass sheet, shape it around a form, solder it together)
Haven't decided how I'm going to make the end plug yet (could be anything from stacking/laminating sheets to 3D printing to CNC milling in foam and casting it in urethane), plus I need to buy the brass rod for the nut and the allthread rod for, um, the allthread rod. And the little brass screws. I think I have enough scrap brass to make the internal battery contacts, though.
So anyway, I'm not sure I could finish even one of these tasks tonight by midnight, which is why I'm bagging it. Have a good Monday everybody!")
Hey folks, got sucked into PS/Illustrator creating laser templates for the handle, plus it took me some time to get packed for the shop because I was switching out a lot of tools and materials. Not to mention the Lovecraftian horror that was the cat box.
It's after six pm now, so I'm going to bag it today and go early tomorrow.
Next Session: The Handle
• Laser cut the popsicle sticks in wood
• Laser cut a wood template for the brass bottom plate which I'll do on the metal bandsaw, the knee mill, and probably hand-finish
• Create the brass handle (cut 0.010" brass sheet, shape it around a form, solder it together)
Haven't decided how I'm going to make the end plug yet (could be anything from stacking/laminating sheets to 3D printing to CNC milling in foam and casting it in urethane), plus I need to buy the brass rod for the nut and the allthread rod for, um, the allthread rod. And the little brass screws. I think I have enough scrap brass to make the internal battery contacts, though.
So anyway, I'm not sure I could finish even one of these tasks tonight by midnight, which is why I'm bagging it. Have a good Monday everybody!
asalaw
Sr Member
Re: John Long Phaser 1 Kit Buildup plus MM P2 Restoration
Well, good news and bad news. The good news is lots of things went very well, and I figured out better ways to do several of these parts. The bad news (not really that bad) is that I didn't finish all those bullet points, despite 9 1/2 hours of giving it my best shot. Some things just take more time than you think, and life is full of little annoying delays that invariably... delay you. I'm a fan of Deadwood, and as Al Swearengen once said, "Announcing your plans is a good way to hear God laugh."
So here it is, the good, the bad, and the somewhat-less-than-attractive-but-OK-with-booze.
First, off to Michael's with a 40% coupon. Needed wood (doesn't everybody?) and some tiny files to re-scribe the P2 side details I inadvertently sanded over. At 40% off, these came in just under 5 bucks. Never buy anything but the really cheap stuff at Michael's without a coupon. And there are always coupons.

Now the wood for the popsicle sticks and end plug. Thickness is crucial, and after examining photos, measuring my MM handle with calipers and a micrometer, extrapolating complex-polymer shrinkage factors, and other very challenging math and super-secret industry black magic I could be killed for revealing...

It's a prop. Get real.
Besides, it turns out that only the P2 body shrank lengthwise when MM cast it, and oddly enough, the handle shows no detectable shrinkage at all. Can't tell you how I know that, just rest assured that if you have an MM kit, the phaser body is something like 3/32" short in the cradle area, width and heights are fine, and the handle is fine all around. So for length, stick your John Long P1 in there and gauge it (that's what I did), and for the handle, you're probably fine. (That assumes, of course, that your MM kit shrank the same way mine did, which it probably did.) Or if you're truly obsessive, take calipers to your Wand Co. phaser when it arrives (I know I will), understand that they averaged out measurements to correct the original's imperfections and make it symmetrical, and live with the fact that your three-decimal-place measurements will still be off by several thou in any direction.
Ok, now it's time for
FRIKKIN' LASERS!!!
(Yay!)
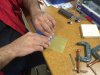
First, I grabbed a piece of scrap pine from the laser cutter scrap pile (they have scrap piles in different places for different kinds of scrap). I loaded up my Illustrator artwork (resulting in one of those delays I mentioned up front), and just went to town. The cuts came out perfectly. No matter how many times I use it, the laser cutter never fails to blow me away.


The popsicle sticks look long because they are. But having just won a 30-minute battle with the computer, I didn't want to modify the artwork in Illustrator. This is a one-off project, not a mass-production, so in this case I will simply use the Holy Bandsaw of Antioch later on.
I ran the actual wood from Michael's for the popsicle sticks and the butt plug (or the bottom half of it, anyway), and also engraved my brass piece to mark out my end plate. To engrave metal, this particular cutter's laser is too weak to ding metal, so you have to paint it or powder coat it (or use anodized aluminum). The laser then actually engraves or rasters the paint or enamel, exposing the metal underneath. Here's one place where thousandths DO matter -- your paint or powder coat will be between 2 and 6 mils thick, or 0.002" to 0.006", and the laser needs to know how deep to go. For the record, I set material thickness for 0.005", which seems to work well enough most of the time. Even precision can be imprecise.
Here's what I got:


And here's the laser cutter in action:
Engraving the Painted Brass
Cutting the Wood Parts
One of the wood cuts below -- I did more but forgot to shoot them all. I also did the bottom half of the butt plug (which is not usually what I use it for), shown later on. I'm going to redo that artwork and cut both halves next time.

Now, time to cut the 0.010" brass for the main shaft of the handle. Precision is crucial, so once again I deployed a super-secret industry voodoo method to get my circumference:

Yes, that's my Techshop keychain I'm using. Best swag ever. But it seems I've taken my point about precision a little too far, and bitten myself in the ass. What I should have done (and will do later this week, after I buy more brass) is wrap a piece of paper around it, cut off the excess so the edges butt up perfectly, and use that as a template to cut my brass. Instead, I just guesstimated to within 1/4", and that became a pain later on. Overall the method's fine, I just have to get rid of the silly demo part.

For the record, I prefer to use the fractions display on the caliper when I'm working on a prop, unless of course I'm machining something. Anyway, 3 3/4" was way too much slop, and brass is a little harder to trim than paper, especially after you've formed it into a cylinder. But do note how I marked it: a ruler, a square, and a metal scribe (or use the back of an X-Acto blade, but the scribe is easier). Measurements on props can be loosey-goosey, but marking straight lines is very important.
That's it for now, gotta go help the wife with prep for an Arbonne party this weekend. I'll finish posting yesterday's work later tonight, but I won't be back at the shop till Friday. Lots to do, lots to clean, and Illustrator files to buff and polish (and not just for this project, he hinted hintingly).


Well, good news and bad news. The good news is lots of things went very well, and I figured out better ways to do several of these parts. The bad news (not really that bad) is that I didn't finish all those bullet points, despite 9 1/2 hours of giving it my best shot. Some things just take more time than you think, and life is full of little annoying delays that invariably... delay you. I'm a fan of Deadwood, and as Al Swearengen once said, "Announcing your plans is a good way to hear God laugh."
So here it is, the good, the bad, and the somewhat-less-than-attractive-but-OK-with-booze.
First, off to Michael's with a 40% coupon. Needed wood (doesn't everybody?) and some tiny files to re-scribe the P2 side details I inadvertently sanded over. At 40% off, these came in just under 5 bucks. Never buy anything but the really cheap stuff at Michael's without a coupon. And there are always coupons.
Now the wood for the popsicle sticks and end plug. Thickness is crucial, and after examining photos, measuring my MM handle with calipers and a micrometer, extrapolating complex-polymer shrinkage factors, and other very challenging math and super-secret industry black magic I could be killed for revealing...
It's a prop. Get real.
Besides, it turns out that only the P2 body shrank lengthwise when MM cast it, and oddly enough, the handle shows no detectable shrinkage at all. Can't tell you how I know that, just rest assured that if you have an MM kit, the phaser body is something like 3/32" short in the cradle area, width and heights are fine, and the handle is fine all around. So for length, stick your John Long P1 in there and gauge it (that's what I did), and for the handle, you're probably fine. (That assumes, of course, that your MM kit shrank the same way mine did, which it probably did.) Or if you're truly obsessive, take calipers to your Wand Co. phaser when it arrives (I know I will), understand that they averaged out measurements to correct the original's imperfections and make it symmetrical, and live with the fact that your three-decimal-place measurements will still be off by several thou in any direction.
Ok, now it's time for
FRIKKIN' LASERS!!!
(Yay!)
First, I grabbed a piece of scrap pine from the laser cutter scrap pile (they have scrap piles in different places for different kinds of scrap). I loaded up my Illustrator artwork (resulting in one of those delays I mentioned up front), and just went to town. The cuts came out perfectly. No matter how many times I use it, the laser cutter never fails to blow me away.
The popsicle sticks look long because they are. But having just won a 30-minute battle with the computer, I didn't want to modify the artwork in Illustrator. This is a one-off project, not a mass-production, so in this case I will simply use the Holy Bandsaw of Antioch later on.
I ran the actual wood from Michael's for the popsicle sticks and the butt plug (or the bottom half of it, anyway), and also engraved my brass piece to mark out my end plate. To engrave metal, this particular cutter's laser is too weak to ding metal, so you have to paint it or powder coat it (or use anodized aluminum). The laser then actually engraves or rasters the paint or enamel, exposing the metal underneath. Here's one place where thousandths DO matter -- your paint or powder coat will be between 2 and 6 mils thick, or 0.002" to 0.006", and the laser needs to know how deep to go. For the record, I set material thickness for 0.005", which seems to work well enough most of the time. Even precision can be imprecise.
Here's what I got:
And here's the laser cutter in action:
Engraving the Painted Brass
Cutting the Wood Parts
One of the wood cuts below -- I did more but forgot to shoot them all. I also did the bottom half of the butt plug (which is not usually what I use it for), shown later on. I'm going to redo that artwork and cut both halves next time.
Now, time to cut the 0.010" brass for the main shaft of the handle. Precision is crucial, so once again I deployed a super-secret industry voodoo method to get my circumference:
Yes, that's my Techshop keychain I'm using. Best swag ever.
But it seems I've taken my point about precision a little too far, and bitten myself in the ass. What I should have done (and will do later this week, after I buy more brass) is wrap a piece of paper around it, cut off the excess so the edges butt up perfectly, and use that as a template to cut my brass. Instead, I just guesstimated to within 1/4", and that became a pain later on. Overall the method's fine, I just have to get rid of the silly demo part. For the record, I prefer to use the fractions display on the caliper when I'm working on a prop, unless of course I'm machining something. Anyway, 3 3/4" was way too much slop, and brass is a little harder to trim than paper, especially after you've formed it into a cylinder. But do note how I marked it: a ruler, a square, and a metal scribe (or use the back of an X-Acto blade, but the scribe is easier). Measurements on props can be loosey-goosey, but marking straight lines is very important.
That's it for now, gotta go help the wife with prep for an Arbonne party this weekend. I'll finish posting yesterday's work later tonight, but I won't be back at the shop till Friday. Lots to do, lots to clean, and Illustrator files to buff and polish (and not just for this project, he hinted hintingly).
Last edited by a moderator:
asalaw
Sr Member
Re: John Long Phaser 1 Kit Buildup plus MM P2 Restoration
And we're back from commercial...
With the brass marked, onto the metal bandsaw. When you set a rip fence, measure between the fence and the blade so that the edge of the blade is outside your line. That way you won't be at your exact measurement minus a blade width (or half a blade width if you cut right down the line). There are reasons to do it those ways, but this is the easiest way I know to get exactly what you measured. Except for the third photo...


Holy crap!! That's a horrible edge. That's what happens when you cut thin metal with a messed-up blade. The upside of Techshop is there are hundreds of us members, and when we're together we cross-pollenate ideas and techniques like crazy. The downside of Techshop is there are hundreds of us members, and not all members are as considerate of others as they should be. So they'll screw up a machine and not tell anyone because they don't realize it or don't care, and the next guy (that would be me) gets a fun surprise. But fortunately, this is fixable.


Couple blocks of scrap wood, a file, a C-clamp, a big-ass bench vise, and you're in business. Just remember, always file in one direction, away from the handle, away from yourself. Unlike sandpaper, files only go one way. No backy-forthy on the file. K?Thx.
Oh, and no, I didn't file that down a quarter inch. I just moved the brass down between photos to give the edge better support. Result:

Nice, clean edge. Another tip: When you're filing an edge like this, stroke ALONG the edge, not across it. It's much easier to get a straight, even edge that way. Go across the edge only if you've got a big bump or something sticky-outy, and even then I get better results when I go diagonally across it, not completely perpendicular to the edge. 45 degrees or so. When the bumpy thing is almost even with the rest of the edge, go back to filing along the edge. Works pretty well for me.
Now it's time to form the, uh, form, so we have something to bend our brass around. I don't have a photo, but I selected my dowel rods using the same super-secret stealth-decoder-ring method. Yep, took my handle to Michael's and compared dowels till one fit. I wound up with 3/4" x 36" dowel. Looks like a pretty good fit - just out to the edges of the handle, but just a wee bit smaller, which is fine because we're only bending .010" brass around it.
All I had to do was shave 1/16" off the edges on the Holy Bandsaw of Antioch, then glue them together, like so:


The glue bottle says to clamp for 30 minutes, then not stress the joint for 24 hours. But this operation will actually squeeze the joint together, and besides, I'm not waiting 24 hours. I'm middle aged and getting middle ageder by the minute. So I wrapped blue tape around the rods to hedge my bets just a little, and then I taped the brass to the center of the form to keep it from wandering during the bend. It was suggested by my metals instructor and one of his students to use a tough green tape you can get at Home Depot, and I'll definitely look into that, but I didn't have any issues with the blue stuff.
Going to a new post now - picture uploads are behaving oddly. And dressing funny. I don't like that.
And we're back from commercial...
With the brass marked, onto the metal bandsaw. When you set a rip fence, measure between the fence and the blade so that the edge of the blade is outside your line. That way you won't be at your exact measurement minus a blade width (or half a blade width if you cut right down the line). There are reasons to do it those ways, but this is the easiest way I know to get exactly what you measured. Except for the third photo...
Holy crap!! That's a horrible edge. That's what happens when you cut thin metal with a messed-up blade. The upside of Techshop is there are hundreds of us members, and when we're together we cross-pollenate ideas and techniques like crazy. The downside of Techshop is there are hundreds of us members, and not all members are as considerate of others as they should be. So they'll screw up a machine and not tell anyone because they don't realize it or don't care, and the next guy (that would be me) gets a fun surprise. But fortunately, this is fixable.
Couple blocks of scrap wood, a file, a C-clamp, a big-ass bench vise, and you're in business. Just remember, always file in one direction, away from the handle, away from yourself. Unlike sandpaper, files only go one way. No backy-forthy on the file. K?Thx.
Oh, and no, I didn't file that down a quarter inch. I just moved the brass down between photos to give the edge better support. Result:
Nice, clean edge. Another tip: When you're filing an edge like this, stroke ALONG the edge, not across it. It's much easier to get a straight, even edge that way. Go across the edge only if you've got a big bump or something sticky-outy, and even then I get better results when I go diagonally across it, not completely perpendicular to the edge. 45 degrees or so. When the bumpy thing is almost even with the rest of the edge, go back to filing along the edge. Works pretty well for me.
Now it's time to form the, uh, form, so we have something to bend our brass around. I don't have a photo, but I selected my dowel rods using the same super-secret stealth-decoder-ring method. Yep, took my handle to Michael's and compared dowels till one fit. I wound up with 3/4" x 36" dowel. Looks like a pretty good fit - just out to the edges of the handle, but just a wee bit smaller, which is fine because we're only bending .010" brass around it.
All I had to do was shave 1/16" off the edges on the Holy Bandsaw of Antioch, then glue them together, like so:
The glue bottle says to clamp for 30 minutes, then not stress the joint for 24 hours. But this operation will actually squeeze the joint together, and besides, I'm not waiting 24 hours. I'm middle aged and getting middle ageder by the minute. So I wrapped blue tape around the rods to hedge my bets just a little, and then I taped the brass to the center of the form to keep it from wandering during the bend. It was suggested by my metals instructor and one of his students to use a tough green tape you can get at Home Depot, and I'll definitely look into that, but I didn't have any issues with the blue stuff.
Going to a new post now - picture uploads are behaving oddly. And dressing funny. I don't like that.
Attachments

asalaw
Sr Member
Re: John Long Phaser 1 Kit Buildup plus MM P2 Restoration
So now we bend the brass. You do it just like the little old Cuban in the cigar shop.
What?
You're NOT Cuban? Crap.
OK, first of all, **** you for not being Cuban. Seriously. There's only maybe 11 million of us, so you're not helping by being something else.
Anyway, roll it up like... no... that only works if you remember the 80s... um... AHA! Like a newspaper you're going to swat a fly with. Nice and tight, because that fly is really pissing you off and you want him to know it. Just a minute to roll it full of your holy wrath, and 157 misses before you give up and get the spray.


You have to do it in one continuous effort, keep the wood form pressed hard against the table, and roll. Then clamp the unholy crap out of it.
It'll need to stay like this for as long as possible, but as always I have lots to work on while I wait for a process. Sitting and waiting is very annoying, and I like to keep moving when I'm in the shop. In the industry, whether you're in a shop or on set, sitting around and waiting is only permissible when there is literally nothing for you to do. And if you're a PA, you'd better make you some worky-worky riki-tik, lest the AD spear you and mount you in his butterfly collection. So I got conditioned to work hard, fast, and smart at an early age.


See that edge sticking up? That's the 1/4" of extra slop laughing at me. And after all I've done for it. *******.
I trimmed some of that off with a bench metal shear (DO NOT use tin snips for this -- you have been warned!!), and I may be able to trim it all the way down, in which case I'll still use this piece - apart from the slop, it came out great.
The other issue is, even though it's only 0.010" thick (and MUCH easier to bend than even 0.015, trust me), I may want to anneal it. If I mess that up (I've never annealed anything this size before), I'm going to have to start over.
Here's a video on annealing. Brass is very, very springy. Springier than spring steel, and that even has the word "spring" right in the name. So when you want to bend it, it fights back. If you're curling it around a form, it fights back even worse. So you grab a blowtorch and heat it till it glows red, then let it cool. After it cools, it no longer fights back. You've broken its spirit, trashed its vinyl record collection, and told it several abusive yo mama jokes. Hence, no fight left. It stays where you bend it.
Of course, it's weaker now, so you have to be more careful, and I don't know yet if annealing it may affect its strength as a handle. Or, it could be the original was annealed, and that's why the handle on GJ's phaser has so many dents. Plus, the cylindrical shape, the popsicle sticks, the end plug, and the Hubbel connector at the top may be all the reinforcement it needs. We'll see. When I anneal it, I'll definitely shoot pictures and probably video. No sense only one of us learning if this goes t!ts-up on me.
So now we're onto the end plate. Not 100% thrilled with the ultimate result here, but most of the method is solid and most mistakes are worth sharing...
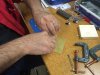
I started with the phaser 1 screw (the one that holds the door in place) since from the photos, it looks about the right diameter and it's also a flathead. And the eyeball test results are very good.

So that's what I'll use to gauge my progress. Now, I have to find the right bit to start the pilot hole for it. Something very tiny....

Zathras correct. Not the one.
Took me like 30 minutes to find the drill bits. They were in the machine cabinet, right where they were supposed to be, laughing at me. Come to think of it, there was a lot of laughing at me last night. I probably shouldn't have told anyone I was wearing a thong...
Anyway, I may be doing something wrong, but the drill presses at the shop vibrate like a SCUD missile with diarrhea.
So I use the knee mill for drilling as well as milling.

It's orders of magnitude more precise, which is important because things like off-center holes really jump out at you. Usually not critical for camera, but obvious to the eye. Plus, I want a lot more time on the milling machine than on the drill press. It's more useful, more versatile, easier to use, and easier to set up your work-holding, plus I get a real Tim Allen rush when I use it.
Without one, get a decent bench drill press (but check it out before you buy it), or a milling head for your lathe, or a Dremel press, or you can make your own drill press for cheap.
On with the show:


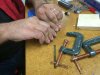
I drilled out the holes with a sacrificial piece of aluminum scrap underneath to avoid bending the brass, starting with a tiny screw and working my way up to the proper diameter. The great thing about a milling machine is the precision table movement. If you need a perfectly straight row of holes, you're in business. Just turn one crank, and you move in a straight line on only one axis. And for R-L movement, it has a variable speed auto-feed, which makes milling straight lines a breeze.
And this is where Fonzie jumps the shark. After this, I was very tired (the hour, as Dylan and Hendrix say, was getting late), and that's when you start screwing up. Don't work tired. You get stupid, and it's actually dangerous around heavy machinery. I won't even look at the lathe if I'm not fresh. And don't try to rush. There is no rush in a machine shop, ever.
So back to me making a sow's ear out of a silk purse:
I figured I'd just do the countersink for the screws and the butterfly-shaped cutout with my Dremel, either grinder or burr bits. I see you shaking your head. I was tired, ok?


Made a mess, ruined a couple of grinder bits, and it turns out burr bits REALLY chatter and mess up your work when you use them on metal, and I never got close to completely countersinking the screw. Don't think I can't hear you chuckle. I'm onto you, buddy.
So that was about the time I remembered we had countersinks in the machine shop. Like I said, tired.
You don't need them as heavy-duty as these if you're not a machinist, but they certainly do the job. You can probably get pretty good ones at Home Depot or Lowe's.

To find the right countersink for your screw, just drill a line of holes in a block of scrap wood big enough for the screw, then try different countersinks till you find the right one by making the countersink and dropping in your screw. I lucked out on the first try.


Way more better! Nice, smooth countersinks, perfectly centered... to each other... more on that wee problem later.
Now that the holes are cut and there's only final shaping left, I roughed out the cut on the metal bandsaw. The blade worked much better on the thicker brass, but I didn't take any chances with the curves. I wanted to file those.


You'll notice the paint is all scratched off after the bandsaw. I certainly did.
Again, file only in one direction away from the handle and away from yourself. With patience, you'll pick it up in no time.

I put it against the MM handle, and traced around it with a red Sharpie. Just file away the red part.
And for the straight sides, use a square against only ONE of the wood blocks to get the piece perpendicular to that block. If you rest it on both blocks, you'll probably be out of square. You can square up your file against that same block of wood. Use gentle, deliberate strokes, lightly pressing the file against the work piece, not down onto the wood. Otherwise you'll file into the wood and go out of square again.


Now, remember, this is a one-off project. I would not go trying to outfit phasers for a landing party with these techniques. I'd do 90% of the work on the CNC mill, probably stacking the brass sheets to do them all in one pass. If I ever have a chance to do that, I'll certainly put up a thread. For this, though, filing after the bandsaw is fine.
I've hit that 24-file wall, so onto the next post - tomorrow. I'm pooped. Just a quick wrap-up of this session remaining, plus what I was talking about when I mentioned my countersinks only being in line with each other.
So now we bend the brass. You do it just like the little old Cuban in the cigar shop.
What?
You're NOT Cuban? Crap.
OK, first of all, **** you for not being Cuban. Seriously. There's only maybe 11 million of us, so you're not helping by being something else.
Anyway, roll it up like... no... that only works if you remember the 80s... um... AHA! Like a newspaper you're going to swat a fly with. Nice and tight, because that fly is really pissing you off and you want him to know it. Just a minute to roll it full of your holy wrath, and 157 misses before you give up and get the spray.
You have to do it in one continuous effort, keep the wood form pressed hard against the table, and roll. Then clamp the unholy crap out of it.
It'll need to stay like this for as long as possible, but as always I have lots to work on while I wait for a process. Sitting and waiting is very annoying, and I like to keep moving when I'm in the shop. In the industry, whether you're in a shop or on set, sitting around and waiting is only permissible when there is literally nothing for you to do. And if you're a PA, you'd better make you some worky-worky riki-tik, lest the AD spear you and mount you in his butterfly collection. So I got conditioned to work hard, fast, and smart at an early age.
See that edge sticking up? That's the 1/4" of extra slop laughing at me. And after all I've done for it. *******.
I trimmed some of that off with a bench metal shear (DO NOT use tin snips for this -- you have been warned!!), and I may be able to trim it all the way down, in which case I'll still use this piece - apart from the slop, it came out great.
The other issue is, even though it's only 0.010" thick (and MUCH easier to bend than even 0.015, trust me), I may want to anneal it. If I mess that up (I've never annealed anything this size before), I'm going to have to start over.
Here's a video on annealing. Brass is very, very springy. Springier than spring steel, and that even has the word "spring" right in the name. So when you want to bend it, it fights back. If you're curling it around a form, it fights back even worse. So you grab a blowtorch and heat it till it glows red, then let it cool. After it cools, it no longer fights back. You've broken its spirit, trashed its vinyl record collection, and told it several abusive yo mama jokes. Hence, no fight left. It stays where you bend it.
Of course, it's weaker now, so you have to be more careful, and I don't know yet if annealing it may affect its strength as a handle. Or, it could be the original was annealed, and that's why the handle on GJ's phaser has so many dents. Plus, the cylindrical shape, the popsicle sticks, the end plug, and the Hubbel connector at the top may be all the reinforcement it needs. We'll see. When I anneal it, I'll definitely shoot pictures and probably video. No sense only one of us learning if this goes t!ts-up on me.
So now we're onto the end plate. Not 100% thrilled with the ultimate result here, but most of the method is solid and most mistakes are worth sharing...
I started with the phaser 1 screw (the one that holds the door in place) since from the photos, it looks about the right diameter and it's also a flathead. And the eyeball test results are very good.
So that's what I'll use to gauge my progress. Now, I have to find the right bit to start the pilot hole for it. Something very tiny....
Zathras correct. Not the one.
Took me like 30 minutes to find the drill bits. They were in the machine cabinet, right where they were supposed to be, laughing at me. Come to think of it, there was a lot of laughing at me last night. I probably shouldn't have told anyone I was wearing a thong...
Anyway, I may be doing something wrong, but the drill presses at the shop vibrate like a SCUD missile with diarrhea.
So I use the knee mill for drilling as well as milling.
It's orders of magnitude more precise, which is important because things like off-center holes really jump out at you. Usually not critical for camera, but obvious to the eye. Plus, I want a lot more time on the milling machine than on the drill press. It's more useful, more versatile, easier to use, and easier to set up your work-holding, plus I get a real Tim Allen rush when I use it.
Without one, get a decent bench drill press (but check it out before you buy it), or a milling head for your lathe, or a Dremel press, or you can make your own drill press for cheap.
On with the show:
I drilled out the holes with a sacrificial piece of aluminum scrap underneath to avoid bending the brass, starting with a tiny screw and working my way up to the proper diameter. The great thing about a milling machine is the precision table movement. If you need a perfectly straight row of holes, you're in business. Just turn one crank, and you move in a straight line on only one axis. And for R-L movement, it has a variable speed auto-feed, which makes milling straight lines a breeze.
And this is where Fonzie jumps the shark. After this, I was very tired (the hour, as Dylan and Hendrix say, was getting late), and that's when you start screwing up. Don't work tired. You get stupid, and it's actually dangerous around heavy machinery. I won't even look at the lathe if I'm not fresh. And don't try to rush. There is no rush in a machine shop, ever.
So back to me making a sow's ear out of a silk purse:
I figured I'd just do the countersink for the screws and the butterfly-shaped cutout with my Dremel, either grinder or burr bits. I see you shaking your head. I was tired, ok?
Made a mess, ruined a couple of grinder bits, and it turns out burr bits REALLY chatter and mess up your work when you use them on metal, and I never got close to completely countersinking the screw. Don't think I can't hear you chuckle. I'm onto you, buddy.
So that was about the time I remembered we had countersinks in the machine shop. Like I said, tired.
You don't need them as heavy-duty as these if you're not a machinist, but they certainly do the job. You can probably get pretty good ones at Home Depot or Lowe's.
To find the right countersink for your screw, just drill a line of holes in a block of scrap wood big enough for the screw, then try different countersinks till you find the right one by making the countersink and dropping in your screw. I lucked out on the first try.
Way more better! Nice, smooth countersinks, perfectly centered... to each other... more on that wee problem later.
Now that the holes are cut and there's only final shaping left, I roughed out the cut on the metal bandsaw. The blade worked much better on the thicker brass, but I didn't take any chances with the curves. I wanted to file those.
You'll notice the paint is all scratched off after the bandsaw. I certainly did.
Again, file only in one direction away from the handle and away from yourself. With patience, you'll pick it up in no time.
I put it against the MM handle, and traced around it with a red Sharpie. Just file away the red part.
And for the straight sides, use a square against only ONE of the wood blocks to get the piece perpendicular to that block. If you rest it on both blocks, you'll probably be out of square. You can square up your file against that same block of wood. Use gentle, deliberate strokes, lightly pressing the file against the work piece, not down onto the wood. Otherwise you'll file into the wood and go out of square again.
Now, remember, this is a one-off project. I would not go trying to outfit phasers for a landing party with these techniques. I'd do 90% of the work on the CNC mill, probably stacking the brass sheets to do them all in one pass. If I ever have a chance to do that, I'll certainly put up a thread. For this, though, filing after the bandsaw is fine.
I've hit that 24-file wall, so onto the next post - tomorrow. I'm pooped. Just a quick wrap-up of this session remaining, plus what I was talking about when I mentioned my countersinks only being in line with each other.
Attachments
Last edited:
asalaw
Sr Member
Re: John Long Phaser 1 Kit Buildup plus MM P2 Restoration
Don't think I wouldn't love to. As I pointed out, though, it's a weak laser, not designed to do anything at all to metal. In fact, if you use it at the cutting setting on metal, the bounce-back could damage the laser, so it's expressly prohibited. You can cut anything but metal, or things that let off fumes like PVC, vinyl, Kydex, etc. Wood, card, paper, natural fabrics, leather, acrylic, some foams, some plastics, and so forth are okay. That's why you have to spray or powder coat your metal, or use anodized metal. The laser can etch that away and expose the metal, and you can do lots of cool things with that. For instance:

We have a massive Water Jet, but I haven't taken the class yet (it's $195 and you can't use coupons for it). That would be the ideal choice for making large runs, way more powerful and versatile than any laser cutter. It'll cut metal, stone, ceramic, plastic - anything flat, up to 6 inches (I think) of tool steel. Lay down a big sheet of brass, load up your CNC tool path, and just watch it cut. Something like these end plates, it could do a full 8' x 4' sheet of brass full of them in minutes. Which is good, since it's the only machine they charge for. $3/minute, because it's a bigger power hog than Mussolini. Just doing a couple for a project would be very cheap, might not even take a minute.
Without the use of the Water Jet (yet), I would do it on the Tormach CNC mill. You can stack your brass and do a pretty good number at once, though you'd have to change bits at least twice because of the different cuts and drilled holes. You'd also have to file out the little corners of the butterfly hole by hand, because I don't know of any end mills with a narrow enough kerf (cutting diameter) to do sharp inside corners. Not saying there aren't, just that the smallest I've seen is 1/16".
And I'm not about to send work out when the whole point of paying for a Techshop membership is to either avoid that, or be the guy people send work out to.
Don't think I wouldn't love to. As I pointed out, though, it's a weak laser, not designed to do anything at all to metal. In fact, if you use it at the cutting setting on metal, the bounce-back could damage the laser, so it's expressly prohibited. You can cut anything but metal, or things that let off fumes like PVC, vinyl, Kydex, etc. Wood, card, paper, natural fabrics, leather, acrylic, some foams, some plastics, and so forth are okay. That's why you have to spray or powder coat your metal, or use anodized metal. The laser can etch that away and expose the metal, and you can do lots of cool things with that. For instance:
We have a massive Water Jet, but I haven't taken the class yet (it's $195 and you can't use coupons for it). That would be the ideal choice for making large runs, way more powerful and versatile than any laser cutter. It'll cut metal, stone, ceramic, plastic - anything flat, up to 6 inches (I think) of tool steel. Lay down a big sheet of brass, load up your CNC tool path, and just watch it cut. Something like these end plates, it could do a full 8' x 4' sheet of brass full of them in minutes. Which is good, since it's the only machine they charge for. $3/minute, because it's a bigger power hog than Mussolini. Just doing a couple for a project would be very cheap, might not even take a minute.
Without the use of the Water Jet (yet), I would do it on the Tormach CNC mill. You can stack your brass and do a pretty good number at once, though you'd have to change bits at least twice because of the different cuts and drilled holes. You'd also have to file out the little corners of the butterfly hole by hand, because I don't know of any end mills with a narrow enough kerf (cutting diameter) to do sharp inside corners. Not saying there aren't, just that the smallest I've seen is 1/16".
And I'm not about to send work out when the whole point of paying for a Techshop membership is to either avoid that, or be the guy people send work out to.
Last edited:
robn1
Master Member
Re: John Long Phaser 1 Kit Buildup plus MM P2 Restoration
I guess it depends on the laser then. I have some aluminum parts someone made for me on a laser cutter, nice sharp cuts too. But he said there's a limit on how small or thin the parts can be, they can distort or melt from the heat. Water cutters of course are self cooling.
I guess it depends on the laser then. I have some aluminum parts someone made for me on a laser cutter, nice sharp cuts too. But he said there's a limit on how small or thin the parts can be, they can distort or melt from the heat. Water cutters of course are self cooling.
asalaw
Sr Member
Re: John Long Phaser 1 Kit Buildup plus MM P2 Restoration
Yeah, that's exactly right, Rob. They simply installed different machines for different purposes, based on their experience in operating the Techshops elsewhere - three in the San Francisco area, one in Austin, one in Philly, one in Pittsburg, DC/Arlington, and I think there's one coming to L.A. They're pretty experienced at that now - for instance, they buy Jet mills and lathes, and certain other machine/metal tools, because they're extremely rugged. More delicate machines would be down all the time from all the different users messing them up, and thus too costly to maintain.
They probably spread CNC cutting between the laser cutter, vinyl cutter, and Water Jet because it's somehow more efficient for them, or maybe they got the water jet to attract artists and sculptors, who absolutely love that thing, and that drove the other choices -- no sense buying a water jet for $100,000 and a metal-cutting laser. But between all three machines, you can precision-cut pretty much anything from gossamer greeting cards to battleship plating.
ecl, thank you for saying so! The compliments really help me keep going.
asalaw
Sr Member
Re: John Long Phaser 1 Kit Buildup plus MM P2 Restoration
And yeah, I've seen very thin metal cuts from the Water Jet and they're amazing. The kerf is very tiny, so it can do pretty sharp inside corners with no trouble.
My only complaint is that the pulsing of the water jet leaves tiny individual cut marks all along your cut sides. You can get rid of them of course, but it creates limitations (just like any machine). For instance, if you want to make many thin plates out of a thick bar of metal by slicing it like a loaf of bread, sure it'll do that, but you'll have to then take the slices to the mill or the Tormach and use a fly cutter to give you an acceptable finish. Cuz those sliced faces will be fugly from the water jet. Which means you'll need to factor in a few thousandths of an inch of extra thickness in your water jet cuts to account for the material the fly cutter is going to remove.
So the CNC giveth, and the CNC taketh away.
asalaw
Sr Member
Re: John Long Phaser 1 Kit Buildup plus MM P2 Restoration
OK, time to wrap up last session's work.
The outside filing came out really nice, and the trick with the red Sharpie gave me a perfect match to the butt plug (that's what I call it - get over it. I coined "crapazoid," so I get to say "butt plug").
I'm pretty sure John taught me the Sharpie trick for filing, but it was a very long time ago and for a few minutes yesterday I thought Nixon was still president, so who knows?


Just a hair over on the other side, but I can take that down no problem.

This, however, = problem.


The damage near the butterfly cutout (because "butterfly hole" sounds too much like insect prison porn) is from a wandering grinder bit, and the straight groove you can see on the left in the center picture is from moving the mill table to the side without first dropping the workpiece away from the countersink bit, thus dragging it across my work.
D'OH! Blah, blah, tired, blah.
Finally, and I'm not sure you can tell in the photos, but the countersinks are not centered on the drilled holes. That happened because I took my workpiece off the mill after drilling, and came back later to countersink it, and I didn't properly align my work to its previous position. Two ways to avoid that next time: 1) use the digital readout on the mill to precisely mark the position of the brass plate before removing it, and 2) don't remove the workpiece in the first place, because all that Dremel stuff was a waste of time anyway. If the workpiece never moves in its vise, changing bits and end mills and whatever is not an issue.
And onto the popsicle sticks. As I said earlier, I laser cut them too long, and here you can see by how much. So I took them to the Holy Bandsaw of Antioch, set up a fence, and zipped them all through at once.


I cut eight rather than the four I needed, and quickly vindicated this choice by screwing one up on the bandsaw, leaving me with seven. They're all perfectly aligned as far as I can see. The first picture shows that pretty well. There seems to be just a hair of extra thickness, and if I decide that needs to go, it's maybe two minutes on the sanding block to thin down all of them. Basswood ain't exactly mahogany. (If I ever had to do a lot of them, I think I'd run the wood through the planer before laser cutting it, and poof! - no sanding.) So, different methods for different kinds of work, using maximum laziness as your guide.
Next, I double-checked the butt plug for thickness with my super prop ninja method. Looks okey-dokey!


Finally, here's the session's total output. Not a lot, but definitely progress.

And here's a bonus picture: In case you're wondering how I get those ultra-close macro shots, I just got one of these for my iPhone on Amazon:

They generally run under $40 and you can get them anywhere for any camera phone. That's the macro on top there, the screw-on wide lens on the table, and the fisheye lens on the underside. The fisheye will see some use soon.
OK, that's it for this session. Back to the shop on Friday with a fresh agenda and hopefully better progress.
OK, time to wrap up last session's work.
The outside filing came out really nice, and the trick with the red Sharpie gave me a perfect match to the butt plug (that's what I call it - get over it. I coined "crapazoid," so I get to say "butt plug").
I'm pretty sure John taught me the Sharpie trick for filing, but it was a very long time ago and for a few minutes yesterday I thought Nixon was still president, so who knows?
Just a hair over on the other side, but I can take that down no problem.
This, however, = problem.
The damage near the butterfly cutout (because "butterfly hole" sounds too much like insect prison porn) is from a wandering grinder bit, and the straight groove you can see on the left in the center picture is from moving the mill table to the side without first dropping the workpiece away from the countersink bit, thus dragging it across my work.
D'OH! Blah, blah, tired, blah.
Finally, and I'm not sure you can tell in the photos, but the countersinks are not centered on the drilled holes. That happened because I took my workpiece off the mill after drilling, and came back later to countersink it, and I didn't properly align my work to its previous position. Two ways to avoid that next time: 1) use the digital readout on the mill to precisely mark the position of the brass plate before removing it, and 2) don't remove the workpiece in the first place, because all that Dremel stuff was a waste of time anyway. If the workpiece never moves in its vise, changing bits and end mills and whatever is not an issue.
And onto the popsicle sticks. As I said earlier, I laser cut them too long, and here you can see by how much. So I took them to the Holy Bandsaw of Antioch, set up a fence, and zipped them all through at once.
I cut eight rather than the four I needed, and quickly vindicated this choice by screwing one up on the bandsaw, leaving me with seven. They're all perfectly aligned as far as I can see. The first picture shows that pretty well. There seems to be just a hair of extra thickness, and if I decide that needs to go, it's maybe two minutes on the sanding block to thin down all of them. Basswood ain't exactly mahogany. (If I ever had to do a lot of them, I think I'd run the wood through the planer before laser cutting it, and poof! - no sanding.) So, different methods for different kinds of work, using maximum laziness as your guide.
Next, I double-checked the butt plug for thickness with my super prop ninja method. Looks okey-dokey!
Finally, here's the session's total output. Not a lot, but definitely progress.
And here's a bonus picture: In case you're wondering how I get those ultra-close macro shots, I just got one of these for my iPhone on Amazon:
They generally run under $40 and you can get them anywhere for any camera phone. That's the macro on top there, the screw-on wide lens on the table, and the fisheye lens on the underside. The fisheye will see some use soon.
OK, that's it for this session. Back to the shop on Friday with a fresh agenda and hopefully better progress.
Last edited:
Re: John Long Phaser 1 Kit Buildup plus MM P2 Restoration
Uh, I can't see any images.
Uh, I can't see any images.
asalaw
Sr Member
Re: John Long Phaser 1 Kit Buildup plus MM P2 Restoration
Keeps happening, and I have to keep re-uploading the images. Wait. Zathras fix.

OK, coming through again now at least on my end. I'd hoped it wouldn't happen with fewer pictures per post. Bummer.
Folks, please feel free to PM me if this happens again so I can get an alert and fix it sooner. Thanks!

Gaugrrgh!!Uh, I can't see any images.
Keeps happening, and I have to keep re-uploading the images. Wait. Zathras fix.
OK, coming through again now at least on my end. I'd hoped it wouldn't happen with fewer pictures per post. Bummer.
Folks, please feel free to PM me if this happens again so I can get an alert and fix it sooner. Thanks!
Last edited by a moderator:
Blackbirdcd
Well-Known Member
Re: John Long Phaser 1 Kit Buildup plus MM P2 Restoration
Okay now I'm just going to have to craft my own Phaser handle when I tackle that MM kit.
I also have a JLong P1 which is mostly ready for final assembly and I've wanted to incorporate it into a P2 body for a long time. Seems like the MM kit is a good starting point to do so, although I admit a fascination with crafting my own shells. Someday I'll get back to it, but in the meantime this has been an inspiring build thread.
asalaw
Sr Member
Re: John Long Phaser 1 Kit Buildup plus MM P2 Restoration
I too will craft my own shells, because the sheer number of hero phasers I've wanted for 20 years to have all over my home requires it. And of course, I'll post threads for those too. This is fun, keeps me on my toes, pushes me to get better, and of course to finish! Not to mention the thrill I get when someone gets inspired.
So never mind the incredible joy and contentment I get from making props and models. Just your saying that puts a spring in my step and makes me want to get right back to work.
Working on the Illustrator artwork again tonight, expecting a productive day tomorrow!
Wow, Christopher, thanks! You just made my day!Okay now I'm just going to have to craft my own Phaser handle when I tackle that MM kit.
I also have a JLong P1 which is mostly ready for final assembly and I've wanted to incorporate it into a P2 body for a long time. Seems like the MM kit is a good starting point to do so, although I admit a fascination with crafting my own shells. Someday I'll get back to it, but in the meantime this has been an inspiring build thread.
I too will craft my own shells, because the sheer number of hero phasers I've wanted for 20 years to have all over my home requires it. And of course, I'll post threads for those too. This is fun, keeps me on my toes, pushes me to get better, and of course to finish! Not to mention the thrill I get when someone gets inspired.
So never mind the incredible joy and contentment I get from making props and models. Just your saying that puts a spring in my step and makes me want to get right back to work.
Working on the Illustrator artwork again tonight, expecting a productive day tomorrow!
asalaw
Sr Member
Re: John Long Phaser 1 Kit Buildup plus MM P2 Restoration
Hey folks, just thought I'd pass this on before I head to the shop this morning.
I've been trying to get better prices on brass for my props - aluminum is very cheap, but brass is murder. I was about to pull the trigger on 6 sheets of K&S 0.010" for around $26 including shipping when I discovered this:
6" x 100" of .010" brass for $17.81 plus shipping on Amazon, Prime eligible.
I got Saturday shipping for $4 since I have Prime, so if my handle doesn't pan out today, there's more where that came from. And with all the phasers I want to have, that should last me the next year or two, depending on the breaks.
Last edited:
asalaw
Sr Member
Re: John Long Phaser 1 Kit Buildup plus MM P2 Restoration
Well, the good news is my metal showed up today, and it's a helluva lotta brass for $22!

The other good news is the handle's coming along great! Not finished yet (of course...), but really getting there.

HONEY, I'M HOOO-OOOME!
So when we left off, I had some overhang issues with the brass for the handle, and forming it was becoming a pain. First, I needed an accurate guide for circumference. I used blue tape around the base of the handle and then decapitated the excess. The sharper your #11 blade, the better, so I put in a fresh blade. Don't worry about overlapping the tape. Go right ahead.


Here's why there's no need to worry about overlapping the tape: you just cut it right down the center, and the overlap is no longer an issue. In this case, it stayed behind on the handle when I transferred it to the brass.


And now I had a very good idea how much I needed to trim. I marked it with the back of a knife blade using a square.

And now the shear...

Note -- this is a huge pain with a curled sheet like this. Next time I'm definitely getting an accurate cut before bending, and that's not the only thing I'll be doing differently. So, after cutting on the shear and just a wee bit of filing the rough part of the cut:

Here we are, cut back to the proper size (well, just very close it turned out, but it was no longer a problem).
And now it's time to take care of the not-bendy-problem.
Time to...


Well, the good news is my metal showed up today, and it's a helluva lotta brass for $22!
The other good news is the handle's coming along great! Not finished yet (of course...), but really getting there.
HONEY, I'M HOOO-OOOME!
So when we left off, I had some overhang issues with the brass for the handle, and forming it was becoming a pain. First, I needed an accurate guide for circumference. I used blue tape around the base of the handle and then decapitated the excess. The sharper your #11 blade, the better, so I put in a fresh blade. Don't worry about overlapping the tape. Go right ahead.
Here's why there's no need to worry about overlapping the tape: you just cut it right down the center, and the overlap is no longer an issue. In this case, it stayed behind on the handle when I transferred it to the brass.
And now I had a very good idea how much I needed to trim. I marked it with the back of a knife blade using a square.
And now the shear...
Note -- this is a huge pain with a curled sheet like this. Next time I'm definitely getting an accurate cut before bending, and that's not the only thing I'll be doing differently. So, after cutting on the shear and just a wee bit of filing the rough part of the cut:
Here we are, cut back to the proper size (well, just very close it turned out, but it was no longer a problem).
And now it's time to take care of the not-bendy-problem.
Time to...
Last edited by a moderator:
Similar threads
- Replies
- 11
- Views
- 1,274