Hi folks. This is my first project posted here, I thought I'd put up some pictures and info documenting the AT-AT Driver costume I'm trying to crank out in time for Halloween. The bug hits me every year with barely enough time to make something awesome, but I might pull it off this time. ") Special thanks to Clutch and others who built similar costumes, I've found tons of useful reference info on this forum. This costume isn't going to be 100% accurate (or even 80%), but I'm trying to capture the look on a budget and time crunch as best as I can.
Special thanks to Clutch and others who built similar costumes, I've found tons of useful reference info on this forum. This costume isn't going to be 100% accurate (or even 80%), but I'm trying to capture the look on a budget and time crunch as best as I can.
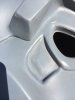
It started with this helmet, a fairly poor resin recast I bought on eBay for about $40 a while back. It looks like a cast of a vinyl Tie Pilot helmet to me, based on the warping. Maybe Don Post? I'm no expert. It was fairly pock marked and the mohawk was a mess, but it's a good starting point. Here it is after stripping the first coat of primer (Rustoleum, wouldn't stick even after a thorough washing).

I rebuilt the mohawk with plastic card (garage sale sign), corrected(ish) the mohawk front, ground off the screw details, did tons of filling and sanding. Here it is almost done in a coat of primer with dramatic dining room lighting.

I've never built hard wearable armor before, but here's my go at it. I originally planned to cast it in fiberglass from a plaster mold but will be vacuforming instead. Torso armor started as a sheet of pink insulation foam. This stuff is super easy to carve/sand into shape, love it! Being too cheap to buy two sheets I built up the depth only where required (since I wasn't planning to vacuform).
Front:


Back:


Hard angle shapes on the front were built with a for sale sign. The rectangles were cut from styrofoam I had laying around, kind of a bad idea, I should have used plywood or something. Then a coat of spackle and/or Durham's Water Putty, which ended up being a ton of extra work. I ended up going with polyester resin/fiberglass to harden the back, which was also a ton of work. The coating didn't perfectly protect the foam from being eaten by resin/spot putty, so lots of extra work re-filling and smoothing.


They look like this after primer. By this point I had decided to vacuform so I'm not agonizing over the smoothness.

I'll post more later with chest box pics and some info about other greebles.
Wish I knew where to get some BOC siphon cartridge holders! I'll probably end up scratchbuilding the hangers, they're fairly simple anyway.
Feel free to post comments and suggestions. Thanks to all who came before me, this site is truly a wealth of info!
Special thanks to Clutch and others who built similar costumes, I've found tons of useful reference info on this forum. This costume isn't going to be 100% accurate (or even 80%), but I'm trying to capture the look on a budget and time crunch as best as I can.It started with this helmet, a fairly poor resin recast I bought on eBay for about $40 a while back. It looks like a cast of a vinyl Tie Pilot helmet to me, based on the warping. Maybe Don Post? I'm no expert. It was fairly pock marked and the mohawk was a mess, but it's a good starting point. Here it is after stripping the first coat of primer (Rustoleum, wouldn't stick even after a thorough washing).
I rebuilt the mohawk with plastic card (garage sale sign), corrected(ish) the mohawk front, ground off the screw details, did tons of filling and sanding. Here it is almost done in a coat of primer with dramatic dining room lighting.
I've never built hard wearable armor before, but here's my go at it. I originally planned to cast it in fiberglass from a plaster mold but will be vacuforming instead. Torso armor started as a sheet of pink insulation foam. This stuff is super easy to carve/sand into shape, love it! Being too cheap to buy two sheets I built up the depth only where required (since I wasn't planning to vacuform).
Front:
Back:
Hard angle shapes on the front were built with a for sale sign. The rectangles were cut from styrofoam I had laying around, kind of a bad idea, I should have used plywood or something. Then a coat of spackle and/or Durham's Water Putty, which ended up being a ton of extra work. I ended up going with polyester resin/fiberglass to harden the back, which was also a ton of work. The coating didn't perfectly protect the foam from being eaten by resin/spot putty, so lots of extra work re-filling and smoothing.
They look like this after primer. By this point I had decided to vacuform so I'm not agonizing over the smoothness.
I'll post more later with chest box pics and some info about other greebles.
Wish I knew where to get some BOC siphon cartridge holders! I'll probably end up scratchbuilding the hangers, they're fairly simple anyway.
Feel free to post comments and suggestions. Thanks to all who came before me, this site is truly a wealth of info!