Tyrion Lannister (Peter Dinklage) bust, critique and tips welcome.

powder monkey

New Member
This is the end of play day 1 of my first sculpt. I'm really looking for tips on how to get a better likeness for Peter Dinklage so any tips or good profile pictures would be awesome. I could also use tips on how to smooth and work with oil clay better so any tips/tricks you have would also be great. This is my first time working with any sort of sculpture so it's all guesswork at the moment.

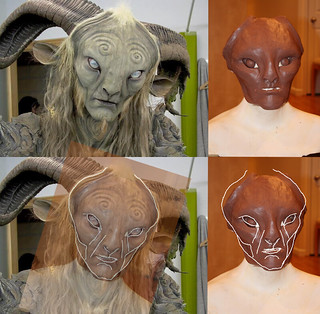
At the moment it's looking more like a mask because I've run out of clay to do the back of his head or any hair. I'm more focused on getting a likeness in the face to begin with and then adding to it. I'm working in oil clay at the moment, planning on making a mold when I'm a bit more flush and the bust is fully completed. I'm even thinking I might do a full statue. I don't know the exact scale probably around 1:4

Thanks for looking!

IMAG0024.jpgIMAG0025.jpgIMAG0026.jpgIMAG0027.jpgIMAG0028.jpgIMAG0029.jpg
 
IMAG0048.jpgIMAG0049.jpgIMAG0050.jpgIMAG0051.jpgIMAG0052.jpgIMAG0053.jpgIMAG0054.jpgIMAG0055.jpg

I decided to start over because I couldn't see the wood for the trees. It seems every time I rework something it gets bigger in scale.

My lack of clay is becoming an issue but the site I bought this stuff from is closed and it was just described as "industrial oil clay" - no brand name. Is it OK to mix different brands of oil clay?

This **** is hard to get right.

EDIT: Dang, I just realised looking at the photos that he's starting to look like Daniel Craig. I really need to buy some more clay.
 
Last edited:
Thanks Blastin! I've ordered some more clay. I couldn't find the same clay so I've ordered monster clay since everyone seems to have good things to say about it. I don't know if it will mix well with the clay I have but I can test it out. I'm going to have a break until the new clay arrives so I probably won't update until monday.

IMAG0056.jpgIMAG0057.jpgIMAG0058.jpgIMAG0059.jpgIMAG0060.jpgIMAG0061.jpgIMAG0062.jpgIMAG0063.jpgIMAG0064.jpgIMAG0065.jpgIMAG0066.jpg
 
The nose and eyes are starting to turn out! You should try using photoshop to overlay a photo of several different angles on the face, it always helps me out when I'm stumped.

Like this:
9023687721_577913b805_n.jpg
 
Thanks! I'm being a bit ascetic for now and trying to avoid photoshop or the like. I know it sounds silly but I come from a digital art background so I want to avoid overlays as long as I can and try and do it all by eye from my reference photos. If I hit a wall though I'll definitely go the route you suggest. I'd rather get a good likeness than stick to any self-imposed constraint.

I feel like I'm getting pretty close now though. I underestimated the difficulty and subtlety in trying to get a likeness but I'm really enjoying the experience.

Thanks again for looking! Your faun is looking awesome, that's a really ambitious costume idea. I'll be keeping an eye on it!
 
If anyone's still following, I'm still working on this. I've not updated for a while because the updates have been fairly incremental up until now. I think I've reached an impasse so I'll probably be taking booksandcorset's advice and lining it all up in photoshop. I've been too close to this for a while, so I need some kind of distance.

I've not been able to take photos today because my phone is screwed but I'll upload my progress as soon as I've got a camera. Should be sometime tomorrow.

Cheers!
 
Not that their is a wrong way or a right way to do it, but I highly suggest sculpting the whole head before you focus on the face. If you want the sculpt to look right, the proportions need to be right.
I generally have a skull analog next to me and I sculpt the skull. Then I sculpt the ears, and rough in the face. After I get all the shapes how I want them I go back and polish the sculpt. (Not actually polishing, just refining and detailing and the sorts.) Polishing can last me anywhere from a day to two weeks.
 
Yeah, I think I've gone about this a bit arse backwards. I'd definitely have better control over the scale and materials next time. This time I just kind of jumped in feet first, so there will definitely be a bit more planning next time I do fresh sculpt. I may even end up restarting this one that way if I can't get his one right. I thought that once I got the face right I could make everything else fit, but you're way of doing it is the better way.
 
Thanks rudigger!

Things have been hectic in work and out, so here's my latest update. I find sculpting quite relaxing, or at least pleasantly distracting, so it's nice to get some time to do it. I haven't lined anything up in photoshop yet but I've added hair and I'm working on the back of the head and hair. The hair needs a lot of work. I was going to have a look at some renaissance sculptures for tips on how to depict hair in sculpture but I just wanted something on there for now to get a sense of proportion.

The colours aren't great, but I'm sure you'll still notice I've mixed monster clay and industrial oil clay. I did a test where I mixed them, froze them and heated them together and they seemed to mix OK. They're quite different to work with though, so you have to bear that in mind when you're using the two together without properly mixing them.

Monster clay is the far superior of the two. Though it does cost a fair bit more. The industrial oil clay tends to discolour a bit when you work with it, it gets a but white when you try and spread it and it breaks up more. Monster clay has a nicer, glossier finish too.

IMAG0074.jpgIMAG0075.jpgIMAG0076.jpgIMAG0077.jpgIMAG0078.jpg
 
This is where I'm at. I just finished a fairly major rework of the eyes/brow/bridge area. It's hard to notice a difference with all the gradual changes but I feel like I'm getting there. I need to start work on the hair but I still think that can wait until either I'm happy with the face or I give up on refining it.

IMG_20130816_202606.jpgIMG_20130816_202612.jpgIMG_20130816_202619.jpgIMG_20130816_202626.jpgIMG_20130816_202633.jpgIMG_20130816_202638.jpgIMG_20130816_202647.jpgIMG_20130816_202709.jpgIMG_20130816_202718.jpg
 
The dangers of warming clay. Be careful, I literally just set my workstation on fire warming my clay with a halogen lamp. I thought it was foolproof: point the lamp at the clay, not touching it, leave it there for a while and hey presto. Only the lamp fell over (still not sure how, it wasn't over balanced) and the bulb was actually touching it. Thank god for smoke alarms.

Don't be an idiot like me, pay attention to heat sources at all times. Even if you think they are safe.

And make sure your smoke alarm batteries are good. I will be buying a second alarm tomorrow, just to be safe.

(Yes, looking back this was a dumb move on my part, halogens are not a safe heat source, I was just trying to work with what I have. I get paid soon, I'll get something safe)
 
My latest pics. Nothing much in the way of huge changes but I'm slowly refining it. Something still doesn't sit quite right but I can't see what it is.

IMG_20130825_143528 (1).jpgIMG_20130825_143536 (1).jpgIMG_20130825_143538 (1).jpgIMG_20130825_143558 (1).jpgIMG_20130825_143609 (1).jpgIMG_20130825_143622 (1).jpgIMG_20130825_143631 (1).jpgIMG_20130825_143649 (1).jpgIMG_20130825_143658 (1).jpgIMG_20130825_143703 (1).jpgIMG_20130825_143718 (1).jpgIMG_20130825_143734 (1).jpgIMG_20130825_143748 (1).jpg
 
This thread is more than 10 years old.

Your message may be considered spam for the following reasons:

  1. This thread hasn't been active in some time. A new post in this thread might not contribute constructively to this discussion after so long.
If you wish to reply despite these issues, check the box below before replying.
Be aware that malicious compliance may result in more severe penalties.
Back
Top