Zap's Fallout Radiation King Radio

That is the closest I have ever seen.
Unfortunately they're pretty hard to come by, even on eBay. I've seen two different versions, One made of Polyresin & Stonepowder, and one made of cast iron. (insanely heavy) I was able to get a Polyresin one, but it was damaged in the mail... I'm looking at trying to repair it with green stuff and making a mold, or 3D scanning and printing it.
 
bbroerman I don’t think I have the code for the Sparkfun motor sitting around any longer. On GitHub it may show up in some of the older commits. It should be similar to the code that is there now, just delivered a different way. However, the direction control is what is needed to prevent the motor getting stuck at 90 degrees.

TymanRoach Thanks for the compliments. Please share links to the gnome and Bobby pin box.
Yeah, I looked. it's not in Github. I'll figure it out using the other code as reference. For mine, I only need it to go from 0 - 90 degrees, then I was going to let the return-to-zero magnet bring it back when disabled. I might (if I get that working well) also have it ping 180 degrees. Not sure yet... I'll just play with it when it gets here :)
 
The simplest solution is to use the ON semiconductor CS8190 IC that is noted it the Simco datasheet. This takes just a tachometer frequency input and moves the motor along with a return to zero function. This IC wasn't available when I started my project, so I ended up going a different route.
Yeah, I looked into that, but I'd need an I2C based GPIO extended with a PWM pin. The one I'm using right now (which triggers the soundFX board) doesn't do PWM. I am looking into maybe a QT PI or Trinket with I2C and having it read from the I2C to get commands. The ones I see may fit, and have 5 GPIO that can all be PWM as well. I'd like to just have the 1 board added to my already cramped screen caddy instead of 2 if I can help it.

Next version will be more like yours, with a Pi Zero 2 WH and a HyperPixel display. I could probably stick a Pi pico in there to handle all the GPIO and then all I'd need would be the I2C Rotary Encoder board. The Pi can handle the 2 Analog to Digital I currently have, as well as well as an added volume control and a pushbutton (just like the power switch) on top for the flashlight feature. Still looking on how to fit all of that in properly.
 

----------------

IMG_4442.jpg


So I had some motivation this weekend and got a whole lot done on the radio. First I glued up my 12 layers of MDF. The 12 layer was supposed to be a routing template for the front panel, but I accidently included it in the stack. I used a trim router bit to carve the 1/2" thick maple front, and then the 1/4" maple backpanel.

--------------------------

9A7A4AD6-769B-4DE7-B5BA-09B643BA88AA.jpg

To cover the MDF, I am using 1mm thick maple veneer. Before I glue it though, I pre-formed it to the MDF by steaming the wood and then wrapping it with ratchet straps.

--------------------------

87D897DC-33F8-45F7-807B-CF48EDA9DC74.jpg

I then used contact adhesive to bond the veneer to the MDF, and trimmed the excess.

--------------------------

73962C15-47E2-4E03-B4FB-873BC2A5CC32.jpg


I glued on the front and rear maple panels. Later I applied a rustic wood stain to the whole thing.
 
Last edited:
B3DC827B-FEB3-4415-8FB5-BDDDC297FE06.jpg

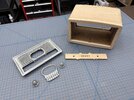
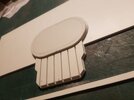
I wanted the front bezel to look like metal. So I used a technique I saw somewhere here on the RPF. Zinc Galvanizing Spray. If your new to this thread, these are SLS 3D printed parts.

--------------------------

BB42CF14-2020-415E-AE98-675E669AD21B.jpg

This is a paint with lots of zinc metal in the paint. It goes on grey, but then can be shined up using steel wool.
However, after polishing the whole face, it did look like metal, but also very boring and monotone.

--------------------------

3214E61C-CCA3-4978-B7A9-E91B915C2BA2.jpg


I had purchased some cream colored paint to try as an alternative, but then had an idea: Use both!
I sprayed a very light coat of the cream colored paint over the zinc. I then polished away the paint. It really looks very nice in person. The zinc shows up as glints of metal, and the paint makes it look like the radio has been around for a hundred years. The coolest part is any more wear over time will just make it look more authentic. Later I added some washes to break up the two color finish with a bit of very light rust.

--------------------------

IMG_4479.jpg

I SLA 3D printed the logo, and small buttons. Then used a molotow chrome pen to make them silver, aging them similarly.

--------------------------

IMG_4478.jpg

I did another test assembly of the radio, and it looks (and sounds) like it was taken right out of the game.

--------------------------
IMG_4483.jpg

There are still a few more things to do. The gauge is currently paper, and it needs to be replaced with laser etched brass.
I have some fake vacuum tubes to add to the interior, along with LEDs to illuminate them.
Then everything gets wired to the rear panel, which has authentic rust on the steel plate.

--------------------------

I have a few electronic bugs to work out. The major one being that the Pi Pico doesn't want to show up on the Raspberry Pi at a fresh boot. I have to physically remove the Pico from the PCB, reset it, and then plug it back into the board with USB still attached.
 

Attachments

  • AE3042A3-FF73-4768-844F-917974A02C87.jpg
    AE3042A3-FF73-4768-844F-917974A02C87.jpg
    1.5 MB · Views: 46
IMG_4522.jpg

CB384596-530B-421A-99A0-D9872AFFA9C5.jpg

As one of the final steps of the project I laser etched the brass gauge face. First I had to polish the the plate, such that the area between the numbers stays with a mirror finish, and the rest is made matte by the laser. It also does the blackening all in one 6 minute etch by a fiber laser.

-----------------------
9FFEDD39-E8F2-4BD4-9ED7-7785972BDA61.jpg


17DC3A14-A040-4CDD-8593-A95DC70EF72F.jpg

This is the electronics as they sit before final assembly. I should have spent some time to shorten the wires, but I was too lazy.
Not shown is the AC to DC supply.

---------------------------
60D3E988-FE53-4F4F-BBB4-A1CB2512C24D.jpg


71B312DD-1ACC-4195-89F4-3DAA594A343C.jpg

I have three neopixels inside 3D printed vacuum tube socket. Yes, these are real fake tubes. But they look great when you look inside the back of the radio.

------------------------------

IMG_4531.jpg

The very last step (which I will probably redo) was to make the Radiation King badge as reflective as possible. For this I actually used silver gilding leaf. This was the best of 6 attempts, I am not sure if I want to redo it, or leave it a bit rough as the rest of the radio is that way anyways.

I also finally have the code done. I added a few new features that make it just work smoother.
 
Excellent, I started my own project of a Radiation King Radio, but from scratch, making the pine wood box, the front and the back cover. Plastic but created from scratch, no thermoforming or 3D printing, it is an excellent project
 

Attachments

  • frontal.jpeg
    frontal.jpeg
    117.8 KB · Views: 29
  • perilla.jpeg
    perilla.jpeg
    83.5 KB · Views: 27
Excellent, I started my own project of a Radiation King Radio, but from scratch, making the pine wood box, the front and the back cover. Plastic but created from scratch, no thermoforming or 3D printing, it is an excellent project
Eager to see your next update(y)(y)
 
Back
Top