DARTH SABER
Master Member
So after making my first VKK a few months back, I decided to make another one more faithful to the Professor Blomberg style kits which are scattered through out museums around the world.
The last Vamp kit I made was pretty much the idealized version of the ultimate VKK. It had pretty much every possible tool every mentioned for killing vampires. I basically tossed in everything but the kitchen sink....WHich resulted in a large and cumbersome vampire kit which wasn't really practical and style wasn't faithful to the Blomberg style vampire kits seen in museums.
I really wish I had made my first kit much smaller.
This time around I wanted something more accurate to the popular Blomberg kits. This new kit is much smaller, utilizes space much better, has less tools and incorporates mortise hinges with flat head screws (which was accurate during the 19th century.) THe placement of the items is also more in line with the placement found in the Blomberg kits.
THe new kit measures 10" X 7 1/8" X 3"
FInding the right looking box is much harder that it would seem.
Has to be just the right size, right style, not too gaudy, and not too plain, right type of hinges, slightly weathered, not too expensive, and not flimsy.
I spent about a week looking and finally I came across this box which I picked up for about 30$.


Keep in mind the photos above must have been taken in some kind of flourescent lighting because the box looks like a dull brown. In standard indoor lighting the box actrually has a nice reddish rich tone, similar to the pics below. (Although the pics below are just slightly saturated. I wanted that 1940's technicolor magazine photo look.)
After the box arrived I needed to do some minor customizing.
I ripped out the velvet lining, and the dividers...Sanded down the residue that was left from the lining adhesive.
I didn't like the leatherish padding on the top or the crest. So I removed all that stuff including the entire board backing on the top lid and replaced it with different wood and stained it Red Oak.
I went ahead and added simple crucifix design for the top lid.

I then went ahead and created my own dividers using wood strips sold at my local arts and crafts store. I had to measure everything out to make sure I used the most amount of space possible.
THis time around I included a small European replica pocket flintlock gun (I was looking for a replica percussion gun but couldn't find one that would fit in the kit....Since this is a flintlock I didn't have to worry about adding percussion caps to the kit).
The gun originally came with an ornate design carved into the handle...I didn't like it so I sanded it off.

Some of the parts I used were left over from my previous kit (bottles, some wood, lead shots, etc.
I actually cannibalized a few parts from my previous kit (powder flask, Rosary beads, bible....Ill eventually be getting parts to put back into the original kit again).

I got lucky and happened to find another syringe which was virtually identical to the one I used in my last kit -


One of the problems I had was label for the kit. Most of the blomberg labels have a unique trademark filigree border around the text. I trie dmy hardest to find a hi-res image of this filigree design but eventually I had to recreate it by hand.


THis small kit was pretty much a breeze to make (Unlike the last one, which was a nightmare.)....Once all the parts were in hand the whole thing probably took up about 24 hours worth of time spread over the course of two weeks.
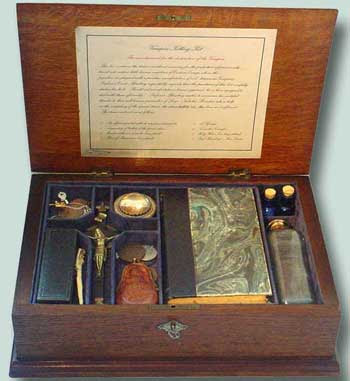
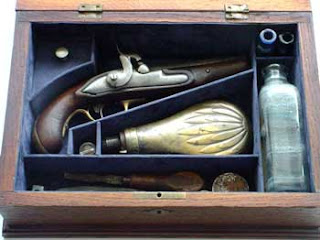
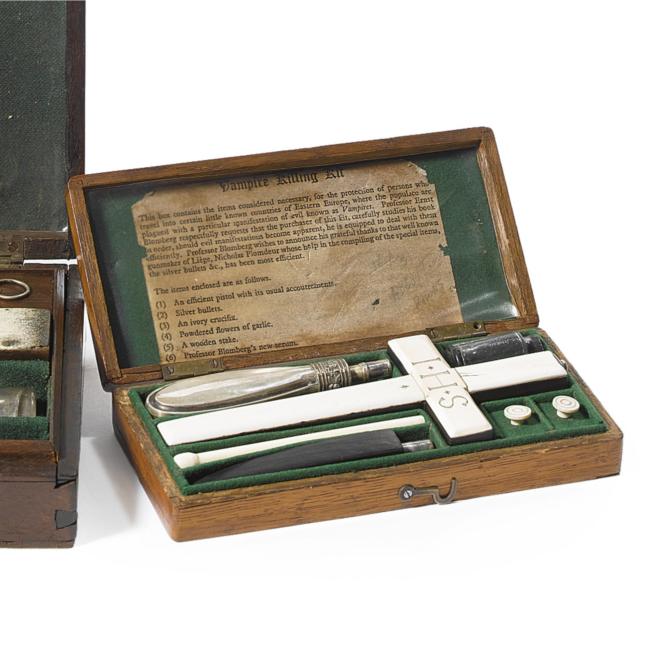
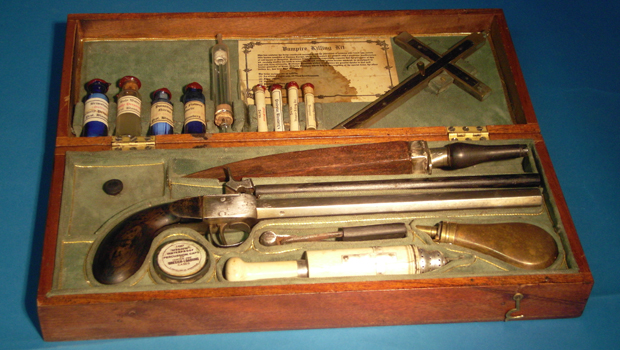
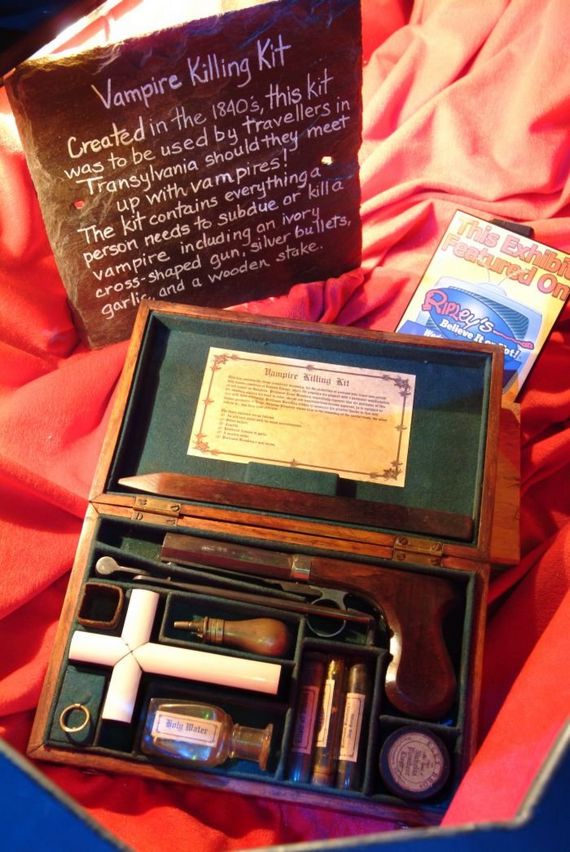
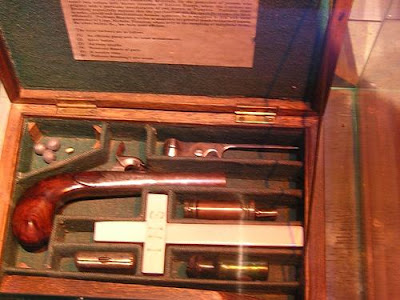
Here are some other samples of the supposedly "authentic" Blomberg style kits which reside in museums -


The last Vamp kit I made was pretty much the idealized version of the ultimate VKK. It had pretty much every possible tool every mentioned for killing vampires. I basically tossed in everything but the kitchen sink....WHich resulted in a large and cumbersome vampire kit which wasn't really practical and style wasn't faithful to the Blomberg style vampire kits seen in museums.
I really wish I had made my first kit much smaller.
This time around I wanted something more accurate to the popular Blomberg kits. This new kit is much smaller, utilizes space much better, has less tools and incorporates mortise hinges with flat head screws (which was accurate during the 19th century.) THe placement of the items is also more in line with the placement found in the Blomberg kits.
THe new kit measures 10" X 7 1/8" X 3"
FInding the right looking box is much harder that it would seem.
Has to be just the right size, right style, not too gaudy, and not too plain, right type of hinges, slightly weathered, not too expensive, and not flimsy.
I spent about a week looking and finally I came across this box which I picked up for about 30$.
Keep in mind the photos above must have been taken in some kind of flourescent lighting because the box looks like a dull brown. In standard indoor lighting the box actrually has a nice reddish rich tone, similar to the pics below. (Although the pics below are just slightly saturated. I wanted that 1940's technicolor magazine photo look.)
After the box arrived I needed to do some minor customizing.
I ripped out the velvet lining, and the dividers...Sanded down the residue that was left from the lining adhesive.
I didn't like the leatherish padding on the top or the crest. So I removed all that stuff including the entire board backing on the top lid and replaced it with different wood and stained it Red Oak.
I went ahead and added simple crucifix design for the top lid.
I then went ahead and created my own dividers using wood strips sold at my local arts and crafts store. I had to measure everything out to make sure I used the most amount of space possible.
THis time around I included a small European replica pocket flintlock gun (I was looking for a replica percussion gun but couldn't find one that would fit in the kit....Since this is a flintlock I didn't have to worry about adding percussion caps to the kit).
The gun originally came with an ornate design carved into the handle...I didn't like it so I sanded it off.
Some of the parts I used were left over from my previous kit (bottles, some wood, lead shots, etc.
I actually cannibalized a few parts from my previous kit (powder flask, Rosary beads, bible....Ill eventually be getting parts to put back into the original kit again).
I got lucky and happened to find another syringe which was virtually identical to the one I used in my last kit -
One of the problems I had was label for the kit. Most of the blomberg labels have a unique trademark filigree border around the text. I trie dmy hardest to find a hi-res image of this filigree design but eventually I had to recreate it by hand.
THis small kit was pretty much a breeze to make (Unlike the last one, which was a nightmare.)....Once all the parts were in hand the whole thing probably took up about 24 hours worth of time spread over the course of two weeks.
Here are some other samples of the supposedly "authentic" Blomberg style kits which reside in museums -
")

