NextGenMaker
Active Member
Heard amount The RPF on Tested.com; been lurking for a week and all this modeling finally got me back to a model I started in middle school...like, ten years ago. I've got an alternate history pirate Nazi sub cooking with my boyfriend, so I can't work on that solo.

This AMT Enterprise model has been sitting around in my hobby hovel for years; it's branded for Star Trek VI: The Undiscovered Country and it seems to be in 1:535 scale, which is a curious choice. I started filing sprue away back in sixth grade when we had a preemptive 'storm day' that turned into a 'slightly muggy afternoon'. Beats me where it came from; my father was a wired model airplane guy, and it's always been kicking around the hobby supplies.
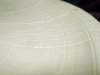
At the time I thought the amount of panel detail was really cool; the main panels are all scribed in, but the panels which are merely implied via a complex Aztecing of different pearlescent paints on the 'real' model are here molded into the hull. The two patterns are not synchronized, so there are spots where two panel lines come really close together.

I mean, look at it! Some of those lines are a millimeter deep; that means we've got hull plating over half a meter thick, not to mention that all that small panel detail is supposed to be painted, not baked in. On top of that, the AMT Enterprise refit kits also sport a wood grain texture across the surface. I am not applying decals to this surface, even with a relaxing agent. They've got to go.
I started on the dorsal half of the primary hull, probably because it happened to be on the top in the box. I cut the grain texture down with some 80 grit, then scrubbed with a hand brush, warm water, and a dot of laundry detergent to remove all the dust and any ancient mold release or finger grease left on the surface.
My stash of supplies includes a long neglected can of Evercoat finishing body filler, purchased on instruction from a model car book I got...for Christmas fourteen years ago? Anyway, turns out that body filler won't got bad so long as the can holds up and is sealed, so I slathered a good skim coat across the saucer's plating. More 80 grit to get flush with the first pass of sanding, then 150 to cut down some of the 'furring' styrene acquires with coarse sanding.

Already looks better! The plastic is quite old, so there is significant oxidation staining across the whole kit; knocking that off really makes it breath.

The dorsal saucer half, backlit. The remaining filler nestled in the old plating details shows up as purpleish.
Time for scribing new panel lines. The old major panel lines are quite visible, so I can use them as a guide.

For straight panel lines, I use a flexible stainless ruler, an x-acto blade, and a steady hand. It needs to be flexible so you can contour it to the hull. The cork backing also helps you avoid digging into the plastic. One pass with the blade, a second with the tip 90° to the ruler to scrape out a slightly rectangular groove that will catch paint and light. When the new line doesn't line up with the filled channel, it can get hairy and you need to be extra careful because the plastic needs more work to scribe than the body filler. It can also go off track as the plastic 'slips' while the filler 'grips'.

For the circles, I realized that my Staedler geomaster's graphite chuck accepts an x-acto blade neatly. The smaller Staedler compasses might work for lighter scribing, but they tend to loosen up with use and aren't as steady as the geomaster, plus you need to shim the graphite chuck to grab the blade.
The part of the bridge module that is cast into this piece has a convenient injection point smack dab in the middle of the saucer, so...

I can scribe the circular panels with a few passes of the compass. You can rotate the blade a bit to get a more or less perpendicular angle to the hull. The chuck's nut has to be really tight as the blade tends to want to slip and change the radius. The last line is a stretch for the geomaster, since it does not support extensions (or I merely don't have them), so I had to angle the blade outwards instead. Still scribed well.
The center point I used is a little eccentric, or the dish isn't exactly circular, I'm not sure. So that last line's radius is fudged between the little 'dart' shaped panels on the perimeter of the saucer.
Scribing styrene tends to create a fine flange of plastic, so after knife work you need to cut the flange off with a few swipes of sand paper. After it is all done, another scrubbing with the hand brush and detergent in a circular motion to completely clear the new lines. You need to be gentle; the body filler is a little soft.

It came out nice; even without paint it looks way more like the 'real' thing. Still more lines to scribe and a number of mistakes and chipped body filler to fix, but I needed to see if the whole business would work.
Along the way I did some detailing work to flatten out areas that are supposed to be...well, flat. The differential shrinkage of plastic means that the casting will sink in the middle of flat surfaces. Anyone who has done more than a few models knows this, of course, but I wanted to mention it because I've never seen anyone tackle it the way I usually do.

One of my other hobbies is woodworking, by hand, so I'm no stranger to using all manner of finicky blades and steel to make things flat. On any surface that isn't sunken too much, I take my x-acto and scrape it almost perpendicularly across the surface, taking peels of styrene off the high points until it's true; this is identical to the use of a cabinet scraper on furniture or a card scraper on stringed instruments. Planing both surfaces at an corner sharpens the edge, a good thing for miniatures where part of the scale is crisp edges. Here I'm planing that fin...thing on a warp nacelle.
You can dig in if you aren't careful and don't have the blade at just the right angle. Also it is easy to un-square edges, and if you use the blade too close to the tip it will chatter and leave an undesirable finish. It also murders blades, but they are disposable for a reason.
The AMT Enterprise kits (I'll assume the rest are the same way) are very conducive to lighting; they are quite obviously designed for it, in fact. So I think I'll be lighting this thing as well.
This AMT Enterprise model has been sitting around in my hobby hovel for years; it's branded for Star Trek VI: The Undiscovered Country and it seems to be in 1:535 scale, which is a curious choice. I started filing sprue away back in sixth grade when we had a preemptive 'storm day' that turned into a 'slightly muggy afternoon'. Beats me where it came from; my father was a wired model airplane guy, and it's always been kicking around the hobby supplies.
At the time I thought the amount of panel detail was really cool; the main panels are all scribed in, but the panels which are merely implied via a complex Aztecing of different pearlescent paints on the 'real' model are here molded into the hull. The two patterns are not synchronized, so there are spots where two panel lines come really close together.
I mean, look at it! Some of those lines are a millimeter deep; that means we've got hull plating over half a meter thick, not to mention that all that small panel detail is supposed to be painted, not baked in. On top of that, the AMT Enterprise refit kits also sport a wood grain texture across the surface. I am not applying decals to this surface, even with a relaxing agent. They've got to go.
I started on the dorsal half of the primary hull, probably because it happened to be on the top in the box. I cut the grain texture down with some 80 grit, then scrubbed with a hand brush, warm water, and a dot of laundry detergent to remove all the dust and any ancient mold release or finger grease left on the surface.
My stash of supplies includes a long neglected can of Evercoat finishing body filler, purchased on instruction from a model car book I got...for Christmas fourteen years ago? Anyway, turns out that body filler won't got bad so long as the can holds up and is sealed, so I slathered a good skim coat across the saucer's plating. More 80 grit to get flush with the first pass of sanding, then 150 to cut down some of the 'furring' styrene acquires with coarse sanding.
Already looks better! The plastic is quite old, so there is significant oxidation staining across the whole kit; knocking that off really makes it breath.
The dorsal saucer half, backlit. The remaining filler nestled in the old plating details shows up as purpleish.
Time for scribing new panel lines. The old major panel lines are quite visible, so I can use them as a guide.
For straight panel lines, I use a flexible stainless ruler, an x-acto blade, and a steady hand. It needs to be flexible so you can contour it to the hull. The cork backing also helps you avoid digging into the plastic. One pass with the blade, a second with the tip 90° to the ruler to scrape out a slightly rectangular groove that will catch paint and light. When the new line doesn't line up with the filled channel, it can get hairy and you need to be extra careful because the plastic needs more work to scribe than the body filler. It can also go off track as the plastic 'slips' while the filler 'grips'.
For the circles, I realized that my Staedler geomaster's graphite chuck accepts an x-acto blade neatly. The smaller Staedler compasses might work for lighter scribing, but they tend to loosen up with use and aren't as steady as the geomaster, plus you need to shim the graphite chuck to grab the blade.
The part of the bridge module that is cast into this piece has a convenient injection point smack dab in the middle of the saucer, so...
I can scribe the circular panels with a few passes of the compass. You can rotate the blade a bit to get a more or less perpendicular angle to the hull. The chuck's nut has to be really tight as the blade tends to want to slip and change the radius. The last line is a stretch for the geomaster, since it does not support extensions (or I merely don't have them), so I had to angle the blade outwards instead. Still scribed well.
The center point I used is a little eccentric, or the dish isn't exactly circular, I'm not sure. So that last line's radius is fudged between the little 'dart' shaped panels on the perimeter of the saucer.
Scribing styrene tends to create a fine flange of plastic, so after knife work you need to cut the flange off with a few swipes of sand paper. After it is all done, another scrubbing with the hand brush and detergent in a circular motion to completely clear the new lines. You need to be gentle; the body filler is a little soft.
It came out nice; even without paint it looks way more like the 'real' thing. Still more lines to scribe and a number of mistakes and chipped body filler to fix, but I needed to see if the whole business would work.
Along the way I did some detailing work to flatten out areas that are supposed to be...well, flat. The differential shrinkage of plastic means that the casting will sink in the middle of flat surfaces. Anyone who has done more than a few models knows this, of course, but I wanted to mention it because I've never seen anyone tackle it the way I usually do.
One of my other hobbies is woodworking, by hand, so I'm no stranger to using all manner of finicky blades and steel to make things flat. On any surface that isn't sunken too much, I take my x-acto and scrape it almost perpendicularly across the surface, taking peels of styrene off the high points until it's true; this is identical to the use of a cabinet scraper on furniture or a card scraper on stringed instruments. Planing both surfaces at an corner sharpens the edge, a good thing for miniatures where part of the scale is crisp edges. Here I'm planing that fin...thing on a warp nacelle.
You can dig in if you aren't careful and don't have the blade at just the right angle. Also it is easy to un-square edges, and if you use the blade too close to the tip it will chatter and leave an undesirable finish. It also murders blades, but they are disposable for a reason.
The AMT Enterprise kits (I'll assume the rest are the same way) are very conducive to lighting; they are quite obviously designed for it, in fact. So I think I'll be lighting this thing as well.
") .
.


