You are using an out of date browser. It may not display this or other websites correctly.
You should upgrade or use an alternative browser.
You should upgrade or use an alternative browser.
X-Wing Cast from Original Parts
- Thread starter DaveG
- Start date


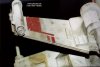
Nothing quite gets the blood hot like seeing a primed studio scale X-Wing!
SB
Last edited:
Vacformedhero
Sr Member
I think when I thought the lazer shields looked thick it was the close ups, they look spot on in these shots including the whole shot, very nice
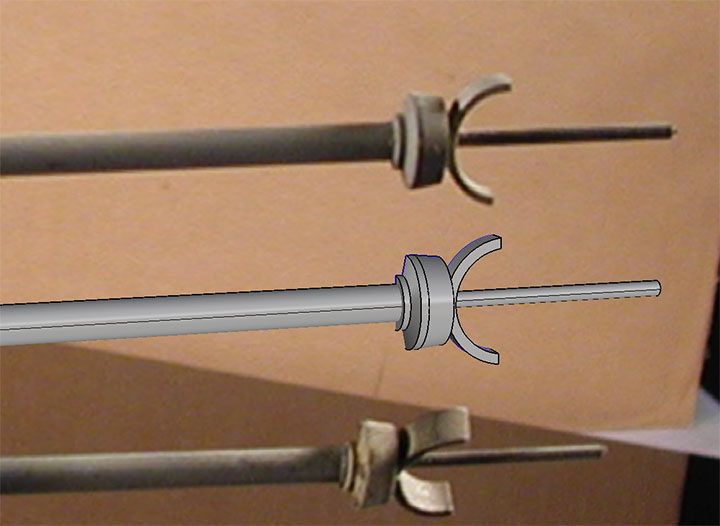
RPF member vfxsup64 was nice enough to send me a digital model of the Hummel wheel measured off of some kit parts he has (thanks Andre!). Here's a mockup with the 3/4" OD half moon part (the grey ones I showed in an earlier post), looks about right to me. I'll make a final decision when I get the real Hummel wheels.

Are you talking about the two wires on the outside of the cylinder that lead up to the heat sink? If so, those were molded into the castings on the pyro models, not added on pieces as on the hero models. For the most part, I'm happy building the pyro as a pyro, and accepting these castings for what they are. These castings are pretty rough, lots of bubbles and imperfections, and I'm fine with not trying to fix everything to being perfect. It's part of the pedigree of this model. The paint scheme is going to be that of Red 3, which got blown up, so that's appropriate.
Last edited:
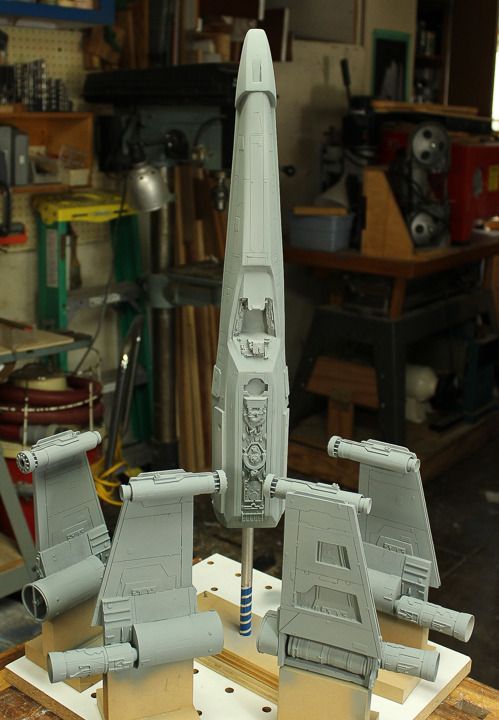
Time to start painting! First step is a base coat of Tamiya XF-25 Light Sea Grey. In the photos it doesn't look much different than the lacquer primer but it's actually a bit darker and warmer.
My plan was to create the chipped paint effect by stippling some liquid masking over the grey, then painting the entire model with a very light grey as the basic color, masking off the red markings along with some more dabs of liquid mask. Then the spray the red color and rub off the masking after the paint was dry to reveal the under paint in areas. I picked up some Micro Mask, which is the blue splotches applied to the model. But I'm having second thoughts before I spray the light grey. The Micro Mask seems really tough to remove. It take quite a bit of scrubbing. I know the ILM model makers used rubber cement as a masking to create paint chips and I'm thinking about removing the Micro Mask (it's water soluble and washes off) and going the rubber cement route instead. Does anyone have any experience with any of these masking techniques, or another masking fluid? Thanks.
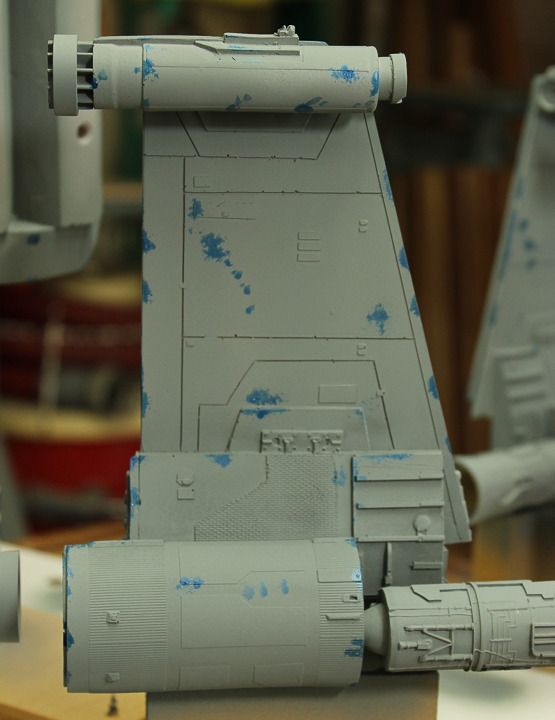
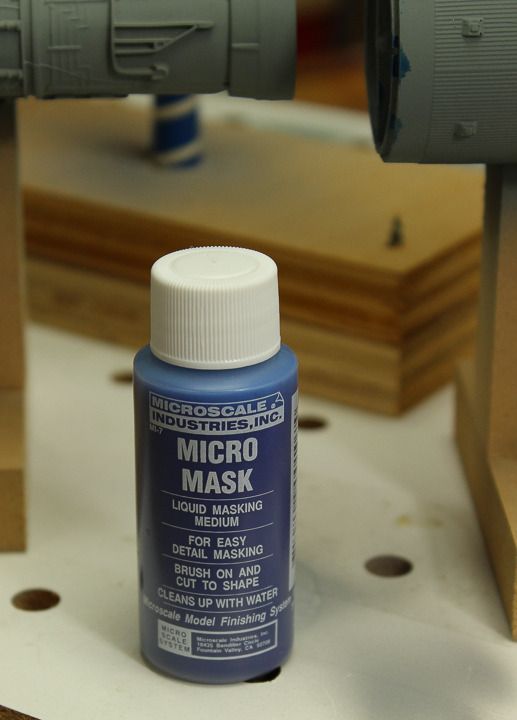

My plan was to create the chipped paint effect by stippling some liquid masking over the grey, then painting the entire model with a very light grey as the basic color, masking off the red markings along with some more dabs of liquid mask. Then the spray the red color and rub off the masking after the paint was dry to reveal the under paint in areas. I picked up some Micro Mask, which is the blue splotches applied to the model. But I'm having second thoughts before I spray the light grey. The Micro Mask seems really tough to remove. It take quite a bit of scrubbing. I know the ILM model makers used rubber cement as a masking to create paint chips and I'm thinking about removing the Micro Mask (it's water soluble and washes off) and going the rubber cement route instead. Does anyone have any experience with any of these masking techniques, or another masking fluid? Thanks.


VFX Freak
Sr Member
I'll be very curious to see what people recommend. I've had nothing but trouble with the Micro Mask. It is indeed very tough to remove.
I've picked up some Vallejo masking liquid but haven't tried it yet. I'm building the training wheels version of the X- Wing: the 1/72nd scale FM kit.
Your build looks fantastic. I look forward to watching your progress.
Sent from my iPad using Tapatalk
I've picked up some Vallejo masking liquid but haven't tried it yet. I'm building the training wheels version of the X- Wing: the 1/72nd scale FM kit.
Your build looks fantastic. I look forward to watching your progress.
Sent from my iPad using Tapatalk
Vacformedhero
Sr Member
Maskol comes off just by rubbing , kind of rolls off easily and easy to apply . I've only used mine once but was surprised with the results considering it was my first time
MonsieurTox
Master Member
I've used latex rubber for years (no special brand). It's quite cheap (like $5 for a one liter of latex which will be enough for your whole life but would probably dry before you use it all  ). Easy to peel off
). Easy to peel off Starting to paint!
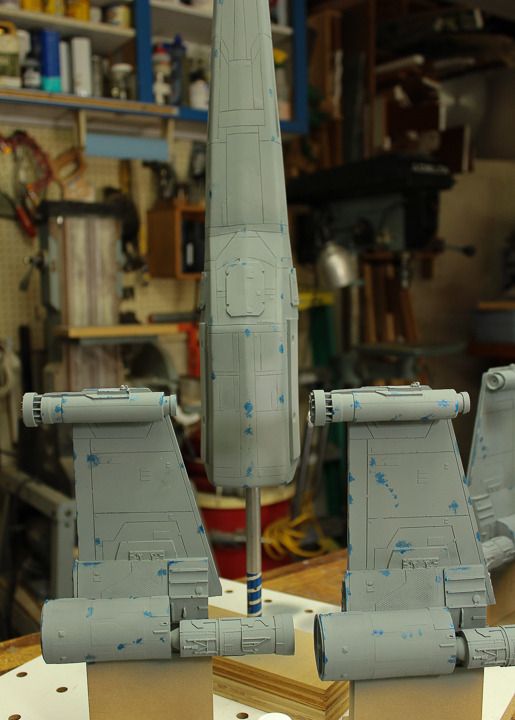
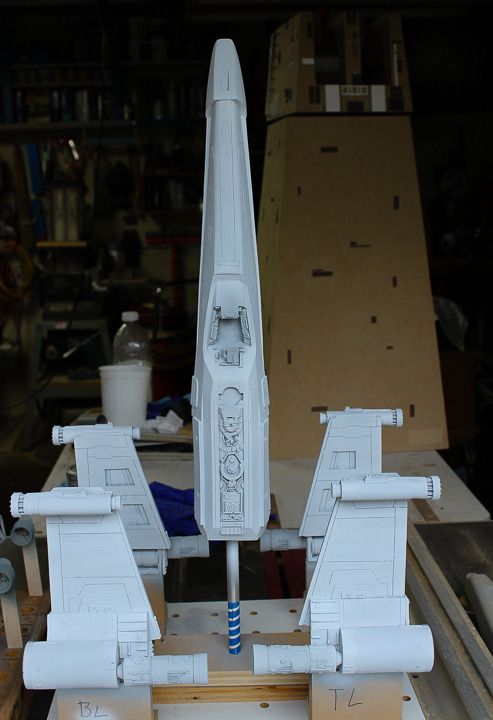
I washed off the Micro Mask and stippled on some liquid latex so I can reveal grey chips later. I'm glad I had to redo as when I looked at the reference photos of the studio model I realized that I had gone too heavy with the Micro Mask. Most of the chipping is of the panel colors revealing the white/grey base coat. After that I sprayed on a base coat of light grey, a mixture of Tamiya XF-2 White with a little bit of XF-19 Sky Grey.
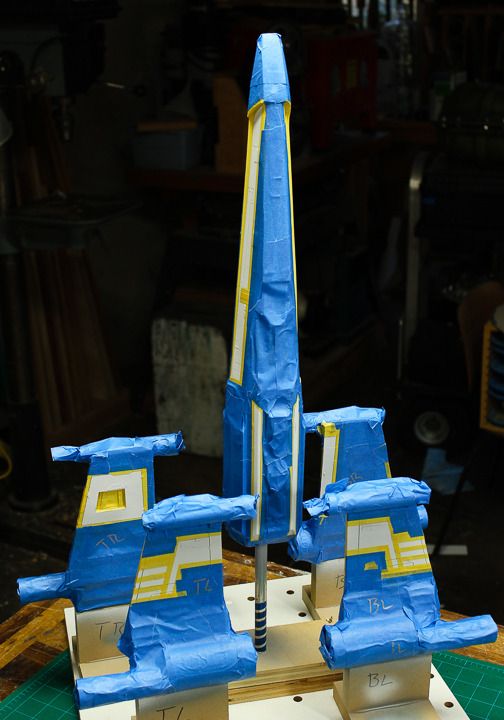
Then masked off the red panels using Tamiya yellow masking tape and blue painters tape.
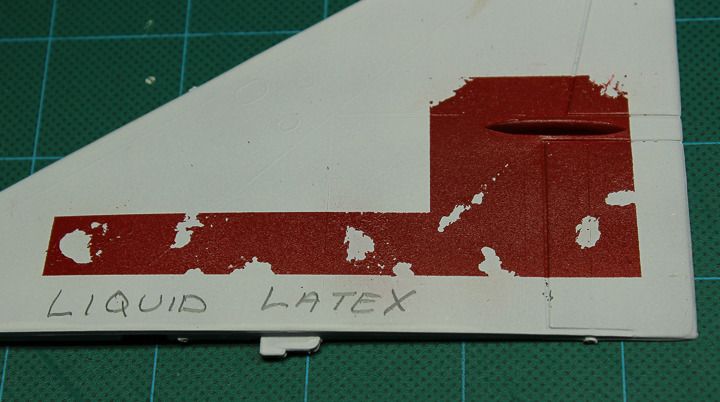
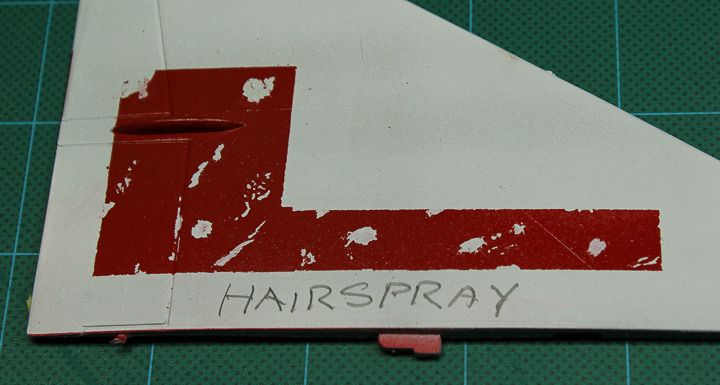
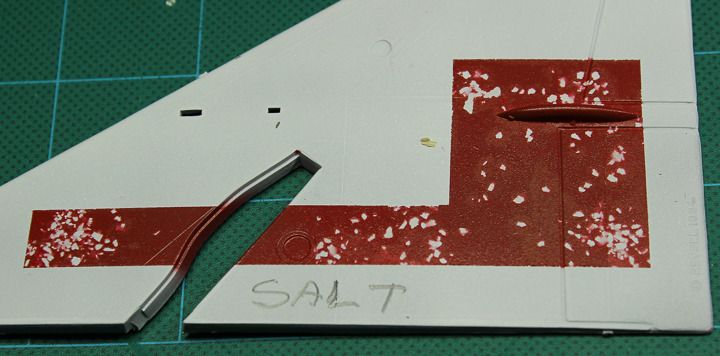
Before spraying the panel color I decided to do a few paint chipping tests. I painted some scrap model parts using liquid latex masking, the hairspray technique and salt. Both the latex and hairspray looked good, the salt isn't the right look for this model. I've decided to go with the hairspray technique as the paint chips look a little more realistic, it's more controllable, and I can chip away the paint to match the reference photos after the red color has been sprayed rather than having to mask it all off before.
The red panel color sprayed on. I realized too late that I grabbed a bottle of X-2 Gloss Red at the hobby shop instead of XF-2 Flat Red but by the time I'm done with the weathering it won't make any difference.

I washed off the Micro Mask and stippled on some liquid latex so I can reveal grey chips later. I'm glad I had to redo as when I looked at the reference photos of the studio model I realized that I had gone too heavy with the Micro Mask. Most of the chipping is of the panel colors revealing the white/grey base coat. After that I sprayed on a base coat of light grey, a mixture of Tamiya XF-2 White with a little bit of XF-19 Sky Grey.

Then masked off the red panels using Tamiya yellow masking tape and blue painters tape.

Before spraying the panel color I decided to do a few paint chipping tests. I painted some scrap model parts using liquid latex masking, the hairspray technique and salt. Both the latex and hairspray looked good, the salt isn't the right look for this model. I've decided to go with the hairspray technique as the paint chips look a little more realistic, it's more controllable, and I can chip away the paint to match the reference photos after the red color has been sprayed rather than having to mask it all off before.


The red panel color sprayed on. I realized too late that I grabbed a bottle of X-2 Gloss Red at the hobby shop instead of XF-2 Flat Red but by the time I'm done with the weathering it won't make any difference.

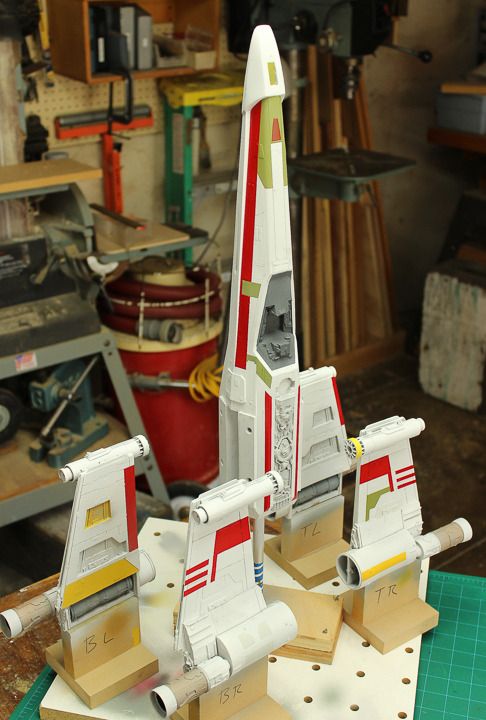
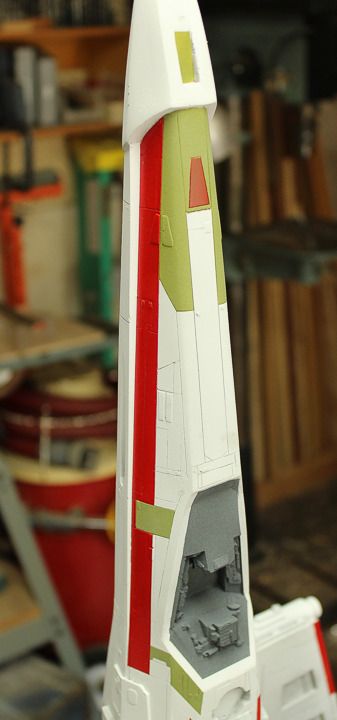
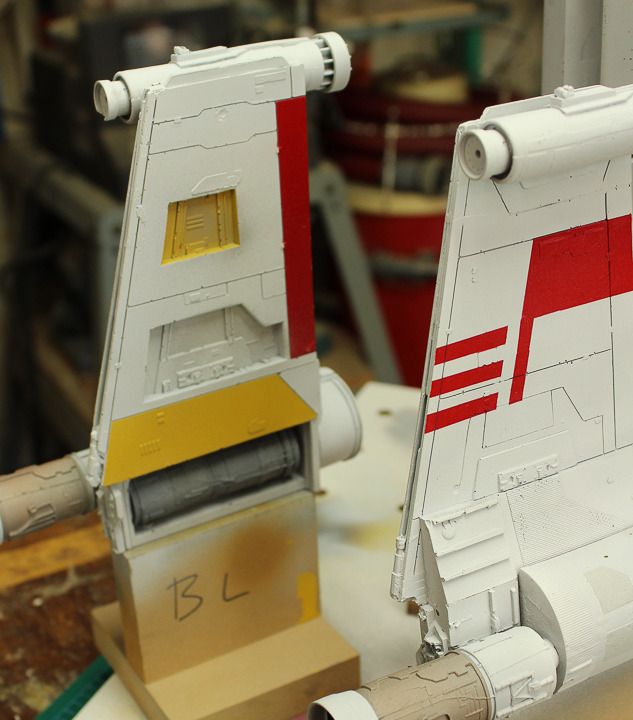
Pretty much finished with painting the various panels and some other areas. the colors all look very bright and clean right now but they won't end up that way by the time the weathering is done! Next step is to chip away the colored paint using the production model as a reference.


Well, as Adam Savage likes to say, "Failure is always an option!"
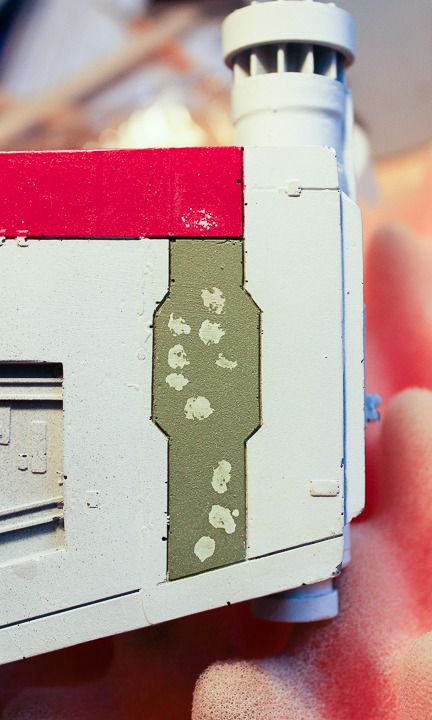
The hairspray paint chipping technique isn't working out. It worked fine on the sample I did but on the resin castings it just is not very effective. The paint isn't chipping off like it's supposed to with some gentle prodding with a toothpick, instead it's taking scraping with a knife blade to get the paint off and the end result is not looking very good. And it takes so much scraping often the base grey is coming up too. I'm not sure what the issue is but I suspect it has to do with the surface texture of the painted parts, with all the surface prep, priming and spray painting the surface of the paint has a lot more "tooth" for the hair spray and colored paint to cling to. And when the paint does come off it's leaving a colored residue behind.
Here's a section of the green panel, the paint did scrape off but I'm not happy with the results. I'm going to have to go back and touch up the spots with the light grey base color. You can see on the red area I was barely able to get the paint to scrape off at all. Maybe that's do to the red being a gloss paint? Who knows.
Here's a yellow panel, again not very "chipper"!
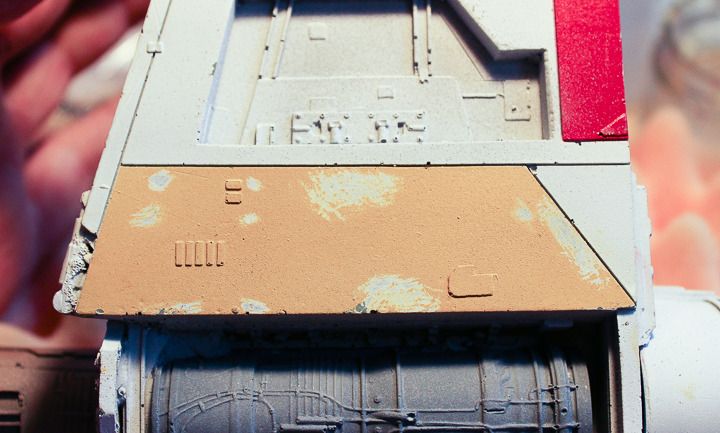
Fortunately, it's really easy to just go in and brush paint the paint chips by hand over the solid panel with not pre-scraping at all. Here's a section of red markings where all the chips were painted on, not chipped away. It looks almost exactly like the chipped sample that I did. You'd have to get out a magnifying glass to see much of a difference. And it probably takes less time to boot!

The hairspray paint chipping technique isn't working out. It worked fine on the sample I did but on the resin castings it just is not very effective. The paint isn't chipping off like it's supposed to with some gentle prodding with a toothpick, instead it's taking scraping with a knife blade to get the paint off and the end result is not looking very good. And it takes so much scraping often the base grey is coming up too. I'm not sure what the issue is but I suspect it has to do with the surface texture of the painted parts, with all the surface prep, priming and spray painting the surface of the paint has a lot more "tooth" for the hair spray and colored paint to cling to. And when the paint does come off it's leaving a colored residue behind.
Here's a section of the green panel, the paint did scrape off but I'm not happy with the results. I'm going to have to go back and touch up the spots with the light grey base color. You can see on the red area I was barely able to get the paint to scrape off at all. Maybe that's do to the red being a gloss paint? Who knows.

Here's a yellow panel, again not very "chipper"!

Fortunately, it's really easy to just go in and brush paint the paint chips by hand over the solid panel with not pre-scraping at all. Here's a section of red markings where all the chips were painted on, not chipped away. It looks almost exactly like the chipped sample that I did. You'd have to get out a magnifying glass to see much of a difference. And it probably takes less time to boot!

Similar threads
- Replies
- 5
- Views
- 972
- Replies
- 13
- Views
- 2,155