Worgen Death Knight Armor for 12yr - Final Pics!

indiefilmgeek

Sr Member
UPDATE: Here is what I got done by Halloween 2014:
15735648555_747f7fda15_z.jpg


We still have a LOT to do to complete this costume, but for the time I had, I think we pulled off a pretty cool Halloween get-up! :)


--------------------------------
Original Post
--------------------------------

I've gotten a VERY late start on Halloween costumes this year. :unsure

I've been asked to pull off Vanellope for my 5yr old, Hiccup's flight suit for my 6yr old, Hellboy for my 8yr old, and my 12yr old son has agreed to allow me to build him a full set of our Worgen Death Knight armor (from her lvl 90 World of Warcraft character).

Here's what we're working on for that:
14956712149_aaa56e198e_z.jpg


As I'm NOT sure I'll get this full suit complete, I'm starting off with the shoulders and helmet. I figure they will make killer items to hang on the wall even if I don't get the entire costume done by Halloween. :)

There are some very cool tools I used to start this build. First there is the free WoW Model Viewer. This little program allows you to view all the characters/armor/items/creatures/etc.
15140426281_3bf223e806.jpg


It also allows you to export the items to .obj files. From there, you can use a 3D modeling program to adjust them and then re-save the files ready for unfolding in Pepakura.

Once in Pepakura Designer, you can unfold and arrange the pieces for printing.

For the Helmet and Shoulders I've already done this:

WoW DeathKnight Helmet Pep
15120404536_af89243d9b_n.jpg


WoW DeathKnight Shoulder Pep
14956843948_647112b639_n.jpg


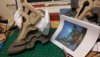
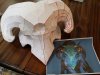
After printing, cutting, folding and gluing these together I had well-scaled peps - ready for conversion to foam templates.
15123206762_b3b1fc57f6_z.jpg

NOTE: The red lines. I'm marking this up so I can cut it out into foam templates.

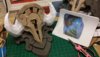
However, I REALLY didn't want to try to build the horns out of foam (it would take a long time to do them right), so I decided to try and 'cheat'... First, I duct taped the pepakura horns.
14936915090_0416401284_z.jpg


Then I used Great Stuff expanding foam and fill the two horns (from the inside).
14936998077_4417f25911_z.jpg


14936864439_6ff22bdbc6_z.jpg


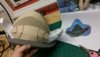
After it was hardened for over 24 hours I peeled the tape and paper off the foam and have some basically decent starting shapes for the horns.
14936994858_830647dc03_z.jpg


I plan to use some filler and do some carving and then paint/coat these with latex fabric paint.... We'll see. The experiment of using a pepakura model as a mold continues! :D

Next up... Working on the Shoulder Armor! Pepakura-to-Foam-Templates
 

Attachments

  • 15123206762_b3b1fc57f6_z.jpg
    15123206762_b3b1fc57f6_z.jpg
    101.4 KB · Views: 175
Last edited:
Re: WoW Worgen Death Knight Armor for my 12yr Son - WIP

Most of time, I start off with either pepakura models or scratch-build card stock mockups, and I use those to make EVA foam templates.

Here's my process....

First I select foam that has the thickness I want for the particular part of the piece. In the case of the outer parts of the shoulder armor, I decided to use very thick floor matts rather than my normal 6mm or 4mm EVA foam. I cut out the sections of the pep I want to re-create in foam then use those parts to trace out templates (right and left) in the foam.

Here I've cut off the bottom-most lip off the shoulder armor pep and now I'm tracing that on the foam. NOTE: since the next section of the armor overlaps this first tier or lip of the armor, I've added extra area to the overlap side of the foam template, so I can use that to glue the next layer to.
14936994717_114da72b27_z.jpg


Here you can see the re-built paper pep pieces and their foam counter-parts...
14936903180_3eb1d69c73_z.jpg


For the rest of the armor I don't want to use the foam matts and will transition to much nicer 6mm EVA foam.

Same Process:
Cut out the paper pep in sections that make sense for a foam build. Then use only one side symmetrical pieces, and just flip them over for the Left and Right halves (this makes sure they're the same on both sides)
14936987267_367c91e0c2_z.jpg


The next small part is the back of this piece... Remember that angle cutting the foam will allow you to get different angles (90, 45, etc) between the foam edges of the pieces.
15126994115_74a95c3b7b_c.jpg


For a quick tutorial on how I'm gluing these pieces together here is a video for that (from my 5yrs Iron Man build):
14957273368_19222c4065_z.jpg
 
Last edited:
Re: WoW Worgen Death Knight Armor for my 12yr Son - WIP

Detail lines in foam:


One more item to mention is the detail lines in this build. From the reference photos you can see that there are swirl designs on the armor (which aren't in the pep itself since it was only in the graphic texture image - and not in the model).
14956749060_f41179104a_z.jpg


After marking where I want these detail lines, I'm using a woodburning tool to burn these detail lines into the foam.
14936988737_0bf9b3d821_z.jpg


For a quick tutorial on how to get both side the same by using templates, see this video:
14957179750_e6e5015ffe_c.jpg
 
Last edited:
Re: WoW Worgen Death Knight Armor for my 12yr Daughter - WIP

Looks great so far! Hope you get it all done for Halloween!
 
Re: WoW Worgen Death Knight Armor for my 12yr Daughter - WIP

Wow, you work pretty hard to make your kids spend a good Halloween! Parenting win! :) My mom made fantastic costumes for me too when I was a kid... I hope I'll have the chance to do the same with my daughter when she's older! Keep it up, can't wait to see more!
 
Re: WoW Worgen Death Knight Armor for my 12yr Son - WIP

Wow, you work pretty hard to make your kids spend a good Halloween! Parenting win! :) My mom made fantastic costumes for me too when I was a kid... I hope I'll have the chance to do the same with my daughter when she's older! Keep it up, can't wait to see more!

Yeah, Halloween is generally a bigger deal at our place than even Christmas (well, almost a bigger deal). :lol

Did a bit more work this weekend on the shoulder armor. I still need to do the horns, but since I'm building BOTH shoulders at once, I'll be knocking out both of these in another weekend (minus wiring up lights in them).

Front on - with reference pic
14985080937_ff47f1f0a0_c.jpg


3/4 view - with reference image
14985069628_ee21c0ca6c_c.jpg


Top view - with reference pic
15171266182_a55ed46049_c.jpg
 

Attachments

  • 14985069628_ee21c0ca6c_c.jpg
    14985069628_ee21c0ca6c_c.jpg
    97.9 KB · Views: 137
  • 14985080937_ff47f1f0a0_c.jpg
    14985080937_ff47f1f0a0_c.jpg
    95.6 KB · Views: 139
  • 15171266182_a55ed46049_c.jpg
    15171266182_a55ed46049_c.jpg
    78.1 KB · Views: 145
Last edited:
Re: WoW Worgen Death Knight Armor for my 12yr Daughter - WIP

Cracking work, I hope my kids are as cool as yours one day :lol
 
Re: WoW Worgen Death Knight Armor for my 12yr - WIP

will you be making a pair of digigrade stilts?

I actually HAVE built a pair of digigrade-style stilts... I'll post some pictures. But I think I'm going to go with just changing his normal leg shape with foam padding. My hand-made stilts are pretty rough to stand/walk in. :(
 
Last edited:
Re: WoW Worgen Death Knight Armor for my 12yr Daughter - WIP

Wow this looks amazing, cant wait to see it all together :D
 
Re: WoW Worgen Death Knight Armor for my 12yr Daughter - WIP

This is a seriously impressive build. I will be following it with great interest!
 
Re: WoW Worgen Death Knight Armor for my 12yr Daughter - WIP

I've got one kid costume to do and I started just now...so I know what you mean about starting late. Plus I will lose about 3 weeks for work. :-( A bunch of late/long nights...

Good luck!
 
Re: WoW Worgen Death Knight Armor for my 12yr - WIP

Sorry, I didn't keep this up to date as I was building! I was running late (as always) for Halloween and barely had time to get the build done!

Here is the rest of the build - starting with the legs.

I built a pair of digi-grade stilts, but they would have been too hard to walk around in, so I decided to go with changing the shape of his legs with padding foam. Here you can see a pair of black leggings on a duct-tape model of his legs. With his legs straight, our goal was to use the foam padding to change the shape into the wolf legs. I started with a paper template to get the basic size.
15115765954_774b187da0_z.jpg


I then used a block of 6" foam to make the shapes I needed. These were then hot-glued to the leggings.
15735718495_2965541d41_z.jpg


I shaped the foam with the help of this amazing tool! cut the foam like a hot knife through butter!
15116334913_f849ee38c9_z.jpg


My son tried them on next to check size and shape...
15549837349_7e80bb59fc.jpg


Terrified of the fur and scratch-building leg armor with ZERO reference images, I turned to the foot/shoes.

I started with some slip-on shoes and used some EVA foam to form the shapes I wanted for the foot claws.
15711987676_6ca28d95f0_z.jpg


Then a couple coats of plasti-dip and fur (all hot-glued on).
15737196022_edb207b928_z.jpg


After delaying as long as I could, I finally went back to the legs and started glueing fur and making the rough shapes for the leg armor.
15737214852_26bb003840_z.jpg


That basic shape got turned into this;
15550470487_3ce540a8be_z.jpg


I then created the other leg armor pieces - starting with paper templates and working up to the foam.
15711942546_eef27a4777_c.jpg


At the lower leg I added another piece of padding and an armored flap that further disguised his leg shape.
15116267593_9b7b233a68_z.jpg


Once the fur was glued on (between the armored plates), here's what the legs looked like:
15737192422_403f854f20_c.jpg


And here is the first test-fitting!
15550814100_d28cd12e2f.jpg


I didn't get to finish the dry-brushed distressing on these prior to Halloween, but I plan to do that now that the rush is over and before we take some pro photos.

...more WIP and finish costume pics coming up next! :)
 

Attachments

  • 15115765954_774b187da0_z.jpg
    15115765954_774b187da0_z.jpg
    48.8 KB · Views: 159
Last edited:
Re: WoW Worgen Death Knight Armor for my 12yr Son - WIP

Shoulder Armor Update:

Picking up where I left off, the I had to plasti-dip the shoulder units I built...
15737322692_854c5390a4_z.jpg


...then paint them up (after hitting this with Adhesive Promoter to help the enamel paint stick and not crack as much on the foam). After that I had to come up with a way to make those horns. I ended up skipping the Great-Stuff foam mess I'd made and just crafted them out of EVA.

I made them smooth, and then used a wood-burning tool to create the horn ridges:
15735766365_214aedda95_z.jpg


15550927150_21d8dc574d_z.jpg


To disguise my crappy seams and all, I then hit these with a texture paint.
15549879299_af4b322a1c_z.jpg


This also contrasted nicely with the smooth metal look...
15116365543_6b6f03425b_z.jpg


15712035856_0dfb125ce3_z.jpg


With a little paint, the horn ridges popped!
15549865479_9cc35555d7_z.jpg


Here is the pair of them in progress (with the lights). The lights are just 9-LED mini-flashlights I have mounted in them (in a way I can just pull them out and replacement if necessary).
15550291508_e4420aa0f1_c.jpg


Then I just needed to add some dirt and grim...
15712003856_24fb043502_z.jpg


And put them all together on an old football shoulder pad rig I had laying around...
15733722061_32829420fa_c.jpg
 
Last edited:
Re: WoW Worgen Death Knight Armor for my 12yr Daughter - WIP

Helmet Update:

So, after abandoning the Great-Stuff horns, I finally just dove into creating an all EVA foam helmet.
15550502247_cdf43c2dd5_z.jpg


Here it is with the horns (prior to my wood-burning the ridges into them).
15711976886_62a386f393_c.jpg


Once plasti-dipped and painted, the helmet looked like this:
15550236748_d86484e8bd_c.jpg


This is after it was distressed and lit...
15735673265_e3bdb817b5_c.jpg

**he sees through the two slots on either side of the front panel of the helmet.

...and, of course, I can't help but to take a quick selfie in the helmet!
15549791989_236aba21e7_z.jpg
 
Last edited:
Re: WoW Worgen Death Knight Armor for my 12yr Son - WIP

ODDS AND ENDS...


I literally was up at 3am in the morning the day before Halloween painting the bracers... this is the only picture I have of them in progress:
15116259963_429a2dab59_z.jpg


I painted those and added a cuff of fur so it tied into the rest of the costume.

My mother offered to sew the tabard (based on The Tabard of the Protector).
15736134925_9b2caf5af0_z.jpg


She also created a cape for the costume.

Here's the Halloween pictures:
15550197498_31bec8609f_b.jpg


And here she is at the game store - holding his favorite game (and the one that this character appears in).
15737186292_aeb66a109c_b.jpg
 
Last edited:
Back
Top