Wolverine Claws v2.0 Kits Available for Sale Now 1/29/11

weaponx82

Well-Known Member
RPF PREMIUM MEMBER
I'm putting my Batman Arkham Asylum armor project (http://www.therpf.com/f24/batman-arkham-asylum-armor-progress-update-11-04-10-w-halloween-pics-84723/) on hold to go back to building my wolverine claws from scratch.

I created a set a few years back which turned out well.
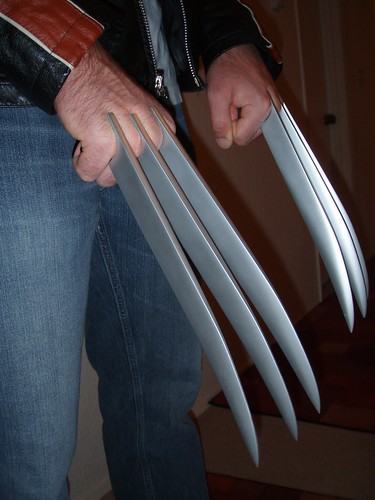
2994301176_5767df811c.jpg


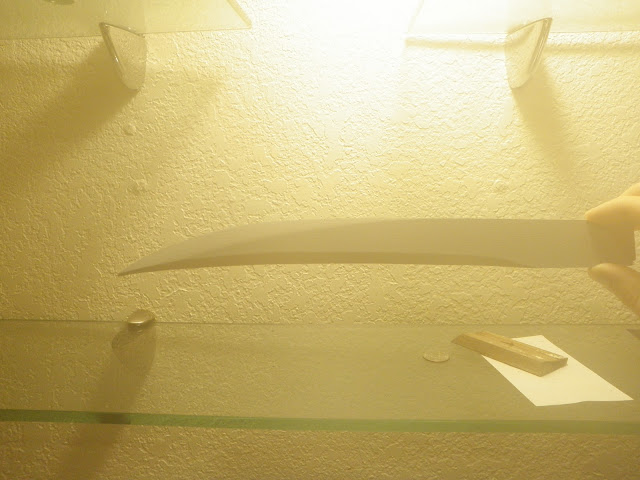
But now I want to make a new set with a more serious business end of the blades, if you know what I mean. I've started from scratch cutting and sanding a new blade out of 1/4" Bass wood and am pleased with it's current state. This issue I have now is, how to get rid of the wood grain. I can cast a mold, make a second blade and sand it out but I'd rather take care of it at this step instead of having to make two molds to get to my final mold.
PB120130.JPG


My dad was saying I could use a primer sealer then hit it with a paint that would fill in the grain. What do you guys think?
 
Last edited:
Re: wolverine claws v2.0

You could use sandable primer, but it basically means you are re-making the lines and edges when sanding.

Are you doing a custom version or a specific movie version?
 
Re: wolverine claws v2.0

Hit it with some light misting of sandable primer, you MAY need some bondo but you'll know after it's coated. Then begin sanding with a low grit and work your way up to a very high grit and wet sand it. It's looking KILLER and I'd love a set when your done! They're lookin' very accurate. How long are they and how tall? What's the scale lookin' like?
 
Re: wolverine claws v2.0

Very nice. I wish I could finish my claws, but I dont know how. I have 6 resin claws, but I fear that they will break if I try to srew small holes in the end to put some wire in it, to hold it with my hands...
 
Re: wolverine claws v2.0

Are you doing a custom version or a specific movie version?

They're lookin' very accurate. How long are they and how tall? What's the scale lookin' like?

I looked at some pics from the first movie and eyeballed the design. It will be a 1/4" thick. About a 1" deep and about 12" long. I'll get some more accurate measurements when finished. I'm aiming for a look like the movies but don't intend to go for spot on accuracy.

I have 6 resin claws, but I fear that they will break if I try to srew small holes in the end to put some wire in it, to hold it with my hands...

I know your hardship! When I first started making these, I'd drill holes and press the wires in. A very risky practice! When I make the claws now, I set the wires into the mold and the plastic cures around them. A lot less problematic! I'll show you how I do it when I get there.
 
Re: wolverine claws v2.0

Start with a coat of KILZ and then follow up with "FILLER PRIMER". That takes care of the wood grain in short order.
 
Re: wolverine claws v2.0

I know your hardship! When I first started making these, I'd drill holes and press the wires in. A very risky practice! When I make the claws now, I set the wires into the mold and the plastic cures around them. A lot less problematic! I'll show you how I do it when I get there.

Thanks... any advice how to become a nice pait of wearbale claws with that claws I have now?

Dont know anything of making 'em from resin, I bought it from ebay for some bucks... Thought about to make a nice wolverine display with using a rubber hand to show 'em...
 
Re: wolverine claws v2.0

There is a product called 'Grain Filler' that is used for high gloss finishes on furniture and guitars. It is oil based, rub it on...let it dry, then sand it. Just wanted to share that for more options.
 
Re: wolverine claws v2.0

Will I'm letting the primer filler dry to do some more sanding, I need some input on mold making.

I did a test making a quasi bleeder tube for the tip of the blade in a block mold. The bleeder doesn't fully exit from the mold, it's just extra room within the mold that would hopefully get at least partially filled with plastic.

Block Mold:
PB200138.JPG


Made with this blade tip:
PB200135.JPG


This is the piece that came out. I don't know if you can tell but (not too surprisingly) it did trap an air bubble at the tip.

PB200134.JPG


I was hoping the pressure of the plastic poured in would push whatever air was at the bottom into the partial bleeder tube. I could make a bleeder that would run all the way to the top of the mold I'll be making but that's a lot of travel that I'd rather not deal with. Would that be my best route or do you guys have any ideas?
 
Re: wolverine claws v2.0 11/20/10 Need mold making advice!

there's no such thing as a "partial" bleeder tube... the bleeder has to exit the silicone to allow the air to escape completely... The bleeder should extend all the way out the silicone and then as you fill the mold with resin and it begins to drip out of your bleeder, you know it's filled the tip and plug the bleeder with a small screw or something and continue filling the bold.
 
Re: wolverine claws v2.0 Update 12/1/10

I'm readying the pieces to mold now.

Here's the basic layout of the mold.
PC010141.JPG

The long copper wire touching the tip of the blade will create the bleeder. The wood primed in white will create the pour spout. The copper wire at an angle underneath the primed wood will create the groove that will allow me to lay the wire in the mold so plastic cures around it.

I'm working on a two piece palm grip that will sandwich the wires. It will be a little thicker than my original palm grip but should make the claws a lot easier to adjust.
This are just the test pieces.
PC010142.JPG


PC010144.JPG
 
Re: wolverine claws v2.0 Update 12/1/10

Better profile image of the claw.
PC010145.JPG


You may notice the top 'cut' goes back further than the movie claws. I did this because I think it makes more sense for Wolverine. I feel the movie's never ran far back enough.
 
Back
Top