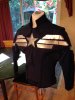
Posting the latest in a Captain America Stealth Suit. This is for my son. We have darkblue "Coast Guard" pants. I have created a dark blue matching "Stealth Shirt" to go with the pants to make the Stealth "suit". I am also working on another TFA costume - a top only - so we can interchange - either be a TFA or a "winter Soldier " Captain America.
The base of the costume is a Fruit of the Loom "wicking Performance" shirt in Navy. I was going to build my own (and had ) but it didn't stretch enough - aborted that and decided to buy a couple of Shirts from Amazon and build on top of those.
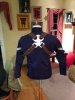
Tailored the shirt to fit son (he is very tall and thin)
Using a variety of resources on line (including such people as "Captain Cosplay" and others - I created patterns to overlay on top of the shirt. These serve as the "armored" pieces one sees in the Stealth Suit images.
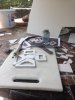
Free handed them in newspaper...taped to son, did some "draping" in newspaper until I got the right look .
Cut the pieces out in a blue serge, backed them with a light interfacing and then used "Heat and Bond" to attach them to the shirt.
Attaching a rigid thick piece of layered fabric to a stretchy shirt using a fusible web is tricky. sometimes you get wrinkles you didn't want, sometimes it doesnt fuse completely and you can also "overheat" the fusible web (the Heat and Bond) and it breaks down and ceases to "stick". But it worked. Also had trouble with silly sewing machine tension - lots of skipped stitches. let me advise you to make sure that you have the correct needes. Topstitching needles, Leather needles, etc. Make sure that you have good sharp ones and a lot of them.
Finally got all the "armor" pieces attached and sewed down (in addition to the heat and bond) by either machine or hand to make sure that they didnt go anwhere.
Created a "shawl" piece for the shirt - attaches with velcro.
The stripes are made with a silver vinyl fabric. Which after I spent a lot of time cutting, bonding, rebonding....kind of looked like shiny duct tape. Ah well.
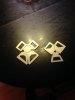
I created the star using EVA Craft foam. Found a nice star template on line, printed it out, traced it onto the foam - used a heat gun so that I ccould get some shaping to the foam and then glued the shaped star to a backing flat star. The flat back has velcro which enables the star to attach to the front of the shirt.
Harness is made from "naugahyde" (many naugas died to bring you this harness) - double layered, used leather needles to sew. Created a template again by simply free handing using newspaper and tape. lots of tape.
I regret not having more "in progress" pictures but at the time I was just trying to make it work and it wasn't particularly photogenic.

.jpg")