Callianis
New Member
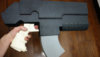
Hello folks, been a while ") Thought I'd share my most recent prop (that I made for the Punished Props Secret Santa) that I wasn't allowed to talk about before Christmas
Thought I'd share my most recent prop (that I made for the Punished Props Secret Santa) that I wasn't allowed to talk about before Christmas
.png")
.png")
.jpg")
This was my first big prop that was mostly made from foam. Prior to this my other big prop was the Pulse Rifle from Aliens (3D printed).
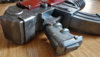
The main body of the Bolter, plus the magazine, charging handle and top rail + sights are made from EVA foam, and the rest including grip, muzzle and Imperial Aquila are 3D printed.
The foam is sealed with Rosco FlexBond and the whole bolter painted with acrylic paints.
The magazine is friction fit and should hold small items such as cash/keys/card, or snacks, or other small personal effects of choice.
Designing and Templating
I actually took a 3D model that was created by Jaiman Bhardwaj and turned the design into a template I printed on cardstock for the EVA foamsmithing side of things.
My 3D design skills are limited so I put the Bolter into Tinkercad to cut out the pieces I wanted to 3D print, and to recreate some of the low poly pieces in a higher resolution, and I added some holes to mount the pieces with rods. Since I was on a time limit and I wanted to reduce the amount of sanding, I removed the texture from the grip along with a couple of other features. I left off the bolts along the gun sights and replaced the emblem entirely. The side bolts I replaced with actual meta hex bolts. I decided that 3D printing the muzzle, laser sight and other round parts for example would give a better result than foam or PVC pipe.


.png")
With the template next to the Pulse Rifle it doesn't look that big. But where the Pulse Rifle is longer, it is also slimmer, shorter and more elegant, while the bolter is chunky.
A Warhammer forum discussed sizing and a popular method of sizing was for the weapon to have a 3″ barrel diameter, so that’s what I did. Based on this you should get a Bolter between 400mm and 700mm depending on what template you use. The one I made was 570mm. This also brought the Bolter size down to what could be used by a non-augmented human. Does that mean it's now a Godwyn-De'az Bolter?
Building the Astartes Mark Vb Godwyn Pattern Bolter
The main body is made out of several layers of EVA foam. The middle layers have some squares cut out for some slight weight and material saving. They were glued with contact cement.
.jpg")
.jpg")
.JPG")
I used a rotary tool with a sanding drum to round off the front end where the foregrip will go. This section doesn't need to be smoothed with a stone tip as it's going to have more foam and foam clay going over the top. For the fore grip itself, I cut slots out of some foam then used a rotary tool to grind out a rounded end. This was then glued onto the main Bolter body and contoured with foam clay. The result wasn’t as neat as I was hoping but I was on a time limit and couldn’t dally.
.jpg")
.jpg")
.jpg")
The bottom edge of the “side plate” has a bevel so I used a 3D printed bevel attachment on my rotary tool to grind a nice even bevel.

.jpg")
.JPG")
Since I don’t have a bandsaw with a fence I measured the middle line of my scroll saw table and clamped on some wood. I used a fine-tooth blade to then cut the top bevel of the Bolter.
Feeling the march of time the ejection ports are very simple – scored knife lines that I hit with the heat gun to open up. Gotta make sure your cuts get all the way into the corners for best results.
Making the plates at the rear of the bolter were a little tricky, given the curves, corners and foam thickness.
.JPG")
.JPG")
.jpg")
Cutting a V groove in foam allows for tighter corners. This method was used for the bottom of the magazine and the accent on the side-rear bolter plates.
All 3D printed parts were sanded with various grits of sand paper and further smoothed with automotive filler primer. Love that stuff for filling in fine cracks and lines.
.jpg")
.jpg")
.JPG")
.jpg")
.JPG")
.jpg")
.JPG")
Creating the top rail and sights. The front sight was made with 3 pieces of foam - the central "fin" and 2 bevel-cut pieces.
.JPG")
.JPG")
.JPG")
The foam portions of the prop were sealed with a few layers of slightly watered down Rosco Flexbond. The plastic parts were pre-painted prior to attachment (gloss black undercoat, gun metal top coat, a little bit of shading in black inc around the muzzle holes). An aluminium rod and some epoxy attaches the hand grip to the prop. The other plastic parts were also attached with rods of various thicknesses along with super glue.
.JPG")
.JPG")
.JPG")
.JPG")
Construction complete! Next step, on to painting!
Painting The Bolter
Both foam and 3D printed parts were painted (airbrushed) gloss black before the colours were applied. The 3D printed parts and the main body of the bolter were painted in gunmetal while the Aquila emblem got a golden colour instead. The foregrip I added a little bit of black paint to the mix for a darker foregrip and to add some contrast.
I chose a bright red for the bolter which was fortunate since the black undercoat toned it down a fair bit. I used almost a whole 10ml/1/3oz bottle of Tamiya Red X-7 to get enough coverage over the black.
Once the paint had had some time to dry I used low tack masking tape to help create registration marks to align both of the Imperial Aquila symbols. I also used some metal hex nuts I pushed into some holes along with some super glue, but not before I hit a number of the nuts with some 60 grit sand paper to weather them a bit.
.jpg")
.jpg")
.jpg")
.jpg")
Next up was some weathering, such as smearing on some watered down blacks, reds, browns and wiping or dabbing most of it off. This really helped add some dimension especially on the clean and boring gunmetal. This was followed with some dry bushing with some silver paint to highlight some of the edges.
.jpg")
.jpg")
.jpg")
.jpg")
.jpg")
.jpg")
Warhammer Purity Seal
This was something I didn’t get to finish. I got as far as making 2 complete wax seals but not the inscription. This was a combination and modification of 2 designs from Thingiverse, 3D printed and then molded in silicone and cast in resin. I made 2. It took some time to get the paint hue right and the paint I used would leave a strange surface tint that could be buffed off.
.png")
.png")
.png")
Bolter Project Review
I now have a better idea on things I could improve the next time around. They include;
Thought I'd share my most recent prop (that I made for the Punished Props Secret Santa) that I wasn't allowed to talk about before Christmas This was my first big prop that was mostly made from foam. Prior to this my other big prop was the Pulse Rifle from Aliens (3D printed).
The main body of the Bolter, plus the magazine, charging handle and top rail + sights are made from EVA foam, and the rest including grip, muzzle and Imperial Aquila are 3D printed.
The foam is sealed with Rosco FlexBond and the whole bolter painted with acrylic paints.
The magazine is friction fit and should hold small items such as cash/keys/card, or snacks, or other small personal effects of choice.
Designing and Templating
I actually took a 3D model that was created by Jaiman Bhardwaj and turned the design into a template I printed on cardstock for the EVA foamsmithing side of things.
My 3D design skills are limited so I put the Bolter into Tinkercad to cut out the pieces I wanted to 3D print, and to recreate some of the low poly pieces in a higher resolution, and I added some holes to mount the pieces with rods. Since I was on a time limit and I wanted to reduce the amount of sanding, I removed the texture from the grip along with a couple of other features. I left off the bolts along the gun sights and replaced the emblem entirely. The side bolts I replaced with actual meta hex bolts. I decided that 3D printing the muzzle, laser sight and other round parts for example would give a better result than foam or PVC pipe.
With the template next to the Pulse Rifle it doesn't look that big. But where the Pulse Rifle is longer, it is also slimmer, shorter and more elegant, while the bolter is chunky.
A Warhammer forum discussed sizing and a popular method of sizing was for the weapon to have a 3″ barrel diameter, so that’s what I did. Based on this you should get a Bolter between 400mm and 700mm depending on what template you use. The one I made was 570mm. This also brought the Bolter size down to what could be used by a non-augmented human. Does that mean it's now a Godwyn-De'az Bolter?
Building the Astartes Mark Vb Godwyn Pattern Bolter
The main body is made out of several layers of EVA foam. The middle layers have some squares cut out for some slight weight and material saving. They were glued with contact cement.
I used a rotary tool with a sanding drum to round off the front end where the foregrip will go. This section doesn't need to be smoothed with a stone tip as it's going to have more foam and foam clay going over the top. For the fore grip itself, I cut slots out of some foam then used a rotary tool to grind out a rounded end. This was then glued onto the main Bolter body and contoured with foam clay. The result wasn’t as neat as I was hoping but I was on a time limit and couldn’t dally.
The bottom edge of the “side plate” has a bevel so I used a 3D printed bevel attachment on my rotary tool to grind a nice even bevel.
Since I don’t have a bandsaw with a fence I measured the middle line of my scroll saw table and clamped on some wood. I used a fine-tooth blade to then cut the top bevel of the Bolter.
Feeling the march of time the ejection ports are very simple – scored knife lines that I hit with the heat gun to open up. Gotta make sure your cuts get all the way into the corners for best results.
Making the plates at the rear of the bolter were a little tricky, given the curves, corners and foam thickness.
Cutting a V groove in foam allows for tighter corners. This method was used for the bottom of the magazine and the accent on the side-rear bolter plates.
All 3D printed parts were sanded with various grits of sand paper and further smoothed with automotive filler primer. Love that stuff for filling in fine cracks and lines.
Creating the top rail and sights. The front sight was made with 3 pieces of foam - the central "fin" and 2 bevel-cut pieces.
The foam portions of the prop were sealed with a few layers of slightly watered down Rosco Flexbond. The plastic parts were pre-painted prior to attachment (gloss black undercoat, gun metal top coat, a little bit of shading in black inc around the muzzle holes). An aluminium rod and some epoxy attaches the hand grip to the prop. The other plastic parts were also attached with rods of various thicknesses along with super glue.
Construction complete! Next step, on to painting!
Painting The Bolter
Both foam and 3D printed parts were painted (airbrushed) gloss black before the colours were applied. The 3D printed parts and the main body of the bolter were painted in gunmetal while the Aquila emblem got a golden colour instead. The foregrip I added a little bit of black paint to the mix for a darker foregrip and to add some contrast.
I chose a bright red for the bolter which was fortunate since the black undercoat toned it down a fair bit. I used almost a whole 10ml/1/3oz bottle of Tamiya Red X-7 to get enough coverage over the black.
Once the paint had had some time to dry I used low tack masking tape to help create registration marks to align both of the Imperial Aquila symbols. I also used some metal hex nuts I pushed into some holes along with some super glue, but not before I hit a number of the nuts with some 60 grit sand paper to weather them a bit.
Next up was some weathering, such as smearing on some watered down blacks, reds, browns and wiping or dabbing most of it off. This really helped add some dimension especially on the clean and boring gunmetal. This was followed with some dry bushing with some silver paint to highlight some of the edges.
Warhammer Purity Seal
This was something I didn’t get to finish. I got as far as making 2 complete wax seals but not the inscription. This was a combination and modification of 2 designs from Thingiverse, 3D printed and then molded in silicone and cast in resin. I made 2. It took some time to get the paint hue right and the paint I used would leave a strange surface tint that could be buffed off.
Bolter Project Review
I now have a better idea on things I could improve the next time around. They include;
- Gluing the main body together before cutting to shape/size. A bandsaw would help make this process easier
- I messed up the alignment of a part of the top rail but the glue set before I could fix it. “Battle damage”, eh?
- The foregrip contours needed more time, which I didn’t have. I could either grind it out or fill it with foam clay again
- Given enough interest, would like to mould and cast the 3D portions for speedier replication
- More detailed magazine
- More detailed charging handle, which could be 3D printed (and maybe molded and cast) as this seems a piece that might get damaged easy
- Perhaps 3D print the front sight, as this might also attract damage due to its position
- Seal the prop with a clear coat
- Make a smaller purity seal, and complete the inscription
Attachments

Last edited:


.jpg")


.png")
.png")
.png")