Universal Soldier - The Definitive UniSol Build

Yea it was pretty awesome he has tweeted us and on his instagram with a different angle shot of us with him Screenshot_2015-11-22-19-12-41.png
Screenshot_2015-11-22-18-44-17.png
 
Hard to believe it has been eight years since I posted this photo, but I finally removed the electronics board from the guts of the piece, sanded the top of the board down, and glued it to the top of the sensor.

Nothing amazing, but the result was correct, which is what I wanted!


attachment.jpg


Unisol-Heat-Sensor-Internals-1.jpg


Unisol-Heat-Sensor-Internals-2.jpg
 
Hard to believe it has been eight years since I posted this photo, but I finally removed the electronics board from the guts of the piece, sanded the top of the board down, and glued it to the top of the sensor.

Nothing amazing, but the result was correct, which is what I wanted!


View attachment 1717233

View attachment 1717230

View attachment 1717231

Hey man how did you get the top peace to stay? And the red latch after you cut the groove and then put the red switch in? You glue it or use the spring it came with? To stay on the thermal monitor? I just got one of these bad boys
 
Re: Universal Solider - The Definitive UniSol Build

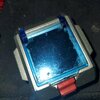
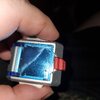
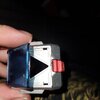
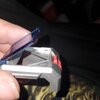
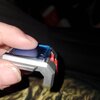
Got in my Chojin Sentai Jetman Cross Changer toy today and immediately went to work on it. The first thing was to remove the back spring clip entirely. Second was to flip the front clip around (facing upward instead of downward) and carve out a groove for it to fit in. Because these pieces are so small and so delicate and the space is so tight, this was a bit nerve-wracking and stressful, but after a couple of hours of very careful filing and sanding, I am very happy with the results and feel I have a piece extremely similar to the original. One of the cool things I discovered was that there is some detailing on the underside of the lid of the hero thermal monitor. Upon taking the toy apart, I discovered that detail is just the circuit and light chip found in the original toy that has been removed and glued to the underside of the lid!

Still have some work to go including getting the blinking light to work and getting the entire unit painted.


attachment.jpg


attachment.jpg


attachment.jpg


attachment.jpg
Like this or does the red button lip has to be on the blue lid.i had to cut off the red 2 side peaces and theres a bottom where they are idk if i cut that to
 

Attachments

  • 20230910_043254.jpg
    20230910_043254.jpg
    1.2 MB · Views: 24
  • 20230910_043304.jpg
    20230910_043304.jpg
    893.9 KB · Views: 17
  • 20230910_043320.jpg
    20230910_043320.jpg
    601.6 KB · Views: 17
  • 20230910_043327.jpg
    20230910_043327.jpg
    661.5 KB · Views: 34
  • 20230910_043335.jpg
    20230910_043335.jpg
    538 KB · Views: 23

Your message may be considered spam for the following reasons:

If you wish to reply despite these issues, check the box below before replying.
Be aware that malicious compliance may result in more severe penalties.
Back
Top