Recently got a life size Gemmy/Spirit Frankenstein's Monster animatronic and began the process of upgrading/repairing and generally improving his appearance.
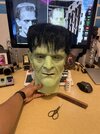
He's modeled after Karloff's Frankenstein, and although the likeness is somewhat there, they def couldn't get the actor's likeness licensed. Regardless, i'll be airbrushing his face to better give off that classic Frankenstein appearance as best as I can.
His arms raise up and down, head turns, eyes light up and a few different lines from the movie along with his groans are played when he's activated. I used a Frankenstein themed doorbell as a housing for better electronics and to act as a remote switch for kids to bring him to life on halloween.
Here's my general progress so far.
As received:

he stands just about 7 feet:

New tailored suit and temporary black shirt:

Had to make him custom tearaway pants lol:

The remote. Casted clear acrylic capacitors/insulators? with an led circuit to sync with the doorbell eye animatronic/sound in parallel to the mono switch plugged intro Frank:

He needed a haircut. Adjust the wig, gave him bangs, then trimmed them and slightly styled them with gel (needs a bit further refinement).

before the gel and styling:

Finished for now:

Happy with him so far:

Going to start the following some time next week:
Hope you guys find this somewhat entertaining.
He's modeled after Karloff's Frankenstein, and although the likeness is somewhat there, they def couldn't get the actor's likeness licensed. Regardless, i'll be airbrushing his face to better give off that classic Frankenstein appearance as best as I can.
His arms raise up and down, head turns, eyes light up and a few different lines from the movie along with his groans are played when he's activated. I used a Frankenstein themed doorbell as a housing for better electronics and to act as a remote switch for kids to bring him to life on halloween.
Here's my general progress so far.
As received:
he stands just about 7 feet:
New tailored suit and temporary black shirt:
Had to make him custom tearaway pants lol:
The remote. Casted clear acrylic capacitors/insulators? with an led circuit to sync with the doorbell eye animatronic/sound in parallel to the mono switch plugged intro Frank:
He needed a haircut. Adjust the wig, gave him bangs, then trimmed them and slightly styled them with gel (needs a bit further refinement).
before the gel and styling:
Finished for now:
Happy with him so far:
Going to start the following some time next week:
- Paint up the face and hands
- Weathering the clothes and boots
- Fix some of the animatronics on his left arm
- Further tailor the suit fit
Hope you guys find this somewhat entertaining.