UC United Cutlery Museum Collection Sting Preservation and Restoration: Warning Expensive Collectible Damage Photos!!

thd9791

Master Member
RPF PREMIUM MEMBER
The Museum Collection swords from United Cutlery are famously hella expensive. I managed to get one of the later serial numbers. Apparently they were unable to sell the later ones and some places bought them up for cheap. I got this from an online toy store for between 200-300 dollars: Oiled and set in styrofoam, with no glass case or accessories. I had to double check with them via email because I didn’t believe it.

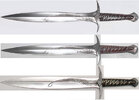
I think this was around 2017… anyway it is absolutely stunning. Unlike the normal Sting, this is much thinner, much more sharply machined and feels like an actual weapon. Well balanced and pretty.

Unfortunately the light chemical weathering did not age well. Since, even with wax it’s been darkening like the Roman’s empire MPP chrome thing. Also the vinyl decal on the handle has been peeling
IMG_5977.jpegIMG_5975.jpegIMG_5978.jpeg

So I’ve been mildly anxious about losing the detail. What do I do if it peels off or rips? Is my sword just going to get darker and more yellow/black?

Some might know me in the Star Wars section, I’m a bit of a monster. My collection honestly is meant to be handled and I have long term goals of keeping the awesome fantasy alive. I’d hate to look at this in 20 years and see it degraded.
IMG_5982.jpeg
What follows may make collectors cringe. I apologize in advance, and this is your warning to avert your eyes if you need to.

I have a very robust set of skills in the workshop so I first tried to polish off the dark tarnish. Unfortunately it looks like it’s a plating or heavy coat and I slipped and marred some of the handle. **** up #1

IMG_5979.jpeg

Can’t really go back from that so I’ve been staring at this on my wall (I made a casual wall mount for myself) and thinking.. what to do. Ever since more of the handle decal has started to peel more and I thought… okay I need a plan.

Looking at this, which I got for 1/3 the price I remembered that I’ve built a carbon steel sword already. I’ve done machining and turning and repairs all over my collection and my house. So I decided to do two things:

1) re-finish the handle. Stain and clear hard coat, it will look beautiful. But what about the decal?! I’m going to make a template, engrave and inlay silver solder into the handle, the way the original design was intended. Weta couldn’t pull that off in 1999 and they do it now with their special collectibles they sell. Of course, they CNC the inlay, I’m just going to do it the best I can, possibly soldering the leaves to the main spiral.

2) I’m going to finish polishing the handle hardware. I was going at weird angles because the handle was still attached. Any issues with re-installation I can machine and fix myself. I’ll use the luthier Fish Glue I use for guitars and pianos that can take high tension, or epoxy where need-be.

This is going to be a beautiful sword when I’m done, and the actual materials are stunning. This is my own unique decision and I’m not suggesting anyone else try this.

For educational purposes, if anyone else has an accident, I will include pictures of the structure inside the sword.
IMG_5968.jpegIMG_5973.jpegIMG_5983.jpegIMG_5984.jpeg
The end is epoxied on. There is a steel threaded insert with a hex head supporting the end of the tang, which ends about where the last leaf, pointing down, lays. I did need a hammer drill to undo the insert.
 
You sir are a much braver man than I!

Unless you like the look of the silver inlay on the handle, I'd stay away from going that route and find a good silver vinyl decal transfer just like the movie props were done. The MSSC swords were done that way as an option for collectors paying nearly $10k for a sword. But that's just my opinion as a LOTR purist.

UC is in the process of redoing the standard Sting sword and possibly doing another MC version with a blue blade (tariff's and economy pending) and parts of that could be used in your restoration.

Also the pommel and hilt are plated and aged, so be careful how far you polish them back.

Look forward to seeing how this turns out!

Here are some stunt prop photos.

149076_xl.jpg149077_xl.jpg149078_xl.jpg149079_xl.jpg149080_xl.jpg


LOTR-FOTRMan03.jpgLOTR-FOTR-PRODUCT-WEP-FAN002.jpgtumblr_m8ud5a3Hoj1rrjmgoo1_1280.jpg
 

Attachments

  • Sting Versions_Orig Weta Props.jpg
    Sting Versions_Orig Weta Props.jpg
    67.5 KB · Views: 45
Oh that is wonderful thank you! I’m putting this away for today, but I am happy to report, it is essentially full tang! Last inch is the tall threaded nut and the glued on pommel.
IMG_6010.jpegIMG_6008.jpegIMG_6007.jpegIMG_6006.jpegIMG_6002.jpegIMG_6001.jpeg
Looks like the whole thing is stamped in its basic shape, including the tang, and the blade is ground from there.

The polish is weird, I know there’s a VERY thin layer of silver and this layer of darkening so I kinda backed off when it was shiny, splotchy or not.
Oh yeah, there was puffy expanding gorilla glue in the guard. Not even kidding. I cleaned them out best I could.

IMG_6022.jpegIMG_6021.jpegIMG_6017.jpegIMG_6016.jpeg
I have already rough cut two pieces of Wenge wood I had on hand.

IMG_6023.jpeg
There were two half-round metal plates on the tang, essentially filling this 2mm thick wood tube that was the handle.

IMG_6029.jpegIMG_6028.jpegIMG_6027.jpeg
Everything was covered in glue, so the lengthwise strength was not as strong as the inward strength. Couldn’t get the handle off safely, but it was just a tube so…
 
Last edited:
Welp, I made my decision and I’m going to see this through.
IMG_6040.jpegIMG_6041.jpeg
Unfortunately I don’t have chisels this small.. whatever the diameter is of the threaded portion of the tang, so I used my hanging rotary tool or die grinder and some wood burrs and a wood dremel cutoff wheel to take out this material. I then used some mid-grippy metal files to finish off the shape.

Why? Because wenge is a freaking hard hardwood! What the hell?! The only saw that would cut it reasonably was my Irwin dowel saw. My power tools really struggled.
IMG_6036.jpegIMG_6039.jpeg
Anyway I have a rough shape and I was able to make snug-fit channels and it’s now being glued overnight. The outside I wanted to sand with both halves together.
IMG_6038.jpeg
Oh yeah, I have to be really careful where I lay this blade… it’s sharp as hell!IMG_6043.jpeg
 
nice work Tom :) good luck with all this!
My woodworker tip of the minute because it's always important to know: Wenge is an amazing wood, however, be extremely carefull because it splinters a lot, and you'll get an infection from a splinter injury.
 
A while back I bought a bag of nice markers from a thrift store and there was a silver sharpie paint pen in there. I wondered what I would ever use it for.

I guess tracing shapes on dark wood is one use. I won’t use it on any surfaces that will be finished.

IMG_6045.jpegIMG_6046.jpegIMG_6047.jpegIMG_6048.jpeg

The first time I ever saw a silver sharpie was when I got to wait in line and have the Goo Goo Dolls sign one of their new albums! They used a silver sharpie and I got a double thumbs up and a personal thank you from Johnny and Robby lept up to shake my hand good memories
 
I do believe the original prop handle was made from cocobolo hardwood.

Check this video with Richard Taylor from Weta around the 36 min mark.


White or other light colored pencil will also work for marking dark woods.
 
Last edited:
I should definitely grab some white pencils.

The shape of this handle is interesting to me because the part that slides into the pommel is round and conical and the top is a soft oval! These shapes blend together as you move down the handle, and I was able to pull that off.
IMG_6054.jpegIMG_6049.jpegIMG_6052.jpeg

If I was made of money I’d go source that exact wood but wenge is pretty close color wise and currently on sale near me lol

The tang is still a little snug about 1/8 from where it slides fully, I need to do a little internal filing.
 
Took a long time with rough needle files to fix whatever shape was incorrect inside.
IMG_6056.jpegIMG_6061.jpeg

There’s still a gap!
IMG_6067.jpeg
There we go!

The handle wood is so nice
IMG_6058.jpeg
And with the white crayola pencil.. here goes nothing!!!
IMG_6068.jpegIMG_6069.jpeg
 
Funny story, I could not get hot solder to grip the Wenge wood. It worked on pine when I practiced but.. anyway, I decided to chase lead-free solder into the grooves that I cut, maybe even glue them in, and sand it down.

For this first one, I lightly squashed the solder, chased it in, hit it with a belt sander, and then used the new flat to chase it more, lengthening it and sticking it in a couple holes in the wood at the beginning and end. It’s rough right now but I think with more work I can get it to the detail I want.

I plan on doing this with the leaves and using my soldering iron to bridge the gap.

I don’t have an anvil, so I went to the metal supermarkets near me and got 12” of steel I beam as wide as my hand. I’ve got it in wood and carpet on the floor and it’s working great!
IMG_6071.jpegIMG_6072.jpeg
 
Aaand I have been having fun chasing silver but it was just too big.

Harbor freight solder is around.28 and that’s what I wanted for the leaves. All the hardware store solder was .6 and above, and my main grooves are around .5

I plan on hammering and sanding this. I’m doing each leaf now first, with a drop of superglue in each hole, and then wrapping the main spirals over them.
IMG_6074.jpeg
 
It’s messy, so bear with me, but I’ve made huge headway.

I used harbor freight solder for the leaves and benzomatic solder for the vine, some sanding, lots of hammering and some super glue… worked out. I pulled up the vines and laid some e6000 underneath them for good measure

I’m liking where this is headed
IMG_6077.jpeg
 
I thought I could even everything out with a soldering iron. Apparently not. Solder flows towards heat and there is no other metal to bond with. Ooops hahaha
IMG_6078.jpeg

I cut a new piece of solder, ground the two ends to wedges and smushed them together.
IMG_6079.jpeg

Okay, so I decided to hammer, and belt sand (which does heat things up) and that seemed to work great.
IMG_6084.jpegIMG_6083.jpeg

I have to clean up the wood somehow…

For the time being, I put a cheap buffing wheel in my lathe and hit the solder with it
IMG_6085.jpegIMG_6082.jpeg

I also shortened and trimmed/faced the included nut, it was out of round
IMG_6099.jpegIMG_6088.jpeg
 
Btw those PVC pipes I use for molding parts haha, the extra pieces just ended up behind my lathe for some reason
 
UC is in the process of redoing the standard Sting sword and possibly doing another MC version with a blue blade (tariff's and economy pending) and parts of that could be used in your restoration.
Do you know if the new Sting will have a screen accurate cross section all the way through? The MC Sting is a near perfect replica for me and yet it always bothered me how no licensed replica has a screen accurate cross section.

Sorry about your sword, OP.
 
Do you know if the new Sting will have a screen accurate cross section all the way through? The MC Sting is a near perfect replica for me and yet it always bothered me how no licensed replica has a screen accurate cross section.

Sorry about your sword, OP.
thank you

what part of the cross section are you referring to, the blade's hollow grinds, the hilt hardware, etc?
 
thank you

what part of the cross section are you referring to, the blade's hollow grinds, the hilt hardware, etc?
I mean where the blade meets the guard. It's ground all the way into the part of the blade inside the guard because Weta/Peter Lyon grinds the blade before he adds the guard. It's inaccurate on the UC and NC swords.
 
I mean where the blade meets the guard. It's ground all the way into the part of the blade inside the guard because Weta/Peter Lyon grinds the blade before he adds the guard. It's inaccurate on the UC and NC swords.
If you watch this video of Peter making the MSSC Sting is shows that he grinds the blade up to the cross guard and the rest of the blade going thru the guard and into the handle are full thickness. This also makes for an easier slot to be made in the hilt and tighter fit up of the two pieces.


Screenshot 2025-04-22 093704.pngScreenshot 2025-04-22 093725.pngScreenshot 2025-04-22 093749.pngScreenshot 2025-04-22 093824.png

Peter is able to do each of these pieces by hand and make any custom shape needed where as UC uses programed machines to grind each blade more efficiently and the same each time, but they have limitations. But to answer your question, they have been able to improve the blade grinds closer to the hilt than the previous MC release. It's not perfect, but closer.


IMG_3011a.jpg
 
This is so fascinating, thank you! I haven’t looked that close… I always loved how the fuller on Theodin’s sword runs behind the guard.
 
Back
Top