JonnyT
Well-Known Member
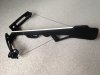
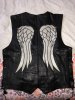
I'm going to a Zombie themed party at the end of the week and I decided I would go as Daryl Dixon from The Walking Dead c.season 5. In my opinion, the two things you absolutely gotta have if you are going to be Daryl Dixon is the leather vest with angel wings (thank you popular on line auction site), and a crossbow.
Going as a more up-to-date Daryl I decided on the Stryker Strykezone 380 over the Horton he has used in the past.
So here's the thing, I live in the UK and
1. I don't have £680 to spend on a Stryker Strykezone 380.
2. There's no way in hell I could carry it out and about without getting arrested.
My solution was to try and find a toy one that's about the right size but there's very little out there, and I'm broke until pay day at the end of the month, so I decided to make a crossbow out of some cardboard boxes I had at work.
I should probably point out that I've only ever bought props and costumes before. I used to visit the RPF loads as a guest and only just signed up as a member last year. I've never tried to make anything. I have absolutely zero experience with modelling etc. But what the hell, I thought I'd give it a go.
First off, reference material!


These are the two pictures I was working from to ascertain the shape and size of the thing.
I also went here: http://crossbows.gearsuite.com/l/75/Stryker-StrykeZone-380 for sizing information.
I found that with the second picture I was able to use GIMP to resize the image so that when I viewed it on my 42 inch TV it was the actual size of the crossbow I wanted to make. This made things a lot easier.
Daryl doesn't have the sight on the top, which is a bonus, and I'm not making the funky quiver/bolt holder on the bottom either.
So I got me some corrugated card:


Got me a Stanley knife with a fresh blade and a straight metal edge and started sketching out the basic shape:

I figured if I cut this out three times and glued all three layers of the card together it would be quite rigid.

My first noticeable mistake was the straight edge that I was using. It is a spirit level and is quite chunky so it stood up too high off the card which made me cut into the card at an angle with the blade. I rectified this later on with a flatter straight edge.
The next parts to cut were the arms of the crossbow and the plate that holds them to the rifle looking part (I know! I know! I can almost here crossbow enthusiasts shouting at me "Hey man, they're not called 'arms' they're limbs and that 'plate' is actually the riser, duh!" I'm sorry, I'm clearly no expert, I just googled that terminology just now)

The Stryker has two rows of bow arms called "split limbs" so I needed to add split limbs to my replica. A bit of hot glueing and things really started to come together.


You'll notice the addition of the cams at the end of the split limbs. They are held in place by a piece of dowling rod that goes through the centre of them and is glued to the split limbs at the top and bottom.
Obviously I'm nowhere near finished. I still need to paint and string it and do some detailing.
I'm just wondering though, is there an easy way anyone can suggest just to make it more rigid and solid? At the minute I think I'd be pretty ginger with it at the party and it will probably break easily. A friend suggested paper mache, another suggested many coats of PVA. I figured if anyone is gonna have a definitive answer for me it'll be the good folks of the RPF.
Your advice would be much appreciated. And go easy on me, it's my first time
Going as a more up-to-date Daryl I decided on the Stryker Strykezone 380 over the Horton he has used in the past.
So here's the thing, I live in the UK and
1. I don't have £680 to spend on a Stryker Strykezone 380.
2. There's no way in hell I could carry it out and about without getting arrested.
My solution was to try and find a toy one that's about the right size but there's very little out there, and I'm broke until pay day at the end of the month, so I decided to make a crossbow out of some cardboard boxes I had at work.
I should probably point out that I've only ever bought props and costumes before. I used to visit the RPF loads as a guest and only just signed up as a member last year. I've never tried to make anything. I have absolutely zero experience with modelling etc. But what the hell, I thought I'd give it a go.
First off, reference material!
These are the two pictures I was working from to ascertain the shape and size of the thing.
I also went here: http://crossbows.gearsuite.com/l/75/Stryker-StrykeZone-380 for sizing information.
I found that with the second picture I was able to use GIMP to resize the image so that when I viewed it on my 42 inch TV it was the actual size of the crossbow I wanted to make. This made things a lot easier.
Daryl doesn't have the sight on the top, which is a bonus, and I'm not making the funky quiver/bolt holder on the bottom either.
So I got me some corrugated card:
Got me a Stanley knife with a fresh blade and a straight metal edge and started sketching out the basic shape:
I figured if I cut this out three times and glued all three layers of the card together it would be quite rigid.
My first noticeable mistake was the straight edge that I was using. It is a spirit level and is quite chunky so it stood up too high off the card which made me cut into the card at an angle with the blade. I rectified this later on with a flatter straight edge.
The next parts to cut were the arms of the crossbow and the plate that holds them to the rifle looking part (I know! I know! I can almost here crossbow enthusiasts shouting at me "Hey man, they're not called 'arms' they're limbs and that 'plate' is actually the riser, duh!" I'm sorry, I'm clearly no expert, I just googled that terminology just now)
The Stryker has two rows of bow arms called "split limbs" so I needed to add split limbs to my replica. A bit of hot glueing and things really started to come together.
You'll notice the addition of the cams at the end of the split limbs. They are held in place by a piece of dowling rod that goes through the centre of them and is glued to the split limbs at the top and bottom.
Obviously I'm nowhere near finished. I still need to paint and string it and do some detailing.
I'm just wondering though, is there an easy way anyone can suggest just to make it more rigid and solid? At the minute I think I'd be pretty ginger with it at the party and it will probably break easily. A friend suggested paper mache, another suggested many coats of PVA. I figured if anyone is gonna have a definitive answer for me it'll be the good folks of the RPF.
Your advice would be much appreciated. And go easy on me, it's my first time