I thought I would share the Tusken Raider helmet I made my son for CT Terrificon.

For the most part I followed the Nerdist article . Total cost was about $50 for just about everything that went into the build.
The files came from thingiverse. I printed a test ring to check the size and found that no resizing was needed. I have a large head and it fit me fine. I added padding to adjust the fit to my son.
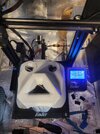
Print time on my ender 3 was about 100 hours for the shell and the greeblies. I used PLA for everything using the standard Cura settings. If I make another I would increase the number of walls to 3 or 4. I found the helmet to feel a bit thin as I was doing more work on it. I would also consider using PLA+ or PETG for durability. Also the shell can be printed as fast as possible. The quality really doesn’t matter since everything gets covered anyway.

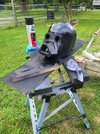
The helmet was glued together then given a couple of coats of truck bed liner. It wasn’t really necessary to do anything since everything gets covered in the end.

The greeblies were painted with Bondo Liquid Metal thinned down with acetone then sanded and primed. It was the first time trying this and it came out pretty good. With a little bit more effort they would have come out even better. Rub n’ Buff was used to give a metallic appearance.
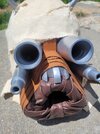
Faux leather was used around the muzzle. It was pretty tough to get the pleating to look right. After some trial and error I found that forming the pleats before the leather was glued in place was the key. I used hot glue to form the pleats but sewing them may have been easier. The leather was glued around the inside and pulled over the outside. Faux leather strips were glued around the outside to complete the muzzle.
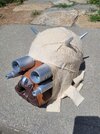
The greeblies were glued in place then screwed from the inside. I used hot glue. I would use epoxy in the future. The glue and the screws is serviceable but not the most rugged. The outside was covered in strips of canvas. I did some weathering to the canvas with coffee before attaching the strips.


This was my first time attempting most of the techniques used so overall I was pretty happy with how it turned out.

For the most part I followed the Nerdist article . Total cost was about $50 for just about everything that went into the build.
The files came from thingiverse. I printed a test ring to check the size and found that no resizing was needed. I have a large head and it fit me fine. I added padding to adjust the fit to my son.
Print time on my ender 3 was about 100 hours for the shell and the greeblies. I used PLA for everything using the standard Cura settings. If I make another I would increase the number of walls to 3 or 4. I found the helmet to feel a bit thin as I was doing more work on it. I would also consider using PLA+ or PETG for durability. Also the shell can be printed as fast as possible. The quality really doesn’t matter since everything gets covered anyway.

The helmet was glued together then given a couple of coats of truck bed liner. It wasn’t really necessary to do anything since everything gets covered in the end.

The greeblies were painted with Bondo Liquid Metal thinned down with acetone then sanded and primed. It was the first time trying this and it came out pretty good. With a little bit more effort they would have come out even better. Rub n’ Buff was used to give a metallic appearance.
Faux leather was used around the muzzle. It was pretty tough to get the pleating to look right. After some trial and error I found that forming the pleats before the leather was glued in place was the key. I used hot glue to form the pleats but sewing them may have been easier. The leather was glued around the inside and pulled over the outside. Faux leather strips were glued around the outside to complete the muzzle.
The greeblies were glued in place then screwed from the inside. I used hot glue. I would use epoxy in the future. The glue and the screws is serviceable but not the most rugged. The outside was covered in strips of canvas. I did some weathering to the canvas with coffee before attaching the strips.


This was my first time attempting most of the techniques used so overall I was pretty happy with how it turned out.
