TOS Battlestar Galactica Blaster Resin or 3D a HARD Choice!!

darkev2

Well-Known Member
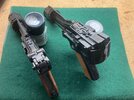
Okay Folks I need some advice. My last major prop purchase for a bit and I can't make up my mind. After "all" these years I'm looking to add the Original Series Battlestar Galactica Colonial Blaster to the collection. I have narrowed the choices down to the two best choices for resin kits; Alchemyarms and Monsters in Motion and from what I have found the only choice readily available for 3D Printed (which I found on the thingiverse). I have read good things about all three options but I am still undecided. Mine you I am still leaning towards getting one 3D printed but the cost to print "all" the individual parts puts the entire set at close to $300.00 (the wife if she ever found out would KILL ME)!!! The two resin kits are far more affordable but only one is hollow (but molded in one (1) piece) which somewhat limits the possibility of adding a light, trigger switch and sound. The 3D version is designed to accommodate such additions already.

So here is the question for those who have been down this road, what would you recommend??? All comments and suggestions will be GREATLY Appreciated!!!

Thank You!!!!
 
Last edited:
Re: TOS Battlestar Galactica Blaster Resin or #D a HARD Choice!!

Where are you getting that quote for the 3D printing from?

If it's Shapeways, which does tend towards the pricey, you can probably get a better deal with an FDM print from a service like 3DHubs (though you'd undoubtedly have to do more finishing work to smooth out the layers before painting).
 
Both versions involve a lot of work. The resin one may need to have casting flaws filled and flash removed. If you go with the hollow one, there is all the electronics that need to be fitted as well a light blocking depending on where the light winds up inside.

The 3D printed version will need to have the striation lines filled but depending on how you fill them may lessen some detail. Other striation lines will need to be sanded down to make level surfaces and depending on the material used to print it, that may be easier said than done.

So a very great deal will depend on your finishing skills for both versions, it will come down to which you are more comfortable with. There are finished blasters sold as well. Have you checked Etsy at all?
 
Yes Shipbrook the quote was from Shapeways; great quality but for these parts the prices were HIGH!!! I did try your ida of using 3DHubs and I found prices a heck of a lot cheaper (and producers in my area). So time will tell!!!

Hello 19narvik40 I realize I'm biting off a bit of work but my experience with Resin Mecha Kits and such should I feel carry me through. Mine you I'm wondering if lighting whatever prop I get is going to be possible for me since I haven't wired a circuit from scratch in "DECADES"!!! My hope was to find a rather micro sized simple flash circuit to at least give off a burst of light from a trigger pull but so far I have come up empty (still looking though). Failing that I guess I will go for just a static piece but it would sure be nice to get lights and even sound as well.
 
I will admit to not having much experience with resin kits but I've done a lot of finishing on 3D printed parts and modifying for electronics. Prints are a real pain in the arse to finish as all the lines need filled in over the entire body and then sanded smooth. If they have thin walls (0.8 or less) they can also be easily damaged. Starting from a smooth solid cast surface might save you some time. That said 3D models are the easiest to modify if you have the right software. You can split them up to make it easier to assemble, create mechanical action and if something goes wrong you only need to print off the part you damaged again.
 
What would you recommend to fill in those printing lines on a mid to lower quality print run (ABS or PLA)???? My very first 3D print purchase was a DL-44 where the lines were so obvious and serrated that I just put the parts back in the box and sealed it. This one kit was the start of my turn to shapeways for their smoother surface part runs. The detail work on the BSG Blaster I found on the thingiverse would seem to be a nightmare for such lines given print quality and that is why I was leaning towards shapeways again but then I saw the estimated cost; "FAR" higher then I paid for the Captain Mal Pistol and DL-44 parts I had printed and backed off.

I've never used 3D print services as I have access to printers at my local maker space, can you specify print settings when you buy a print? If you can, ask to have the layer height set to 0.1 or lower, that should make the lines much less noticeable. As for removing the lines the simplest option is to sand them smooth so long as the wall thickness is large enough, 1.2 mm + should be okay. If you want to smooth out the surface without sanding the plastic you can use a filler. I've used milliput a 2 part epoxy resin that can be worked into the lines but if you can find some use "bondo". It's essentially car body filler and it works great and it works fast. Work it in then sand it smooth. If you can find it there are spray on fillers out there but I haven't used any personally.
 
Still up in the air. Since I've been working on a build of the Nu-Galactica Blaster, I've put aside the purchase for the moment. I still want to go oldschoo so I'll complete the purchase sometime soon.

What was the outcome Darkev2
 
Hello Folks!!!

Well, I have finally made a decision and went and 3D Printed the parts I found online to create the TOS Laser Pistol. Now that I have all the parts in my hand (except for a second "clear" muzzle that I have on order) I'm ready to go to the second step and find the Interior Electronics; circuit board(s), light source and power supply I will need to start assembling the piece. So with that in mind, I need some guidance. I'm trying to be rather frugal in this part of the project if at all possible so items totaling hundreds of dollars are not in the budget. So that being said any guides, information or retail sites, general help and/or suggestions that I could get from the group would be GREAT GREATLY Appreciated.

Thank You!!!
 
Ok; I just found this;

Adafruit Audio FX Mini Sound Board - WAV/OGG Trigger - 2MB Flash

and this;

Adafruit customer service forums • View topic - Adafruit Audio FX Mini Sound adding LEDs

on adding LEDs to the board above while doing a google search for the electronics I mentioned previously. Has anyone out there had any experience with this product or similar???
I just took a replica Denix Luger P08 and cut the barrel off at the base of the receiver, drilled an approx. 7/16 diameter hole, then inserted a wooden dowel. I ordered a 3D printed blaster off of Etsy and used the front half and JB welded it all together with a coat of Testors semi-gloss black model spray paint in a can. It has a lot of weight and a nice heft and feel to it. The other blaster in the picture was just used for comparison as I have had that one for a few years. I know this is a unorthodox build, when the show came out in 1978 I had an old Luger cap gun that I originally taped an Estes model rocket cardboard tube to the front and played with that after seeing the show. I like the idea of combining a more authentic firearm with some parts like they did in the original ANH Star Wars with their blasters. Technically it is not done as I have not added more details to it, probably won't as it will just be sitting on a shelf in the basement Thanks for looking. YouTube Link Denix Galactica Luger Build
 

Attachments

  • Denix 1.jpg
    Denix 1.jpg
    941.7 KB · Views: 118
  • Denix 2.jpg
    Denix 2.jpg
    886.5 KB · Views: 115
  • Denix 3.jpg
    Denix 3.jpg
    661.4 KB · Views: 119
Last edited:
I just took a replica Denix Luger P08 and cut the barrel off at the base of the receiver, drilled an approx. 7/16 diameter hole, then inserted a wooden dowel. I ordered a 3D printed blaster off of Etsy and used the front half and JB welded it all together with a coat of Testors semi-gloss black model spray paint in a can. It has a lot of weight and a nice heft and feel to it. The other blaster in the picture was just used for comparison as I have had that one for a few years. I know this is a unorthodox build, when the show came out in 1978 I had an old Luger cap gun that I originally taped an Estes model rocket cardboard tube to the front and played with that after seeing the show. I like the idea of combining a more authentic firearm with some parts like they did in the original ANH Star Wars with their blasters. Technically it is not done as I have not added more details to it, probably won't as it will just be sitting on a shelf in the basement Thanks for looking.
Digging it!!

(y) from the Capt.!!
 
This thread is more than 3 years old.

Your message may be considered spam for the following reasons:

  1. This thread hasn't been active in some time. A new post in this thread might not contribute constructively to this discussion after so long.
If you wish to reply despite these issues, check the box below before replying.
Be aware that malicious compliance may result in more severe penalties.
Back
Top