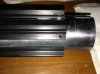
My favorite lightsaber is now becoming real! I found a 3 cell included in a massive large format kit. (Some of which will become @NeoRutty s graflex claymore..trying to sell the rest and make up the difference...
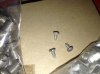
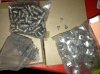
anyways, it's a beautiful, gunky flash unit, perfect for a (basically) Dagobah saber. I collected screws from beige TI calculators and slotted screws from that electronic connecting kit (see ESB screw thread) Omni-grips. The card is from an Otis board, and the track is Gino's!
textured tape came from John at Blast-Tech, we started with that. I used the squares to measure and cut the tape with an X Acto. I also had this idea of keeping the screw/rectangular nut attached, so I added a pinhole and sandwiched the tape between them. As so.


Then my dad and I pried off the beer tab, and just ground off its remnants. The raised knob looks cool, and this is a crap saber anyway


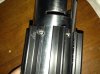
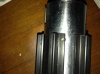
So tep, red button went where it belongs, based on the "rare" archives photos. Next was the grips...we HAD an exacto razor saw and mitre box but rigging up a 92mm rig was more confusing than I thought. Also, we didn't have quite the right grinding wheel to cut the notches. We made do, and my dad went to town cutting up the grips haha


And onto the notches...messy and subject to human measuring error...


But that's what a weathered saber is all about, so I did the same thing as my Vader saber....superglue before drilling and screws! (Just glue tonight)


anyways, it's a beautiful, gunky flash unit, perfect for a (basically) Dagobah saber. I collected screws from beige TI calculators and slotted screws from that electronic connecting kit (see ESB screw thread) Omni-grips. The card is from an Otis board, and the track is Gino's!
textured tape came from John at Blast-Tech, we started with that. I used the squares to measure and cut the tape with an X Acto. I also had this idea of keeping the screw/rectangular nut attached, so I added a pinhole and sandwiched the tape between them. As so.
Then my dad and I pried off the beer tab, and just ground off its remnants. The raised knob looks cool, and this is a crap saber anyway
So tep, red button went where it belongs, based on the "rare" archives photos. Next was the grips...we HAD an exacto razor saw and mitre box but rigging up a 92mm rig was more confusing than I thought. Also, we didn't have quite the right grinding wheel to cut the notches. We made do, and my dad went to town cutting up the grips haha
And onto the notches...messy and subject to human measuring error...
But that's what a weathered saber is all about, so I did the same thing as my Vader saber....superglue before drilling and screws! (Just glue tonight)
Last edited: