Tom's Bapty Stunt E-11

So i originally had some wire tying the stock to the receiver (got the idea from the Boba Fett front scope mount) and still may do that if i find some uncoated good wire...
But after finding a triangular metal shim frok my junk piles... that had an oval hole so you could slip a screw back and forth... i ALMOST had it. Nothing with any girth can get in the way of the stock tab. Literally i used a micro computer hard drive screw and the post of the screw prevented it from closing.

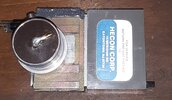
Instead, i used my new pair of tin snips and cut a strong spring i salvaged from a camera. I cut it shorter so i could squeeze it into the empty space and after some pushing, i got it to keep the stock in place for the most part. I put e6000 around the spring to keep it in place for now. It seems to be working!
20200204_165947.jpg


I know, its off center and i think thatd why it works. The spiral of a spring has a continuously rising height and that specific spot must be the height of the tab

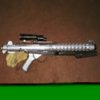
I still have to cut the scope rail shorter, seeing as i have a filled in rear sight. I cant really bend this stuff so im thinking of making a little aluminum v block to act as a spacer between the back of the rail and the receiver
20200204_165931.jpg
 
Yes! Mostly with metal files and some rough sandpaper. I don't have a bench sander/grinder and I have a palm sander thing but the motor burned out before someone gave it to me. real useful lol A dremel worked for a certain amount but none of my sanding drums will fit on the sanding bit. Maybe the moisture in my basement did that...
 
Thanks! Yea this one was a real work-out .. took days to get it to fit.

I cut the sideplates for the grip and lost them weeks ago, I gotta find some more!
 
I got the scope rail bent, fitted and installed today.

I used a heat gun, ball peen hammer, and the floor to bend this to shape. A vice grip for the short section as it was hot. I also re heated it and quenched it in water? It felt right to do but i dont understand why? Lol
20200214_171243.jpg
20200214_171304.jpg

Dremelled, shaped drilled and tapped a screw for the back of the rail
 

Attachments

  • 20200214_171304.jpg
    20200214_171304.jpg
    1.4 MB · Views: 74
  • IMG_20200214_165956_970.jpg
    IMG_20200214_165956_970.jpg
    119.8 KB · Views: 53
So i think i might still use a piece of metal and some steel stick putty for the stock tip to hook onto, but in the meantime i finally got to coat this thing.

Light wrinkle coat for the "sterling" replica and some regular old black i had lying around for the solid cast parts.
20200721_175748.jpg
20200721_175805.jpg
20200722_161038.jpg
20200722_161144.jpg

I also used a standoff and a long screw (lathed down the head with my drill press) and drilled it into the steel pipe spacer ive got ...to make the fake charging handle we see on the propstore gun
20200722_161245.jpg
 
Big news!

I got a counter... well 2 tehnically. I knew buying one of these would mean i would have to use some of my elbow grease to patch them up... but by golly IT HAS THE ORIGINAL ZINC COATED CAGE

Im learning thats a bit of a big deal. Correct me if im wrong, but they changed their logo because of the Nazi regieme and their similar icons. I see mostly black plastic cages on counters that have the big H logo, and the zinc/metal cages on eagle counters. Some of those H ones are old too, but since the blasters have the eagle ones, that dates the counters we want to the 1940s and they probably came with the zinc cage. Considering this set has one AND it had an extension wih an eagle logo on the internals... theres a good chance these are almost the right kind!

Ive seen at least 2 types of eagle logos, that probably helps date them too.

20200921_183028.jpg20200921_182918.jpg20200921_182854.jpg
20200921_182837.jpg
 
So, first thing was to remove the extension and the bracket. These things remind me of MGCs... heavy and well machined. Long screws hold that... thing on the back. The bracket was held under the plugs.. which have 1 screw and are pressure fit with little metal spring sockets over the plug pins.

20200921_182826.jpg20200921_182415.jpg
20200921_182443.jpg
20200921_182800.jpg


And the cage and front came off with some insanely small countersunk screws too
20200921_182614.jpg20200921_182647.jpg20200921_182629.jpg
 
The way these are stacked really made me tense. I could see the window inside one, but not the casing and the casing of the other bjt not inside. One had a (im guessing) later Eagle logo! And the other had Eagle internals!
20200921_182727.jpg20200921_182738.jpg20200921_182713.jpg20200921_182658.jpg

They had long screws holding them together... one was the normal kind and the other was a bit lager, probably because it keys into the lower one so they both move together
20200921_182557.jpg
Aaand 2 eagle counters!!!!
20200921_182542.jpg
20200921_182521.jpg
 
Looks good! I love the look of the Bapty rail for some reason, there's something about it that just looks "right" to me. I used it on my airsoft E-11, too.
 
I finally got around to modifying this counter

(I actually also gutted and hacksawed the other larger counter to the right size so another plastic front would fit on it. Its got a fieldmarshall cage on it and thats for another day)

So these cages have flip flopped patterns on them so the cages can dovetail together. I got two double cages stuck together this way and it made me laugh. That means a straight across cut will look/glue okay on one side but not the other.

A better way was to pick surfaces that could handle the seam lines and leave material to glue... so i went in from the side on one half.. and in from the top on the other, making an L cut. I then had to make the same cuts to the middle of the cage... so im left with this
20201214_171931.jpg

used a hacksaw and dremel (in front of a vacuum hose with a cloth mask) to shape the pieces. And that left a bit of a gap, so i cut a slice of aluminum and shaped it to plug the area.
20201214_172243.jpg

JB Weld was the key. I had to use the counter as a support for the glue so this isnt ever coming a part ever again.

20201214_172114.jpg
20201214_171931.jpg
20201214_172312.jpg

Oh i also sliced the opening larger to see the whole eagle. This version had a smaller window.
20201214_172334.jpg
20201214_172355.jpg
20201214_172145.jpg


Yea the e6000 doesnt look wonderful but im not bothered too much. Straight on its nicer :lol super glue always clouds clear plastic so im never sure whats best
 

Attachments

  • 20201214_172216.jpg
    20201214_172216.jpg
    593.7 KB · Views: 35
This thread is more than 3 years old.

Your message may be considered spam for the following reasons:

  1. This thread hasn't been active in some time. A new post in this thread might not contribute constructively to this discussion after so long.
If you wish to reply despite these issues, check the box below before replying.
Be aware that malicious compliance may result in more severe penalties.
Back
Top