MartinSivertsen
Well-Known Member
Hello all,
My last project was a screen accurate floating Jedi Training Remote, and having built a spherical Star Wars prop replica using my resin 3D printer, I was hungry for more, so I decided to tackle the Thermal Detonator held by Princess Leia in Boushh disguise in Jabba's Palace next.

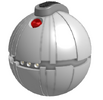
I found this model by Roel Veldhuyzen on Thingiverse and printed a copy on my Phrozen Sonic Mini 8K printer:

It was pretty accurate to my untrained eye, but after reading a bit more, I realized that the diameter was too big at 7 cm, and the slide switch could be more accurate.
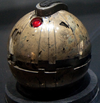
A picture from one of the Star Wars props books I have lists the diameter as 6 cm:

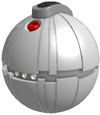
So I resized the same model to 6 cm and printed a new version:

This seemed a tiny bit small to me, and after a bit more research I realized one of the pictures of the worn down original prop showed that the sphere was transparent and showed a bit of the internals, note the white (nylon?) ring probably housing the mechanics, and the blue and purple electrical wire we can see.

Having come from the Jedi Training Remote build where the original prop was all but confirmed to have been constructed using two Plastruct 6" acrylic hemispheres, then it would be plausible that the Thermal Detonator would also be constructed in the same manner. User Spoudastis thought the same in his WIP Thermal Detonator thread, and combining this knowledge with the measurements from the Master Replicas prop provided in this thread measuring the outer diameter to be 63.6 mm, we can conclude with pretty good certainty that 2.5 inch (63.5 mm) Plastruct VHH-250 hemispheres were used.
A side note: The Master Replicas Thermal Detonator was modeled using a prototype made by Adam Savage (of Mythbusters fame). He got to take measurements of the original prop at the Lucasfilm Archives. He tells the story in this video and has a funny anecdote about being called by the FBI during this project at the end of the video.
With this knowledge in mind, as well as the scribed lines on the Roel Veldhuyzen 3D model tapering off towards the top and bottom instead of staying a constant width like the original prop, I set out to 3D model my own Thermal Detonator.
After starting the project back in September it came to a halt when trying to model the thumb switch as it was quite a challenge to get it correct.
I decided to print the top and bottom hemispheres as well as the middle ring just to see how it looked (still using the thumb switch from Roel as a place holder). I also found a red lens cover that was very close to the original (link here).


The three LED holders are printed as separate pieces as they were on the original prop (and for ease of painting I guess).

I couldn't find many different 2 mm LED's for the three center LED's, and the ones I could find were a bit short, so I decided to modify the ring around them to be chamfered so you can see the bulb better.


Upon closer inspection the original seemed to have chamfered rings around the lights as well, but it's not easy to be absolutely sure:


I scoured the web for all reference photos I could find of the original prop in as many orientations as possible and used these as reference for the over all scale and dimensions, but the thumb switch specifically. Using these reference photos coupled with the measurements of the MR one from the linked thread above I got back to the project last week and got very close in accuracy (in my own opinion).


I think my switch even looks a smidge bit better than the Master Replicas one, I feel it's a tiny bit short and the bottom edges are too rounded.

The switch and the rubber tank tread are modeled as two separate pieces, both for ease of painting and if someone wants to print it separately in a flexible material.
I have yet to model anything internally, I will at least model something that limits the thumb switch movement so it slides to the same positions as the original prop, then I'll print a new prototype.
For paint I'm planning on painting it with Alclad Chrome over a gloss black undercoat, I'd also like a weathered version, but I'm not really sure how to go about that. The original looks to be a vacuum metalized chrome where pieces have flaked off and the metal has turned a spotty brown, how much of it is intentional and how much is natural weathering and age is hard to tell. You can tell how it deteriorates over time from picture to picture, and use the amount of "spikes" left on the rubber tank tread on the thumb switch to place the pictures in chronological order.
My last project was a screen accurate floating Jedi Training Remote, and having built a spherical Star Wars prop replica using my resin 3D printer, I was hungry for more, so I decided to tackle the Thermal Detonator held by Princess Leia in Boushh disguise in Jabba's Palace next.
I found this model by Roel Veldhuyzen on Thingiverse and printed a copy on my Phrozen Sonic Mini 8K printer:
It was pretty accurate to my untrained eye, but after reading a bit more, I realized that the diameter was too big at 7 cm, and the slide switch could be more accurate.
A picture from one of the Star Wars props books I have lists the diameter as 6 cm:
So I resized the same model to 6 cm and printed a new version:
This seemed a tiny bit small to me, and after a bit more research I realized one of the pictures of the worn down original prop showed that the sphere was transparent and showed a bit of the internals, note the white (nylon?) ring probably housing the mechanics, and the blue and purple electrical wire we can see.
Having come from the Jedi Training Remote build where the original prop was all but confirmed to have been constructed using two Plastruct 6" acrylic hemispheres, then it would be plausible that the Thermal Detonator would also be constructed in the same manner. User Spoudastis thought the same in his WIP Thermal Detonator thread, and combining this knowledge with the measurements from the Master Replicas prop provided in this thread measuring the outer diameter to be 63.6 mm, we can conclude with pretty good certainty that 2.5 inch (63.5 mm) Plastruct VHH-250 hemispheres were used.
A side note: The Master Replicas Thermal Detonator was modeled using a prototype made by Adam Savage (of Mythbusters fame). He got to take measurements of the original prop at the Lucasfilm Archives. He tells the story in this video and has a funny anecdote about being called by the FBI during this project at the end of the video.
With this knowledge in mind, as well as the scribed lines on the Roel Veldhuyzen 3D model tapering off towards the top and bottom instead of staying a constant width like the original prop, I set out to 3D model my own Thermal Detonator.
After starting the project back in September it came to a halt when trying to model the thumb switch as it was quite a challenge to get it correct.
I decided to print the top and bottom hemispheres as well as the middle ring just to see how it looked (still using the thumb switch from Roel as a place holder). I also found a red lens cover that was very close to the original (link here).
The three LED holders are printed as separate pieces as they were on the original prop (and for ease of painting I guess).
I couldn't find many different 2 mm LED's for the three center LED's, and the ones I could find were a bit short, so I decided to modify the ring around them to be chamfered so you can see the bulb better.
Upon closer inspection the original seemed to have chamfered rings around the lights as well, but it's not easy to be absolutely sure:
I scoured the web for all reference photos I could find of the original prop in as many orientations as possible and used these as reference for the over all scale and dimensions, but the thumb switch specifically. Using these reference photos coupled with the measurements of the MR one from the linked thread above I got back to the project last week and got very close in accuracy (in my own opinion).
I think my switch even looks a smidge bit better than the Master Replicas one, I feel it's a tiny bit short and the bottom edges are too rounded.
The switch and the rubber tank tread are modeled as two separate pieces, both for ease of painting and if someone wants to print it separately in a flexible material.
I have yet to model anything internally, I will at least model something that limits the thumb switch movement so it slides to the same positions as the original prop, then I'll print a new prototype.
For paint I'm planning on painting it with Alclad Chrome over a gloss black undercoat, I'd also like a weathered version, but I'm not really sure how to go about that. The original looks to be a vacuum metalized chrome where pieces have flaked off and the metal has turned a spotty brown, how much of it is intentional and how much is natural weathering and age is hard to tell. You can tell how it deteriorates over time from picture to picture, and use the amount of "spikes" left on the rubber tank tread on the thumb switch to place the pictures in chronological order.
Attachments
Last edited:
